High StrainRate Characterization of Magnesium Alloys Srdjan Simunovic



- Slides: 21

High Strain-Rate Characterization of Magnesium Alloys Srdjan Simunovic Oak Ridge National Laboratory October 5, 2011 Project ID # LM 032 This presentation does not contain any proprietary, confidential, or otherwise rstricted information

Objective • Provide enabling technologies for use of lightweight materials (Mg alloys) in automobiles by the development of: – High strain rate test methods – Methods for characterization of material property degradation (damage) evolution under high rates – Methods for failure characterization at high rates – Databases of material properties – Constitutive models for FEM simulations • Technology developed in this project is directly applicable to Mg alloys and other lightweight materials. 2 Managed by UT-Battelle for the U. S. Department of Energy Relevance

Relevance to VT Program • The current designs with lightweight materials result in overdesigned components in order to compensate for the uncertainties in the deformation and failure mechanisms. • Reducing uncertainties in component design greatly improves the overall vehicle system reliability and enables weight reduction (Technical Target: Vehicle Weight). • Vehicle designers need (Barriers C and G): – Mechanical properties under impact, damage and failure characterization, material and failure models, FEM technology – Methods for material characterization under impact – Very limited material data and models are currently available for crashworthiness of Mg alloys • This project develops enabling technologies and material data for use of Mg alloys in automotive structural applications. 3 Managed by UT-Battelle for the U. S. Department of Energy Relevance

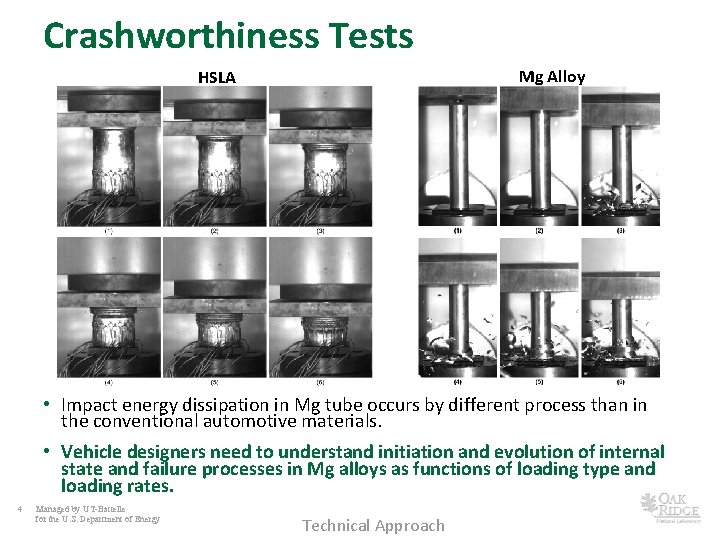
Crashworthiness Tests Mg Alloy HSLA • Impact energy dissipation in Mg tube occurs by different process than in the conventional automotive materials. • Vehicle designers need to understand initiation and evolution of internal state and failure processes in Mg alloys as functions of loading type and loading rates. 4 Managed by UT-Battelle for the U. S. Department of Energy Technical Approach

Strain Rates in Automotive Design • Low (quasi-static) rate tests - entire system is in equilibrium at all times • Fast rate tests - single impact pulse travels through the system • Intermediate rate tests (between 1/s and 1000/s) - multiple wave reflections in the system – Difficult to establish dynamic equilibrium in the sample and the system – These rates are important because maximum strain rates in automotive crash are in the interval of 10 -1000/s (also important forming) • It is essential to: – – Reduce mass in the system Develop lightweight load cells and sensors Understand control oscillations in the system Combine multiple measurement techniques for the same data • Intermediate strain rate tests have not been standardized – Active research field • This project develops new testing methodologies and material information for the strain rates of interest in vehicle design. 5 Managed by UT-Battelle for the U. S. Department of Energy Technical Approach

Approach/Strategy • Develop new methods and procedures for measurement of material behavior at intermediate strain rates. – Develop test methods, loading equipment, control, sensors, specimens, fixtures. • Test measurements must be based on multiple sensor types. – We must have multiple data sources for each measured quantity. • Verify measurements throughout the range of strain rates of interest. – As some sensor types reduce accuracy with increasing speeds, new sensors must gradually take over. – Validity of a new sensor type must be established in the transition region. • Develop new methods for strain-interrupted tests at high rates. – Essential for investigation of strain-rate dependency of damage evolution. – It is easier to speed up than to instantly stop, especially at 500 in/sec. • Investigate formation and growth of voids in Mg alloys using microscopy for strains and strain rates of interest. • Distribute data as soon as possible. 6 Managed by UT-Battelle for the U. S. Department of Energy Technical Approach

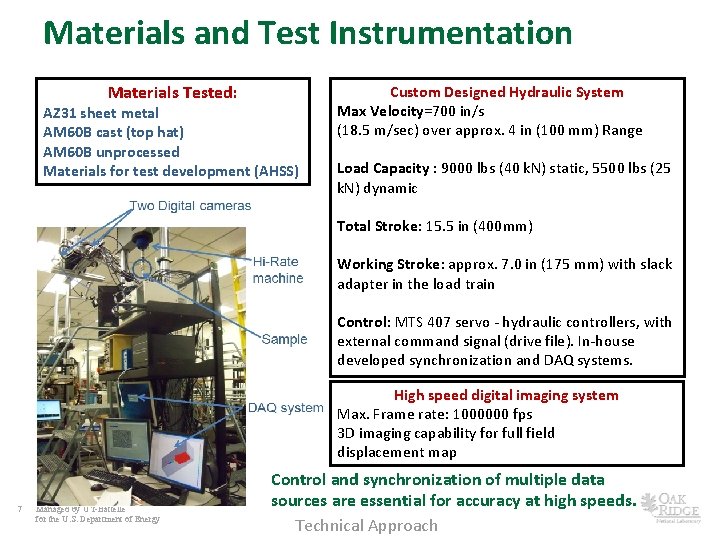
Materials and Test Instrumentation Materials Tested: AZ 31 sheet metal AM 60 B cast (top hat) AM 60 B unprocessed Materials for test development (AHSS) Custom Designed Hydraulic System Max Velocity=700 in/s (18. 5 m/sec) over approx. 4 in (100 mm) Range Load Capacity : 9000 lbs (40 k. N) static, 5500 lbs (25 k. N) dynamic Total Stroke: 15. 5 in (400 mm) Working Stroke: approx. 7. 0 in (175 mm) with slack adapter in the load train Control: MTS 407 servo - hydraulic controllers, with external command signal (drive file). In-house developed synchronization and DAQ systems. High speed digital imaging system Max. Frame rate: 1000000 fps 3 D imaging capability for full field displacement map 7 Managed by UT-Battelle for the U. S. Department of Energy Control and synchronization of multiple data sources are essential for accuracy at high speeds. Technical Approach

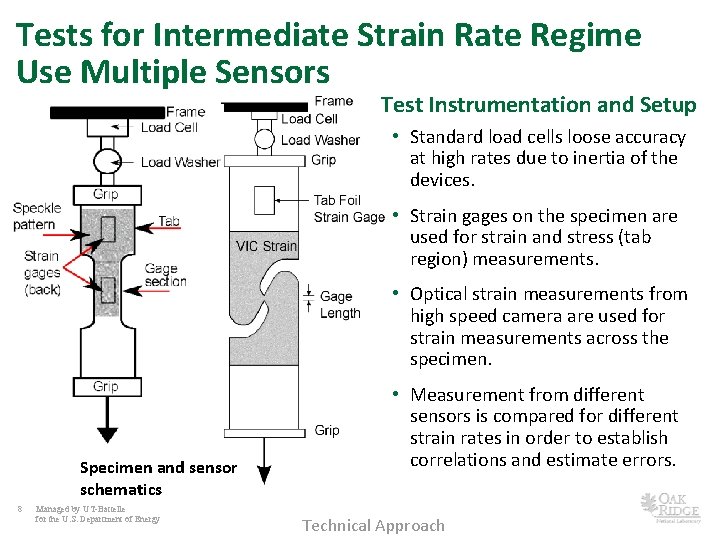
Tests for Intermediate Strain Rate Regime Use Multiple Sensors Test Instrumentation and Setup • Standard load cells loose accuracy at high rates due to inertia of the devices. • Strain gages on the specimen are used for strain and stress (tab region) measurements. • Optical strain measurements from high speed camera are used for strain measurements across the specimen. Specimen and sensor schematics 8 Managed by UT-Battelle for the U. S. Department of Energy • Measurement from different sensors is compared for different strain rates in order to establish correlations and estimate errors. Technical Approach

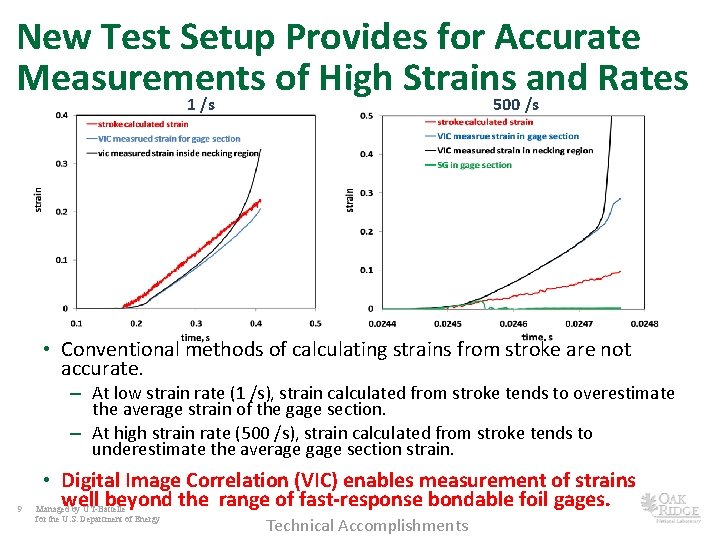
New Test Setup Provides for Accurate Measurements of High Strains and Rates 1 /s 500 /s • Conventional methods of calculating strains from stroke are not accurate. – At low strain rate (1 /s), strain calculated from stroke tends to overestimate the average strain of the gage section. – At high strain rate (500 /s), strain calculated from stroke tends to underestimate the average gage section strain. 9 • Digital Image Correlation (VIC) enables measurement of strains well beyond the range of fast-response bondable foil gages. Managed by UT-Battelle for the U. S. Department of Energy Technical Accomplishments

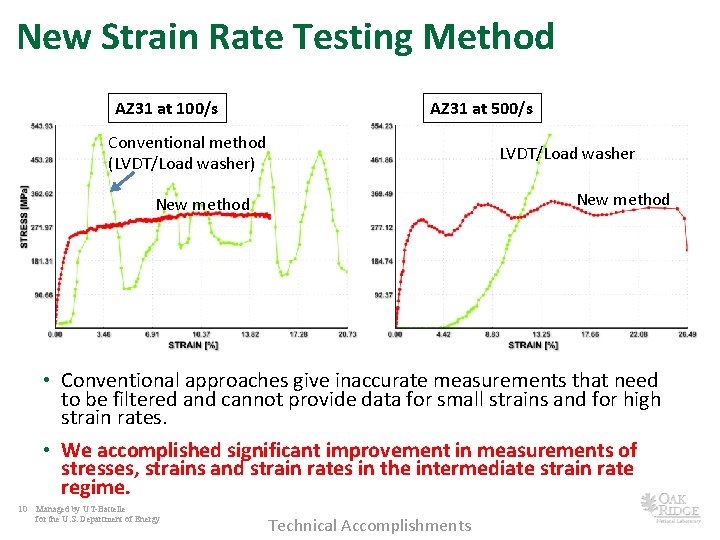
New Strain Rate Testing Method AZ 31 at 100/s AZ 31 at 500/s Conventional method (LVDT/Load washer) LVDT/Load washer New method • Conventional approaches give inaccurate measurements that need to be filtered and cannot provide data for small strains and for high strain rates. • We accomplished significant improvement in measurements of stresses, strains and strain rates in the intermediate strain rate regime. 10 Managed by UT-Battelle for the U. S. Department of Energy Technical Accomplishments

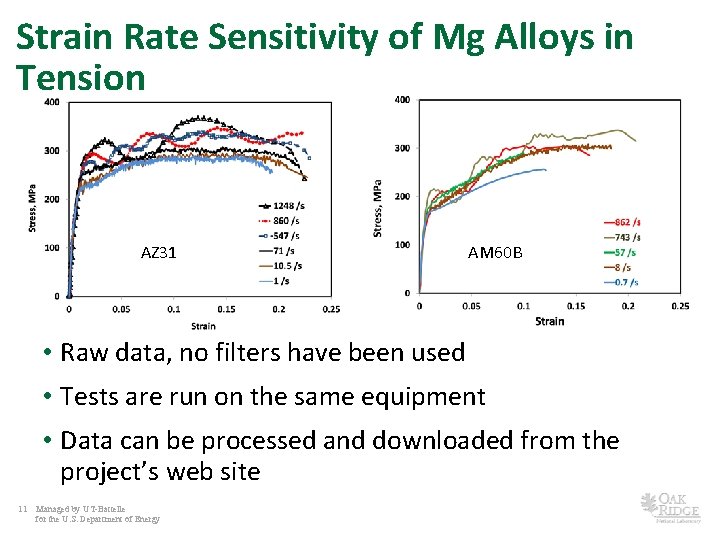
Strain Rate Sensitivity of Mg Alloys in Tension AZ 31 AM 60 B • Raw data, no filters have been used • Tests are run on the same equipment • Data can be processed and downloaded from the project’s web site 11 Managed by UT-Battelle for the U. S. Department of Energy

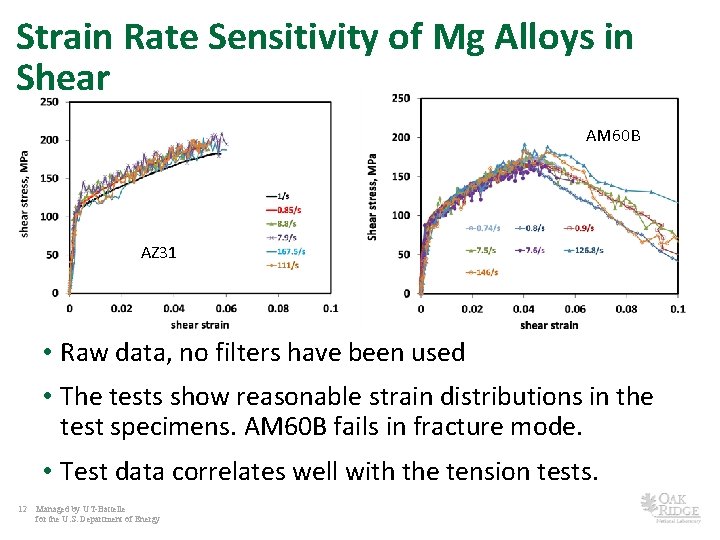
Strain Rate Sensitivity of Mg Alloys in Shear AM 60 B AZ 31 • Raw data, no filters have been used • The tests show reasonable strain distributions in the test specimens. AM 60 B fails in fracture mode. • Test data correlates well with the tension tests. 12 Managed by UT-Battelle for the U. S. Department of Energy

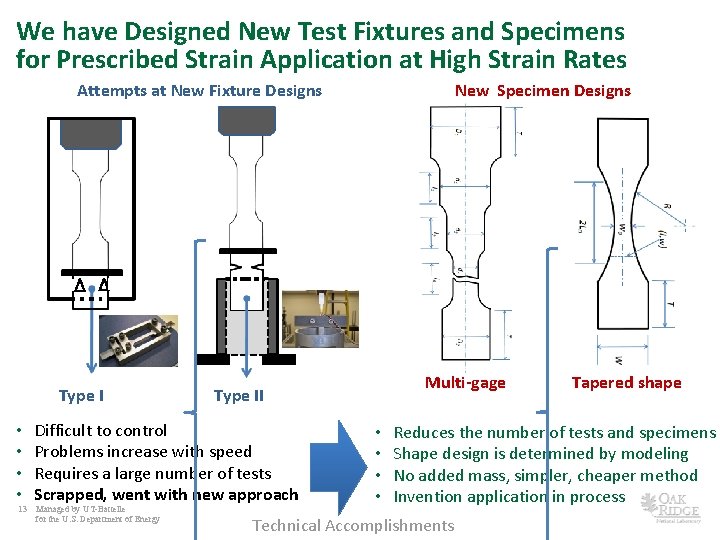
We have Designed New Test Fixtures and Specimens for Prescribed Strain Application at High Strain Rates Attempts at New Fixture Designs Type I • • 13 Multi-gage Type II Difficult to control Problems increase with speed Requires a large number of tests Scrapped, went with new approach Managed by UT-Battelle for the U. S. Department of Energy New Specimen Designs • • Tapered shape Reduces the number of tests and specimens Shape design is determined by modeling No added mass, simpler, cheaper method Invention application in process Technical Accomplishments

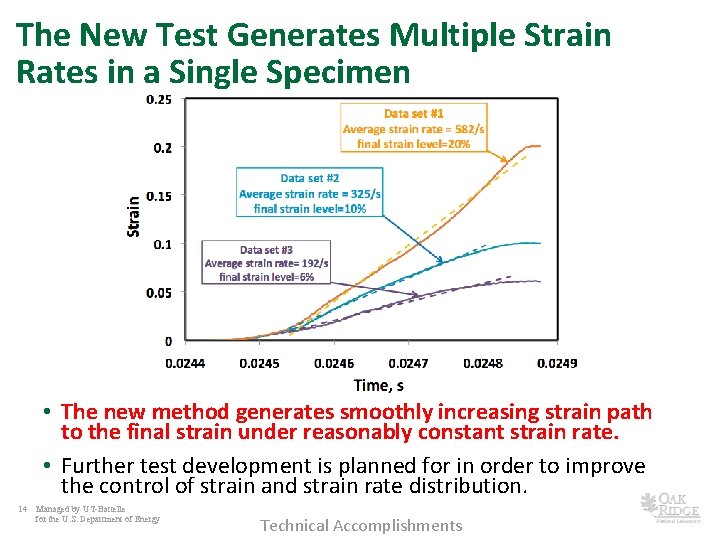
The New Test Generates Multiple Strain Rates in a Single Specimen • The new method generates smoothly increasing strain path to the final strain under reasonably constant strain rate. • Further test development is planned for in order to improve the control of strain and strain rate distribution. 14 Managed by UT-Battelle for the U. S. Department of Energy Technical Accomplishments

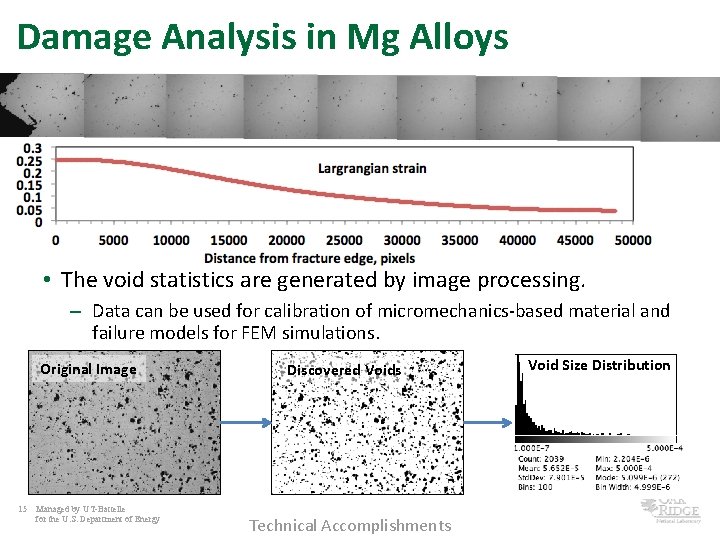
Damage Analysis in Mg Alloys • The void statistics are generated by image processing. – Data can be used for calibration of micromechanics-based material and failure models for FEM simulations. Original Image 15 Managed by UT-Battelle for the U. S. Department of Energy Discovered Voids Technical Accomplishments Void Size Distribution

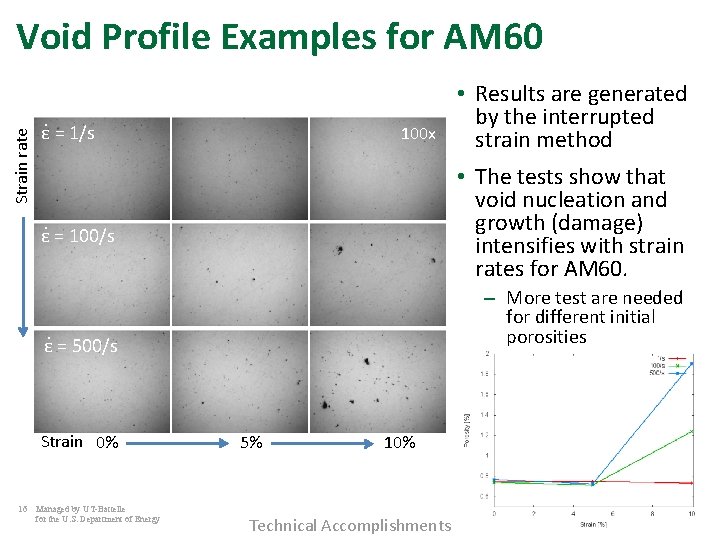
Strain rate Void Profile Examples for AM 60. ε = 1/s 100 x • The tests show that void nucleation and growth (damage) intensifies with strain rates for AM 60. . ε = 100/s – More test are needed for different initial porosities . ε = 500/s Strain 0% 16 Managed by UT-Battelle for the U. S. Department of Energy • Results are generated by the interrupted strain method . ε = 100/s 5% 10% Technical Accomplishments

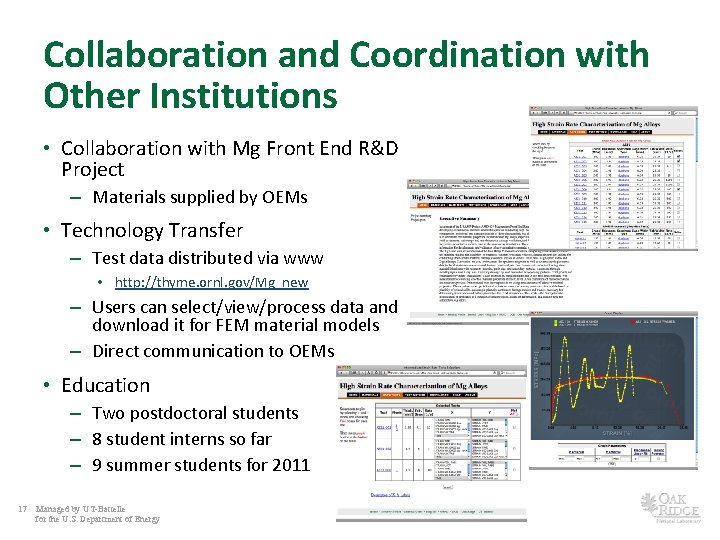
Collaboration and Coordination with Other Institutions • Collaboration with Mg Front End R&D Project – Materials supplied by OEMs • Technology Transfer – Test data distributed via www • http: //thyme. ornl. gov/Mg_new – Users can select/view/process data and download it for FEM material models – Direct communication to OEMs • Education – Two postdoctoral students – 8 student interns so far – 9 summer students for 2011 17 Managed by UT-Battelle for the U. S. Department of Energy

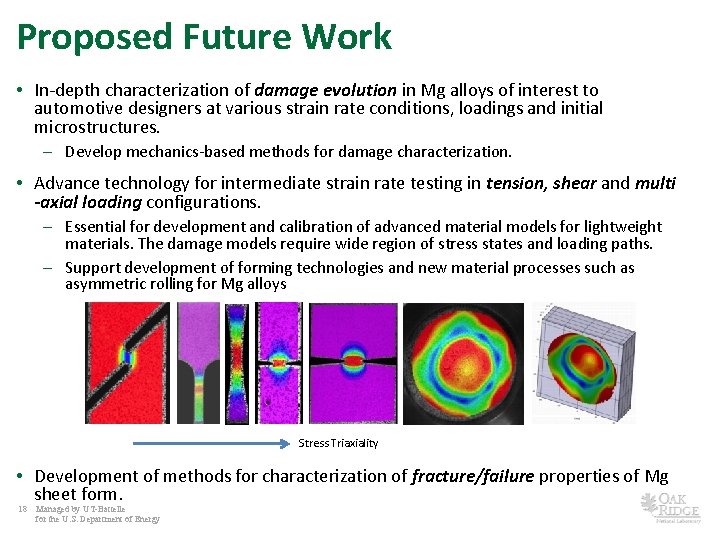
Proposed Future Work • In-depth characterization of damage evolution in Mg alloys of interest to automotive designers at various strain rate conditions, loadings and initial microstructures. – Develop mechanics-based methods for damage characterization. • Advance technology for intermediate strain rate testing in tension, shear and multi -axial loading configurations. – Essential for development and calibration of advanced material models for lightweight materials. The damage models require wide region of stress states and loading paths. – Support development of forming technologies and new material processes such as asymmetric rolling for Mg alloys Stress Triaxiality • Development of methods for characterization of fracture/failure properties of Mg sheet form. 18 Managed by UT-Battelle for the U. S. Department of Energy

Summary • We have developed and demonstrated test methods for characterization of materials under strain rates typical of vehicle crash. – Tension and shear configurations were developed. – Tests provide much needed data for Mg alloy applications. – Tests are used for material model development and calibration. • A new method for interrupted strain rate tests have been developed that enables characterization of material internal state under intermediate strain rates. • The developed methods can be used to address complex problems of characterization of fracture and failure in sheet materials. • Technology transfer occurs via www http: //thyme. ornl. gov/Mg_new 19 Managed by UT-Battelle for the U. S. Department of Energy

Technical Back-Up Slides

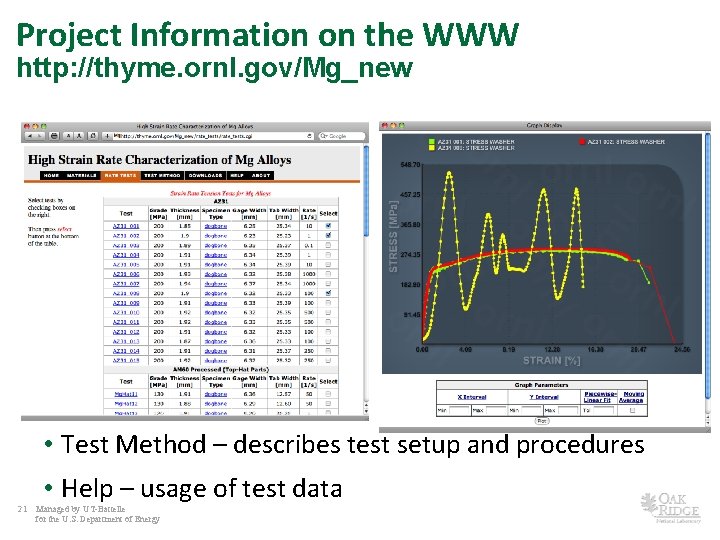
Project Information on the WWW http: //thyme. ornl. gov/Mg_new • Test Method – describes test setup and procedures 21 • Help – usage of test data Managed by UT-Battelle for the U. S. Department of Energy