Time Of Flight Diffraction Technique Time Of Flight






- Slides: 75

Time Of Flight Diffraction Technique

Time Of Flight Diffraction Technique T. O. F. D Technique

Time Of Flight Diffraction Technique • • The diffraction phenomenon Conventional use of diffraction Principles of TOFD Practical implementation Codes and standards Advantages and limitations of TOFD R/D Tech solution Demonstration

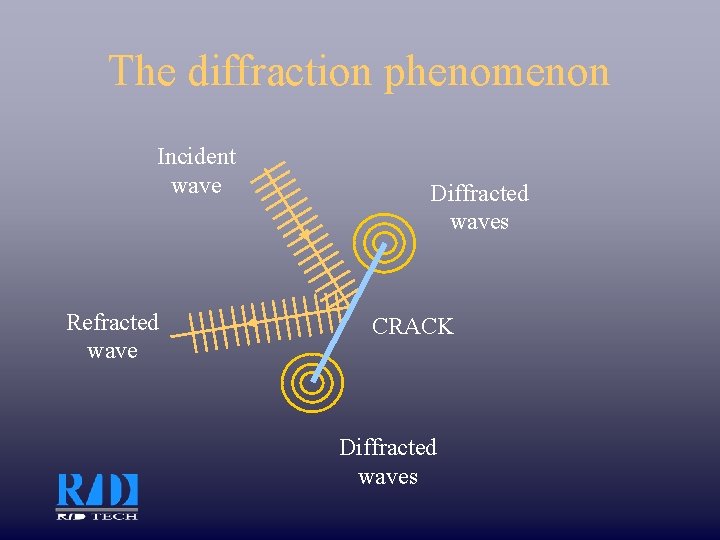
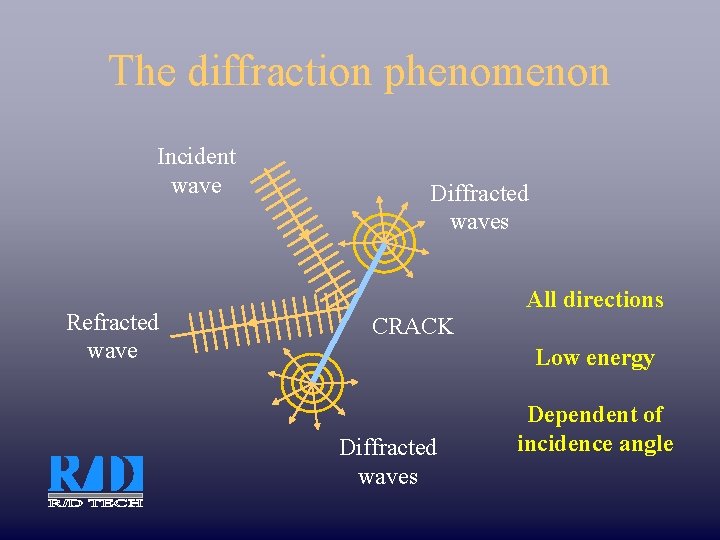
The diffraction phenomenon Incident wave Refracted wave Diffracted waves CRACK Diffracted waves

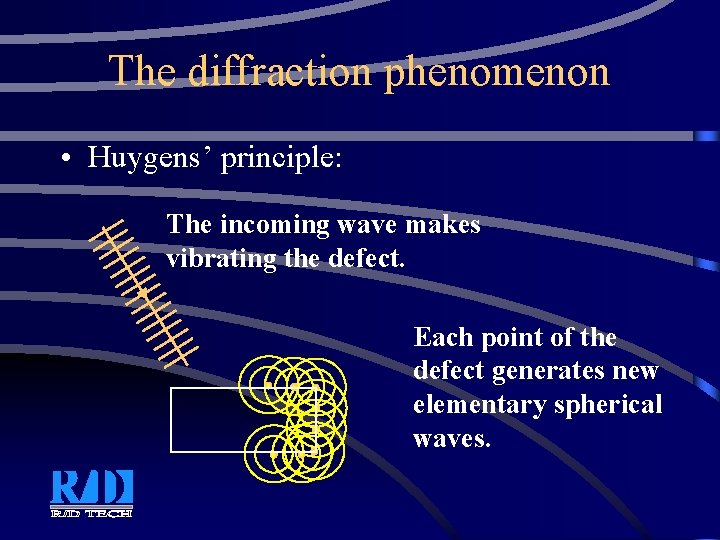
The diffraction phenomenon • Huygens’ principle: The incoming wave makes vibrating the defect. Each point of the defect generates new elementary spherical waves.

The diffraction phenomenon Incident wave Refracted wave Diffracted waves CRACK All directions Low energy Diffracted waves Dependent of incidence angle

Diffraction: summary • Incident wave reflected wave • Incident wave diffracted waves emitted by defect boundaries • Cylindrical/spherical waves emitted in all directions • Amplitude typically 20 to 30 d. B below direct reflection

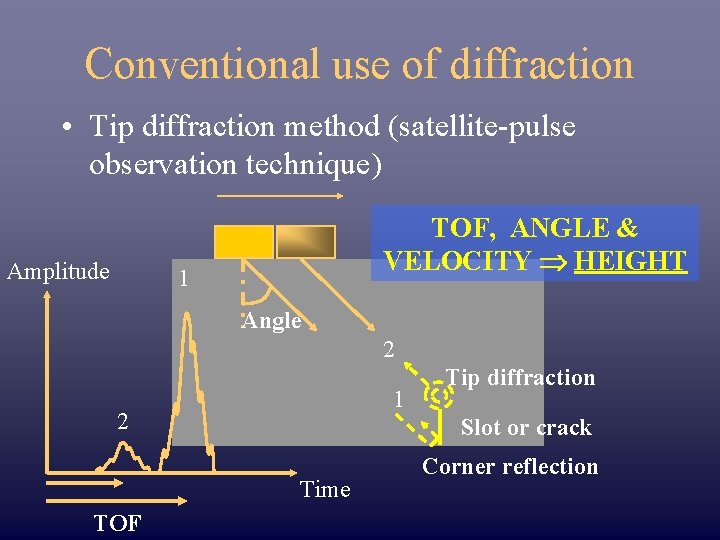
Conventional use of diffraction • Tip diffraction method (satellite-pulse observation technique) Amplitude TOF, ANGLE & VELOCITY HEIGHT 1 Angle 2 1 2 Slot or crack Time TOF Tip diffraction Corner reflection

Basic principles of the TOFD technique

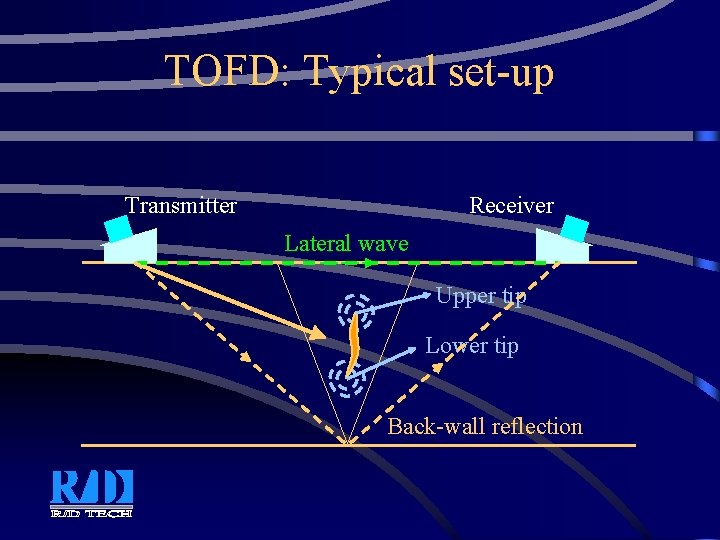
TOFD: Typical set-up Transmitter Receiver Lateral wave Upper tip Lower tip Back-wall reflection

Basic set-up • • • 2 probes (transmitter, receiver) Wide beam, Long. waves Symmetrically to the weld center Lateral wave (sub-surface LW) Back-wall reflection Diffraction signal detection (high receiver sensitivity)

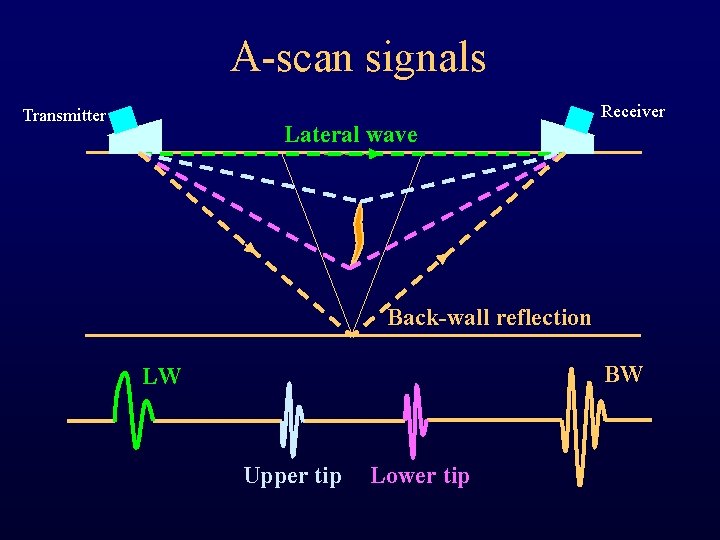
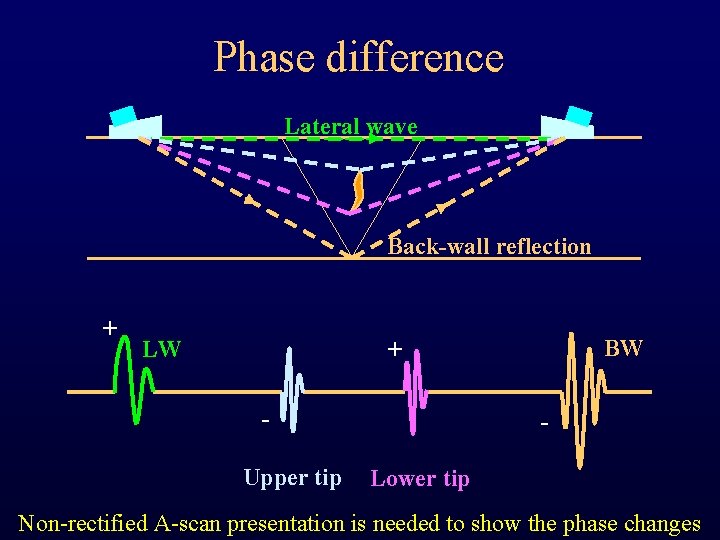
A-scan signals Transmitter Lateral wave Receiver Back-wall reflection BW LW Upper tip Lower tip

Phase difference Lateral wave Back-wall reflection + LW BW + Upper tip Lower tip Non-rectified A-scan presentation is needed to show the phase changes

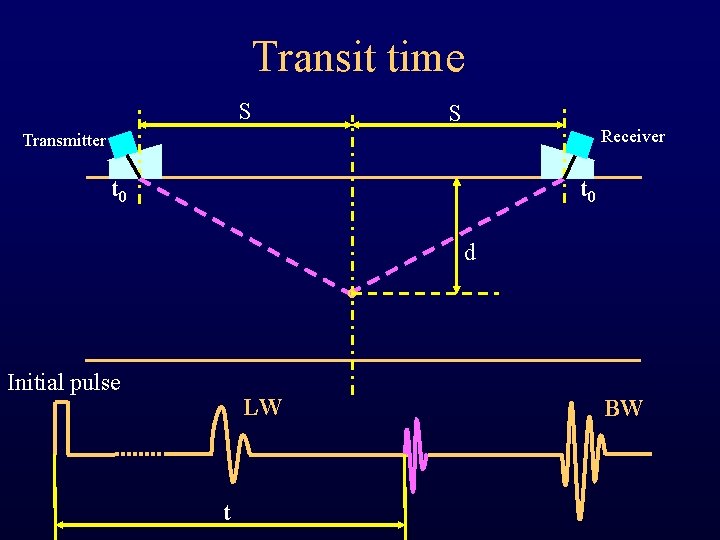
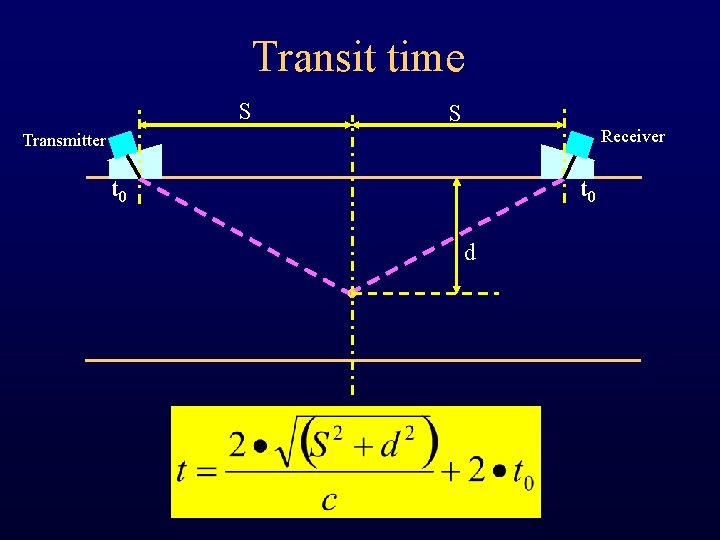
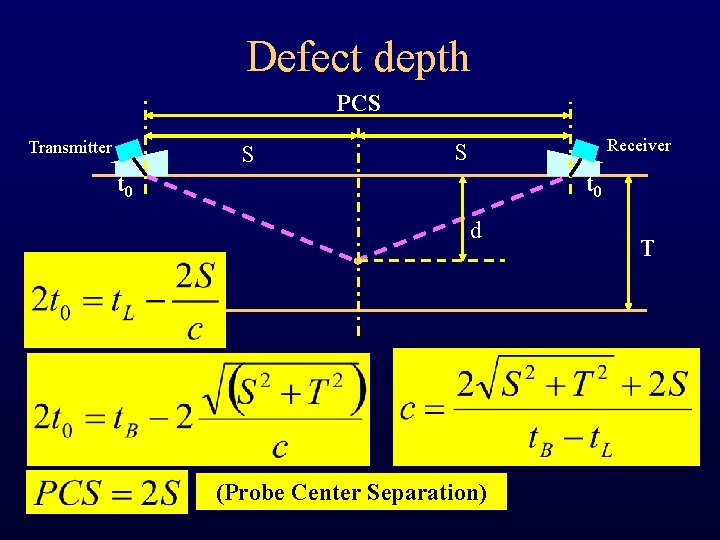
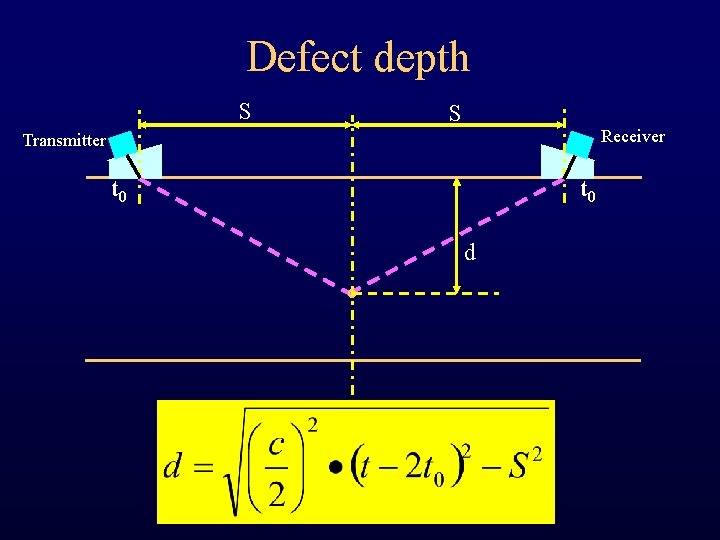
Defect depth • Based upon: – Accurate transit time measurements – Simple trigonometric equations • Achieved by computer

Transit time S S Receiver Transmitter t 0 d Initial pulse LW t BW

Transit time S S Receiver Transmitter t 0 d

Defect depth PCS Transmitter S Receiver S t 0 d (Probe Center Separation) T

Defect depth S S Receiver Transmitter t 0 d

Defect height 2 S Receiver Transmitter d 1 d 2 Since only transit time measurements are used to calculate the height, very accurate height estimation is possible. In practice 1 mm accuracy on real cracks is achievable (0. 1 mm on artificial reflectors)

Some typical defects

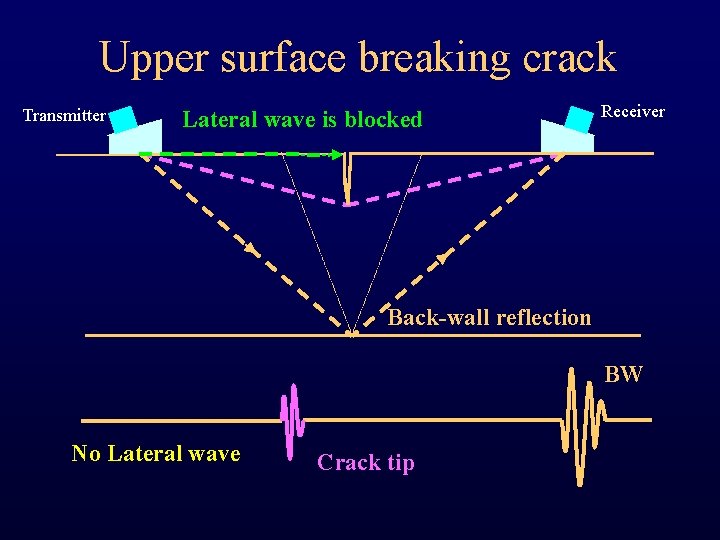
Upper surface breaking crack Transmitter Lateral wave is blocked Receiver Back-wall reflection BW No Lateral wave Crack tip

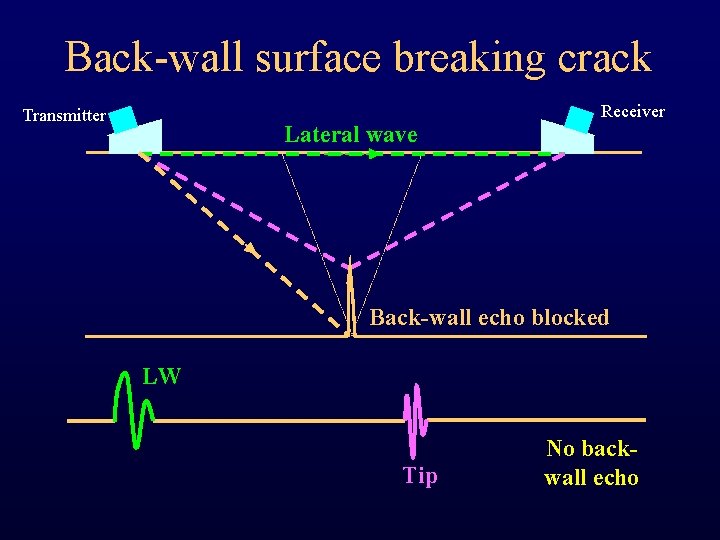
Back-wall surface breaking crack Transmitter Lateral wave Receiver Back-wall echo blocked LW Tip No backwall echo

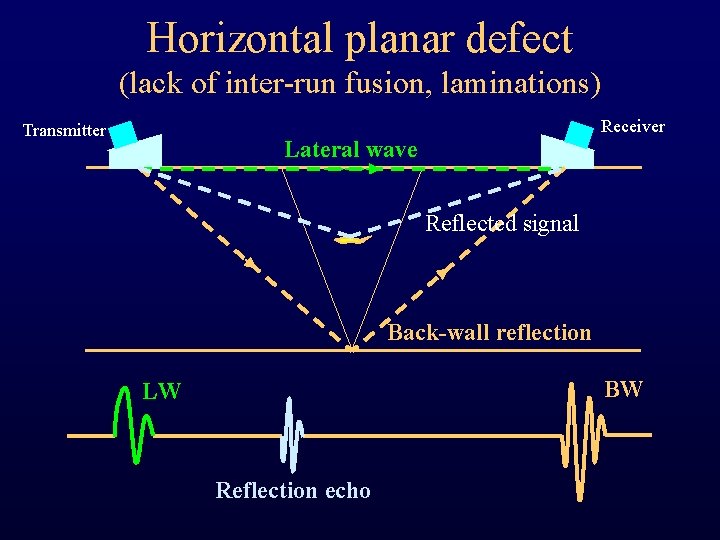
Horizontal planar defect (lack of inter-run fusion, laminations) Transmitter Receiver Lateral wave Reflected signal Back-wall reflection BW LW Reflection echo

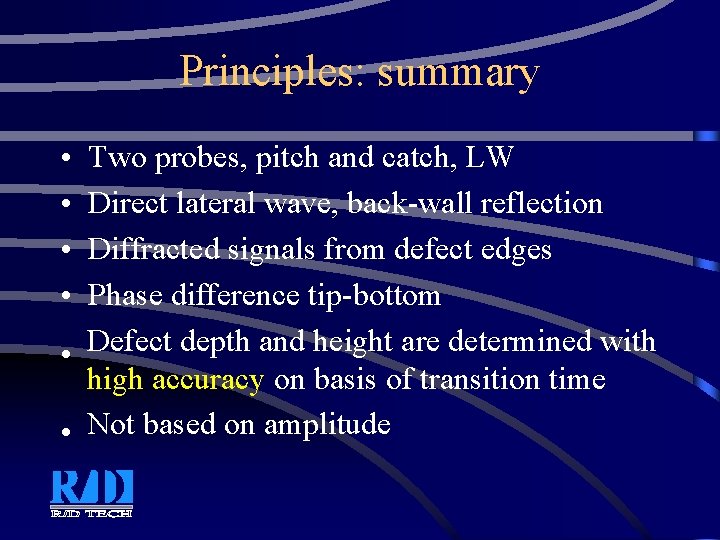
Principles: summary • • Two probes, pitch and catch, LW Direct lateral wave, back-wall reflection Diffracted signals from defect edges Phase difference tip-bottom Defect depth and height are determined with • high accuracy on basis of transition time • Not based on amplitude

TOFD: practical implementation • • • General set-up Probe considerations Data processing and presentation Manipulator Scanning types.

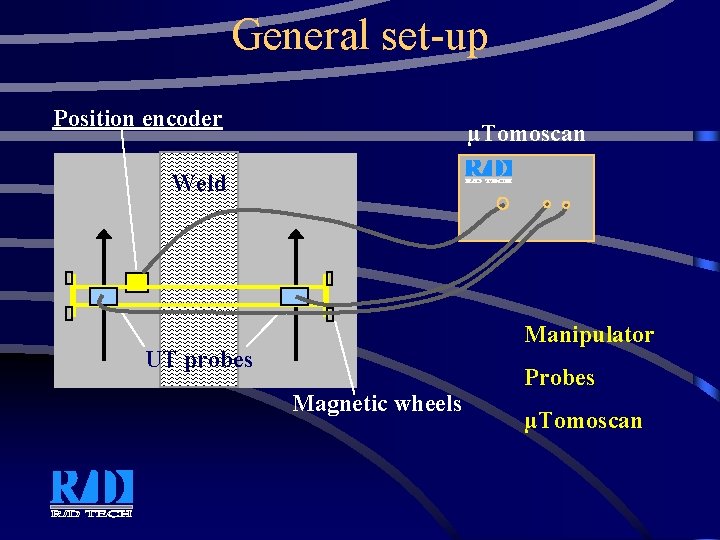
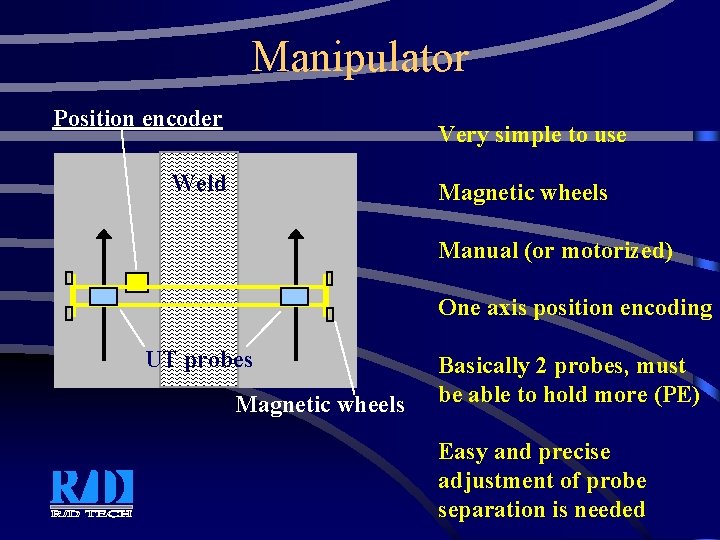
General set-up Position encoder µTomoscan Weld Manipulator UT probes Magnetic wheels Probes µTomoscan

Probe considerations • Propagation mode and angle • Time domain resolution • Beam characteristics.

Propagation mode • Longitudinal waves – Fastest waves, easier interpretation, no confusion with mode conversion waves (SW) – Stronger diffracted signals

Probe angle • Relation between angle and amplitude of generated diffracted signals • Precision on defect height determination • Inspected volume Compromise In many cases 60 degree is a good compromise

Time domain resolution • Time based measurements • Short ultrasonic pulses (importance of UT equipment: probe excitation parameters) • Higher frequencies than standard PE

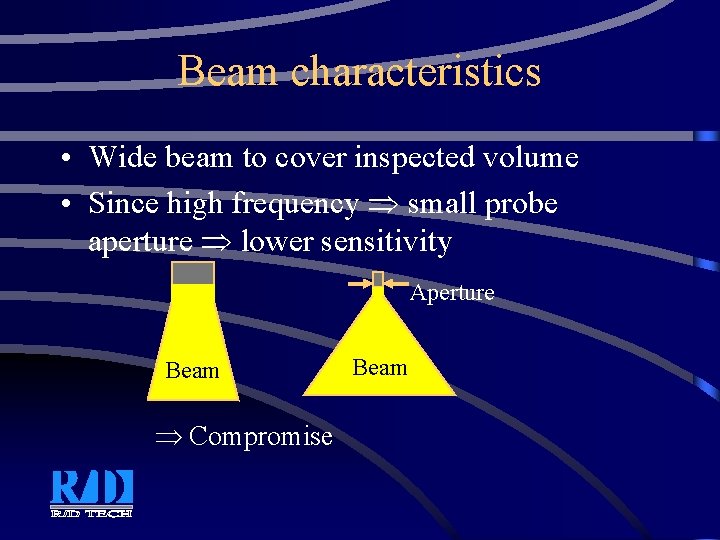
Beam characteristics • Wide beam to cover inspected volume • Since high frequency small probe aperture lower sensitivity Aperture Beam Compromise Beam

Data processing and presentation • Processing of all non-rectified signals requires powerful computing capability • Mass amount of complex signals requires a simple way to visualize the data • Tedious calculations require for easy to use tools

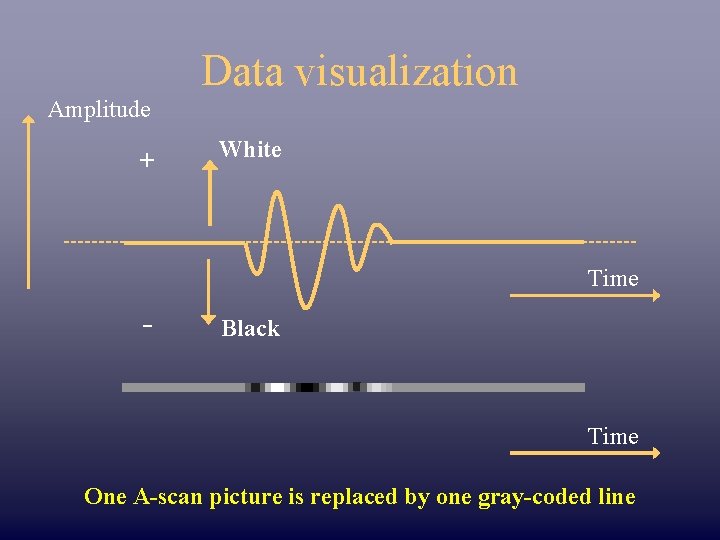
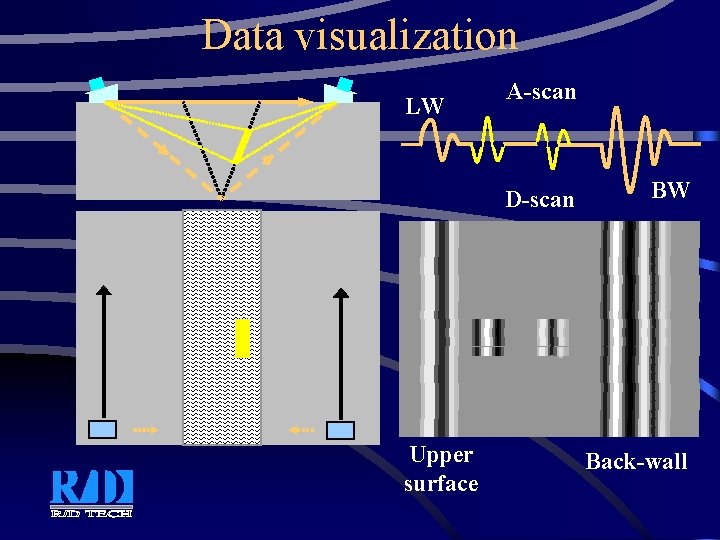
Data visualization • Huge amount of data • Phase information

Data visualization Amplitude + White Time - Black Time One A-scan picture is replaced by one gray-coded line

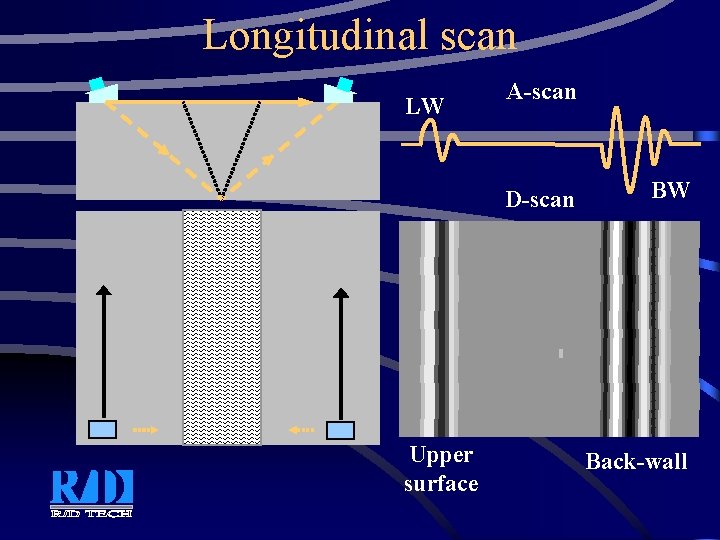
Data visualization LW A-scan D-scan Upper surface BW Back-wall

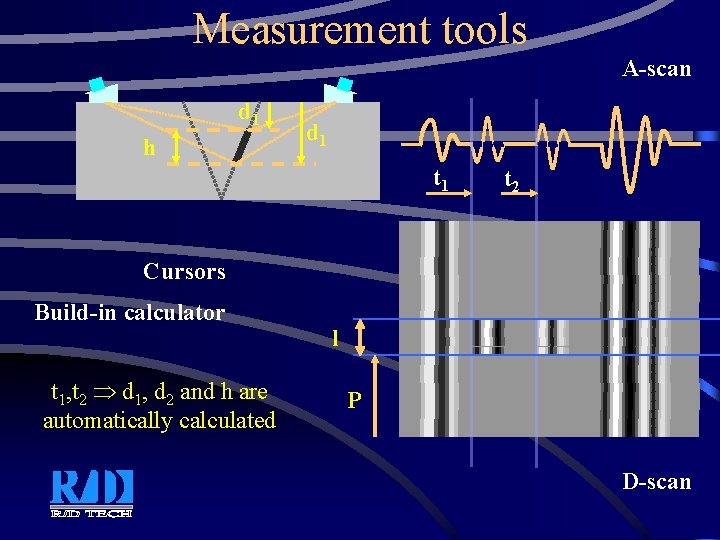
Tools • Depth is expressed by a mathematical equation • Basic tools are needed for – Initial calibration – Performing measurements

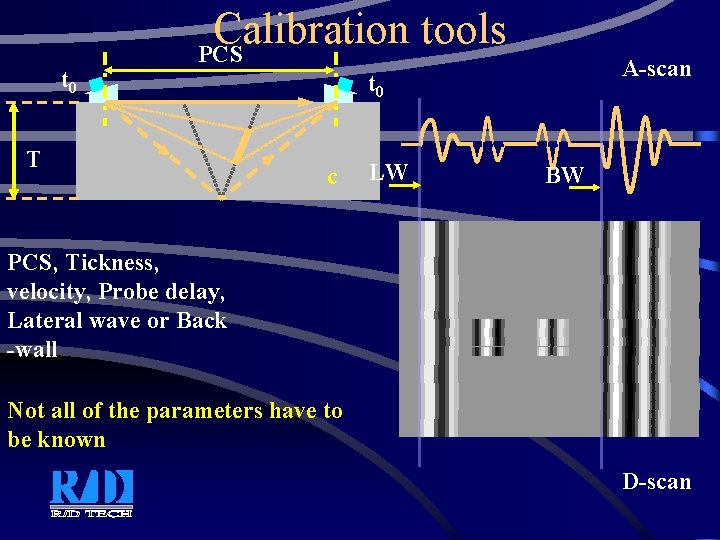
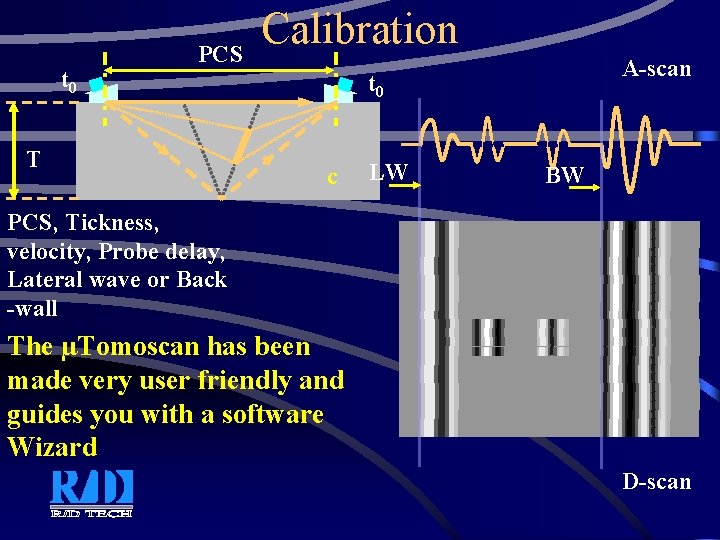
t 0 Calibration tools PCS T A-scan t 0 c LW BW PCS, Tickness, velocity, Probe delay, Lateral wave or Back -wall Not all of the parameters have to be known D-scan

Measurement tools A-scan d 1 h d 1 t 2 Cursors Build-in calculator t 1, t 2 d 1, d 2 and h are automatically calculated l P D-scan

Manipulator Position encoder Very simple to use Weld Magnetic wheels Manual (or motorized) One axis position encoding UT probes Magnetic wheels Basically 2 probes, must be able to hold more (PE) Easy and precise adjustment of probe separation is needed

Scanning types • Longitudinal (non-parallel) • Parallel

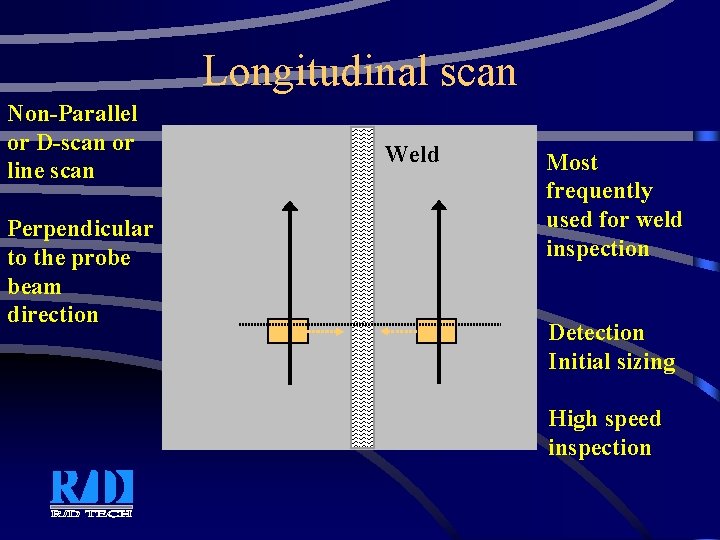
Longitudinal scan Non-Parallel or D-scan or line scan Perpendicular to the probe beam direction Weld Most frequently used for weld inspection Detection Initial sizing High speed inspection

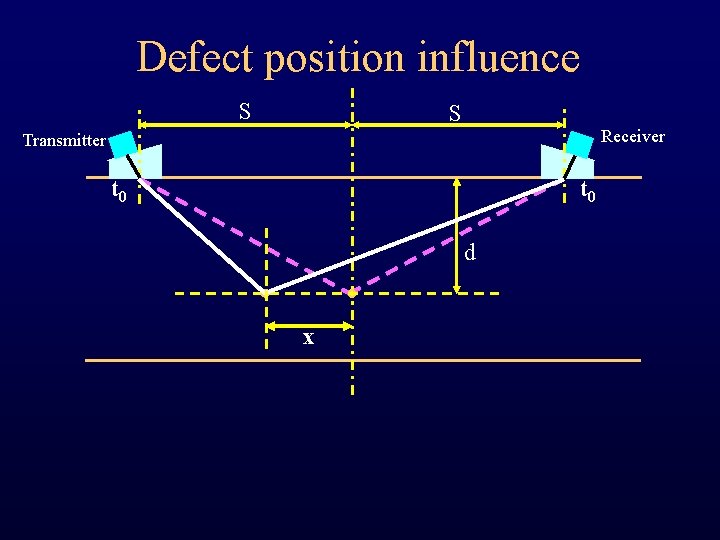
Longitudinal scan: limitations • Defect depth only accurate when the probes are symmetrically positioned with regard to the defect • Defect lateral position is unknown

Defect position influence S S Receiver Transmitter t 0 d x

Defect position uncertainty S S Receiver Transmitter t 1 Constant time locus (t 1+t 2=ct) t 2 dmin dmax In practice: Maximum error on absolute depth position lies below 10%. Error on height estimation of internal (small) defect is negligible. Caution for small defects situated at the back-wall.

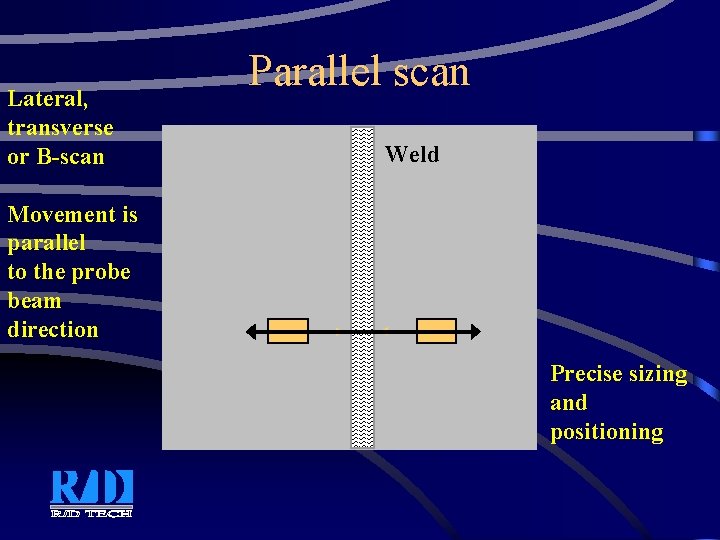
Lateral, transverse or B-scan Parallel scan Weld Movement is parallel to the probe beam direction Precise sizing and positioning

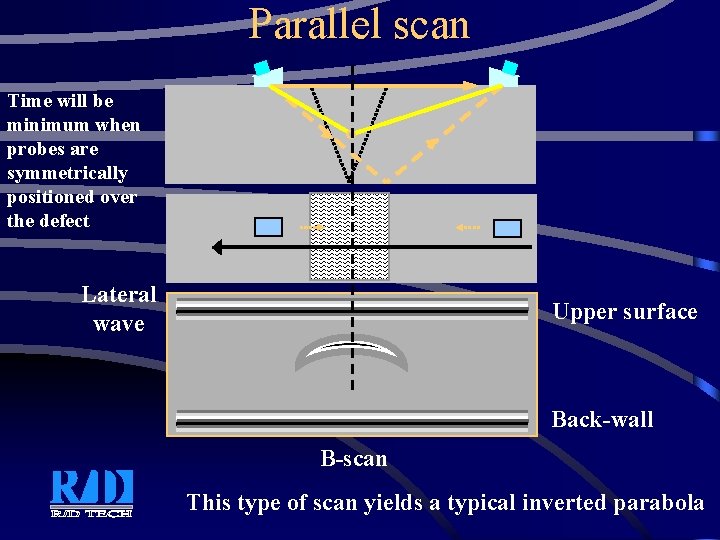
Parallel scan Time will be minimum when probes are symmetrically positioned over the defect Lateral wave Upper surface Back-wall B-scan This type of scan yields a typical inverted parabola

Parallel scan: limitations • Weld inspection: weld cap often reduces or makes impossible the extend of the scan.

Practical implementation: summary • • • Simple, light weight, set-up High speed inspection LW, wide beam, high frequency probes Data visualization and analysis tools Two scanning types.

Codes and standards • British Standard • European

British Standard • Guide to calibration and setting-up of TOFD technique, BS 7706 (1993) • Detailed document with useful practical guidelines for setting up a TOFD examination • Guide for interpretation of the data • Examples of typical weld defects

CEN • TOFD technique as a method for defect detection and sizing, CENV 583 -6 (1997) • Preliminary standard • Tables with recommended probe parameters with regard to different thickness (frequency, crystal size, nominal angle)

Advantages, disadvantages and limitations of TOFD

TOFD Advantages • • One line, volume inspection Very fast scanning Set-up independent of weld configuration Precise defect sizing capability Very sensitive to all kinds of defects Not sensitive to defect orientation Amplitude insensitive, acoustical coupling less critical

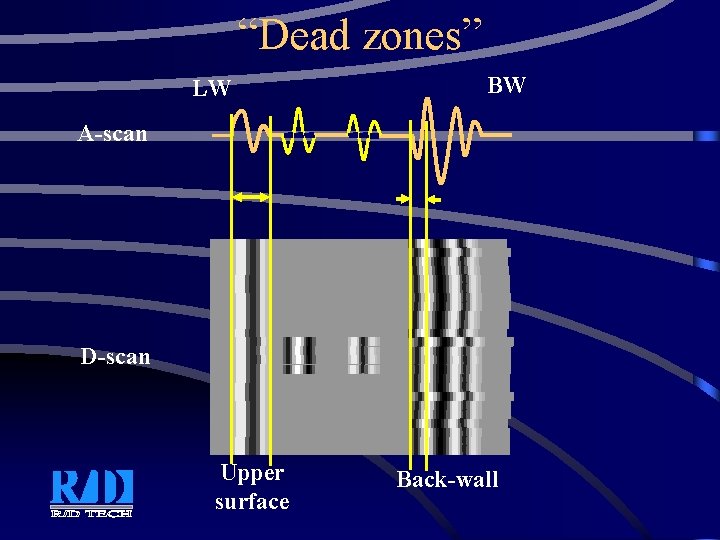
TOFD limitations and disadvantages • “Dead zones”

“Dead zones” LW BW A-scan D-scan Upper surface Back-wall

TOFD limitations and disadvantages • “Dead zones” • “sees” everything analysis difficult • Effect of lateral defect position (longitudinal scan)

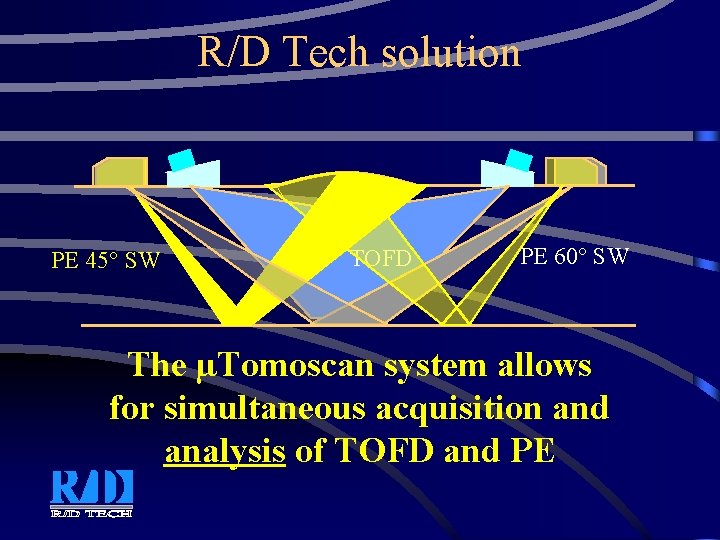
R/D Tech proposed solution • TOFD: YES • BUT: do not forget the good things offered by the standard Pulse-Echo technique • SOLUTION: do both TOFD and PE simultaneously, without reducing the scan speed

R/D Tech solution PE 45 SW TOFD PE 60 SW The µTomoscan system allows for simultaneous acquisition and analysis of TOFD and PE

µTomoscan for TOFD and PE applications • • • Small, lightweight, 1 to 16 channels PE and TOFD software Lateral wave straightening Real-time averaging Multi channel data acquisition and display Linearization for true depth on flat or cylindrical surfaces • Processing (Data compression, . . )

µTomoscan for all kind of applications • Modular system • Options can be added to meet custom requirements – Remote pulser/pre-amplifier – Scanners – Multi-axis manipulator controller – Software (also Matlab compatible)

Demo • General description • System calibration • Demonstrations of acquisition and analysis

General description • µTomoscan • Handscanner • Specimens

t 0 PCS T Calibration A-scan t 0 c LW BW PCS, Tickness, velocity, Probe delay, Lateral wave or Back -wall The µTomoscan has been made very user friendly and guides you with a software Wizard D-scan

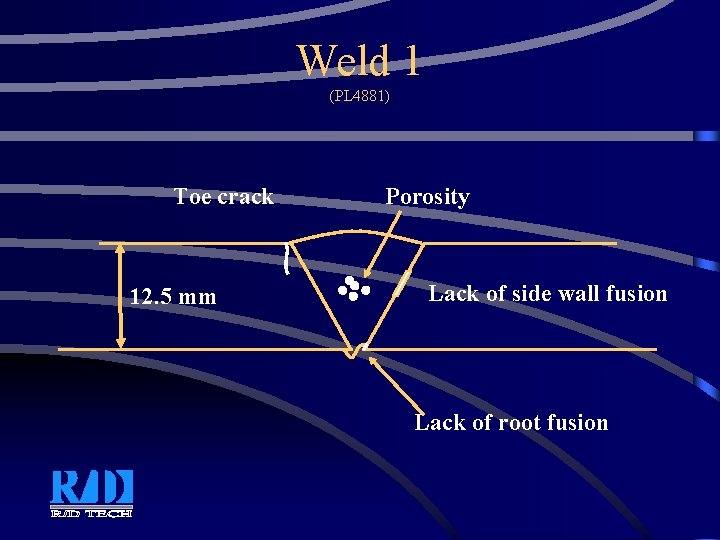
Weld 1 (PL 4881) Toe crack 12. 5 mm Porosity Lack of side wall fusion Lack of root fusion

Longitudinal scan LW A-scan D-scan Upper surface BW Back-wall

R/D Tech solution PE 45 SW TOFD PE 60 SW The µTomoscan system allows for simultaneous acquisition and analysis of TOFD and PE

Comments on results

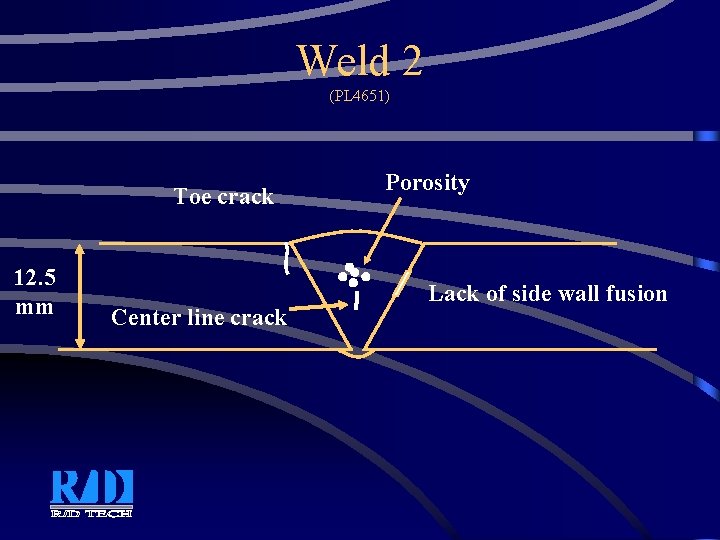
Weld 2 (PL 4651) Toe crack 12. 5 mm Center line crack Porosity Lack of side wall fusion

Longitudinal scan LW A-scan D-scan Upper surface BW Back-wall

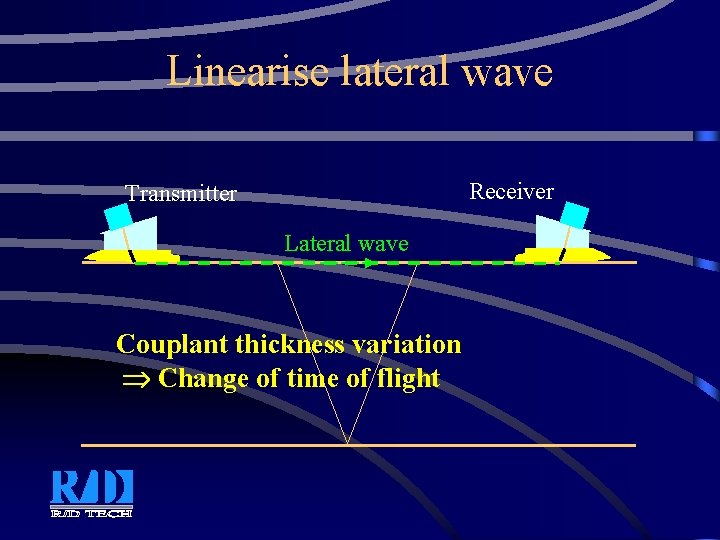
Linearise lateral wave Receiver Transmitter Lateral wave Couplant thickness variation Change of time of flight

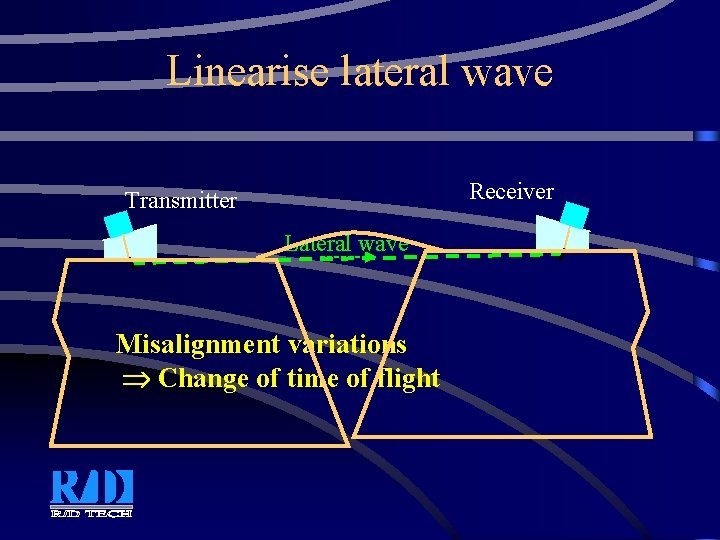
Linearise lateral wave Receiver Transmitter Lateral wave Misalignment variations Change of time of flight

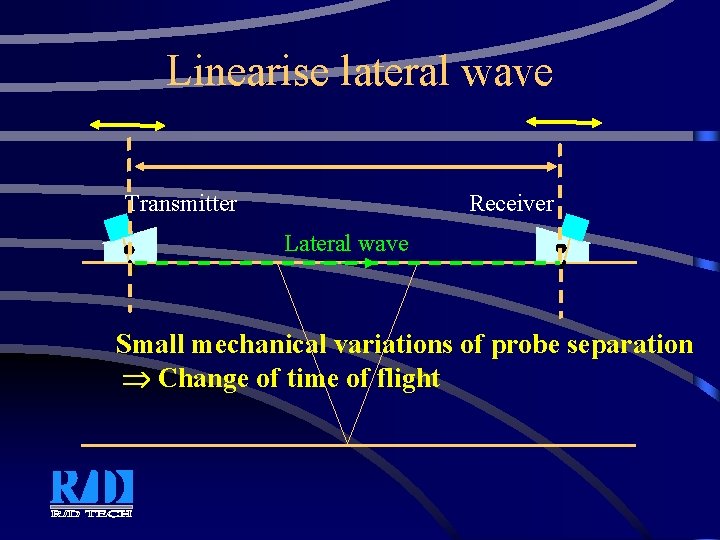
Linearise lateral wave Transmitter Receiver Lateral wave Small mechanical variations of probe separation Change of time of flight

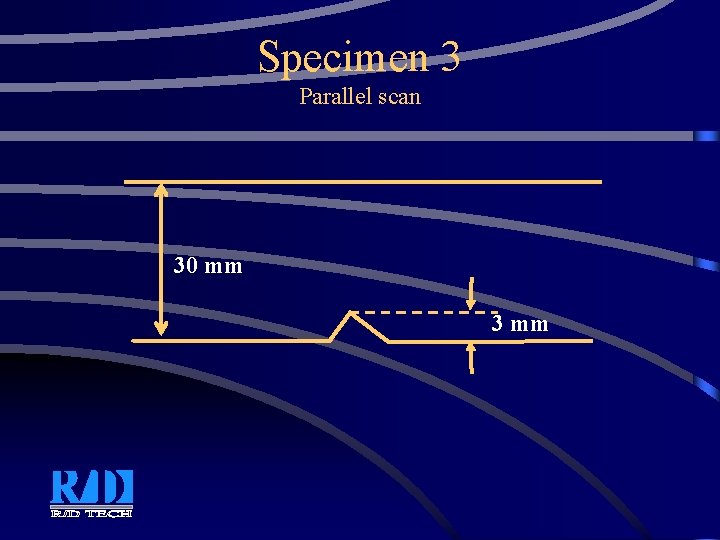
Specimen 3 Parallel scan 30 mm 3 mm

Parallel scan Time will be minimum when probes are symmetrically positioned over the defect Lateral wave Upper surface Back-wall B-scan This type of scan yields a typical inverted parabola

Questions