RTSPRTMP Handshake Parrot Anifi Latte Panda LTE Dongle


 • CPU:Intel Z 8350 Quad Core (1. 92 GHz) • RAM:")
")

 • 新增以下內容: • Section \"Device\" Identifier \"Configured Video Device\" Driver \"dummy\"")
 • 檢查Dongle是否連接: • lsusb • 移除預設的模組: • sudo apt-get -y remove")
 • 從 USB_Mode. Switch 官網下載數據連線 2017/08/06的版本: • wget http: //www. draisberghof.")
 • cd到兩個模組的資料夾內編譯並安裝: • cd ~/usb-modeswitch-2. 5. 1 • make • sudo")
 • 載入核心模組: • sudo modprobe qmi_wwan • sudo modprobe option")
 • 安裝並設定連線: • sudo apt-get -y install pppconfig • sudo pppconfig")
 • 選擇Use dynamic DNS")
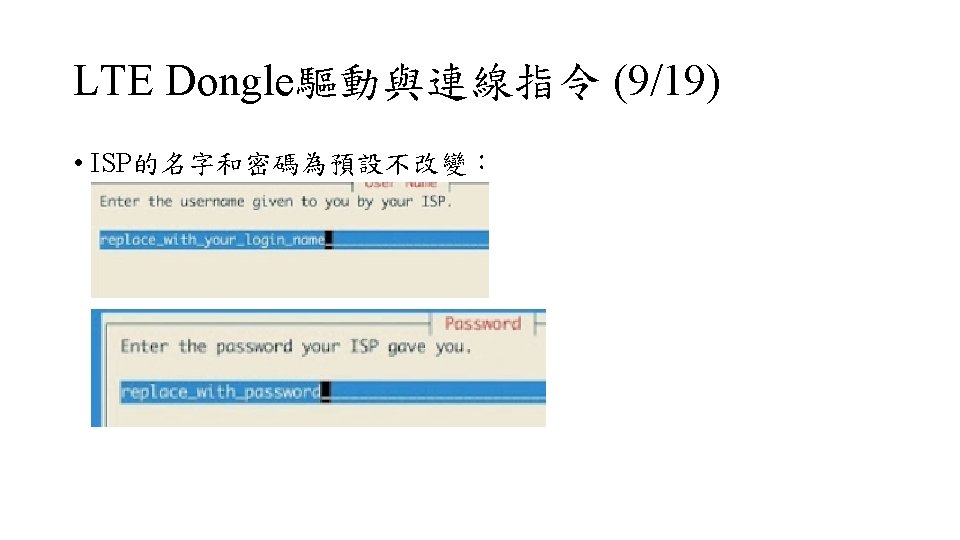
 • 選擇PAP 驗證協定,Peer Authentication Protocol。")
 • 設定通訊埠的路徑為 /dev/tty. USB 1: • 儲存設定Finished Write files and return")
 • 撥接參數如圖設定: • sudo gedit /etc/ppp/peers/4 GLTE • 新增connect \"/usr/sbin/chat -v")
 • 編輯設定檔: • sudo gedit /etc/chatscripts/4 GLTE • 在 '' ATZ")
 • 開機自動連上 4 G 網路,建立網卡介面: • sudo gedit /etc/network/interfaces • 新增三行指令")
 • 服務設定檔,註解After=sys-subsystem-net-devices-%i. device: • sudo gedit /lib/systemd/system/ifup@4 gppp 0. service •")
 • 新增一個設備設定檔: • sudo gedit /etc/udev/rules. d/99 -dwm 222. rules •")


 • cd $HOME • mkdir -p code/parrot-groundsdk • cd code/parrot-groundsdk • repo")
 • 開啟飛行控制指令: • source. /products/olympe/linux/env/shell • 測試指令: • python -c 'import olympe;")
 在~/code/parrot-groundsdk目錄下新增takeoff. py輸入: • # -*- coding: UTF-8 -* • import olympe •")
- Slides: 37
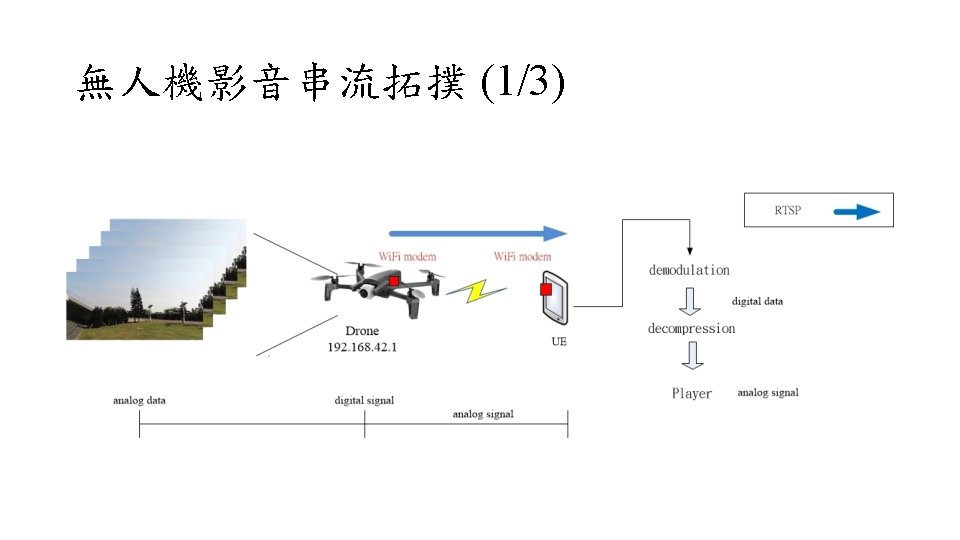
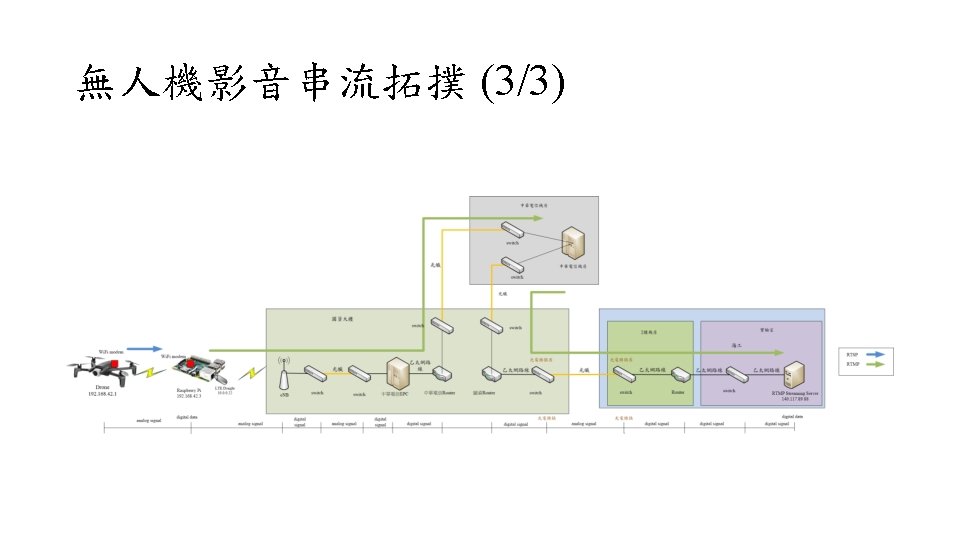
RTSP與RTMP Handshake
硬體介紹 • Parrot Anifi • Latte Panda • LTE Dongle
Parrot Anifi
Latte Panda (1/2) • CPU:Intel Z 8350 Quad Core (1. 92 GHz) • RAM: 4 GB DDR 3 L • Wi-Fi 802. 11 n • USB 3. 0 x 1 • USB 2. 0 x 2 • Weight: 55 g
Latte Panda (2/2)
LTE Dongle
Headless 開機設定 (2/2) • 新增以下內容: • Section "Device" Identifier "Configured Video Device" Driver "dummy" End. Section "Monitor" Identifier "Configured Monitor" Horiz. Sync 31. 5 -48. 5 Vert. Refresh 50 -70 End. Section "Screen" Identifier "Default Screen" Monitor "Configured Monitor" Device "Configured Video Device" Default. Depth 24 Sub. Section "Display" Depth 24 Modes "1152 x 864" End. Sub. Section End. Section
LTE Dongle驅動與連線指令 (1/19) • 檢查Dongle是否連接: • lsusb • 移除預設的模組: • sudo apt-get -y remove usb-modeswitch-data • 從 USB_Mode. Switch 官網下載2017/12/20 的版本是 2. 5. 1: • wget http: //www. draisberghof. de/usb_modeswitch/usb-modeswitch 2. 5. 1. tar. bz 2
LTE Dongle驅動與連線指令 (2/19) • 從 USB_Mode. Switch 官網下載數據連線 2017/08/06的版本: • wget http: //www. draisberghof. de/usb_modeswitch/usb-modeswitchdata-20170806. tar. bz 2 • 解壓縮 2個下載的模組: • tar jxf usb-modeswitch-2. 5. 1. tar. bz 2 • tar jxf usb-modeswitch-data-20170806. tar. bz 2 • 安裝必要的相依套件: • sudo apt-get -y install libgusb-dev
LTE Dongle驅動與連線指令 (3/19) • cd到兩個模組的資料夾內編譯並安裝: • cd ~/usb-modeswitch-2. 5. 1 • make • sudo make install • cd ~/usb-modeswitch-data-20170806/ • sudo make install
LTE Dongle驅動與連線指令 (4/19) • 載入核心模組: • sudo modprobe qmi_wwan • sudo modprobe option
LTE Dongle驅動與連線指令 (5/19) • 安裝並設定連線: • sudo apt-get -y install pppconfig • sudo pppconfig • 選擇Create a connection
LTE Dongle驅動與連線指令 (7/19) • 選擇Use dynamic DNS
LTE Dongle驅動與連線指令 (8/19) • 選擇PAP 驗證協定,Peer Authentication Protocol。
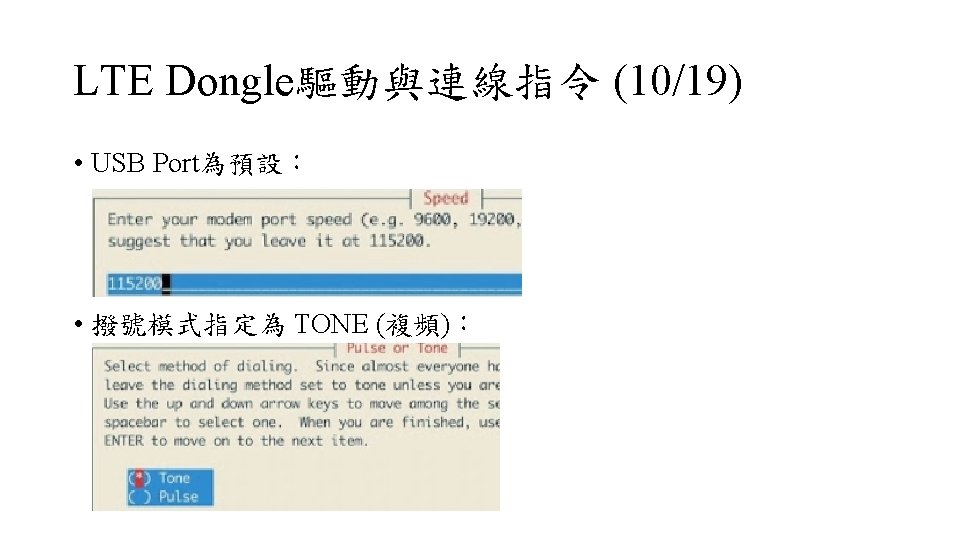
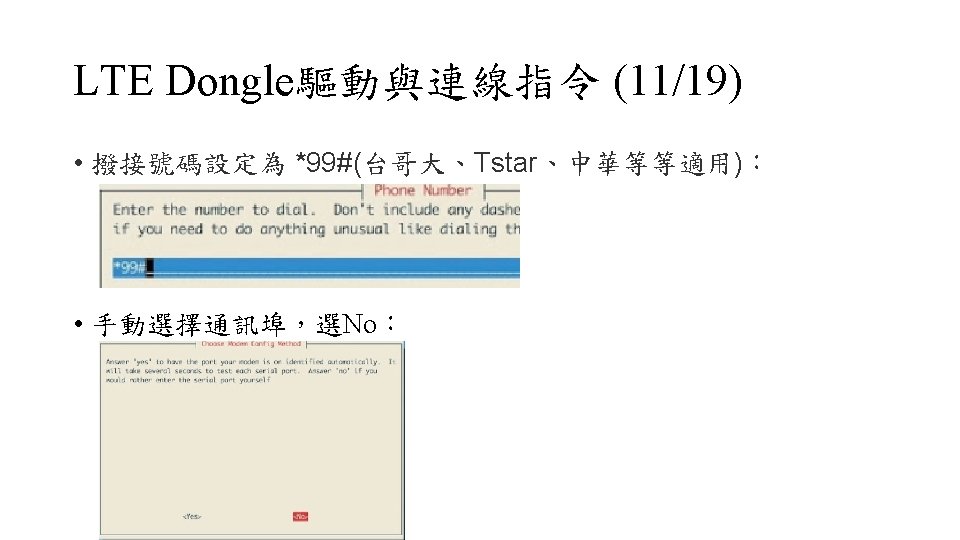
LTE Dongle驅動與連線指令 (12/19) • 設定通訊埠的路徑為 /dev/tty. USB 1: • 儲存設定Finished Write files and return to main menu後Exit
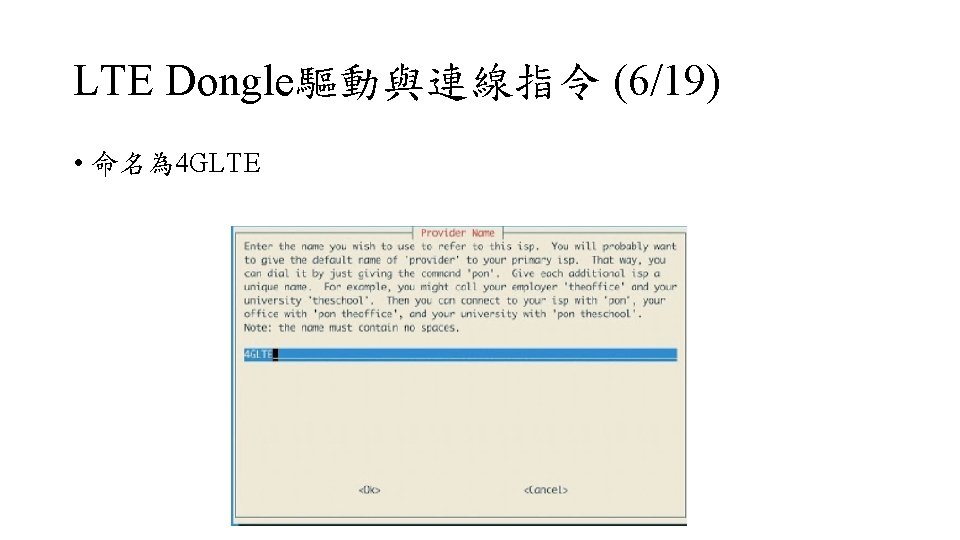
LTE Dongle驅動與連線指令 (14/19) • 撥接參數如圖設定: • sudo gedit /etc/ppp/peers/4 GLTE • 新增connect "/usr/sbin/chat -v -T internet -f /etc/chatscripts/4 GLTE" • 紅線內#要註解,在最下方增加這兩行persist和replacedefaultroute
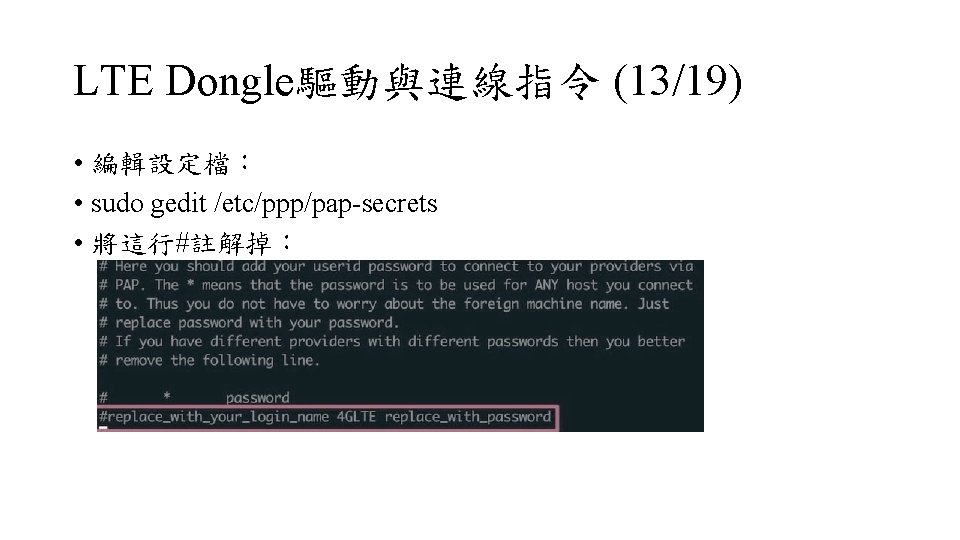
LTE Dongle驅動與連線指令 (15/19) • 編輯設定檔: • sudo gedit /etc/chatscripts/4 GLTE • 在 '' ATZ 的下一行增加 • OK-AT-OK AT+CGDCONT=1, "IP", "T", "", 0, 0 • 註解OK-AT-OK "ATDT*99#" • 改成OK "ATDT*99#"
LTE Dongle驅動與連線指令 (16/19) • 開機自動連上 4 G 網路,建立網卡介面: • sudo gedit /etc/network/interfaces • 新增三行指令 • allow-hotplug 4 gppp 0 • iface 4 gppp 0 inet ppp • provider 4 GLTE
LTE Dongle驅動與連線指令 (17/19) • 服務設定檔,註解After=sys-subsystem-net-devices-%i. device: • sudo gedit /lib/systemd/system/ifup@4 gppp 0. service • • 啟動 4 G 連線服務並讓它開機自動執行: sudo systemctl daemon-reload sudo systemctl restart ifup@4 gppp 0 sudo systemctl enable ifup@4 gppp 0
LTE Dongle驅動與連線指令 (18/19) • 新增一個設備設定檔: • sudo gedit /etc/udev/rules. d/99 -dwm 222. rules • 新增一行 • KERNEL=="tty. USB 1", ATTRS{id. Vendor}=="2001", ATTRS{id. Product}=="7 e 35", ENV{SYSTEMD_WANTS}+="ifup@4 gppp 0. service" • 儲存後輸入: • sudo udevadm control --reload
安裝FFmpeg • sudo apt-get install ffmpeg • 進行RTMP串流: • ffmpeg -i "rtsp: //192. 168. 42. 1/live" -filter: v scale=320: 240 -c: a copy -r 24 -f flv "rtmp: //140. 117. 89. 88: 1935/live/home 2" • 或將無人機的RTSP串流儲存成影音檔: • ffmpeg -i "rtsp: //192. 168. 42. 1/live" -c: v libx 264 -b: v 2 M -maxrate 2 M -bufsize 1 M output. mp 4
安裝SDK (1/3) • cd $HOME • mkdir -p code/parrot-groundsdk • cd code/parrot-groundsdk • repo init -u https: //github. com/Parrot-Developers/groundsdkmanifest. git • repo sync • . /products/olympe/linux/env/postinst • 編譯SDK: • . /build. sh -p olympe-linux -A all final -j
安裝SDK (2/3) • 開啟飛行控制指令: • source. /products/olympe/linux/env/shell • 測試指令: • python -c 'import olympe; print("Installation OK")’
安裝SDK (3/3) 在~/code/parrot-groundsdk目錄下新增takeoff. py輸入: • # -*- coding: UTF-8 -* • import olympe • from olympe. messages. ardrone 3. Piloting import Take. Off, Landing • • • drone = olympe. Drone("192. 168. 42. 1") drone. connect() drone(Take. Off()). wait() drone(Landing()). wait() drone. disconnect() • 並執行python takeoff. py