Mapping Earths Surfaces 4 th Grade Geology Unit
 By: Kira Wiman Background Photo Courtesy")


 Turn students attention")


. Nashua, NH: Delta Education. Module")
- Slides: 29
Mapping Earth’s Surfaces (4 th Grade Geology Unit) By: Kira Wiman Background Photo Courtesy of: Pexels
Active Learning Definition: Active learning is a student-centered instructional approach in which students are engaged in the learning process through a variety of hands on activities that allow for exploration, interaction with their peers and teacher, and reflection on what was learned. Photo Courtesy of: Pexels
Lesson One: Getting to know Topographic Maps Background picture courtesy of: Pexels
Lesson Two: Profile Maps Photo Courtesy of: Photopin
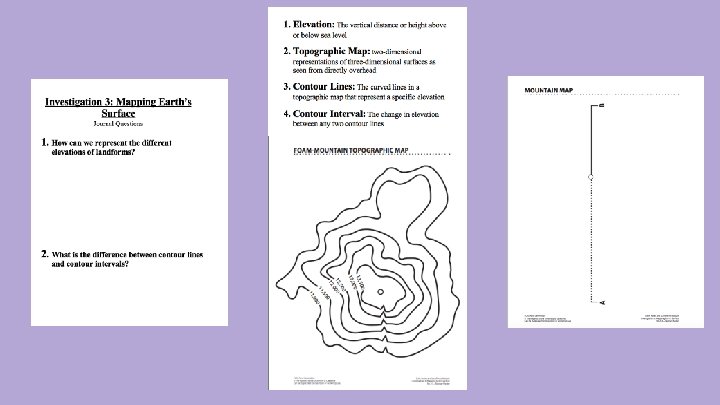
1. Learning Goals: Students will identify contour lines, elevation and contour intervals. Students will test their knowledge on contour line, contour interval, elevation, topographic map and profile. Students will argue their opinion for a trail map and the best route for the trail. ❏ ❏ ❏ 2. Assessments: Diagnostic: Reviewing vocabulary with students and how to look for certain parts on topographic map. Formative: When students do the beach ball bingo, the teacher will be able to assess how well the students are learning the material. Summative: Each journal will be assessed from student’s answers to the journal questions and their argument on the trail. This will allow for personal feedback to each student and help with planning for the next lesson. ❏ ❏ ❏ 3. Anticipatory Set: The teacher will review vocabulary from last lesson, how to find the elevation and contour level with the students. Use beach ball bingo if necessary. 4. Grouping Strategies: The class will work as a whole class and individually during the majority of this lesson. However, partial time will be spent discussing with partners and working in groups to debate between each other.
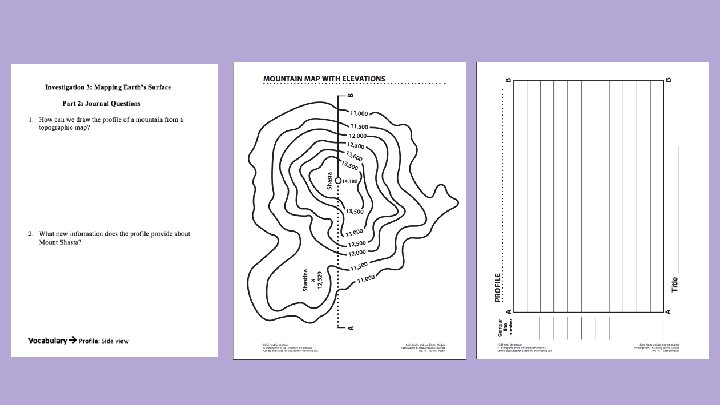
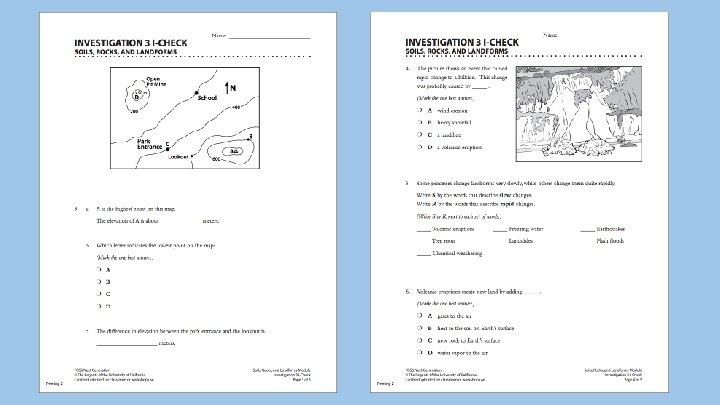
5. Directed Instruction: The majority of this lesson is done as whole class. There is a lot of guided practice with the students. 1. Ask table captains to get one of each sheets in the back for themselves and their table mates. a. Profile, response sheet A and B, contours and intervals 2. Then ask students to paste in their journals in order of first to last: topographic map from last lesson in journal, journal questions and contour and interval information sheet. 3. Bring class back together and refer back to making foam mountain from last lesson and explain this is called a bird’s eye view of Mount Shasta. (Bird’s eye view: from the top looking down) 4. Refer back poster of Mount Shasta and explain to students that someone took a picture of Mount Shasta from one side of the mountain. The one-sided view is called a profile. a. One foam mountain with teacher will be used to compare the mountain to the profile, as well as the poster. 5. a. Introduce focus question to class and ask them to think about it while going through the lesson. How can we draw the profile of a mountain from a topographic map?
6. Guided Practice: Drawing Profile Maps 1. Do finger walks on the contour line with the class. And re-iterate contour lines and how you can tell the elevation no matter where you are on the line. 2. Fold mountain maps in half on line and show class how to on the overhead. i. A and B letters should be facing the top 3. Label contour line numbers on profile sheet i. The last one should be 14, 000 feet 4. Line up mountain map with profile map and plot dots at each intersection, do until all are filled up i. Teacher will determine how many dots to plot with the class and how much the students will plot on their own. 5. Connect the dots and analyze profile. i. Have students connect on their own. ii. Which side is steeper? (Make sure students still understand that the side with closer contour lines together is the steeper side. )
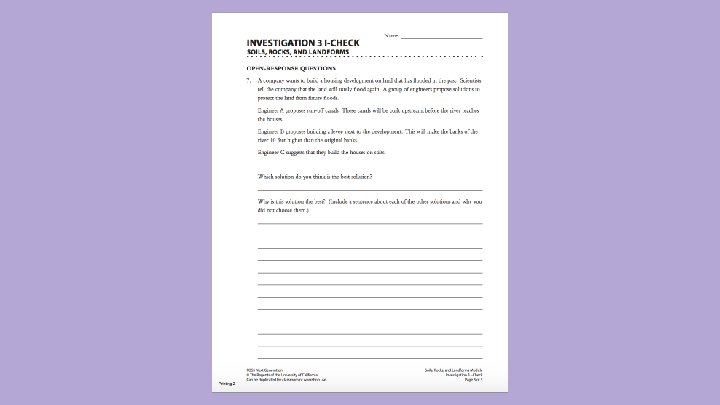
Cont’d Guided Practice 6. 7. Beach Ball Bingo (New Word: Profile) Turn students attention to the Response Sheet A. Popcorn read the story out loud, highlighting key parts. i. Come up with the best solution of a trail for the problem but have the students guide the way by coming up to the board and showing what they think. (I chose to pick sticks) ii. Draw the trail on response sheet maps iii. If there is a discrepancy and not all agree on the way back from the peak for the trail, have students debate. Get students into teams and call on one person to argue why their way is best. iv. Refer back to independent practice for last part.
7. Independent Practice: 1. Some of the guided practice parts are independent practice. 2. Answer focus question and second question in journal individually. i. Remind students to use vocabulary Once done with journal questions, bring class back together and do finish guided practice. 3. After have class discussion on why this trail works best. Then students will write 3 -4 sentences as why this trail works best in their journal. If there was a debate, have students write a convincing argument in their journal. 8. Closure: 1. Read The Story of Mount Shasta in student’s science books. i. Have students close their eyes as the read the story of John Muir’s adventures with Mount Shasta to picture all that took place This will get students ready for next lesson to dive deeper in Mount Shasta and volcanoes.
Lesson Three: Volcanic Eruptions Background Photo Courtesy of:
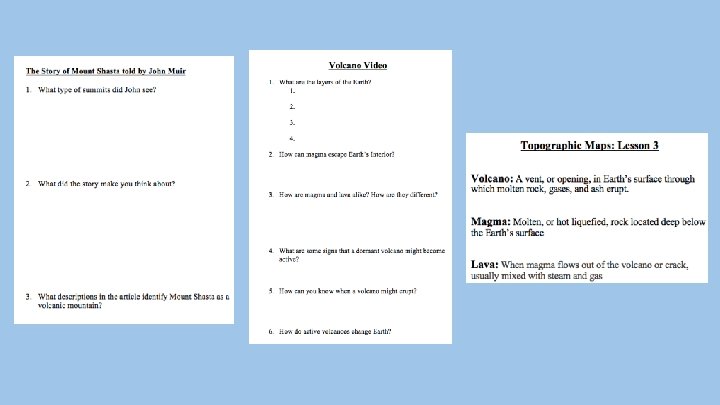
1. Learning Goals: ❏ Students will explain the layers of the Earth, how a volcano forms, how to know a volcano is going to erupt. ❏ Students will differentiate between two topographic maps of Mount St. Helens and their profile drawings. ❏ Students will discuss with classmates and in their journals what they learned in the lesson about volcanoes. 2. Assessments: ❏ Diagnostic: The teacher will assess students understanding of volcanoes after watching the anticipatory set videos. ❏ Formative: The teacher will assess students profiles of the two topographic maps of Mount St. Helens and the discussions the students have with each other by walking around and listening to the conversations. ❏ Summative: The teacher will collect the students journals and will assess the students answers from the volcano video. 3. Anticipatory Set: 1. Class will watch volcano videos as a class. There are video questions that the students will answer. 2. After the first video (Chapter 2: Volcano Formation), students will answer first 3 questions of volcano video questions. Have students get up and act out magma (pressure trying to find a way out) and then lava (smooth release or explosion; student’s choice). 3. After second and third video (Chapter 3 and 4) answer fourth question. 4. Skip Chapter 5 video, after Chapter 6 video answer last two questions. 5. Watch Chapter 7 conclusion video. The videos will lead into the lesson of Mount St. Helens. The teacher should have a small discussion on the volcano videos to assess student engagement and learning.
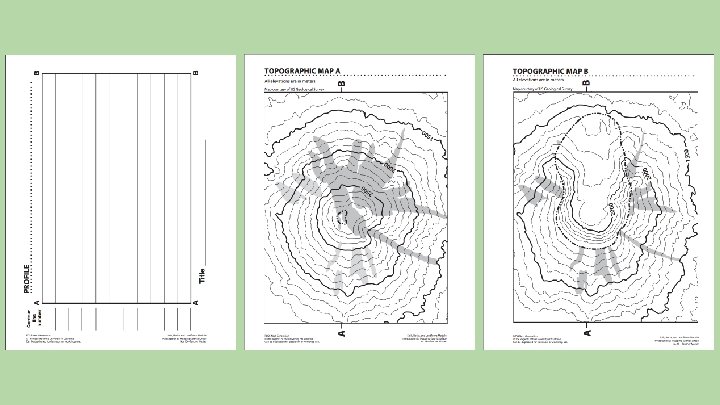
4. Grouping Strategies: The class will work as a whole class and individually during the majority of this lesson. However, partial time will be spent discussing with partners and working in groups to debate between each other. 5. 1. Directed Instruction: Introduce two topographic maps to each of the students. i. Ask the students if these two topographic maps are of the same mountain. ii. Have the students talk about it with a partner on similarities and differences of the two maps. iii. Bring class together and discuss the maps. Inform them that they are the same mountain, Mount St. Helens, which is on the same mountain range as Mount Shasta. 2. The north side is very different from each other. Explain to students why that is and the eruption of May 18, 1980 was the result of such a change in the mountain. iv. Explain they will be drawing the profile of Mount St. Helens before it erupted. Before 1980, the last time it erupted was in 1857. v. Watch USGS video of Mount St. Helens eruption 3. Lead discussion about video a. Questions to ask if stuck: (From Foss Teacher Manual) i. What did you find most interesting about the video? ii. When most people think about volcanoes, they think about liquid lava splashing out of the top of a mountain with red and black lava flowing slowly down its sides. How was the eruption of Mount St. Helens different? i. Several people who lived near Mount St. Helens at the time refused to leave when scientists warned them to go. Why do you think they decided to stay?
Cont’d Directed Instruction ii. Why were scientists so eager to get out on the mountain after each eruption after the big one in May 1980? iii. Move back to Guided practice and independent practice iv. Bring class back together from partner discussion and have class discussion with focus question: How can scientists and engineers help reduce the impacts that events like volcanic eruptions might have on people? v. Beach Ball Bingo 4. New words added: Core, Mantle, Crust, Volcano, Magma, Lava 6. 1. Guided Practice & Independent Practice: Students will draw the first profile of topographic map A on their own. i. Make sure the students label all parts of the profile. ii. If the students are having a hard time figuring out the elevation, go over how to find with contour intervals. Move back to Directed Instruction iii. Students will draw the second profile from Topographic Map B. iv. Once the students draw the profile, they will share with their classmates around them and discuss the profiles and how they look. Move back to Directed Instruction 7. Closure: Students will play a Kahoot game to review what they have learned and watch a short video that will lead into the next lesson.
Lesson Four: Rapid Earth Changes Background Photo Courtesy of: Pexels
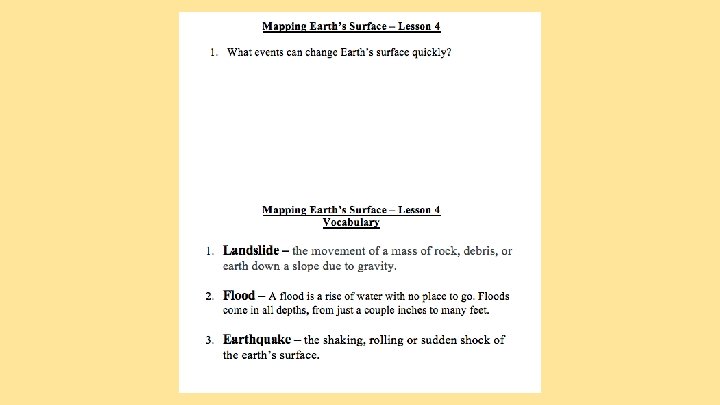
1. Learning Goals: ❏ Students will examine natural rapid Earth events and express it through speaking and writing. ❏ Students will discuss a specific natural rapid Earth event and further discuss important information from that event to the class. 2. Assessments: ❏ Formative: The teacher will assess the students as they walk around in the observation-gallery and observe their comments and questions. ❏ Summative: Students will take a unit test at the end of this lesson. 3. Anticipatory Set: ❏ Introduce the lesson by talking to the students how weathering and erosion can change the Earth slowly, but there are other events that happen that change the Earth quickly. ❏ Have the students discuss in their table groups and partners some ways they have seen or heard about how the Earth changes quickly and naturally. 4. Grouping Strategies: The class will work as a whole class and in groups during the whole lesson. There only independent practice is answering the journal question. 5. Directed Instruction: 1. Talk to students about rapid changes. 2. Play You. Tube videos and after each video show pictures of famous rapid changes that relate to the vide (ex: landslide à La Conchita) {I made a Power. Point} After the Power. Point, go back to guided practice.
6. Guided Practice: 1. Introduce students to the observation-gallery with the rapid-change cards. Let students know they will be working with their table groups. 2. Let the students know that they will be discussing each poster with their group and writing down what they see has happened with the Earth, if Earth materials were moved and how, if the event broke down the Earth or built it up and any questions they may have. 3. Give students three minutes for each poster to discuss and write in their groups. Use large post-its to have them write their observations and questions. 4. After each group has looked over each poster, bring the class together and discuss each poster with their observations and questions. Bring class to directed instruction 5. Have students open their science books to page 38. The class should be divided into eight groups and each group will take on a certain event described in the book: Yosemite Floods of 1997, Canyon Lake Flood of 2002, Big Thompson Canyon Flood of 1976, Mount St. Helens Eruption of 1980, Northridge Earthquake of 1994, San Francisco Earthquake of 1906, La Conchita Landslides of 1995 and 2005 and Yosemite Rockfall of 1996. i. Each group will have a certain amount of time to read their event and decided amongst their group on 3 main points of the event. ii. Each group will present their event to the class. 7. Independent Practice: After the lesson and presentations, each student will answer their journal questions. 8. Closure: Students will tell two other students two things they learned throughout the unit. After, students will take the final unit test.
Works Cited Soils, rocks, and landforms: Teacher toolkit. (2012). Nashua, NH: Delta Education. Module Detail. (n. d. ). Retrieved May 5, 2018, from https: //www. fossweb. com/moduledetail? d. Doc. Name=G 3799443