Manufacturing Processes for Engineering Materials 5 th Edition
- Slides: 46

Manufacturing Processes for Engineering Materials (5 th Edition in SI Units) Chapter 7: Sheet Metal Forming Processes • Shearing-Blanking • Bending • Spinning • Deep Drawing Chapter 7: Sheet-Metal Forming Processes Manufacturing Processes for Engineering Materials © 2008 Pearson Education South Asia Pte Ltd

Sheet-Metal Characteristics • Forming of sheet metals is carried out by tensile forces in the plane of the sheet. • Influencing parameters include: 1. Elongation 2. Yield-point elongation 3. Anisotropy 4. Grain size 5. Residual stresses 6. Springback 7. Wrinkling Chapter 7: Sheet-Metal Forming Processes Manufacturing Processes for Engineering Materials © 2008 Pearson Education South Asia Pte Ltd

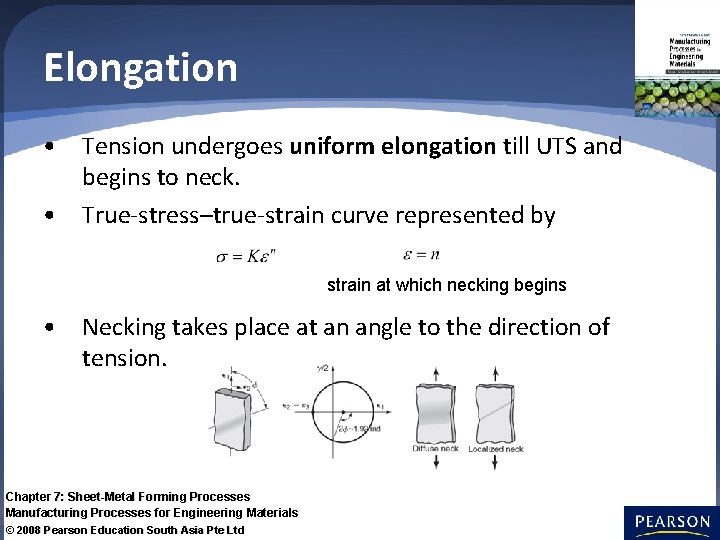
Elongation • Tension undergoes uniform elongation till UTS and begins to neck. • True-stress–true-strain curve represented by strain at which necking begins • Necking takes place at an angle to the direction of tension. Chapter 7: Sheet-Metal Forming Processes Manufacturing Processes for Engineering Materials © 2008 Pearson Education South Asia Pte Ltd

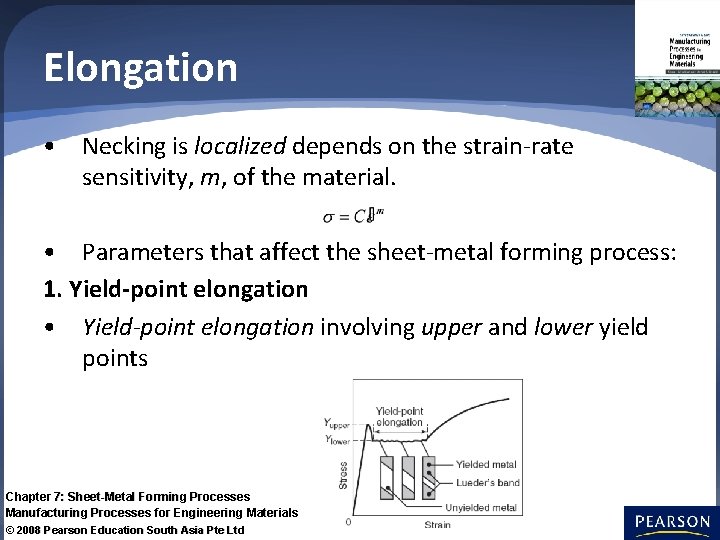
Elongation • Necking is localized depends on the strain-rate sensitivity, m, of the material. • Parameters that affect the sheet-metal forming process: 1. Yield-point elongation • Yield-point elongation involving upper and lower yield points Chapter 7: Sheet-Metal Forming Processes Manufacturing Processes for Engineering Materials © 2008 Pearson Education South Asia Pte Ltd

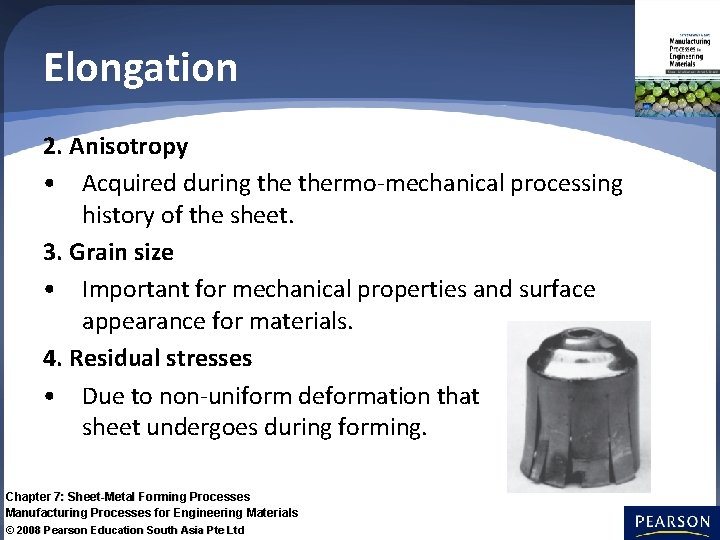
Elongation 2. Anisotropy • Acquired during thermo-mechanical processing history of the sheet. 3. Grain size • Important for mechanical properties and surface appearance for materials. 4. Residual stresses • Due to non-uniform deformation that sheet undergoes during forming. Chapter 7: Sheet-Metal Forming Processes Manufacturing Processes for Engineering Materials © 2008 Pearson Education South Asia Pte Ltd

Elongation 5. Springback • Subjected to relatively small strains during forming. 6. Wrinkling • Circumferential compressive stresses that develop in the flange. 7. Coated sheet • Zinc is used as a coating on sheet steel to protect sheet from corrosion. Chapter 7: Sheet-Metal Forming Processes Manufacturing Processes for Engineering Materials © 2008 Pearson Education South Asia Pte Ltd

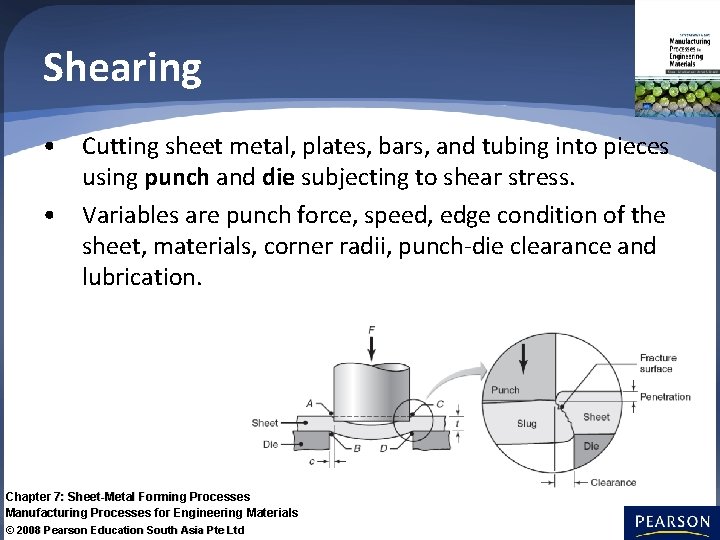
Shearing • Cutting sheet metal, plates, bars, and tubing into pieces using punch and die subjecting to shear stress. • Variables are punch force, speed, edge condition of the sheet, materials, corner radii, punch-die clearance and lubrication. Chapter 7: Sheet-Metal Forming Processes Manufacturing Processes for Engineering Materials © 2008 Pearson Education South Asia Pte Ltd

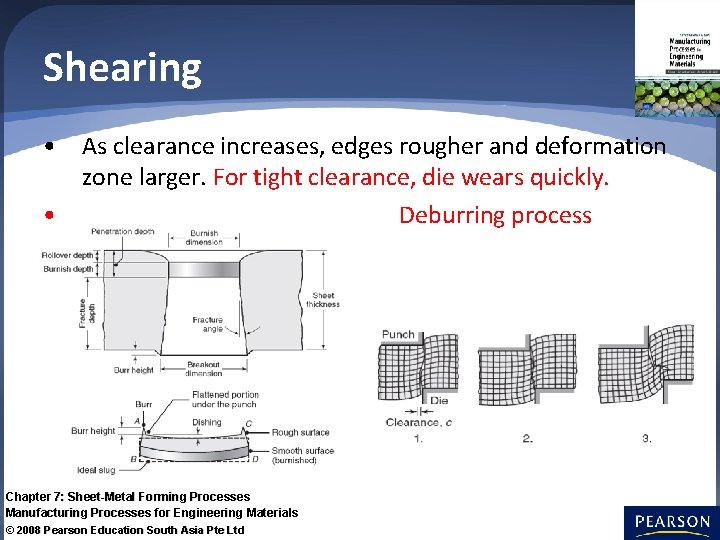
Shearing • As clearance increases, edges rougher and deformation zone larger. For tight clearance, die wears quickly. • Deburring process Chapter 7: Sheet-Metal Forming Processes Manufacturing Processes for Engineering Materials © 2008 Pearson Education South Asia Pte Ltd

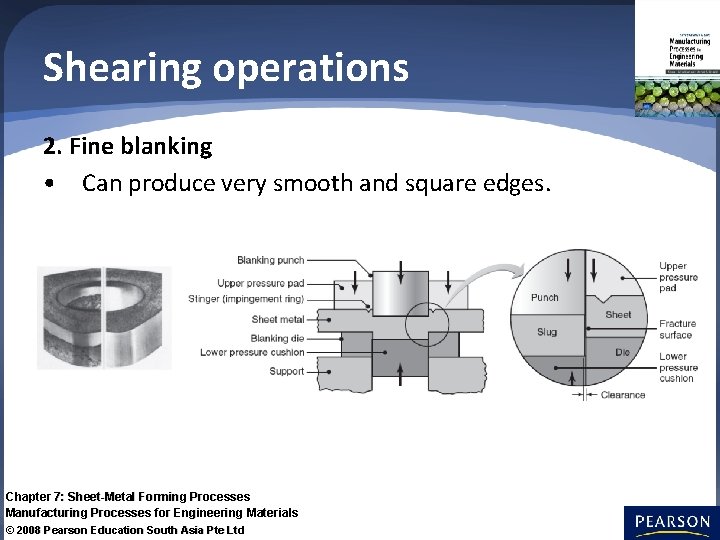
Shearing operations 2. Fine blanking • Can produce very smooth and square edges. Chapter 7: Sheet-Metal Forming Processes Manufacturing Processes for Engineering Materials © 2008 Pearson Education South Asia Pte Ltd

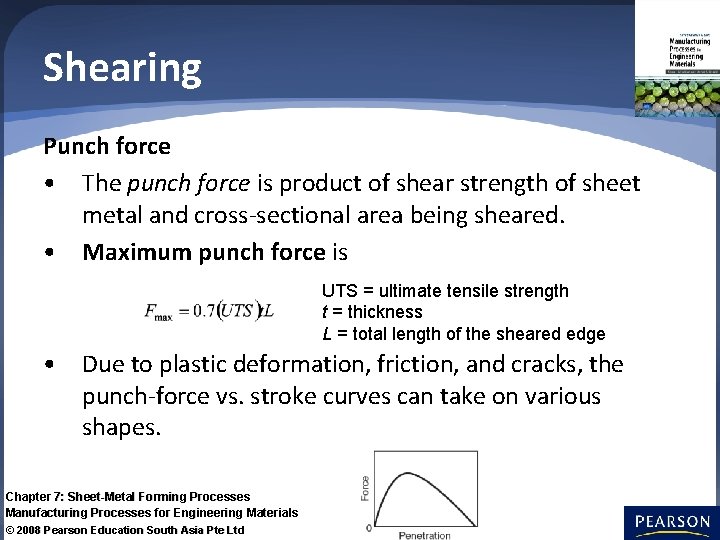
Shearing Punch force • The punch force is product of shear strength of sheet metal and cross-sectional area being sheared. • Maximum punch force is UTS = ultimate tensile strength t = thickness L = total length of the sheared edge • Due to plastic deformation, friction, and cracks, the punch-force vs. stroke curves can take on various shapes. Chapter 7: Sheet-Metal Forming Processes Manufacturing Processes for Engineering Materials © 2008 Pearson Education South Asia Pte Ltd

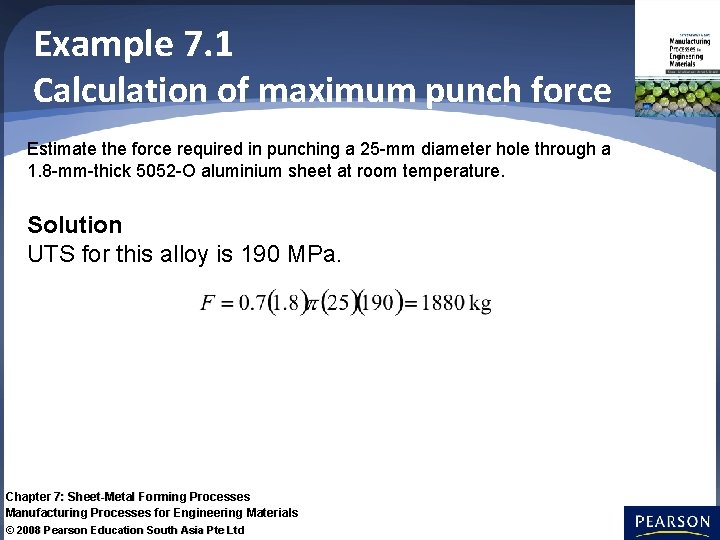
Example 7. 1 Calculation of maximum punch force Estimate the force required in punching a 25 -mm diameter hole through a 1. 8 -mm-thick 5052 -O aluminium sheet at room temperature. Solution UTS for this alloy is 190 MPa. Chapter 7: Sheet-Metal Forming Processes Manufacturing Processes for Engineering Materials © 2008 Pearson Education South Asia Pte Ltd

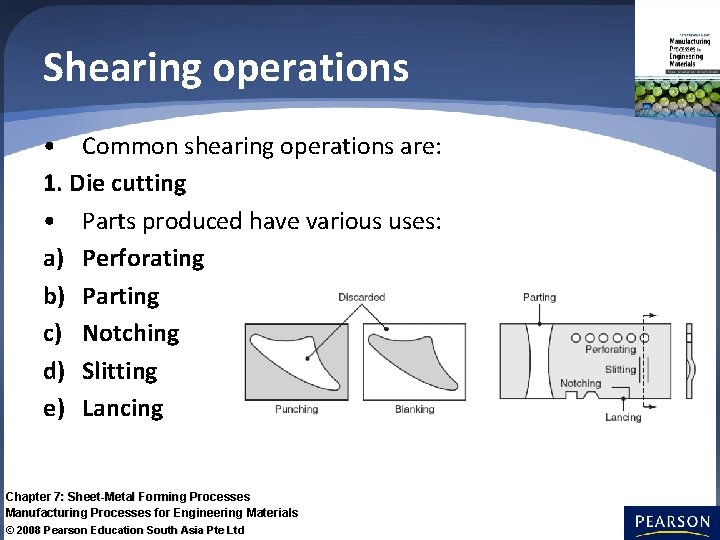
Shearing operations • Common shearing operations are: 1. Die cutting • Parts produced have various uses: a) Perforating b) Parting c) Notching d) Slitting e) Lancing Chapter 7: Sheet-Metal Forming Processes Manufacturing Processes for Engineering Materials © 2008 Pearson Education South Asia Pte Ltd

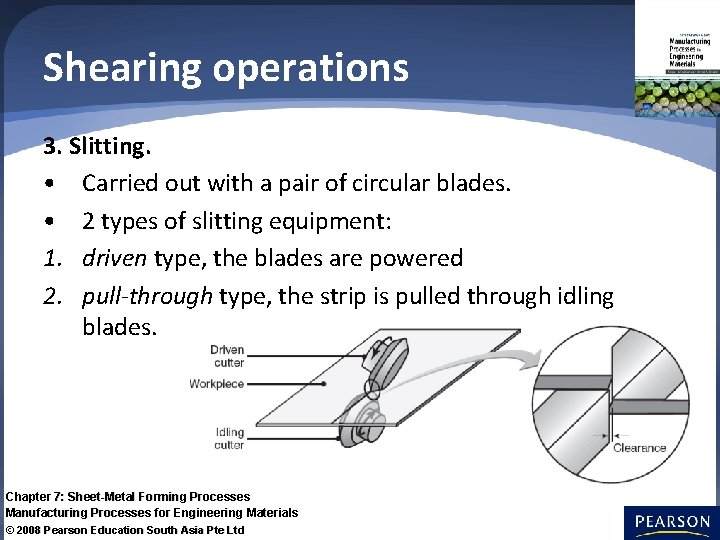
Shearing operations 3. Slitting. • Carried out with a pair of circular blades. • 2 types of slitting equipment: 1. driven type, the blades are powered 2. pull-through type, the strip is pulled through idling blades. Chapter 7: Sheet-Metal Forming Processes Manufacturing Processes for Engineering Materials © 2008 Pearson Education South Asia Pte Ltd

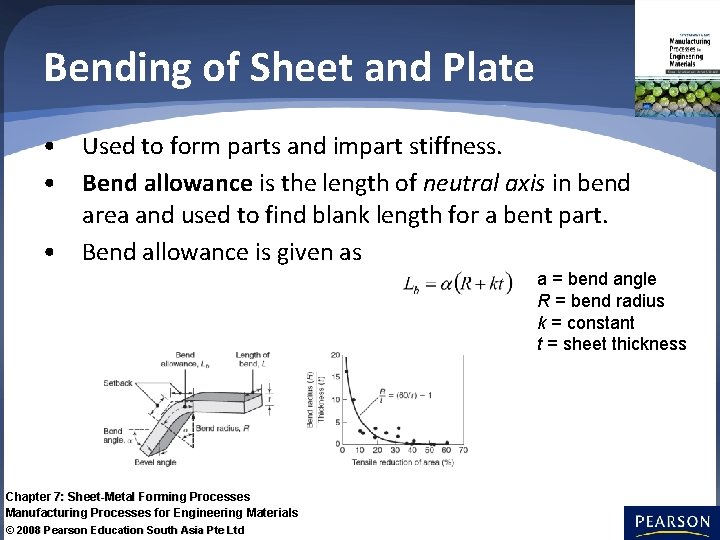
Bending of Sheet and Plate • Used to form parts and impart stiffness. • Bend allowance is the length of neutral axis in bend area and used to find blank length for a bent part. • Bend allowance is given as a = bend angle R = bend radius k = constant t = sheet thickness Chapter 7: Sheet-Metal Forming Processes Manufacturing Processes for Engineering Materials © 2008 Pearson Education South Asia Pte Ltd

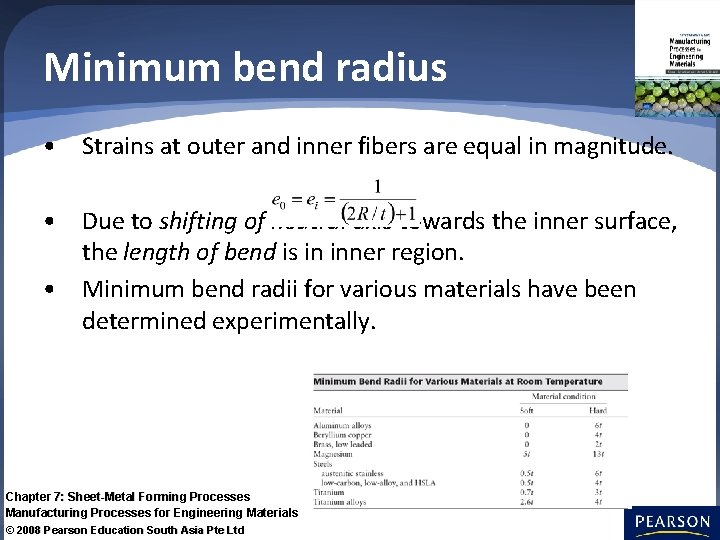
Minimum bend radius • Strains at outer and inner fibers are equal in magnitude. • Due to shifting of neutral axis towards the inner surface, the length of bend is in inner region. • Minimum bend radii for various materials have been determined experimentally. Chapter 7: Sheet-Metal Forming Processes Manufacturing Processes for Engineering Materials © 2008 Pearson Education South Asia Pte Ltd

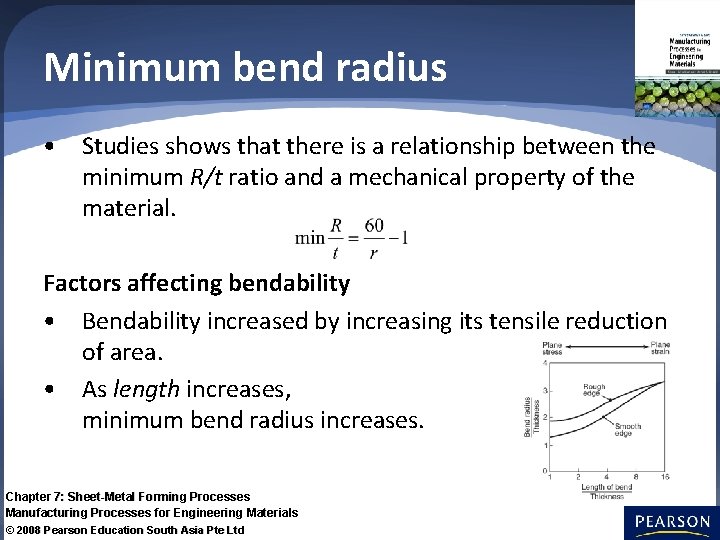
Minimum bend radius • Studies shows that there is a relationship between the minimum R/t ratio and a mechanical property of the material. Factors affecting bendability • Bendability increased by increasing its tensile reduction of area. • As length increases, minimum bend radius increases. Chapter 7: Sheet-Metal Forming Processes Manufacturing Processes for Engineering Materials © 2008 Pearson Education South Asia Pte Ltd

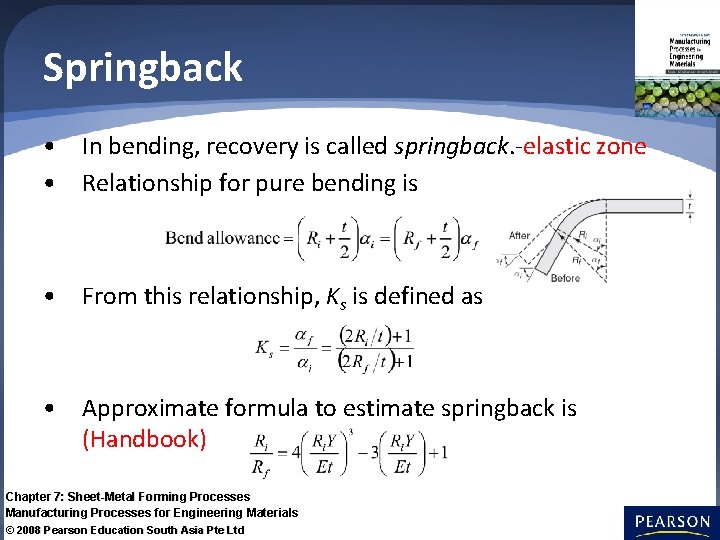
Springback • In bending, recovery is called springback. -elastic zone • Relationship for pure bending is • From this relationship, Ks is defined as • Approximate formula to estimate springback is (Handbook) Chapter 7: Sheet-Metal Forming Processes Manufacturing Processes for Engineering Materials © 2008 Pearson Education South Asia Pte Ltd

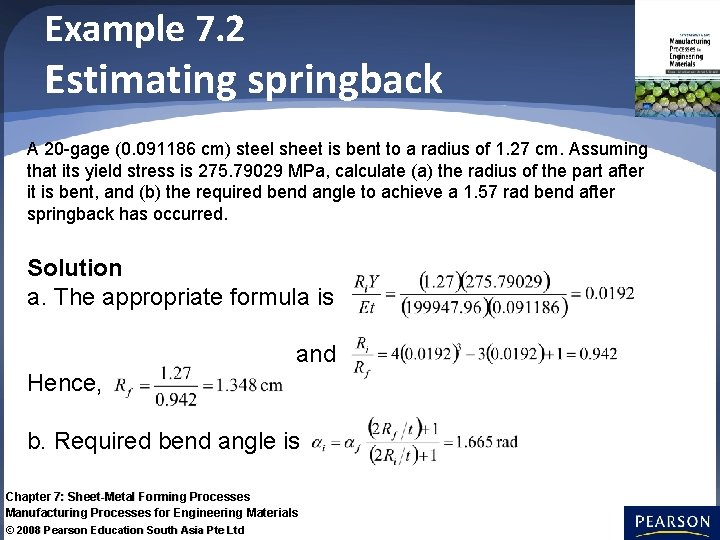
Example 7. 2 Estimating springback A 20 -gage (0. 091186 cm) steel sheet is bent to a radius of 1. 27 cm. Assuming that its yield stress is 275. 79029 MPa, calculate (a) the radius of the part after it is bent, and (b) the required bend angle to achieve a 1. 57 rad bend after springback has occurred. Solution a. The appropriate formula is and Hence, b. Required bend angle is Chapter 7: Sheet-Metal Forming Processes Manufacturing Processes for Engineering Materials © 2008 Pearson Education South Asia Pte Ltd

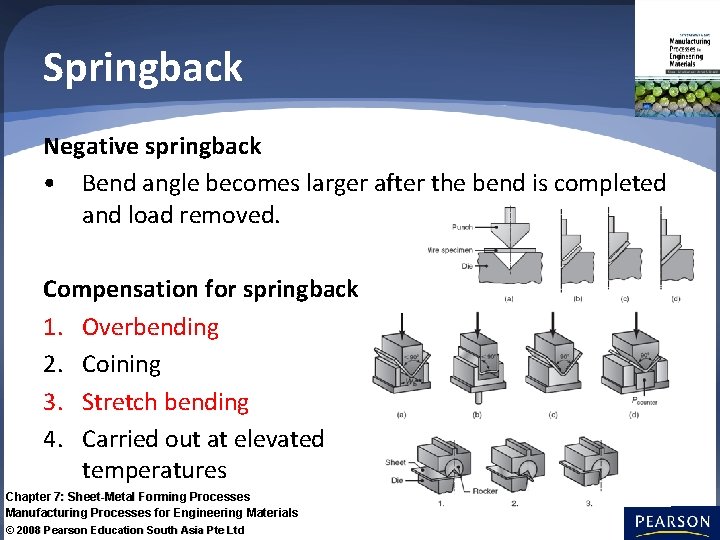
Springback Negative springback • Bend angle becomes larger after the bend is completed and load removed. Compensation for springback 1. Overbending 2. Coining 3. Stretch bending 4. Carried out at elevated temperatures Chapter 7: Sheet-Metal Forming Processes Manufacturing Processes for Engineering Materials © 2008 Pearson Education South Asia Pte Ltd

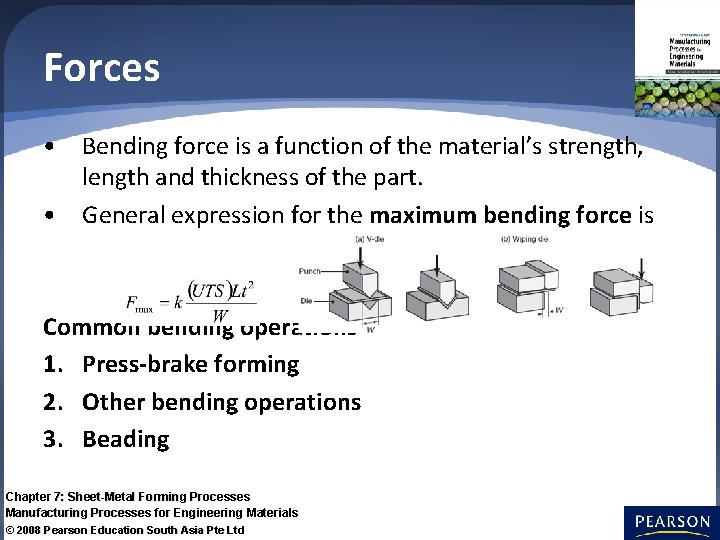
Forces • Bending force is a function of the material’s strength, length and thickness of the part. • General expression for the maximum bending force is Common bending operations 1. Press-brake forming 2. Other bending operations 3. Beading Chapter 7: Sheet-Metal Forming Processes Manufacturing Processes for Engineering Materials © 2008 Pearson Education South Asia Pte Ltd

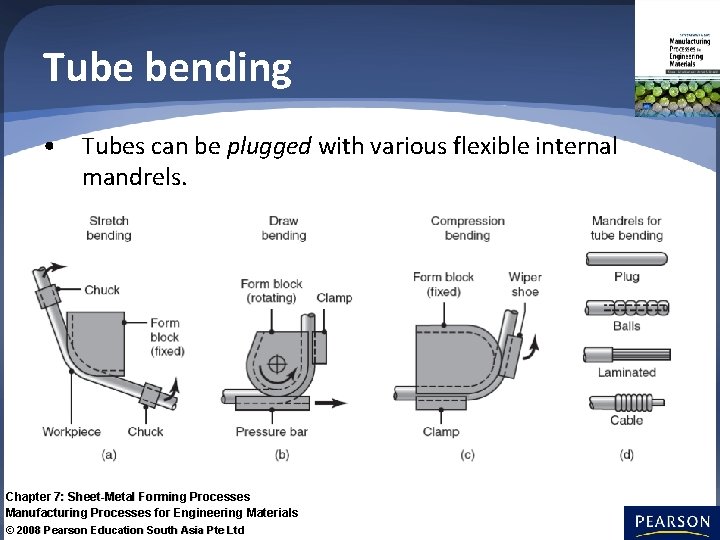
Tube bending • Tubes can be plugged with various flexible internal mandrels. Chapter 7: Sheet-Metal Forming Processes Manufacturing Processes for Engineering Materials © 2008 Pearson Education South Asia Pte Ltd

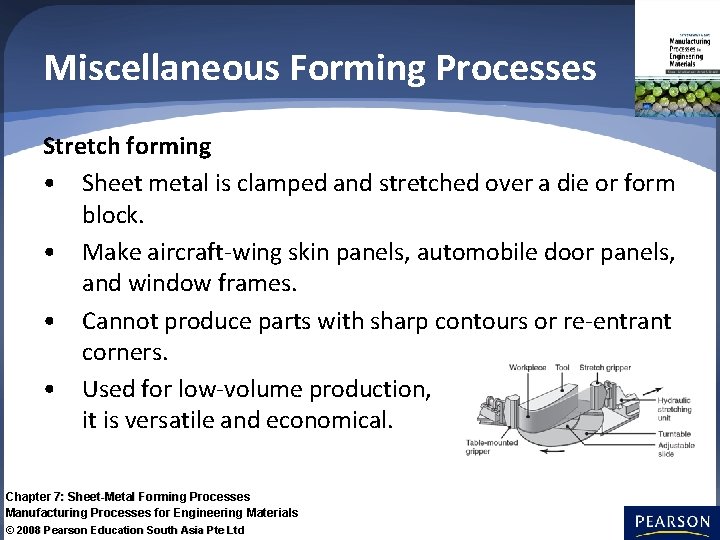
Miscellaneous Forming Processes Stretch forming • Sheet metal is clamped and stretched over a die or form block. • Make aircraft-wing skin panels, automobile door panels, and window frames. • Cannot produce parts with sharp contours or re-entrant corners. • Used for low-volume production, it is versatile and economical. Chapter 7: Sheet-Metal Forming Processes Manufacturing Processes for Engineering Materials © 2008 Pearson Education South Asia Pte Ltd

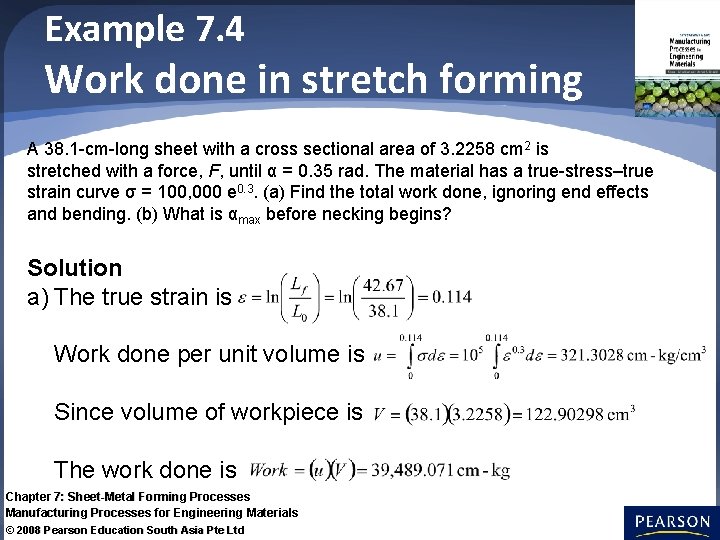
Example 7. 4 Work done in stretch forming A 38. 1 -cm-long sheet with a cross sectional area of 3. 2258 cm 2 is stretched with a force, F, until α = 0. 35 rad. The material has a true-stress–true strain curve σ = 100, 000 e 0. 3. (a) Find the total work done, ignoring end effects and bending. (b) What is αmax before necking begins? Solution a) The true strain is Work done per unit volume is Since volume of workpiece is The work done is Chapter 7: Sheet-Metal Forming Processes Manufacturing Processes for Engineering Materials © 2008 Pearson Education South Asia Pte Ltd

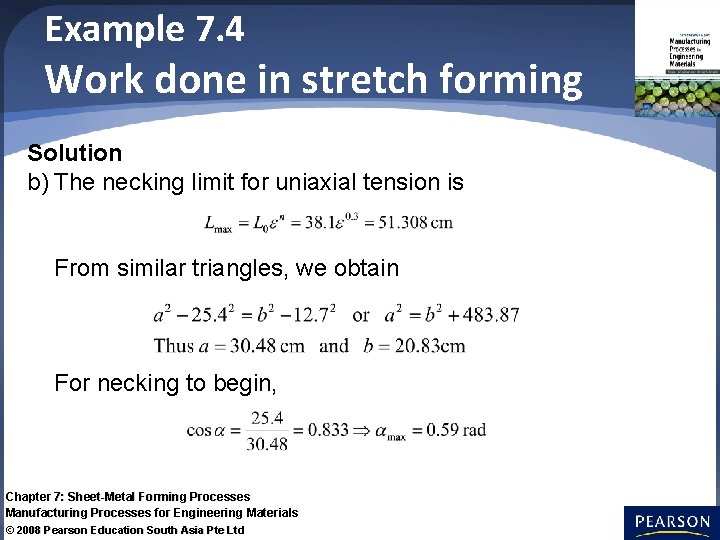
Example 7. 4 Work done in stretch forming Solution b) The necking limit for uniaxial tension is From similar triangles, we obtain For necking to begin, Chapter 7: Sheet-Metal Forming Processes Manufacturing Processes for Engineering Materials © 2008 Pearson Education South Asia Pte Ltd

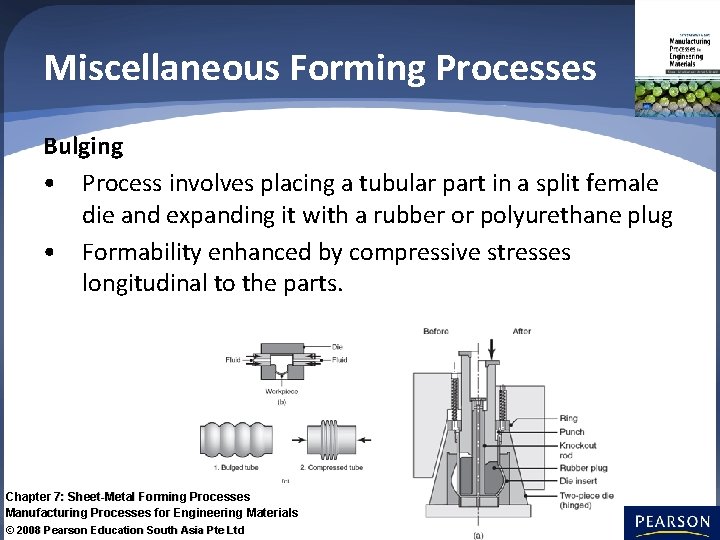
Miscellaneous Forming Processes Bulging • Process involves placing a tubular part in a split female die and expanding it with a rubber or polyurethane plug • Formability enhanced by compressive stresses longitudinal to the parts. Chapter 7: Sheet-Metal Forming Processes Manufacturing Processes for Engineering Materials © 2008 Pearson Education South Asia Pte Ltd

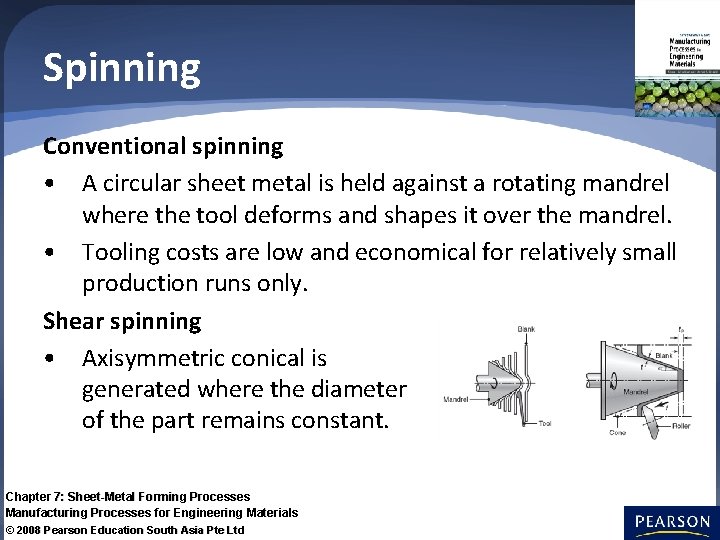
Spinning Conventional spinning • A circular sheet metal is held against a rotating mandrel where the tool deforms and shapes it over the mandrel. • Tooling costs are low and economical for relatively small production runs only. Shear spinning • Axisymmetric conical is generated where the diameter of the part remains constant. Chapter 7: Sheet-Metal Forming Processes Manufacturing Processes for Engineering Materials © 2008 Pearson Education South Asia Pte Ltd

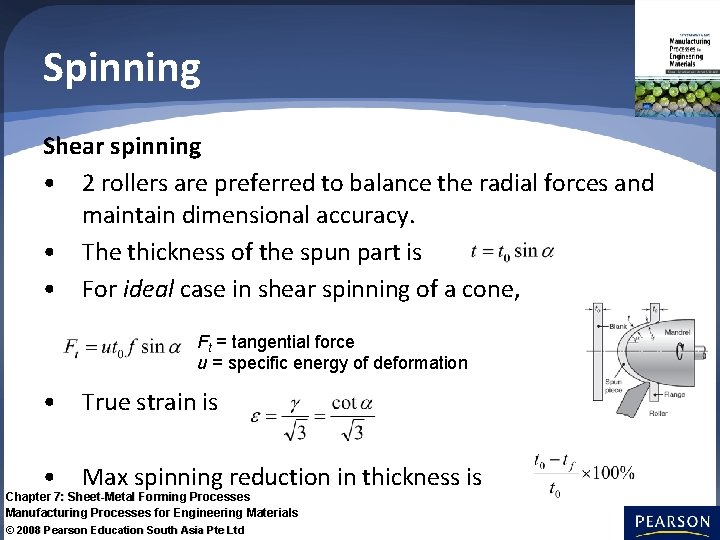
Spinning Shear spinning • 2 rollers are preferred to balance the radial forces and maintain dimensional accuracy. • The thickness of the spun part is • For ideal case in shear spinning of a cone, Ft = tangential force u = specific energy of deformation • True strain is • Max spinning reduction in thickness is Chapter 7: Sheet-Metal Forming Processes Manufacturing Processes for Engineering Materials © 2008 Pearson Education South Asia Pte Ltd

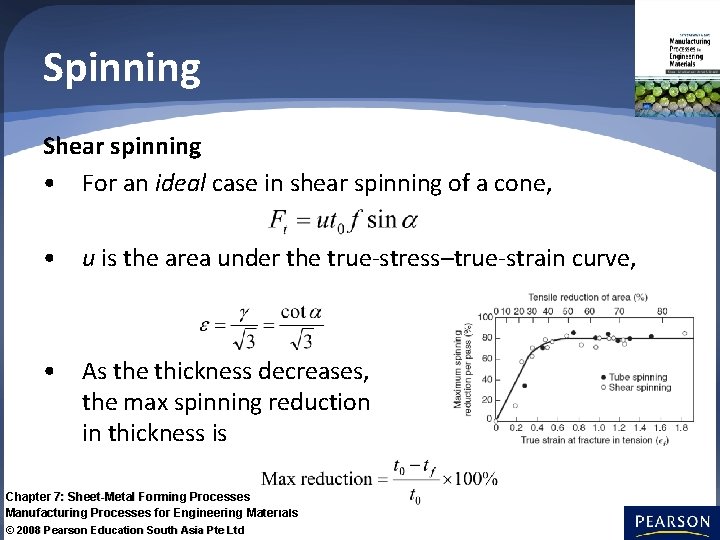
Spinning Shear spinning • For an ideal case in shear spinning of a cone, • u is the area under the true-stress–true-strain curve, • As the thickness decreases, the max spinning reduction in thickness is Chapter 7: Sheet-Metal Forming Processes Manufacturing Processes for Engineering Materials © 2008 Pearson Education South Asia Pte Ltd

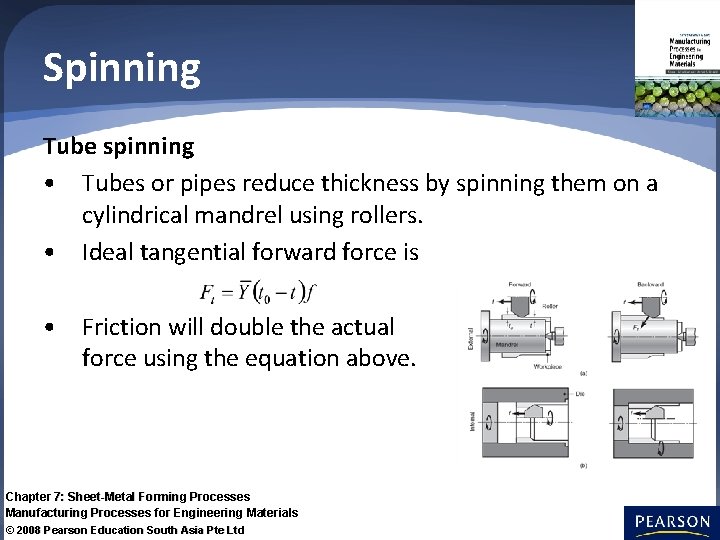
Spinning Tube spinning • Tubes or pipes reduce thickness by spinning them on a cylindrical mandrel using rollers. • Ideal tangential forward force is • Friction will double the actual force using the equation above. Chapter 7: Sheet-Metal Forming Processes Manufacturing Processes for Engineering Materials © 2008 Pearson Education South Asia Pte Ltd

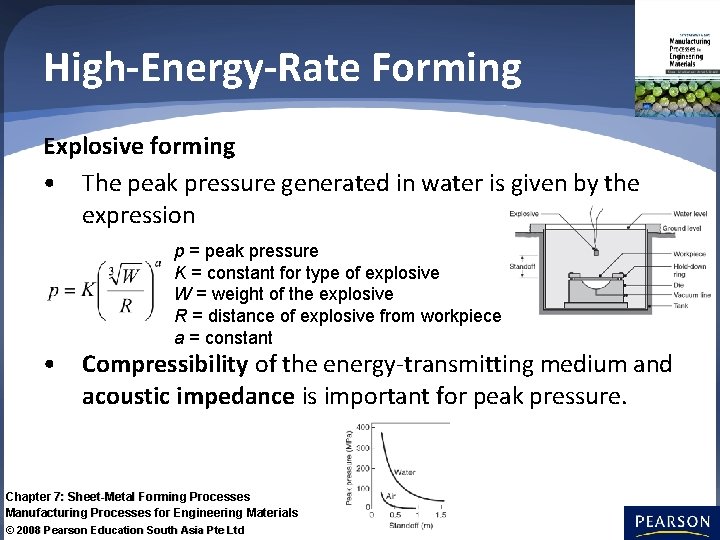
High-Energy-Rate Forming Explosive forming • The peak pressure generated in water is given by the expression p = peak pressure K = constant for type of explosive W = weight of the explosive R = distance of explosive from workpiece a = constant • Compressibility of the energy-transmitting medium and acoustic impedance is important for peak pressure. Chapter 7: Sheet-Metal Forming Processes Manufacturing Processes for Engineering Materials © 2008 Pearson Education South Asia Pte Ltd

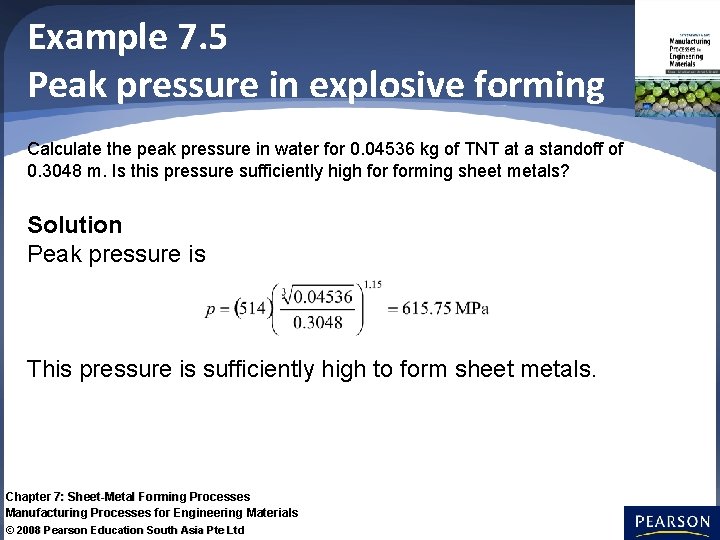
Example 7. 5 Peak pressure in explosive forming Calculate the peak pressure in water for 0. 04536 kg of TNT at a standoff of 0. 3048 m. Is this pressure sufficiently high forming sheet metals? Solution Peak pressure is This pressure is sufficiently high to form sheet metals. Chapter 7: Sheet-Metal Forming Processes Manufacturing Processes for Engineering Materials © 2008 Pearson Education South Asia Pte Ltd

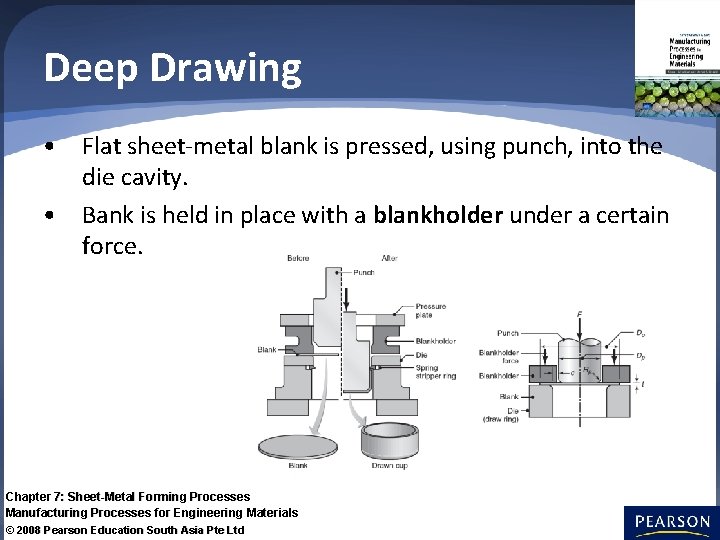
Deep Drawing • Flat sheet-metal blank is pressed, using punch, into the die cavity. • Bank is held in place with a blankholder under a certain force. Chapter 7: Sheet-Metal Forming Processes Manufacturing Processes for Engineering Materials © 2008 Pearson Education South Asia Pte Ltd

Deep Drawing Variables in deep drawing are: 1. Properties of the sheet metal. 2. Ratio of the blank diameter to the punch diameter. 3. Sheet thickness. 4. Clearance between the punch and the die. 5. Corner radii of the punch and die. 6. Blankholder force. 7. Speed of the punch. 8. Friction at the punch, die and workpiece interfaces. Chapter 7: Sheet-Metal Forming Processes Manufacturing Processes for Engineering Materials © 2008 Pearson Education South Asia Pte Ltd

Deep Drawing • During the deep-drawing, workpiece is subjected to the states of stress. • Important to know how much pure drawing and stretching is taking place. • Stresses increase with an increasing Do/Dp ratio and can eventually lead to failure. Chapter 7: Sheet-Metal Forming Processes Manufacturing Processes for Engineering Materials © 2008 Pearson Education South Asia Pte Ltd

Deep drawability (limiting drawing ratio) • LDR is defined as the max ratio of blank diameter to punch diameter that can be drawn without failure, Do/Dp. • Normal anisotropy of the sheet metal is • Based on volume constancy, it reduce to • Average R value is where the subscripts refer to angular orientation Chapter 7: Sheet-Metal Forming Processes Manufacturing Processes for Engineering Materials © 2008 Pearson Education South Asia Pte Ltd

Example 7. 7 Estimating the limiting drawing ratio Estimate the limiting drawing ratio (LDR) that you would expect from a sheet metal that, when stretched by 23% in length, decreases in thickness by 10%. Solution From volume constancy, From the information given, we obtain Hence, Thus, Chapter 7: Sheet-Metal Forming Processes Manufacturing Processes for Engineering Materials © 2008 Pearson Education South Asia Pte Ltd

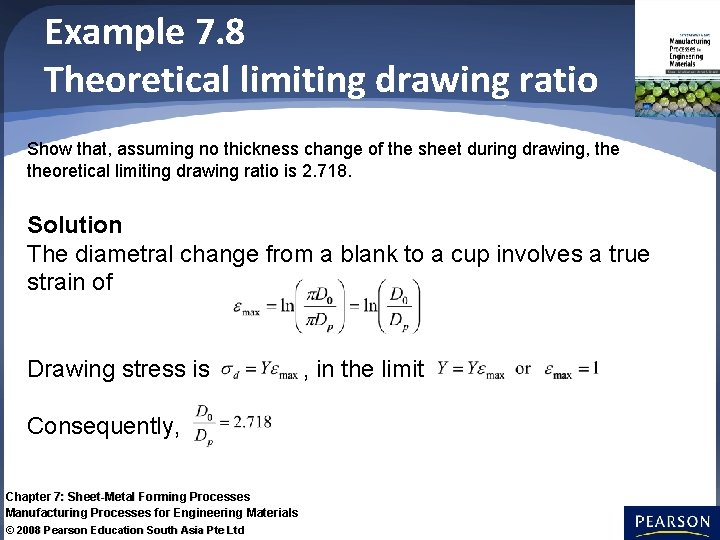
Example 7. 8 Theoretical limiting drawing ratio Show that, assuming no thickness change of the sheet during drawing, theoretical limiting drawing ratio is 2. 718. Solution The diametral change from a blank to a cup involves a true strain of Drawing stress is Consequently, Chapter 7: Sheet-Metal Forming Processes Manufacturing Processes for Engineering Materials © 2008 Pearson Education South Asia Pte Ltd , in the limit

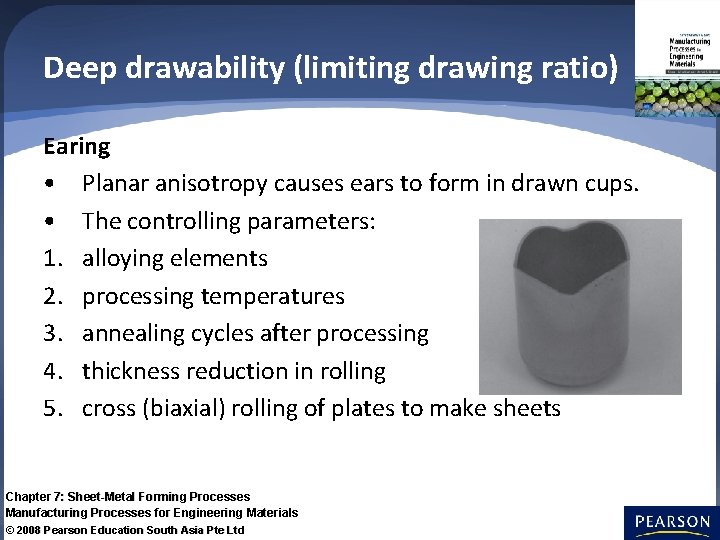
Deep drawability (limiting drawing ratio) Earing • Planar anisotropy causes ears to form in drawn cups. • The controlling parameters: 1. alloying elements 2. processing temperatures 3. annealing cycles after processing 4. thickness reduction in rolling 5. cross (biaxial) rolling of plates to make sheets Chapter 7: Sheet-Metal Forming Processes Manufacturing Processes for Engineering Materials © 2008 Pearson Education South Asia Pte Ltd

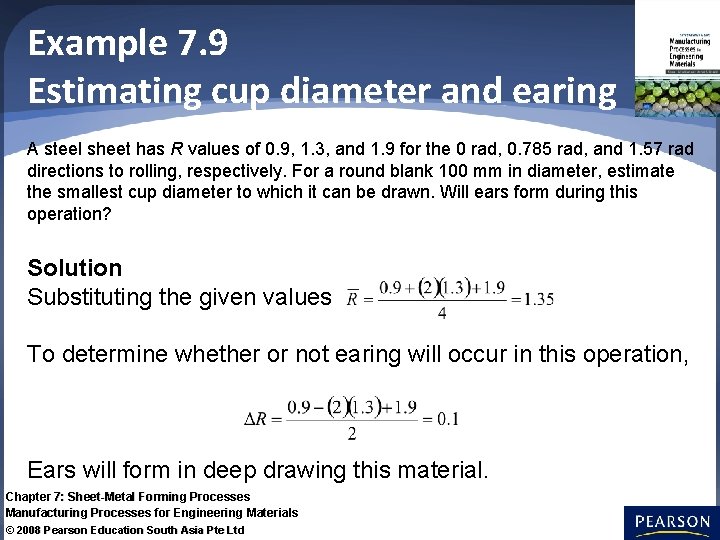
Example 7. 9 Estimating cup diameter and earing A steel sheet has R values of 0. 9, 1. 3, and 1. 9 for the 0 rad, 0. 785 rad, and 1. 57 rad directions to rolling, respectively. For a round blank 100 mm in diameter, estimate the smallest cup diameter to which it can be drawn. Will ears form during this operation? Solution Substituting the given values To determine whether or not earing will occur in this operation, Ears will form in deep drawing this material. Chapter 7: Sheet-Metal Forming Processes Manufacturing Processes for Engineering Materials © 2008 Pearson Education South Asia Pte Ltd

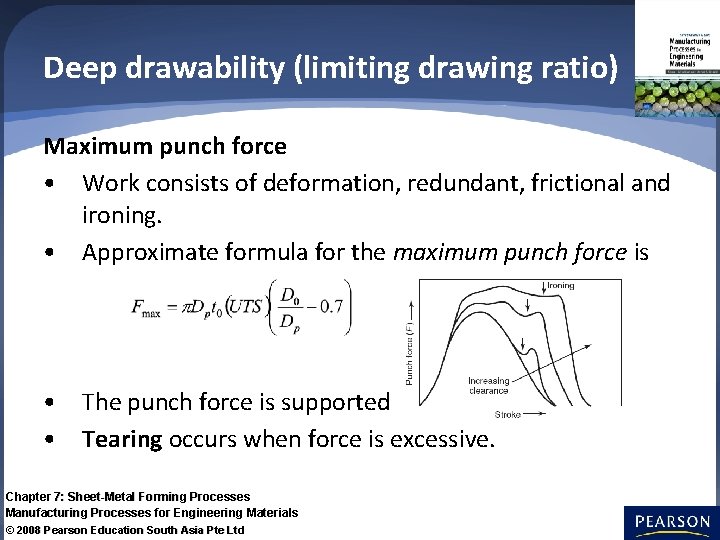
Deep drawability (limiting drawing ratio) Maximum punch force • Work consists of deformation, redundant, frictional and ironing. • Approximate formula for the maximum punch force is • The punch force is supported by the cup wall. • Tearing occurs when force is excessive. Chapter 7: Sheet-Metal Forming Processes Manufacturing Processes for Engineering Materials © 2008 Pearson Education South Asia Pte Ltd

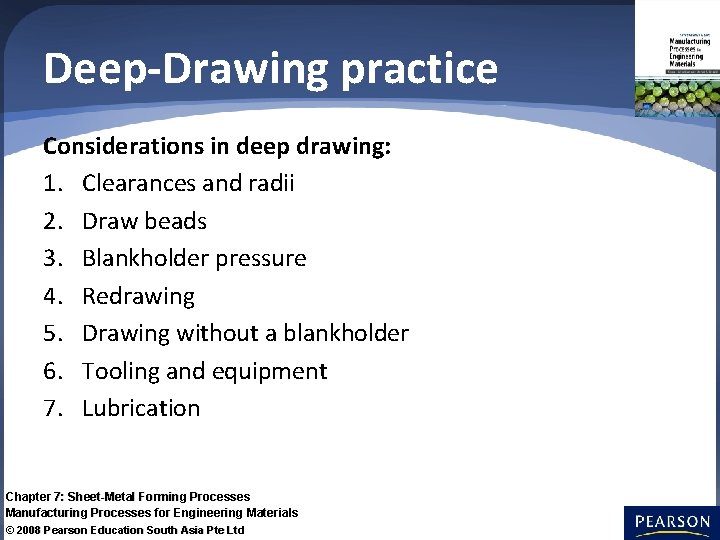
Deep-Drawing practice Considerations in deep drawing: 1. Clearances and radii 2. Draw beads 3. Blankholder pressure 4. Redrawing 5. Drawing without a blankholder 6. Tooling and equipment 7. Lubrication Chapter 7: Sheet-Metal Forming Processes Manufacturing Processes for Engineering Materials © 2008 Pearson Education South Asia Pte Ltd

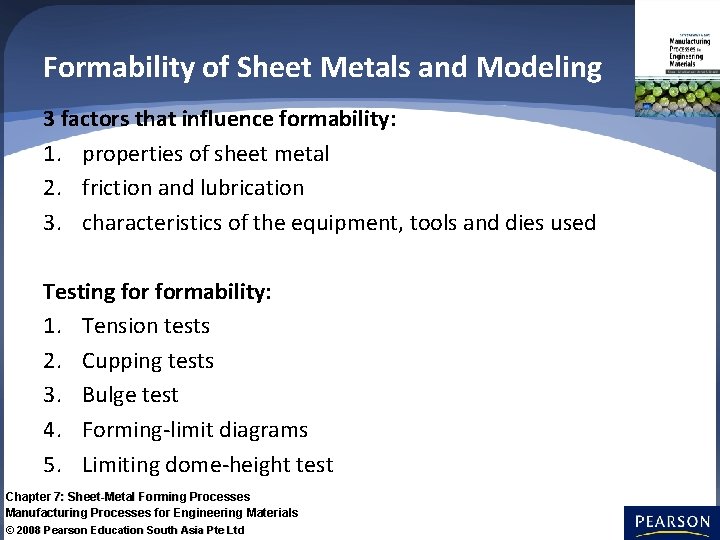
Formability of Sheet Metals and Modeling 3 factors that influence formability: 1. properties of sheet metal 2. friction and lubrication 3. characteristics of the equipment, tools and dies used Testing formability: 1. Tension tests 2. Cupping tests 3. Bulge test 4. Forming-limit diagrams 5. Limiting dome-height test Chapter 7: Sheet-Metal Forming Processes Manufacturing Processes for Engineering Materials © 2008 Pearson Education South Asia Pte Ltd

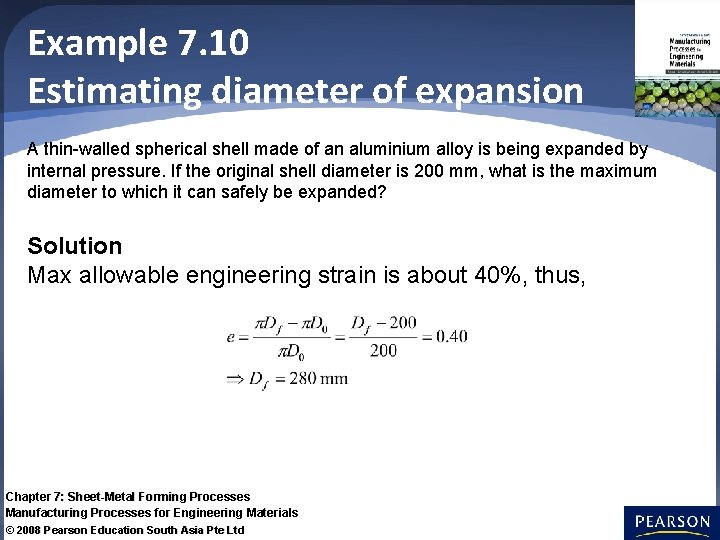
Example 7. 10 Estimating diameter of expansion A thin-walled spherical shell made of an aluminium alloy is being expanded by internal pressure. If the original shell diameter is 200 mm, what is the maximum diameter to which it can safely be expanded? Solution Max allowable engineering strain is about 40%, thus, Chapter 7: Sheet-Metal Forming Processes Manufacturing Processes for Engineering Materials © 2008 Pearson Education South Asia Pte Ltd

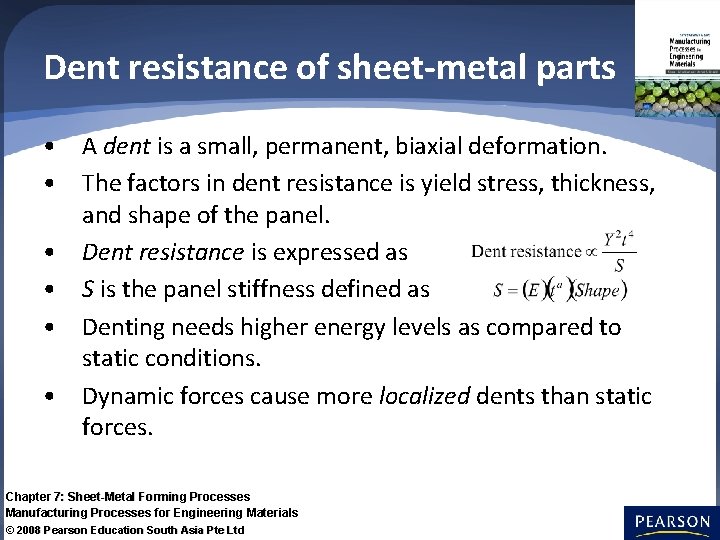
Dent resistance of sheet-metal parts • A dent is a small, permanent, biaxial deformation. • The factors in dent resistance is yield stress, thickness, and shape of the panel. • Dent resistance is expressed as • S is the panel stiffness defined as • Denting needs higher energy levels as compared to static conditions. • Dynamic forces cause more localized dents than static forces. Chapter 7: Sheet-Metal Forming Processes Manufacturing Processes for Engineering Materials © 2008 Pearson Education South Asia Pte Ltd

Equipment for Sheet-Metal Forming • Operations consists of mechanical, hydraulic, pneumatic, or pneumatic-hydraulic presses. Press selection includes the considerations of: 1. types of forming operation, 2. size and shape of the parts 3. length of stroke of the slides 4. number of strokes per minute 5. press speed 6. shut height Chapter 7: Sheet-Metal Forming Processes Manufacturing Processes for Engineering Materials © 2008 Pearson Education South Asia Pte Ltd

Design Considerations • Guidelines for design issues of sheet-metal forming operations: 1. 2. 3. 4. Blank design Bending Stamping and progressive-die operations Deep drawing Chapter 7: Sheet-Metal Forming Processes Manufacturing Processes for Engineering Materials © 2008 Pearson Education South Asia Pte Ltd