LCLS Undulator Fiducialization 1 LCLS Undulator Fiducialization Yurii
- Slides: 23

LCLS Undulator Fiducialization 1 LCLS Undulator Fiducialization Yurii Levashov October 20, 2005 ylevash@slac. stanford. edu *Work supported in part by DOE Contract DE-AC 02 -76 SF 00515

Outline Ø Ø Ø Ø Fiducialization Procedure Capacitor sensors Cam movers Pointed Magnets Test Results Fiducialization Errors Summary 2 LCLS Undulator Fiducialization Yurii Levashov October 20, 2005 ylevash@slac. stanford. edu *Work supported in part by DOE Contract DE-AC 02 -76 SF 00515

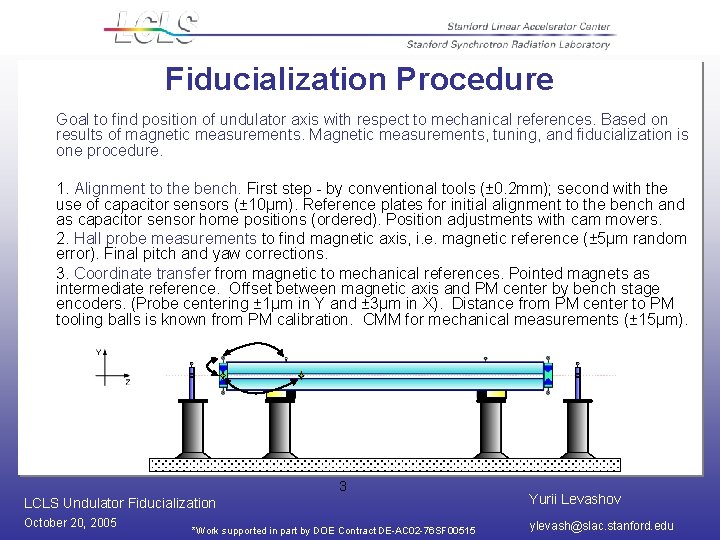
Fiducialization Procedure Goal to find position of undulator axis with respect to mechanical references. Based on results of magnetic measurements. Magnetic measurements, tuning, and fiducialization is one procedure. 1. Alignment to the bench. First step - by conventional tools (± 0. 2 mm); second with the use of capacitor sensors (± 10µm). Reference plates for initial alignment to the bench and as capacitor sensor home positions (ordered). Position adjustments with cam movers. 2. Hall probe measurements to find magnetic axis, i. e. magnetic reference (± 5µm random error). Final pitch and yaw corrections. 3. Coordinate transfer from magnetic to mechanical references. Pointed magnets as intermediate reference. Offset between magnetic axis and PM center by bench stage encoders. (Probe centering ± 1µm in Y and ± 3µm in X). Distance from PM center to PM tooling balls is known from PM calibration. CMM for mechanical measurements (± 15µm). 3 LCLS Undulator Fiducialization Yurii Levashov October 20, 2005 ylevash@slac. stanford. edu *Work supported in part by DOE Contract DE-AC 02 -76 SF 00515

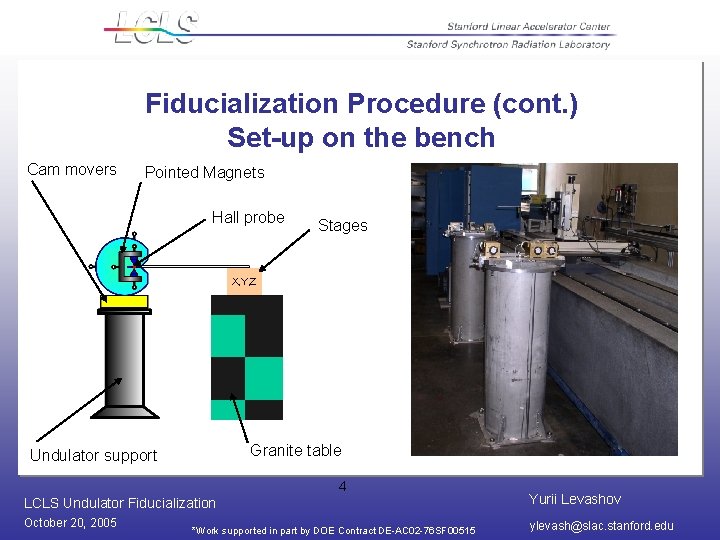
Fiducialization Procedure (cont. ) Set-up on the bench Cam movers Pointed Magnets Hall probe Stages X, Y, Z Granite table Undulator support 4 LCLS Undulator Fiducialization Yurii Levashov October 20, 2005 ylevash@slac. stanford. edu *Work supported in part by DOE Contract DE-AC 02 -76 SF 00515

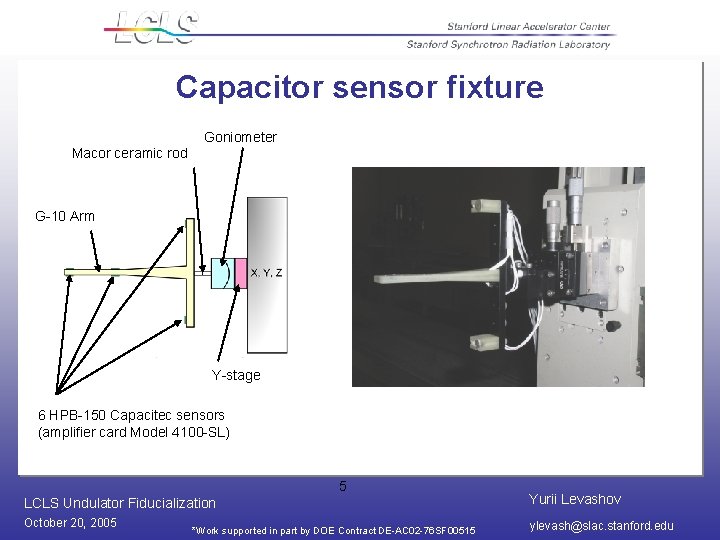
Capacitor sensor fixture Goniometer Macor ceramic rod G-10 Arm Y-stage 6 HPB-150 Capacitec sensors (amplifier card Model 4100 -SL) 5 LCLS Undulator Fiducialization Yurii Levashov October 20, 2005 ylevash@slac. stanford. edu *Work supported in part by DOE Contract DE-AC 02 -76 SF 00515

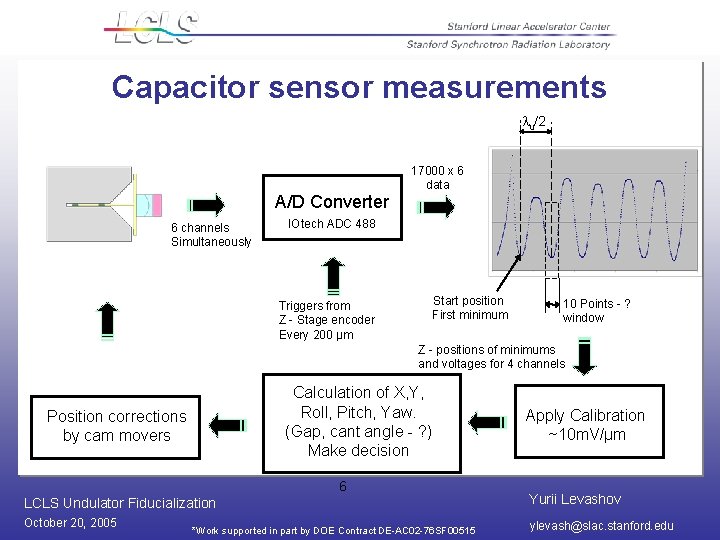
Capacitor sensor measurements u/2 A/D Converter 6 channels Simultaneously 17000 x 6 data IOtech ADC 488 Start position First minimum Triggers from Z - Stage encoder Every 200 µm 10 Points - ? window Z - positions of minimums and voltages for 4 channels Calculation of X, Y, Roll, Pitch, Yaw. (Gap, cant angle - ? ) Make decision Position corrections by cam movers 6 Apply Calibration ~10 m. V/µm LCLS Undulator Fiducialization Yurii Levashov October 20, 2005 ylevash@slac. stanford. edu *Work supported in part by DOE Contract DE-AC 02 -76 SF 00515

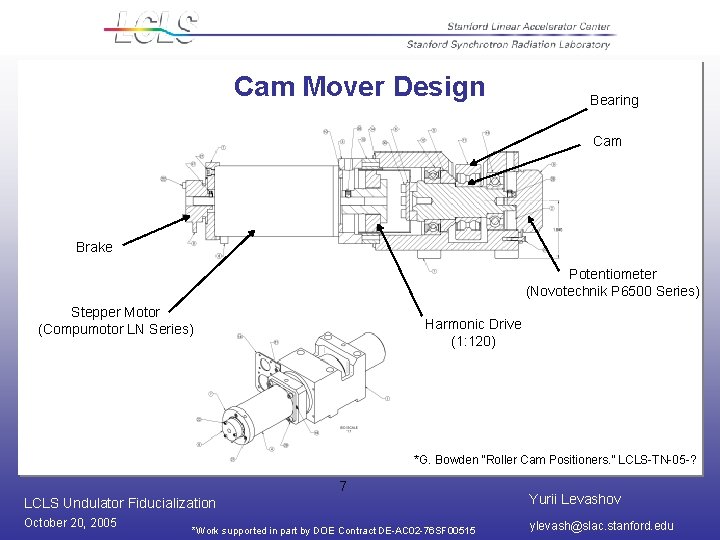
Cam Mover Design Bearing Cam Brake Potentiometer (Novotechnik P 6500 Series) Stepper Motor (Compumotor LN Series) Harmonic Drive (1: 120) *G. Bowden “Roller Cam Positioners. ” LCLS-TN-05 -? 7 LCLS Undulator Fiducialization Yurii Levashov October 20, 2005 ylevash@slac. stanford. edu *Work supported in part by DOE Contract DE-AC 02 -76 SF 00515

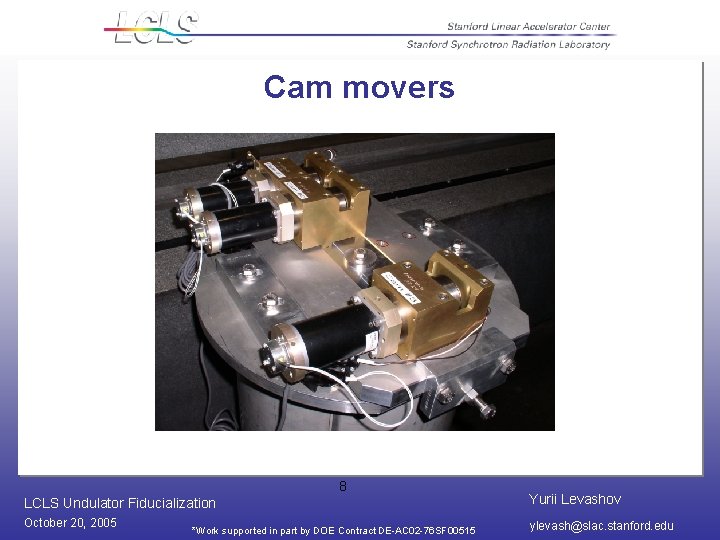
Cam movers 8 LCLS Undulator Fiducialization Yurii Levashov October 20, 2005 ylevash@slac. stanford. edu *Work supported in part by DOE Contract DE-AC 02 -76 SF 00515

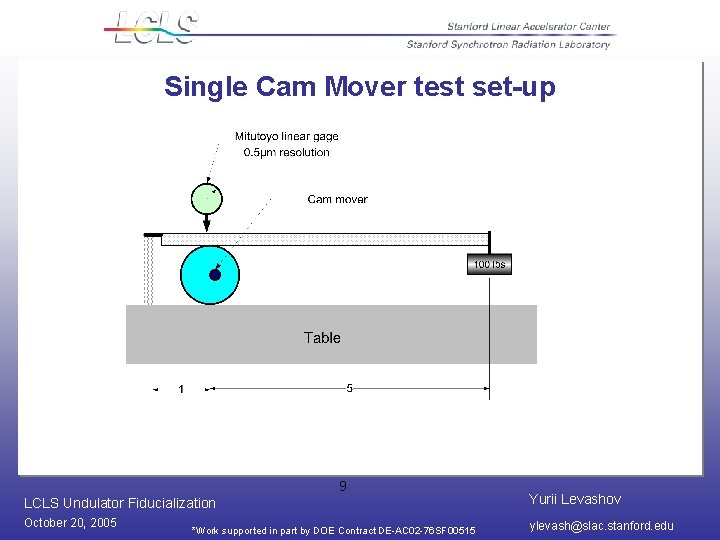
Single Cam Mover test set-up 9 LCLS Undulator Fiducialization Yurii Levashov October 20, 2005 ylevash@slac. stanford. edu *Work supported in part by DOE Contract DE-AC 02 -76 SF 00515

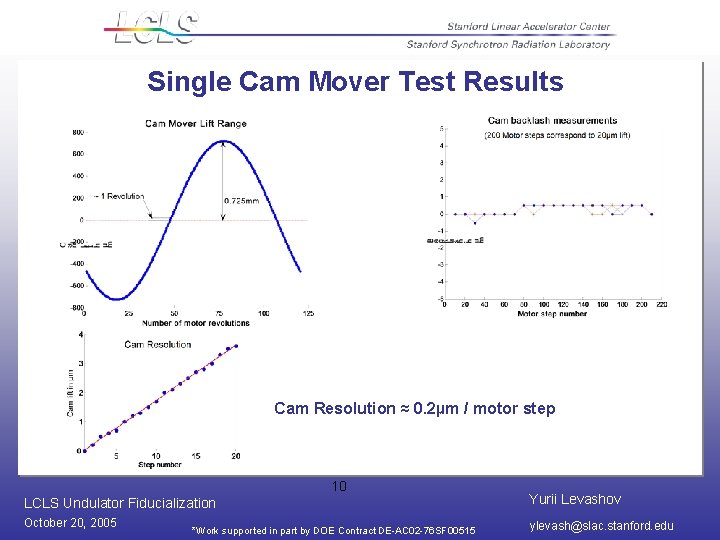
Single Cam Mover Test Results Cam Resolution ≈ 0. 2µm / motor step 10 LCLS Undulator Fiducialization Yurii Levashov October 20, 2005 ylevash@slac. stanford. edu *Work supported in part by DOE Contract DE-AC 02 -76 SF 00515

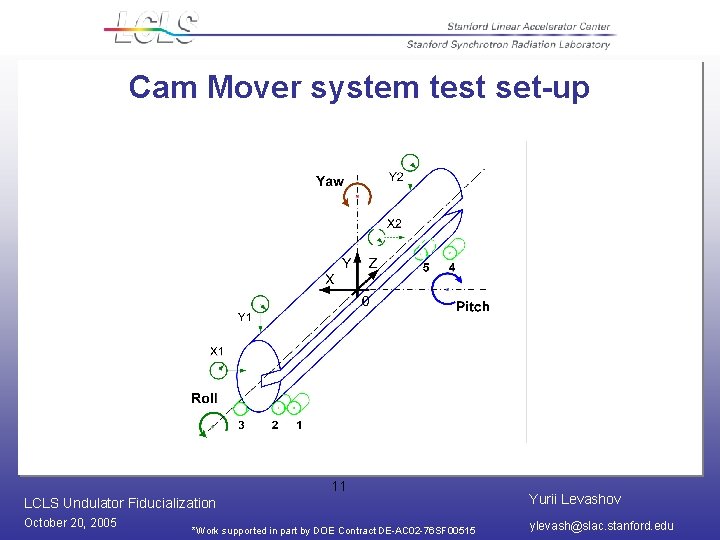
Cam Mover system test set-up 11 LCLS Undulator Fiducialization Yurii Levashov October 20, 2005 ylevash@slac. stanford. edu *Work supported in part by DOE Contract DE-AC 02 -76 SF 00515

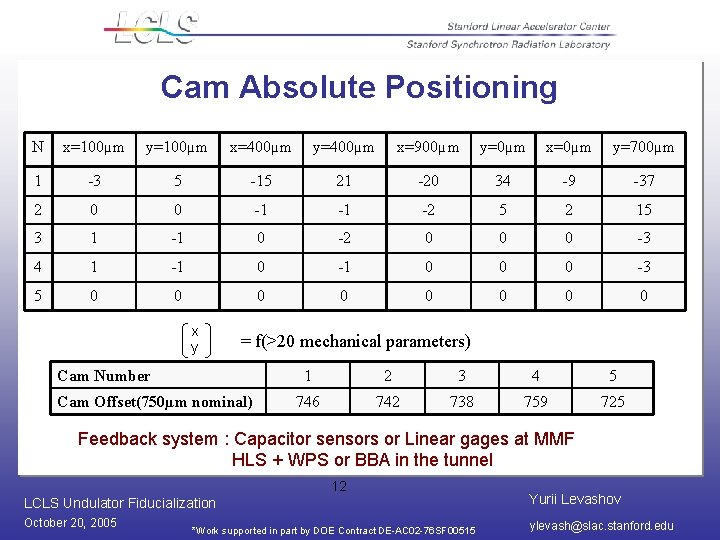
Cam Absolute Positioning N x=100µm y=100µm x=400µm y=400µm x=900µm y=0µm x=0µm y=700µm 1 -3 5 -15 21 -20 34 -9 -37 2 0 0 -1 -1 -2 5 2 15 3 1 -1 0 -2 0 0 0 -3 4 1 -1 0 0 0 -3 5 0 0 0 0 x y = f(>20 mechanical parameters) Cam Number Cam Offset(750µm nominal) 1 2 3 4 5 746 742 738 759 725 Feedback system : Capacitor sensors or Linear gages at MMF HLS + WPS or BBA in the tunnel 12 LCLS Undulator Fiducialization Yurii Levashov October 20, 2005 ylevash@slac. stanford. edu *Work supported in part by DOE Contract DE-AC 02 -76 SF 00515

Hall probe measurements Goal is to find the undulator magnetic axis Scan in X at different Z positions Scan in Y at different Z positions Find undulator center for each Z position. Have a set of points along Z direction. Make linear fit for all points along Z. Make corrections for pitch and yaw angles if necessary. The undulator is aligned to the bench. Apply shims to make trajectory straight and correct phase errors. Scan in Z at different X and Y positions. Calculate K vs. Y and K vs. X. Find where K is nominal. This is the position of the axis. Leave Hall probe in that position. Take readings from stages. Based on Hall Probe noise and our best experience the accuracy will be ± 5µm 13 LCLS Undulator Fiducialization Yurii Levashov October 20, 2005 ylevash@slac. stanford. edu *Work supported in part by DOE Contract DE-AC 02 -76 SF 00515

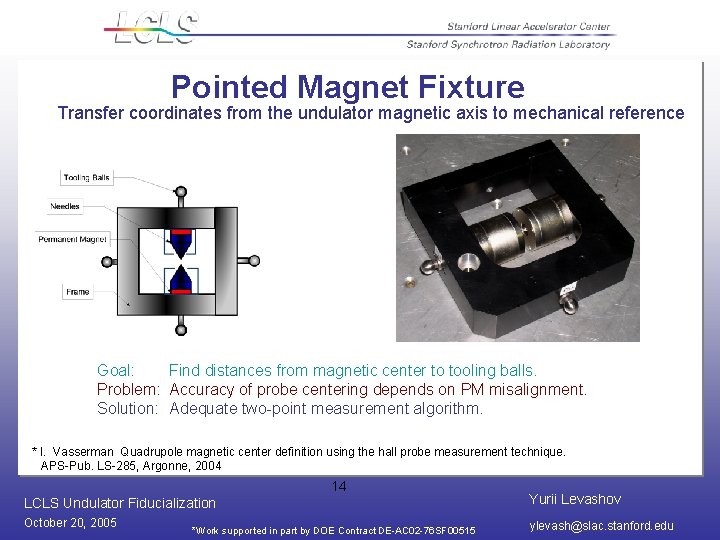
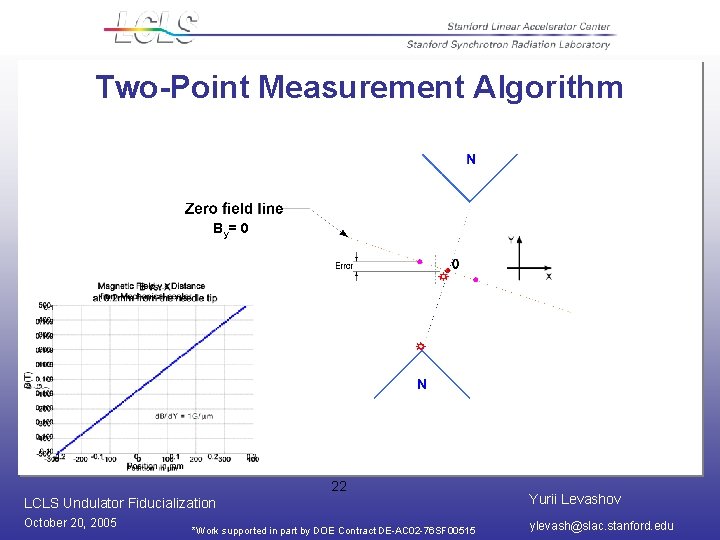
Pointed Magnet Fixture Transfer coordinates from the undulator magnetic axis to mechanical reference Goal: Find distances from magnetic center to tooling balls. Problem: Accuracy of probe centering depends on PM misalignment. Solution: Adequate two-point measurement algorithm. * I. Vasserman Quadrupole magnetic center definition using the hall probe measurement technique. APS-Pub. LS-285, Argonne, 2004 14 LCLS Undulator Fiducialization Yurii Levashov October 20, 2005 ylevash@slac. stanford. edu *Work supported in part by DOE Contract DE-AC 02 -76 SF 00515

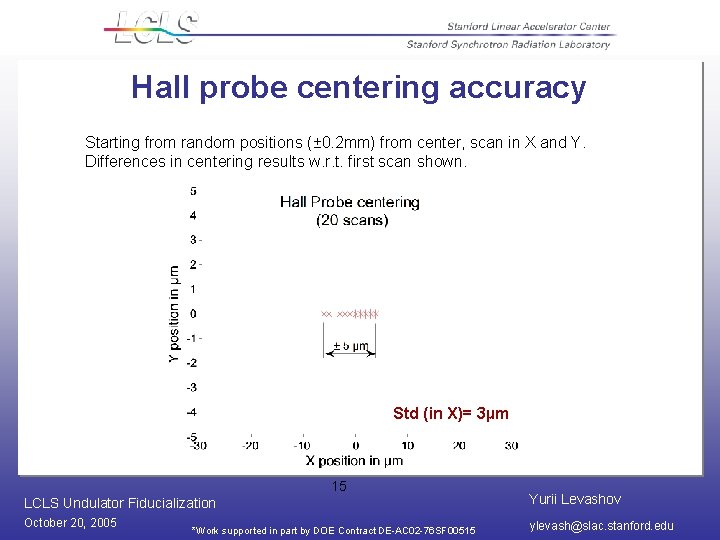
Hall probe centering accuracy Starting from random positions (± 0. 2 mm) from center, scan in X and Y. Differences in centering results w. r. t. first scan shown. Std (in X)= 3µm 15 LCLS Undulator Fiducialization Yurii Levashov October 20, 2005 ylevash@slac. stanford. edu *Work supported in part by DOE Contract DE-AC 02 -76 SF 00515

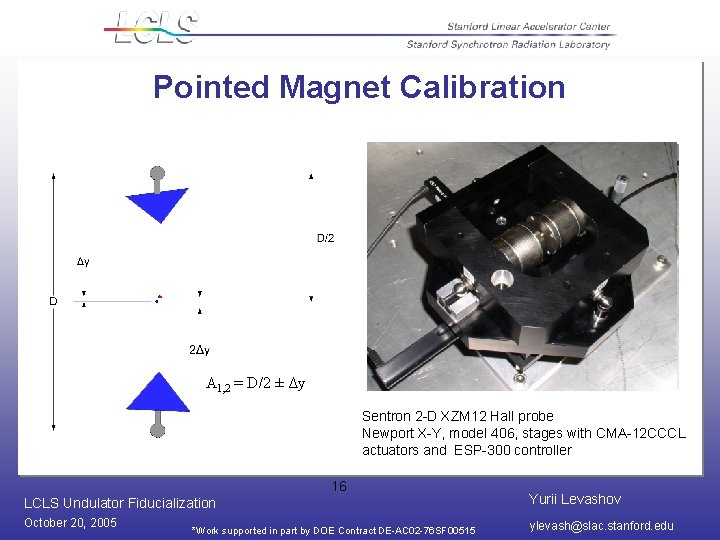
Pointed Magnet Calibration A 1, 2 = D/2 ± Δy Sentron 2 -D XZM 12 Hall probe Newport X-Y, model 406, stages with CMA-12 CCCL actuators and ESP-300 controller 16 LCLS Undulator Fiducialization Yurii Levashov October 20, 2005 ylevash@slac. stanford. edu *Work supported in part by DOE Contract DE-AC 02 -76 SF 00515

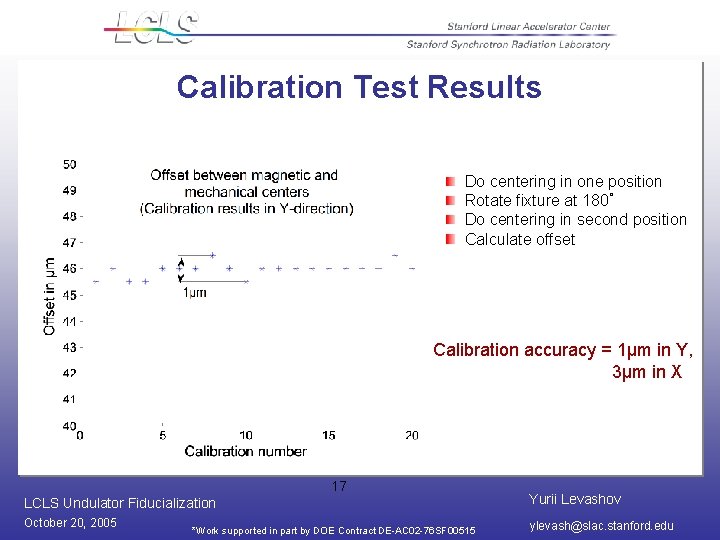
Calibration Test Results Do centering in one position Rotate fixture at 180˚ Do centering in second position Calculate offset Calibration accuracy = 1µm in Y, 3µm in X 17 LCLS Undulator Fiducialization Yurii Levashov October 20, 2005 ylevash@slac. stanford. edu *Work supported in part by DOE Contract DE-AC 02 -76 SF 00515

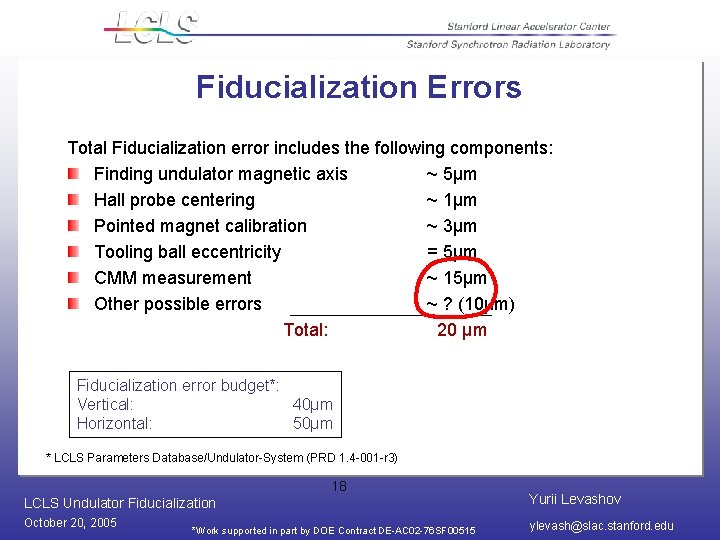
Fiducialization Errors Total Fiducialization error includes the following components: Finding undulator magnetic axis ~ 5µm Hall probe centering ~ 1µm Pointed magnet calibration ~ 3µm Tooling ball eccentricity = 5µm CMM measurement ~ 15µm Other possible errors ~ ? (10µm) Total: 20 µm Fiducialization error budget*: Vertical: 40µm Horizontal: 50µm * LCLS Parameters Database/Undulator-System (PRD 1. 4 -001 -r 3) 18 LCLS Undulator Fiducialization Yurii Levashov October 20, 2005 ylevash@slac. stanford. edu *Work supported in part by DOE Contract DE-AC 02 -76 SF 00515

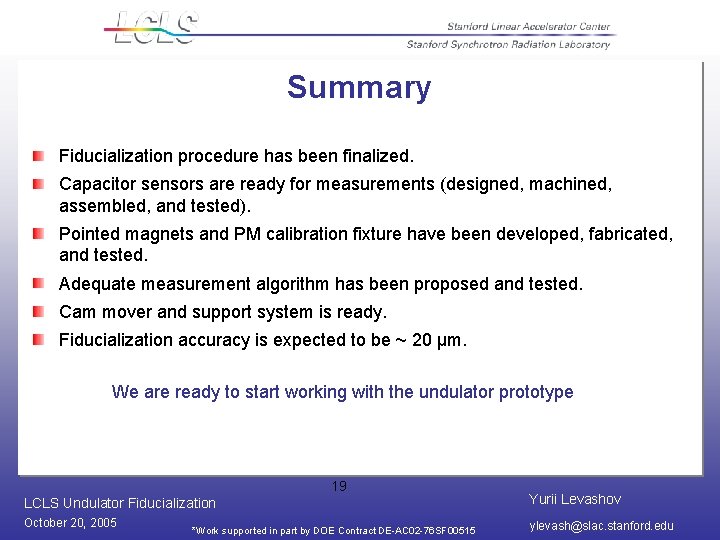
Summary Fiducialization procedure has been finalized. Capacitor sensors are ready for measurements (designed, machined, assembled, and tested). Pointed magnets and PM calibration fixture have been developed, fabricated, and tested. Adequate measurement algorithm has been proposed and tested. Cam mover and support system is ready. Fiducialization accuracy is expected to be ~ 20 µm. We are ready to start working with the undulator prototype 19 LCLS Undulator Fiducialization Yurii Levashov October 20, 2005 ylevash@slac. stanford. edu *Work supported in part by DOE Contract DE-AC 02 -76 SF 00515

End of presentation Thank you! 20 LCLS Undulator Fiducialization Yurii Levashov October 20, 2005 ylevash@slac. stanford. edu *Work supported in part by DOE Contract DE-AC 02 -76 SF 00515

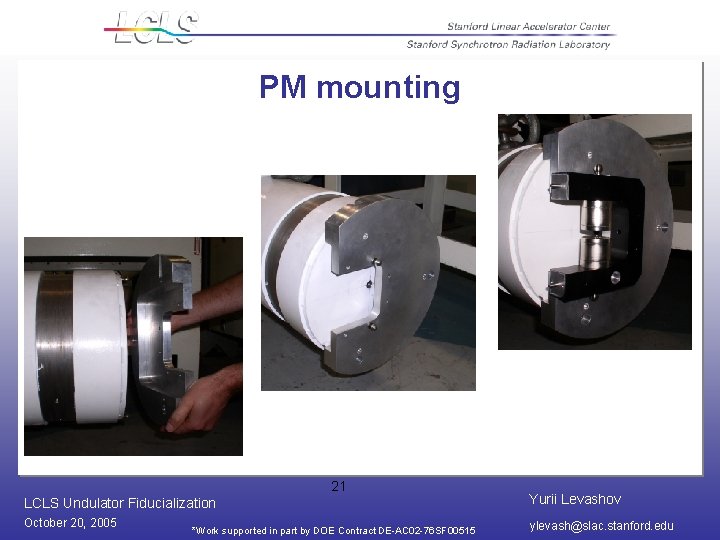
PM mounting 21 LCLS Undulator Fiducialization Yurii Levashov October 20, 2005 ylevash@slac. stanford. edu *Work supported in part by DOE Contract DE-AC 02 -76 SF 00515

Two-Point Measurement Algorithm By= 0 22 LCLS Undulator Fiducialization Yurii Levashov October 20, 2005 ylevash@slac. stanford. edu *Work supported in part by DOE Contract DE-AC 02 -76 SF 00515

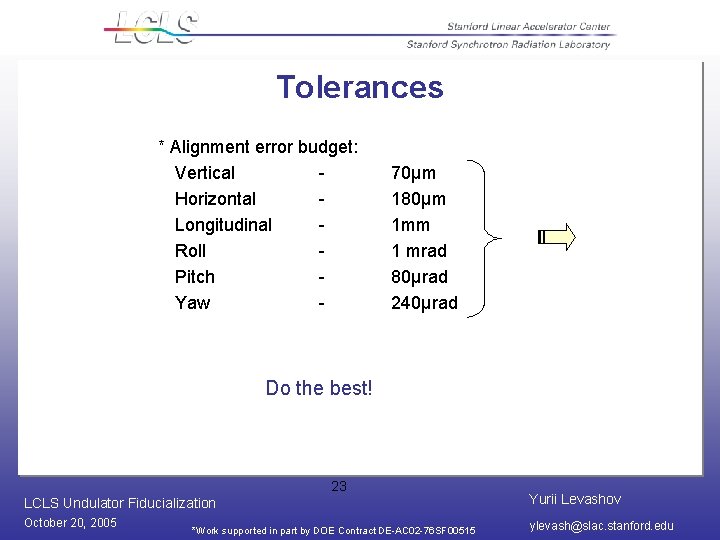
Tolerances * Alignment error budget: Vertical Horizontal Longitudinal Roll Pitch Yaw - 70µm 180µm 1 mm 1 mrad 80µrad 240µrad Do the best! 23 LCLS Undulator Fiducialization Yurii Levashov October 20, 2005 ylevash@slac. stanford. edu *Work supported in part by DOE Contract DE-AC 02 -76 SF 00515