Employee Self Service August 2010 In SITE Self


 at")

- Slides: 58
Employee Self Service August 2010
In. SITE Self Service Employee Self Service Presentation • This presentation is approximately 15 minutes in length. • This is a presentation with sound, however you do not need sound to view this presentation. • The screens will advance automatically, however you can use the enter or page down keys to advance a screen if desired.
Employee Self Service Portal Access • You can easily access your payroll and personnel information. You will access Employee Self Service through the In. SITE application. • If you are new to In. SITE please take a moment to view our Logon and Basic Navigation Presentation.
Access to In. SITE • From a City computer – Click Start, select All Programs – Select In. SITE from the list • From a non-City computer with internet access – Go to Vbgov. com • Select the employee link • Then select the In. SITE Self Service page • Next select the Login to In. SITE Self Service link – Or go to https: //SSIn. SITE. vbgov. com directly from your internet browser
How Do I Log On The rollout of Self Service to the City is in four phases. Please refer to the roll out schedule to determine when your department will go live. A few weeks prior to go-live for your department, you will receive an In. SITE Fact Sheet. The In. SITE Fact Sheet contains information about your username and password. If you do not receive one please ask your department PALS about how to login or call the Support Center at 385 HELP(4357) on or after your go-live date. Only active employees can login to Self Service. Retired or terminated employees will not have access.
Creating/Changing your Password • • • If you are asked to change your password, enter your current password. Press the Tab key or use the mouse to position to the next field and enter your new password again to confirm.
Employee Self Service Responsibility
Upon Logon, your Employee Self Service responsibility will display. Single click on that responsibility to see the list of links that are available for that responsibility.
The various links you can select will display on the right. Single click on a menu item.
My Information The My Information section is where you view information for your Employment, Salary, Performance and Absence details dating back to January 1, 2009. It also provides quick and direct access to basic HR data such as your Employee Number, Department, Manager, etc. To view your information, single click on My Information.
. Employment Information The Employment Tab is highlighted. Additional Employment details are displayed Click on the Show link to view additional employment details.
. Salary Information Click on the Salary Tab. Additional salary details are displayed. Click on the Show link to view additional salary details.
. Performance Information Additional details are Click performance on the Performance Tab. displayed. Click on the Show link to view additional performance details.
. Absence Information Click on the Absence Tab. Additional absence details are displayed. Click on the Show link to view additional absence details.
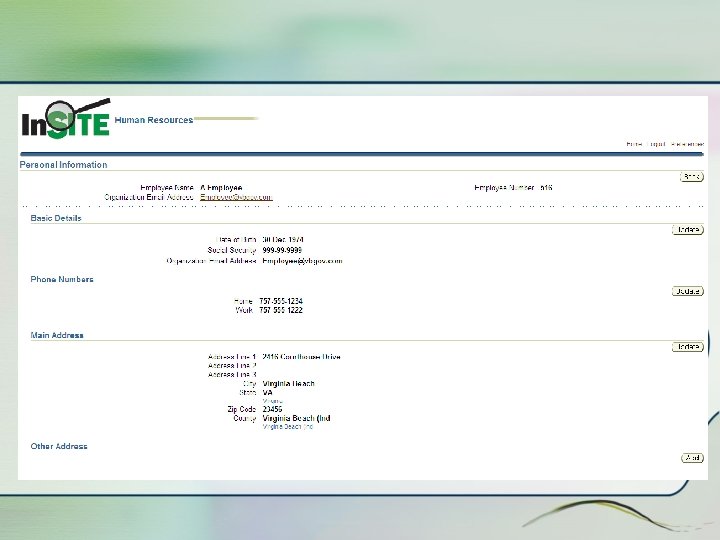
Personal Information The Personal Information section enables employees to view and/or make changes to their personal information. Employees can update their address, phone number and email address. To update other personal information details (name, date of birth, SSN, emergency contact), complete an Employee Personal Information Change Form and return to your Department HR PALS representative. (Note: a list of PALS is on the In. SITE Web Page) To view and/or update your information, single click on Personal Information.
Personal Information Select the section to update. Note: updates to address & phone will automatically email you, your PALS and your manager.
Update Email Address Step 2. Click Next button to update or enter an email address. Step 1. Select the update button
Update Email Address Step 3. Effective date will default to current date. If necessary, you can change the date by clicking on the calendar or entering the date manually. Note correct date format, DD-MMM-YYYY.
Update Email Address Step 4. Update email address and click Next button at top or bottom of screen.
Update Email Address Step 6. Changes. Step have 5. Review and been applied. Click confirm your changes, Return to overview seethe submit thentoclick button. changes. Note, the blue dots indicate what was changed. Click printable page to retain a copy for your records.
Organization Email Address • Employees with a City email account should use their City email as their primary email account. • Employees who do not have a City issued email address may use a personal email address. • It is the employee’s responsibility to maintain and update a current email address in the application. • Any In. SITE generated emails will be sent to this email address, such as "Forgot Password" emails. • Dept PALS will have the ability to update an employee’s email address using HR PALS Self Service. • Do not use a shared email address.
Add/Update Address Step 1. Select the section to update main address or add one more address.
Add/Update Address Step 2. Select the type of change you want to make: correct current address or enter a new address. Click Next.
Add/Update Address Step 3. In this example, we will add a new address. Please pay particular attention to the tips regarding proper format.
Add/Update Address Step 4. First, enter in the address. Enter the City and tab or click on the flashlight.
Add/Update Address Step 5. Find your zip code in the range of zip codes listed and click on the icon under Quick Select.
Add/Update Address Step 6. Based on the selected zip code range, the City, State and County fields are populated.
Add/Update Address Step 7. Enter in your zip code and click Next.
Add/Update Address Step 8. Review and confirm your changes, then click the submit button. Click printable page to retain a copy for your records.
Add/Update Address Step 9. Changes have been applied. Click Return to overview to see new address.
Add/Update Address Note: Employee’s main address has been updated. An email will be sent to you, your PALS and your manager when the address is changed.
Emergency Contact section is view only. To Update Emergency Contact information, contact your Departmental PALS.
Special Information • • The Special Information form allows you to view data such as your alpha status, city equipment that has been distributed to you (optionally used) and other department identification information. The form has three sections: Department Identification – additional data specific to your department Emergency Operations – alpha status, volunteer preference, shelter assignments Equipment Tracking – city equipment that has been distributed to you in order to perform your job duties. To view your information, single click on Special Information.
Special Information details are displayed. Contact your Department PALS or Supervisor for questions or changes to the information below.
Extra Information • The Extra Information form allows employees to view data that is maintained specifically by their department. Currently, there are only three departments (Police, Fire and Parks and Recreation) with Extra Information data in In. SITE. To view your information, single click on Extra Information.
Extra Information details are displayed. Contact your Department PALS or Supervisor for questions or changes to the information below.
Payslips The Payslip section provides detailed information regarding an employee’s earnings and deductions for each pay period dating back to January 2009. To view your information, single click on Payslip
Payslips
Payslips To view previous payslips, select date from drop down box and select the go button
Manage Payroll Payments The Manage Payroll Payments enables an employee to view their direct deposit banking information. To view your information, single click on Manage Payroll Payments
Manage Payroll Payments Your current banking information is displayed
Tax Form The Tax Form enables employees to view and/or update their tax withholding status. To view your information, single click on Tax Form
Tax Form Your current withholding status is displayed. To change, click on the update button
Tax Form Changes can be made to filing status, allowances and additional amount withheld
Tax Form If you are exempt from taxes, check the exempt box You must check the agreement box Click on continue button
Tax Form If the agreement box is not selected, an error will occur
Tax Form Your updated W 4 is displayed with your electronic signature If information is correct, click on the submit button
Tax Form Step 9. Changes have been applied. Click Return to overview to see the changes.
Tax Form To make changes to your Virginia Withholding status, click on Virginia Withholding Form link.
Tax Form A PDF form will open, you will need to print, manually fill out and send to Central Payroll.
Employee W-2 enables employees to view their W-2 from prior tax years starting with 2009. To view your information, single click on Employee W -2
Employee W-2 Your W-2 is displayed
Benefits The Benefits form will display the employee’s current benefits information, including the plan type (medical, dental, long-term disability, etc. ); the option (employee only, employee + spouse, etc. ); the coverage start date; coverage amount ; pre-tax semi-monthly amount; and the post-tax semi-monthly amount. To view your information, single click on Benefits
Benefits The Dependents screen will display when an employee is experiencing an opportunity to change enrollments. Click “Next” to view Current Benefit Enrollment page.
Benefits The current benefit enrollment is displayed. To view enrollment history and any future enrollments that have been keyed in, select the date from drop-down menu and select “Go”.
Contact Information • Username and Password Problems – Contact Support Center (Help Desk) at 3854357 • Questions about data in In. SITE – Contact department PALS or your Supervisor For reference, a list of departmental PALS is on the In. SITE Web Page
Thank You!