Electronics Corporation of India Limited Cn I Division


 and Select")


- Slides: 32
Electronics Corporation of India Limited Cn. I Division Presentation on SEC Application
LAUNCH “SEC” Application By Double Clicking on “SEC” Icon on the Desktop.
1. Click on the Centre of “Ashoka Chakra” for Login
2. Enter the user & password to start the data entry
3. Click on the option “Data Entry” for making Data Entry
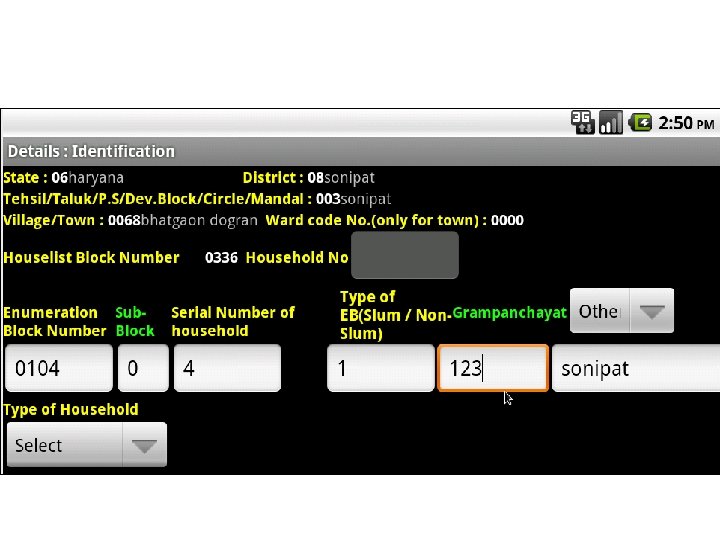
4. Enter the Serial No of Household , Type of EB(if any) and Select Gram Panchayat Details.
5. Select Type of Household. Click on “Proceed to data entry” for next Section.
6. If Household is found Start selecting the availability status of each member present in the image, also enter their sex and year of birth as shown in image against that member.
7. Select the Member Status and then Enter the Sex and Year of birth
8. If new member is to be added to the family then enter new member Name, Sex and Year of birth and click on “add new member” then New member added to list.
9. Enter each and every data as per the screen and click on next member to add corresponding member successfully. Once data of each member has been entered you will be taken to next section automatically. Following is the Initial detail screen for first member.
10. Selection of Caste information pertaining to member. 11. Once all the details are selected/entered “Next Member” has to be clicked. Note: Member will be added only when “Next Member” is clicked.
12. First member added successfully 13. Once member is added , fields will be reset/initialized for next member in the list.
14. Data Entry for new member of the family. 15. Once all the members have been entered clicking on “Next member” will take to next Section. (Housing/Dwelling)
16. All the questions are mandatory 17. Selection of housing/dwelling information for the household
18. Click on “Next Section” for proceeding to section 2. Note : Subsequent Sections shown will depend on whether block belongs to urban or rural area. Some questions and options may change. Some questions will be enabled/disabled accordingly. 19. Following Shows the Selection of Section two codes.
20. On completing section 2 click on “Next Section” for next section 21. Selection of codes : Employment/Income Section
22. Selection of codes : Assets Section 23. Selection of codes : Land Other Assets owned Section. After the selection of Codes Click ‘Proceed’.
24. Once all the sections are covered summary of the Data collected is shown. If data collected is agreed by respondent click on save. 25. Confirm whether Respondent agrees with collected data and acknowledgment slip is issued.
25. Data saved successfully message is displayed. 26. Before Clicking on ‘Save’. If any changes need to be done click on review.
27. In review navigate through member details using “<<” or “>>” button 28. Any changes done will be saved only when clicked on update button.
29. Use “next section” to view corresponding sections. Any options to be changed can be changed. 30. After review if data collected is agreed by respondent click on save. Data saved successfully message is displayed.
31. Whether Enumerator agrees with collected data has to be recorded. If No collect Enumerator remarks 32. Enumerator Agrees with collected data hence no remarks will be collected.
33. Enumerator does not agrees with collected data hence remarks will be collected. 34. Booklet Number and Corresponding Acknowledgment number has to be entered. Save the details
35. After save, following details will be shown for reference 36. Special cases involved 1. If enumerator has to edit his remarks within six hours of data entry , enter the corresponding serial no of household an option is shown for viewing/editing the remarks.
2. If household image is not found for entered household a thumb view is shown listing all the images existing for that block. Operator can browse through the list and select the image. a. if image is found click on HHD found button b. if image is not found in the list click on HHD not found button Thumb view is shown if serial no of household entered is not found
3. If HHD is found the initial screen is shown with selected serial no of Household. Enter remaining details and continue as normal 4. if Household is not found in the list click on “HHD not found”, initial screen with new auto generated serial no of household is shown. Enter remaining details and continue as normal.
5. if Household belongs to section 4 of ahl, it is treated as houseless. If household belongs to section 4 the initial screen will be reinitialized and type of household is set to “houseless” 6. If houseless , select whether household lives in shelter or not. Enter remaining details and continue as normal.
During data entry if any of the member's status is selected as “Out Migrated Inside EB” the corresponding household image is not deleted for future reference once the person with member status recorded as “Out Migrated Inside EB” is found enter the parent “serial no of household” and proceed as normal 7. Image of the household is displayed and only member with “Out Migrated Inside EB” is enabled , rest of the members is disabled.
8. Now change member status to “available”. If any new member is to be added use add new member. After entering all details proceed as normal.
THANK YOU