2018 Safety Presentation Matt Stresak Orthopedic Physician Assistant


 without approved USA Bat standard will be allowed")


 sign/shirt/billboard. Have")


 Common")


. Followed afterwards")

. •")


.")


- Slides: 72
2018 Safety Presentation Matt Stresak Orthopedic Physician Assistant Safety Coordinator, Anaheim Hills Little League Athletic Trainer Strength and Conditioning Specialist Safety
Bats • January 1, 2018, all bats must be marked with the USA Bat label. Batted Ball Coefficient of Restitution (BBCOR). • All bats marked with the BFP (Bat Performance Factor) 1. 15 will not be permitted (including practices) • Barrell size for USA Bat Standards: 2 1/4, 2 1/2, and 2 5/8 inch dimensions. No longer than 34” • Is safety the reason for the change? No. Youth baseball continues to be one of the safest of all sports for youth participants. • Complete list of approved bats - usabat. com.
Bats • Tee ball bats (<26”) without approved USA Bat standard will be allowed for continued use with the application of USA baseball sticker. See me after.
* – Proceedings of the 17 th Annual Football Coaches Association “During the past 7 years the practice has been too prevalent of allowing players to continue playing after a concussion. Again this year, this is true. Sports demanding personal contact should be avoided after a concussion. ”
Concussion • CA State Law 124235 • Youth sports are required to immediately remove an athlete who is suspected of sustaining a concussion or other head injury in an athletic activity for the remainder of the day. The athlete shall not be permitted to return to the athletic activity until being evaluated by, and receiving written clearance to return to athletic activity from a licensed health care provider. • Annual basis, youth sports organization shall provide concussion and head injury information to each athlete – AHLL website* • Each coach/ admin shall be required to complete concussion education at least once (online/ in person)
Concussion symptoms • Headache • Dizziness • Balance disruption • Nausea/Vomiting • Visual disturbances (blurry/double vision) • Confusion • Loss of consciousness • Disorientation • Feeling mentally “foggy” • Vacant stare • Inability to focus • Delayed verbal and motor responses • Slurred/incoherent speech • Excessive drowsiness
Concussion check Concern for neck injury, not moving extremities -then do not move athlete. Call 911. Not breathing, start CPR. If athlete moving and able to communicate then • Ask simple questions: What is the name of your team? What position are you playing? What is the name of your Parents? What is the month? What is the year? No leading questions! • Ask some basic thinking questions: Can you tell me 100 -7 is (vary for age) and subtract 7 from that answer? (serial 7 s/3 s) Can you spell the word “Ball”? Can you spell backward? Do these increase symptoms? Difficult to answer? Player is pulled!
Concussion check • Basic function test: -Look for near and far object(hand) sign/shirt/billboard. Have player read something off it. -Can the player touch your finger and then his nose? -Can the player touch all four fingers in succession to his thumb? -Can player perform single leg balance? (ground check)
Concussion • https: //www. cdc. gov/headsup/youthsports/index. html • Click Coaches link and complete the course (about 30 minutes)
Helmets/ Equipment • Mandatory in all leagues Faceguard use: • Little League use reduced facial injury risk by 35%. • Helmets with facemasks may prevent or reduce severity of 3, 900 yearly facial injuries to children. • No adverse effects on player performance. • 2. Marshall SW, Mueller FO, Kirby DP, Yang J. Evaluation of safety balls and faceguards for prevention of injuries in youth baseball. J Am Med Assoc. 2003; 289(5): 568 -574. • 6. Danis RP, Hu K, Bell M. Acceptability of baseball face guards and reduction of oculofacial injury in receptive youth league players. Inj Prev. 2000; 6(3): 232 -4.
Injuries From Batted Balls 12% of high school baseball injuries • 48% to the head/face • 16% to the mouth/teeth • 42% of acute youth baseball injuries From 1973 -1995, 88 baseball-related deaths • 68 from ball impact (77%) • 38 from blows to the chest, 21 from a blow to the head
Helmet proper fit • Obtain helmet size by measuring the circumference of the head, ½’’ to 1’’ above eyebrow • Helmet should be snug around entire head. There should be no gaps/spaces between head and helmet • Athlete should not wear anything under batter’s helmet (i. e. baseball hat) • Ear holes should line up with athlete’s ears, ensuring the helmet is not sitting too high or low • Athlete should be able to see forward and side-to-side without obstruction
Chest Protectors • Many chest protectors reduce sternal acceleration after impact • However, “the majority of commercially available chest protectors fail to provide consistent reductions in commotio cordis risk. ” Commotio Cordis Extremely rare, but often lethal disruption of heart rhythm as a result of a blow to the area over the heart • Low chances of resuscitation
Chalmers et al. SH 2017 Jue 2018 Whiteley JSSM 2007, Oyama et al. AJSM 2013 Wilk et al. SMAR 2010
Wind Up Phase • Places pitcher in good starting position • Initiation of motion to get knee at max height 90/90 • BALANCE • Stride foot behind stance leg to generate MOMENTUM
Wind Up Phase Common Faults • Moves too quickly – no balance • Over rotate pelvis – need energy to overcome angular velocity • Decreased hip flexion stride leg, increased flexion stance leg = large loss stored gravitational potential energy
Stride Phase • Linear momentum of body generates force which begins with stride leg descent and stride foot contact. • At foot contact: • Stride length about 80% body height • Stride knee bent to 45 deg • Pelvis open to batter • Shoulder line 15 deg closed • Stride foot at 15 deg closed 15 degrees
Stride Phase Common faults • Hips open/ close too early which will affect shoulder and elbow mechanics • Pushing off mound versus “controlled fall (gravity)” will increase humeral IR torque and valgus (angled stress) elbow • Missing target with stride foot plant – Too closed force pitch across body. Too open initiates arm cocking too early
Arm Cocking Phase • Increasing potential energy • Pelvis faces target while arm is cocked • Lag between pelvis rotation and upper trunk rotation is where energy is harvested • Stride leg maintains hip flexion/ support, trail leg moves forward
Arm Cocking Phase Common faults • Poor timing of pelvis and upper trunk leads to slow ball speed or increased load of shoulder and elbow • “Uncontrolled fall (work against gravity) alters entire position and timing yielding poor shoulder/ elbow motion and increasing stress
Arm Acceleration Phase • Transfer of potential energy into kinetic energy • Dynamic stabilization of lead leg as center mass of body progresses over the stride leg • At ball release: • Front knee flexed 35 deg • Trail leg off ground • Flexed trunk
Arm Acceleration Phase Common faults • Increased knee flexion at foot contact and decreased knee extension produces slower ball speeds • Poor timing of pelvis and upper trunk leads to slow ball speed or increased load of shoulder and elbow • “Uncontrolled fall (work against gravity) alters entire position and timing yielding poor shoulder/ elbow motion and increasing stress
Arm Deceleration Phase • Slowing down of the humerus and shoulder blade (scapula) Common Faults • Cutting short follow through • Not using body to dissipate/ assimilate the energy from the throw
Follow Through Phase • Continuation of decelerating the shoulder and rest of body • Continuation of trunk flexion and back leg stepping forward Common Faults • Cutting short follow through • Not using body to dissipate/ assimilate the energy from the throw
Making Adjustments to a Pitcher’s Motion For the coach: • Know the difference in the effect (the visual error)…and it’s cause • Make the adjustment to the cause • Find the moment when the error occurs and adjust that moment For your pitcher: • Always demonstrate and explain error • Create a solution • Create a “feel” for the moment of the initiation of the error • Design a drill that separates the phase of the motion in which the error occurs
Pitch Counts League Age Pitches per day 13 -16 11 -12 9 - 10 7 - 8 95 pitches per day 85 pitches per day 75 pitches per day 50 pitches per day • Pitch log sheets: https: //ll-production-uploads. s 3. amazonaws. com/uploads/2017/12/Baseball-Pitching-Log. pdf • Pitcher eligibility tracking form: https: //ll-production-uploads. s 3. amazonaws. com/uploads/2017/12/Pitching-Eligibility-Tracking-Form. pdf
Pitch Count and Rest Age 14 and under must adhere to the following rest from pitching requirements – player is allowed to participate in throwing for any other position: • Pitch 66 or more / day = four (4) days of rest from pitching must be observed. • Pitch 51 -65 / day = three (3) days of rest from pitching must be observed. • Pitch 36 -50 / day = two (2) days of rest from pitching must be observed. • Pitch 21 -35 / day = one (1) day of rest from pitching must be observed. • Pitch 1 -20 / day = no (0) rest is required.
Sudden Cardiac Events • 10 -25 cases per year in athletes under 30 • 1 death per 200, 000 athletes per year • 34 athlete deaths attributed to cardiac causes from 1985 -1995 • 90% of athletes collapsed during or after a training session • Hypertrophic cardiomyopathy present in 36% of athletes upon autopsy • 3% previously suspected of cardiovascular disease
Cardiac Warning Signs
CPR Update • Compress chest FIRST. • “ABC” is gone. New “CAB” • Ratio is now 30 compressions and 2 breaths. • Rescue breathing: 1 breath every 5 -6 seconds (10 -12 breaths/min)
CPR Steps 1. Check the scene and the person. Make sure the scene is safe, then tap the person on the shoulder and shout "Are you OK? " to ensure that the person needs help 2. Call 911 for assistance. If it's evident that the person needs help, call (or ask a bystander to call) 911, then send someone to get an AED. (If an AED is unavailable, or a there is no bystander to access it, stay with the victim, call 911 and begin administering assistance. ) 3. Open the airway. With the person lying on his or her back, tilt the head back slightly to lift the chin. Check for breathing. Listen carefully, for no more than 10 seconds, for sounds of breathing. (Occasional gasping sounds do not equate to breathing. ) If there is no breathing begin CPR.
CPR Steps • Push hard, push fast. Place your hands, one on top of the other, in the middle of the chest. Use your body weight to help you administer compressions that are at least 2 inches deep and delivered at a rate of at least 100 compressions per minute. • Deliver rescue breaths. With the person's head tilted back slightly and the chin lifted, pinch the nose shut and place your mouth over the person's mouth to make a complete seal. Blow into the person's mouth to make the chest rise. Deliver two rescue breaths, then continue compressions. • Continue CPR steps. Keep performing cycles of chest compressions and breathing until the person exhibits signs of life, such as breathing, an AED becomes available, or EMS or a trained medical responder arrives on scene.
CPR • Compressions at 100 per minute but not > 120 - both adult and pediatric patients. • Compression depths: 2 – 2. 5* inches in adults and adolescents (age 8 -adult) 2 inches in children (age 1 -8) 1. 5 inches in infants (age 0 -1). • Allow full chest recoil. Avoid leaning on chest between compressions. • Minimize interruptions in compressions. Do not overventilate.
AED
Normal Pediatric Vital Signs AGE Heart Rate BP 3– 5 6– 9 10 -11 12 -15 80 -120 bpm 75 -118 bpm 60 -100 bpm 89 -112/46 -72 97 -115/57 -76 102 -120/61 -80 110 -131/64 -83 Respirations 20 -28 per min. 18 -25 per min. 12 -20 per min
First 72 hours after injury!
Effects of Cold Application • Blood flow decreases by vasoconstriction (vessels narrow). Followed afterwards by a vasodilatation which will prevent against hypoxic damage. • Tissue metabolism will decrease • At joint temperatures of 30°C or lower tissue degradation is inhibited. • Decreased metabolic rate limits further injury and aids the tissue in surviving the cellular hypoxia that occurs after injury. • Application of ice for 20 minutes (barrier) on and wait one full hour before re-application
Effects of Cold Application • Hunting reflex: If the cold pack is left on the skin for more than 30 minutes, the blood vessels will dilatate (open) excessively creating more swelling.
Effects of Heat Application • Blood flow increases by vasodilatation (vessels open wide). • The metabolic rate and the tissue extensibility will also increase. • Heat increases oxygen uptake and accelerates tissue healing, • Heat increases the activity of destructive enzymes • Heat can be started 96 hours after an injury. Apply for 20 minutes (barrier) on and wait one full hour before re-application • No creams or ointments. These stimulate heat sensors in the body without causing an actual change in temperature!
Return to sport/ on field quick check – Stresak rule • Lower body: Gradual return to activity/ sports once you are pain free with full range of motion and able to perform single leg hop on affected side. • Upper body: Gradual return to activity/ sports once you are pain free with full range of motion and able to perform single push up on affected side Or hold this position 30 sec
Routine Equipment Check 1. Ensure proper attire by the catcher at all times, including in the bull pens and during infield drills and warm ups. 2. Inspect all bats, helmets, catchers gear and other field equipment on a regular basis. Repair or replace defective equipment. 3. Helmets found to be unsafe must not be used. 4. Keep loose equipment stored properly. 5. Have all players remove all personal jewelry (nothing around the neck, nothing around the wrist except wristbands). 6. Parents should be encouraged to provide safety glasses for all players who wear prescription glasses. 7. It is highly recommended that all players wear a protective cup. It is mandatory for Pitchers & Catchers
Routine Field Check Game • Walk your fields before each game/ practice. (Delegate point person) • Field should be free of any holes, depressions, raised sprinkler heads and other hazards. • Clear the field of stones, pieces of glass and other objects. • Spectators & seating: Make sure spectator areas are a safe distance from the field of play (T-ball and Rookie). Do not allow spectators to be on the playing field. • Remind all field visitors to clean up their area and dispose of trash.
911 • Have phone and Emergency cards with you during all events (practice/ games). • When calling 911, please establish if your call is coming from cell phone and give your current location. You may be transferred to a second operator. • Speak slow and clear. Stay on the line until dispatch states to end the call. • Send another adult to the nearest ambulance access point and let operator know this person is available to direct EMS to specific location. • Notify parents – third adult if available • Keep sports participants away from the injured • Provide calm re-assurance and support that help is one the way
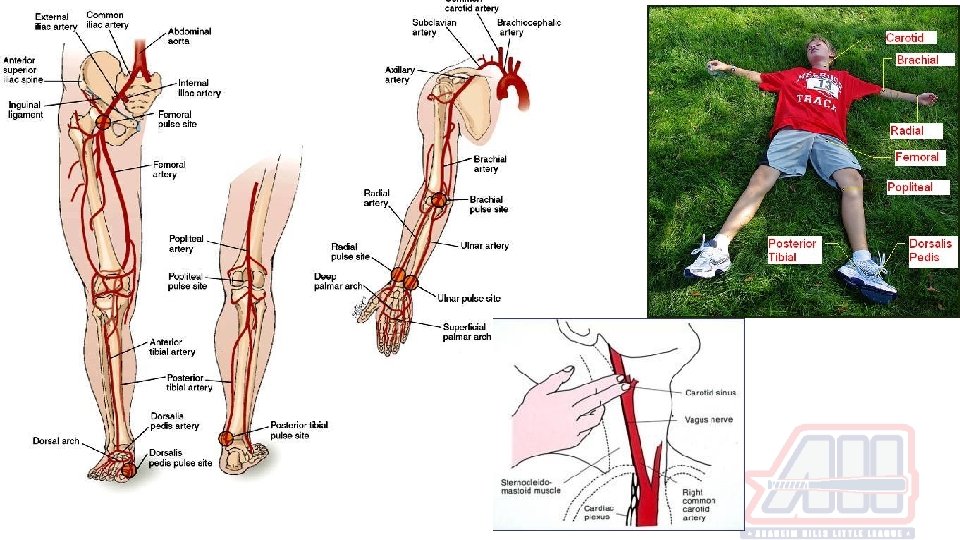
Bleeding Control • Venous is steady and slow. Dark red color • Arterial is fast, spurting. Bright red color • Elevate extremity above the heart • Apply direct pressure 10 -15 minutes • ER if not controlled after 15 minutes
Hydration • As environmental heat stress intensity and duration of practice, training or play increase, sweat loss proportionately increases. • For young athletes, sweating rates ranging from near 0. 5 to 1. 0 liter per hour are very common during vigorous activity in the heat. • Older adolescents, the rate of sweat loss can reach or exceed 2. 5 liters per hour, especially if it is humid.
Hydration • Sports drinks = extra calories that children don’t need. Contributes to obesity/ tooth decay. (CHO stored as fat and extra sugars not used) • Drink water during and after exercise • Sports drinks are not recommended with meals. • Energy drinks contain stimulants : caffeine guarana and taurine. Not electrolytes • Caffeine linked improper development neurologic and cardiovascular systems in children • Some energy drinks > 500 mg of caffeine = 14 cans of soda. • Like everything, moderation is key. • Water, not sports drinks, should be the principal source of hydration for children and adolescents. “But we just bought a case at Costco” • 4 -5 to one mixture of water to one part Gatorade http: //pediatrics. aappublications. org/content/pediatrics/early/2011/05/25/peds. 2011 -0965. full. pdf
Hydration Schedule Ages 6 to 12: Ages 13 to 18: Before Sports Drinking fluids prior to exercise appears to reduce or delay the detrimental effects of dehydration. • 1 to 2 hours before sports: 4 to 8 ounces of cold water • 10 to 15 minutes before sports: 4 to 8 ounces of cold water Before Sports Drinking fluids prior to exercise appears to reduce or delay the detrimental effects of dehydration. • 1 to 2 hours before sports: 8 to 16 ounces of cold water • 10 to 15 minutes before sports: 8 to 12 ounces of cold water During Sports • Every 20 minutes: 5 to 9 ounces of water or a sports drink, depending on weight (5 for a child weighing 88 pounds, 9 ounces for a child weighing 132 pounds) During Sports • Every 20 minutes: Between 5 and 10 ounces of water or sports drink, depending on weight After Sports • Post-exercise hydration should aim to correct any fluid lost during the practice. • Within two hours: at least 24 ounces of water
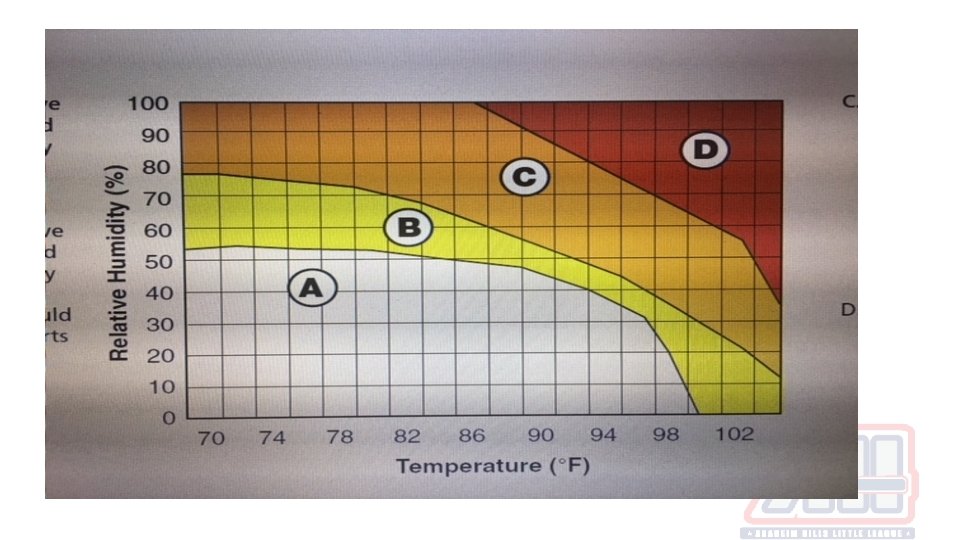
Heat guidelines for activity • Zone A: 5 -10 minute rest and fluid break after every 25 to 30 minutes of activity. • Zone B: 5 -10 minute rest and fluid break after every 20 to 25 minutes of activity. Clothing - shorts and t-shirts (with helmet and shoulder pads only, not full equipment, if worn for activity). • Zone C: 5 -10 minute rest and fluid break after every 15 to 20 minutes of activity. Clothing - shorts and t-shirts only (with all protective equipment removed, if worn for activity). • Zone D: Cancel or postpone all outdoor practices/games. Practice may be held in an air -conditioned space.
Anaheim Temperature and Humidity • Average temperature range from February to June is 71 – 81 F • Average humidity range from February to June is 60 - 75% • Anaheim higher graft zones place us between Zone B and Zone C
If you throw with fatigue as a youth baseball pitcher there’s a 36: 1 times increase in getting your throwing shoulder or elbow injured *James Andrews MD, USA Baseball, Little League International
Little League Shoulder • Salter Harris type 1 physeal injury to proximal humerus – AKA the Growth Plate Mechanism • Overuse causes repetitive microtrauma at growth plate (physis) • From high loads of torque • Culprit - Breaking balls Pathophysiology • Hypertrophic zone is affected • Weakest portion of the growth plate
Little League Shoulder Symptoms • Arm and shoulder pain with throwing • Worse in late cocking or deceleration phases • Pain resolves with rest • May be associated with decreased velocity and control
Little League Shoulder Treatment Non-operative • Rest, ice, PT, progressive throwing program • Refrain from pitching 2 -3 months • Return only after asymptomatic • PT - Rotator cuff strengthening and posterior capsule stretches • Core strengthening and stretching • Progressive throwing program. Start with short tosses at low velocity. Progress slowly with distance and velocity Prevention • Correct pitching mechanics • Throwers 12 at conclusion of practice • Discourage breaking ball pitches until skeletal maturity • Enforcement of pitch counts
Little League Elbow AKA - medial elbow injury • Medial epicondyle stress fractures • Ulnar collateral ligament (UCL) injuries • Flexor-pronator mass strains Epidemiology • LL likely to have apophysitis (stress injury to muscle/ tendon insertion) or avulsion (above complex detaches from insertion) than UCL. • Weak link in the chain Risk factors • Overload leads to repetitive microtrauma • Greater than 80 pitches per game • More than 8 months of competitive pitching per year • Fastball speed >85 mph • Continued pitching despite arm fatigue/pain • Participating in showcases
Little League Elbow Symptoms • Elbow pain in throwing arm • Decreased throwing speed, accuracy, and distance Treatment is same as shoulder but to include elbow/ wrist exercises
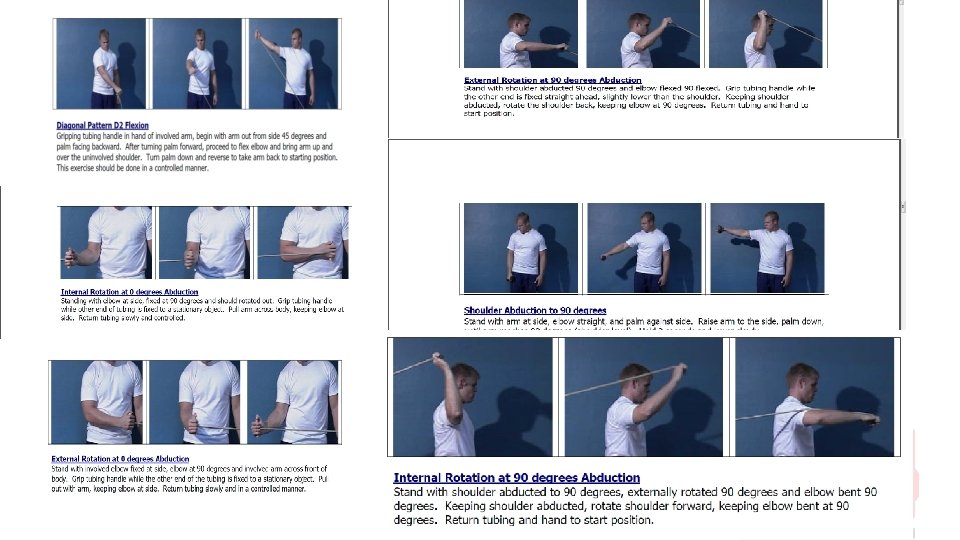
Thrower’s Ten https: //www. muhlenberg. edu/pdf/main/athletics/at hletic_training/throwers 10. pdf Can be used for: • Light stretch 1 set of 12 -15 reps • Prehab/ Rehab - 2 -3 sets of 20 -30 reps • Maintenance - 2 -3 sets or 20 -30 reps • Post workout/ game outing 1 set of 12 -15 reps • Emphasis on endurance and strength, not power! • For use with Thera-band or Thera-tube or very light weight 1 -3 pounds
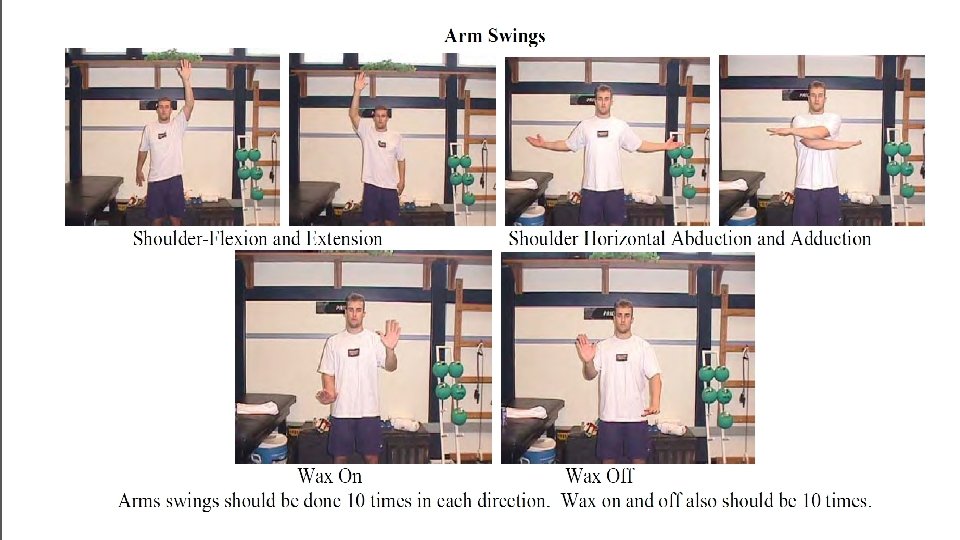
Warm Up • Hip flexor/ extensor • Trunk rotation • Hop/ Skip • Shuffling • Backward walking • Single leg balance
Effect of a 6 week weighted ball throwing program on pitching, velocity, arm stress and injury rates. Reinhold, M. 8/2017 • 6 week program 3 times per week • Weights of 2, 4, 6, 16 and 36 oz. • Control group threw with standard 5 oz balls • 39/44 completed the study • 15. 3 years old, 176. 8 cm, 68. 3 kg Results: • Arm strength and speed was not increased after 6 weeks. Strength was inhibited • Effective at increasing velocity by increasing external rotation – at what cost? • No significant difference in valgus stress or angular velocity in either group
What does MLB Player do for his workout? Who cares! MLB Player is already in the show. What did the MLB Player do when he was younger? Let’s create better athletes and young men! -Train them beyond what they need in the game -Fitness/ Nutrition -Strength/ Power -Speed/ Movement -Education/ Safety -Sportsmanship -Have Fun Email: stresakmatthew@gmail. com