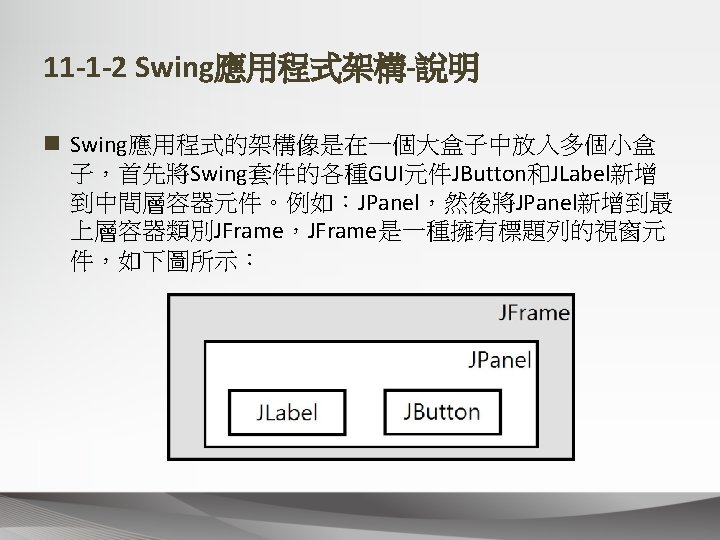
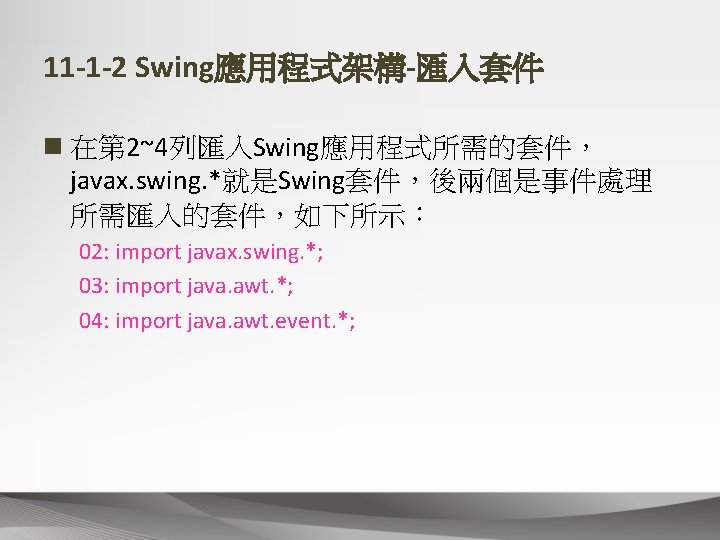
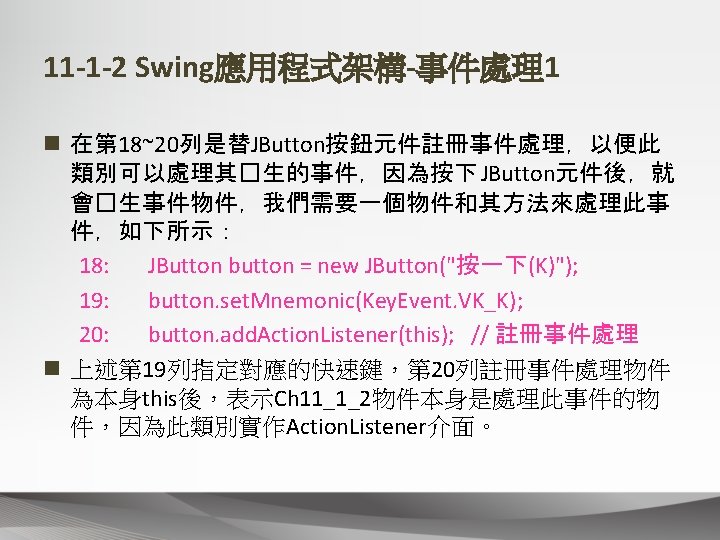
11 1 2 Swing import javax swing import


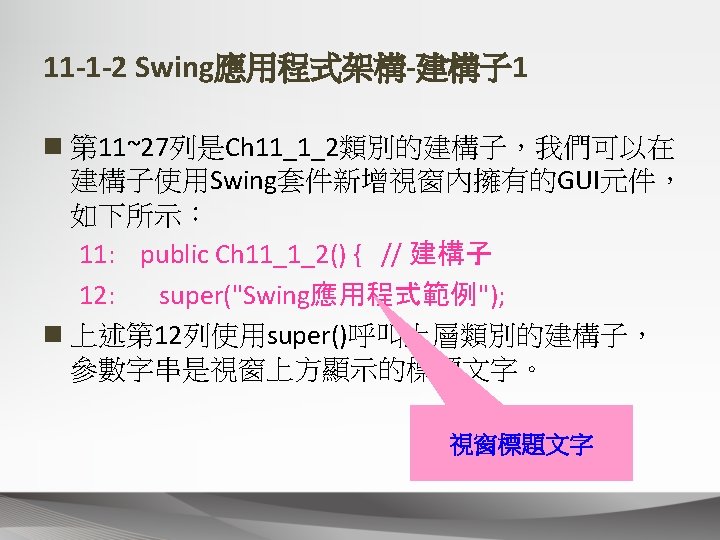


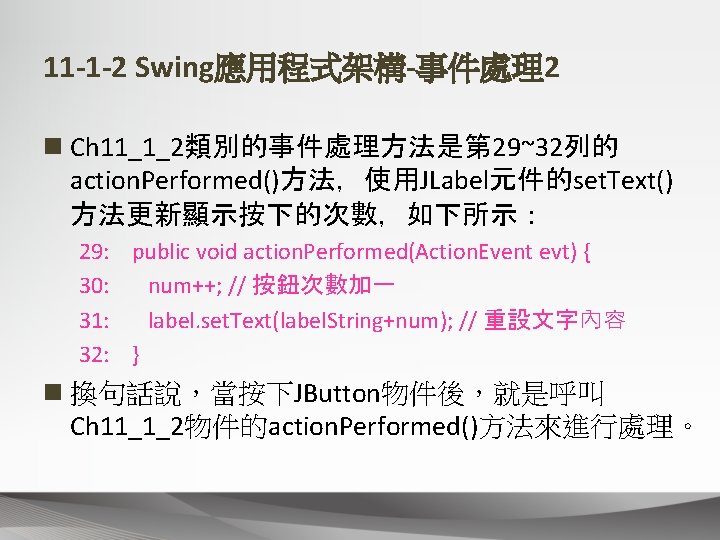
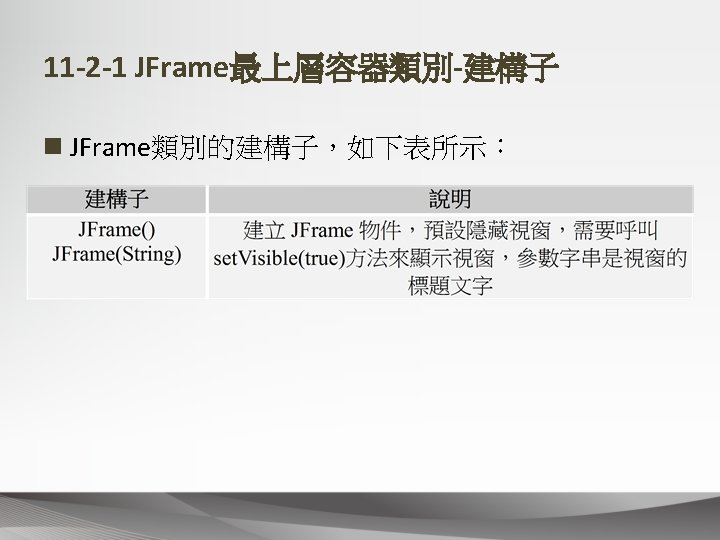
是在第 36列建立Ch 11_1_2類別的 JFrame物件,如下所示: 34: public static void")


方法(範例) n JOption. Pane類別的show. Message. Dialog()類別方法 可以顯示【確定】按鈕的訊息視窗,如下所示: JOption. Pane.")
方法(參數) n JOption. Pane. WARNING_MESSAGE:顯示三角形警 告圖示的訊息。 n JOption. Pane.")
方法(範例) n JOption. Pane類別提供show. Confirm. Dialog()類別方 法,可以顯示詢問問題的對話方塊,如下所示: int n")
![11 -2 -2 JDialog最上層容器類別show. Option. Dialog()方法(範例) n JOption. Pane類別擁有show. Option. Dialog()方法,可以顯示指 定標題文字、圖示、訊息和按鈕的對話方塊,如下所示: Object[] options](https://slidetodoc.com/presentation_image_h2/5a0bd6f140c576a1a577571032c75157/image-33.jpg "11 -2 -2 JDialog最上層容器類別show. Option. Dialog()方法(範例) n JOption. Pane類別擁有show. Option. Dialog()方法,可以顯示指 定標題文字、圖示、訊息和按鈕的對話方塊,如下所示: Object[] options")


; // 建立JPanel物件 jpane 1.")


; c. set. Layout(new")
; c. set. Layout(")
; JButton button =")

; c. set. Layout(new")


; Grid. Bag.")
; JButton button 3 = new")
; JPanel jpane 1")
; // 第二個JPanel bl")

- Slides: 72
11 -1 -2 Swing應用程式架構-範例 import javax. swing. *; import java. awt. event. *; public class Ch 11_1_2 extends JFrame implements Action. Listener { public Ch 11_1_2() { JButton button = new JButton("按一下(K)"); button. add. Action. Listener(this); } public void action. Performed(Action. Event evt) { } public static void main(String[] args) { Ch 11_1_2 app = new Ch 11_1_2(); app. set. Default. Close. Operation(DISPOSE_ON_CLOSE); app. set. Size(300, 100); app. set. Visible(true); } } 匯入Swing套件 類別繼承JFrame且實作 Action. Listener介面 在建構子新增Swing元 件且註冊成JButton元 件的事件傾聽者 實作事件處理 的介面方法 在主程式建立Ch 11_1_2物件,即 建立Windows視窗物件
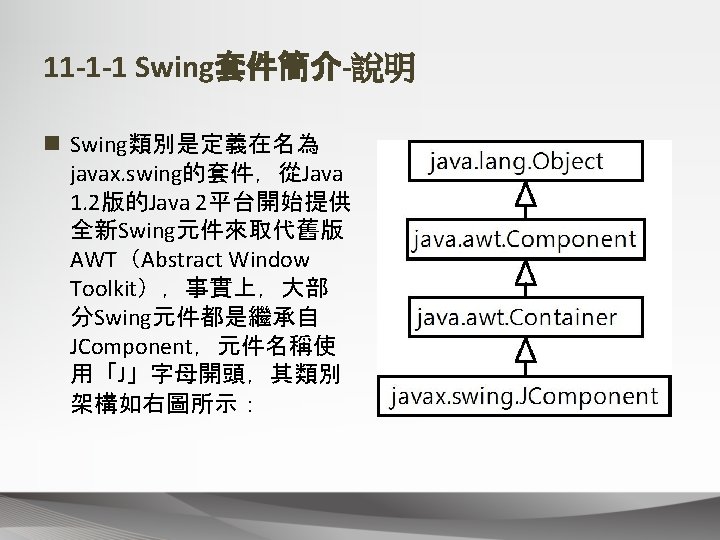
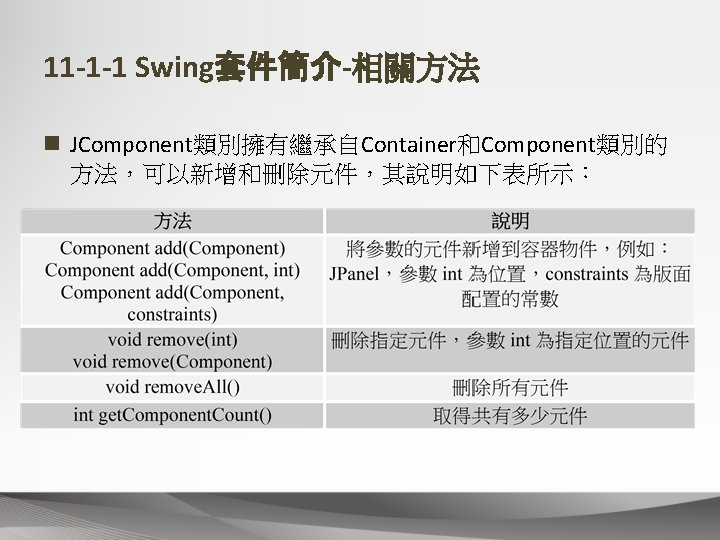
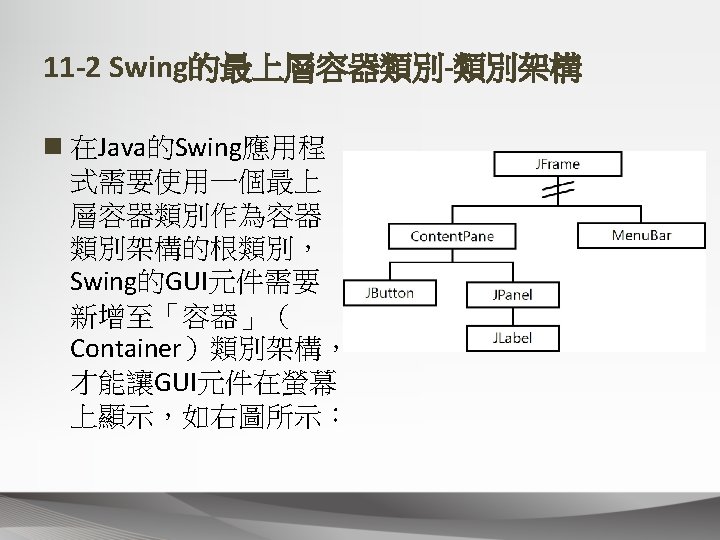
11 -1 -2 Swing應用程式架構-類別宣告 n 在第 6~41列是Ch 11_1_2類別宣告,它是繼承最上層容器類 別JFrame建立的視窗應用程式,如下所示: 06: public class Ch 11_1_2 extends JFrame 07: implements Action. Listener { 08: private static String label. String = "按幾次: "; 09: private int num = 0; // 次數統計 實作事件處理介面 10: private JLabel label; n 上述類別實作Action. Listener介面,這是Java的事件處理, 表示此類別可以處理按下按鈕的事件,第 8~10列宣告成員 變數label. String、num和Swing元件JLabel的物件變數label。
11 -1 -2 Swing應用程式架構-建構子 3 n 接著在第 15列建立JLabel元件,第 16~17列指定元件外的框線為藍色線, 如下所示: 15: label = new JLabel(label. String + num); 16: label. set. Border( // 設定框線 17: Border. Factory. create. Line. Border(Color. blue)); …… 21: JPanel jpane = new JPanel(); // 建立JPanel物件 22: jpane. set. Border( // 設定框線 23: Border. Factory. create. Line. Border(Color. yellow)); 24: jpane. add(label); // 新增元件到JPanel 25: jpane. add(button); 26: c. add(jpane); // 新增元件到Content. Pane 27: }
11 -1 -2 Swing應用程式架構-主程式 n 第 34~40列的主程式main()是在第 36列建立Ch 11_1_2類別的 JFrame物件,如下所示: 34: public static void main(String[] args) { 35: // 建立Swing應用程式的物件 36: Ch 11_1_2 app = new Ch 11_1_2(); 37: app. set. Default. Close. Operation(DISPOSE_ON_CLOSE); 38: app. set. Size(300, 100); // 設定視窗尺寸 39: app. set. Visible(true); // 顯示視窗 40: } 指定視窗關閉方 式
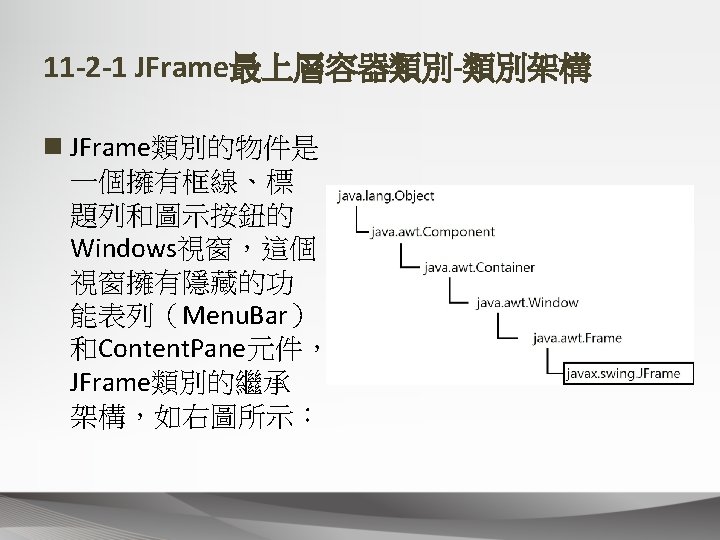
11 -2 -1 JFrame最上層容器類別Content. Pane相關方法 n JFrame類別關於Content. Pane物件的相關方法,如 下表所示: 方法 說明 void set. Content. Pane(Container) 設定JFrame使用的Content. Pane元件 Container get. Content. Pane() 取得JFrame使用的Content. Pane元件 void set. Background(Color) 設定背景色彩,參數是Color色彩物件, 例如:Color. white白色或Color. red紅色 等
11 -2 -1 JFrame最上層容器類別-範例 01: /* 程式範例: Ch 11_2_1. java */ 02: import javax. swing. *; 03: import java. awt. *; 04: import java. awt. event. *; 05: // 繼承JFrame類別 06: public class Ch 11_2_1 extends JFrame { 07: public Ch 11_2_1() { // 建構子 08: super("JFrame最上層容器"); 09: Container c=get. Content. Pane(); // 取得Content. Pane物件 10: c. set. Background(Color. white); // 指定背景色彩 11: } 12: // 主程式 13: public static void main(String[] args) { 14: // 建立Swing應用程式 15: Ch 11_2_1 app = new Ch 11_2_1(); 16: app. set. Default. Close. Operation(DISPOSE_ON_CLOSE); 17: app. set. Size(300, 150); // 設定尺寸 18: app. set. Visible(true); // 顯示視窗 19: } 20: } 類別繼承JFrame 建構子
11 -2 -2 JDialog最上層容器類別show. Message. Dialog()方法(範例) n JOption. Pane類別的show. Message. Dialog()類別方法 可以顯示【確定】按鈕的訊息視窗,如下所示: JOption. Pane. show. Message. Dialog(jpane, "一個測試的訊息視窗!", "Ch 11_2_2 a", JOption. Pane. QUESTION_MESSAGE);
11 -2 -2 JDialog最上層容器類別show. Message. Dialog()方法(參數) n JOption. Pane. WARNING_MESSAGE:顯示三角形警 告圖示的訊息。 n JOption. Pane. ERROR_MESSAGE:顯示錯誤圖示的訊 息。 n JOption. Pane. INFORMATION_MESSAGE:顯示資訊 圖示的訊息。 n JOption. Pane. QUESTION_MESSAGE:顯示問題圖示 的問題訊息。 n JOption. Pane. PLAIN_MESSAGE:沒有圖示的訊息。
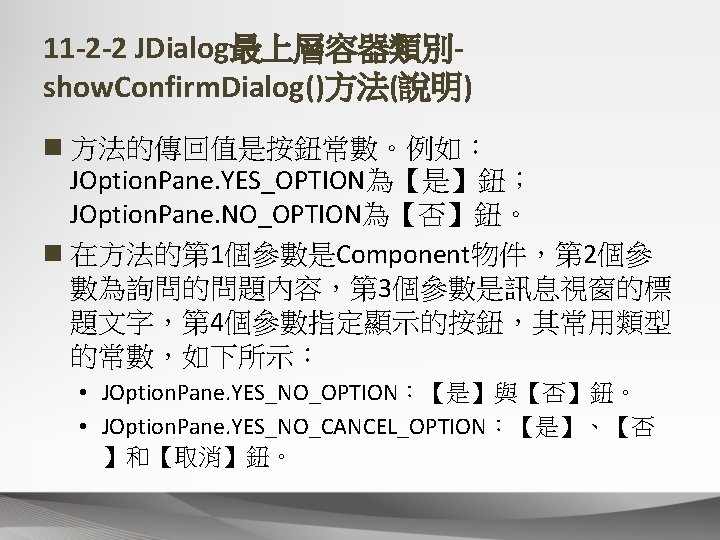
11 -2 -2 JDialog最上層容器類別show. Confirm. Dialog()方法(範例) n JOption. Pane類別提供show. Confirm. Dialog()類別方 法,可以顯示詢問問題的對話方塊,如下所示: int n = JOption. Pane. show. Confirm. Dialog(jpane, "您是否已經按下show. Message. Dialog按鈕? ", "操作問題", JOption. Pane. YES_NO_OPTION);
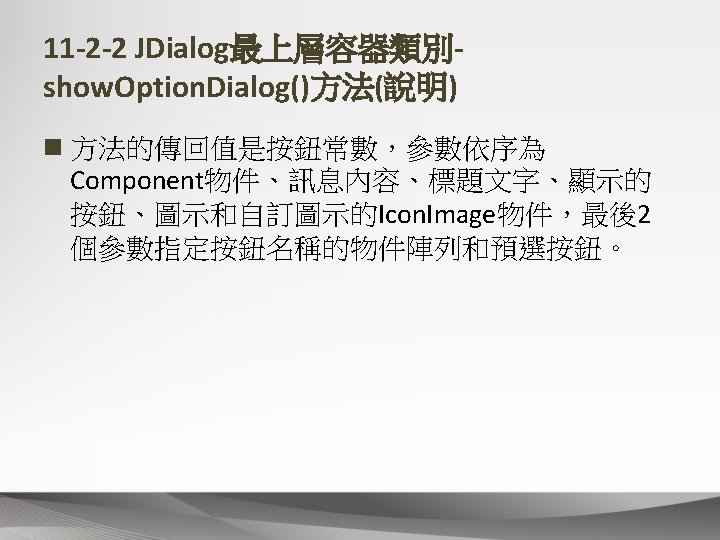
11 -2 -2 JDialog最上層容器類別show. Option. Dialog()方法(範例) n JOption. Pane類別擁有show. Option. Dialog()方法,可以顯示指 定標題文字、圖示、訊息和按鈕的對話方塊,如下所示: Object[] options = {"show. Message. Dialog按鈕", "show. Confirm. Dialog按鈕"}; int m = JOption. Pane. show. Option. Dialog(jpane, "哪一個按鈕顯示警告訊息? ", "操作問題", JOption. Pane. YES_NO_OPTION, JOption. Pane. QUESTION_MESSAGE, null, options[0]);
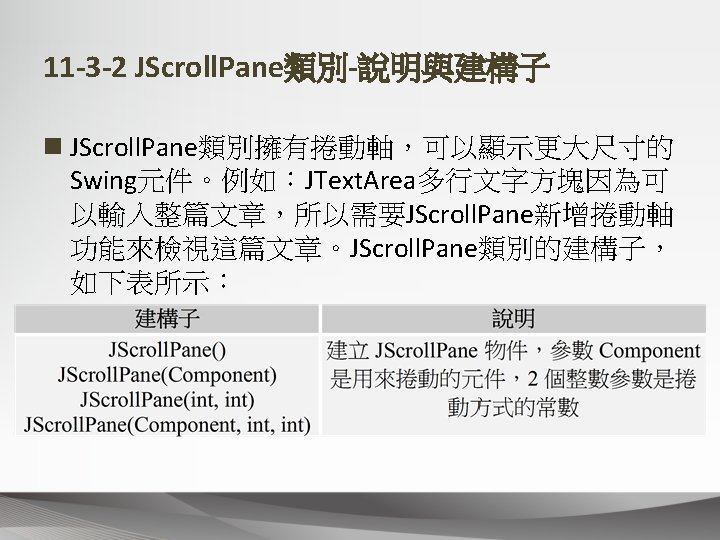
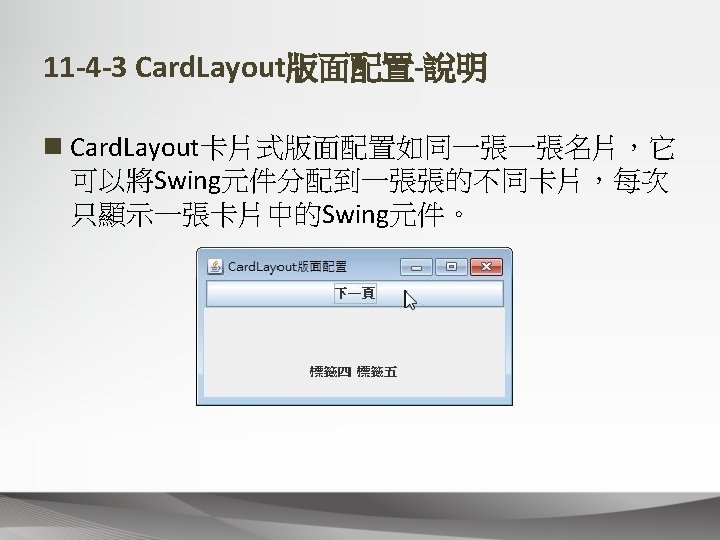
11 -3 Swing的中間層容器類別 n 11 -3 -1 JPanel類別 n 11 -3 -2 JScroll. Pane類別
11 -3 -1 JPanel類別-範例 JPanel jpane 1 = new JPanel(); // 建立JPanel物件 jpane 1. add(new JButton("左按鈕")); JPanel jpane 2 = new JPanel(); // 建立JPanel物件 jpane 2. add(new JLabel("右標籤")); c. add(jpane 1, Border. Layout. WEST); // 新增在西方 c. add(jpane 2, Border. Layout. EAST); // 新增在東方
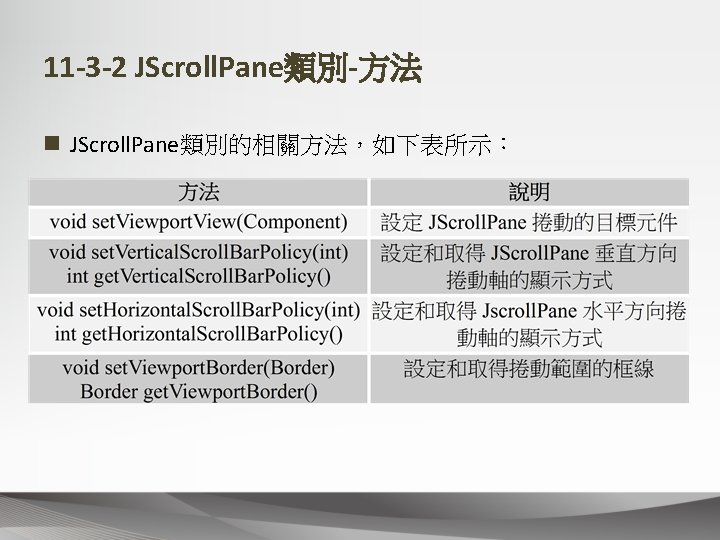
11 -3 -2 JScroll. Pane類別-範例 JText. Area area = new JText. Area("準備輸入資料. . . n", 15, 30); JScroll. Pane scroll = new JScroll. Pane(area); scroll. set. Preferred. Size(new Dimension(250, 100)); scroll. set. Minimum. Size(new Dimension(250, 100)); scroll. set. Alignment. X(LEFT_ALIGNMENT); c. add(scroll, Border. Layout. CENTER);
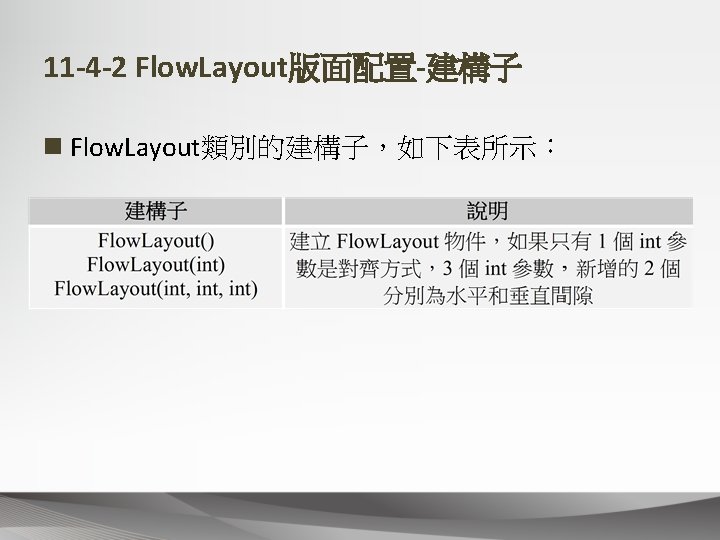
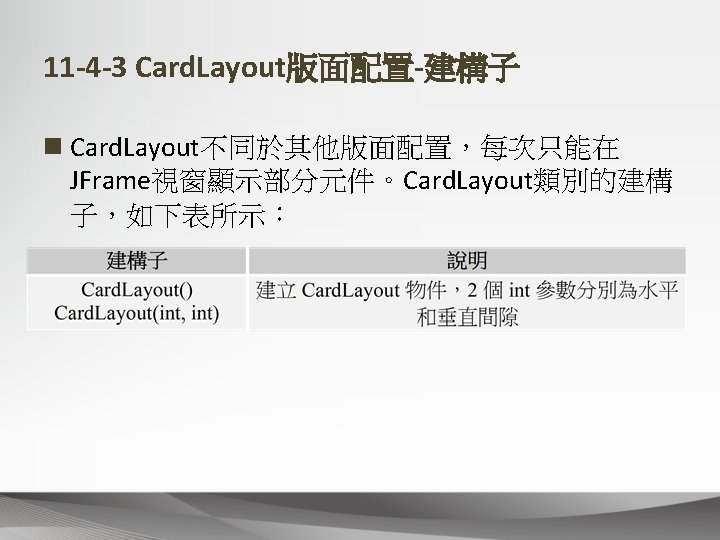
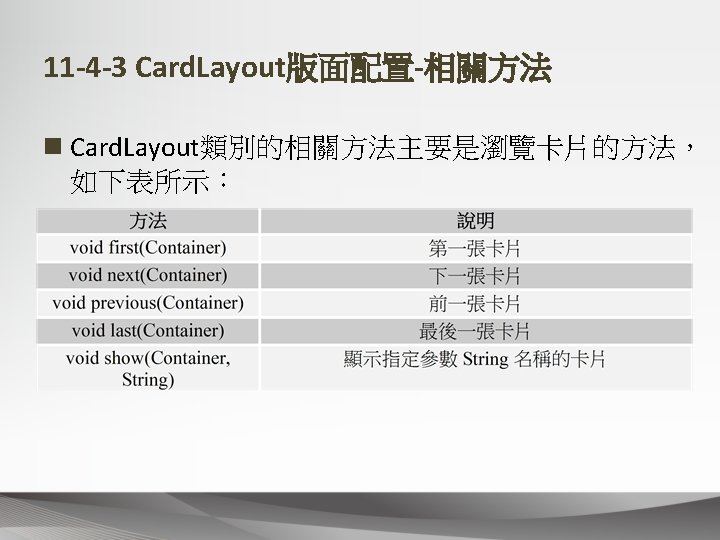
11 -4 Swing版面配置管理員 n 11 -4 -1 Border. Layout版面配置 n 11 -4 -2 Flow. Layout版面配置 n 11 -4 -3 Card. Layout版面配置 n 11 -4 -4 Grid. Layout版面配置 n 11 -4 -5 Grid. Bag. Layout版面配置 n 11 -4 -6 Box. Layout版面配置
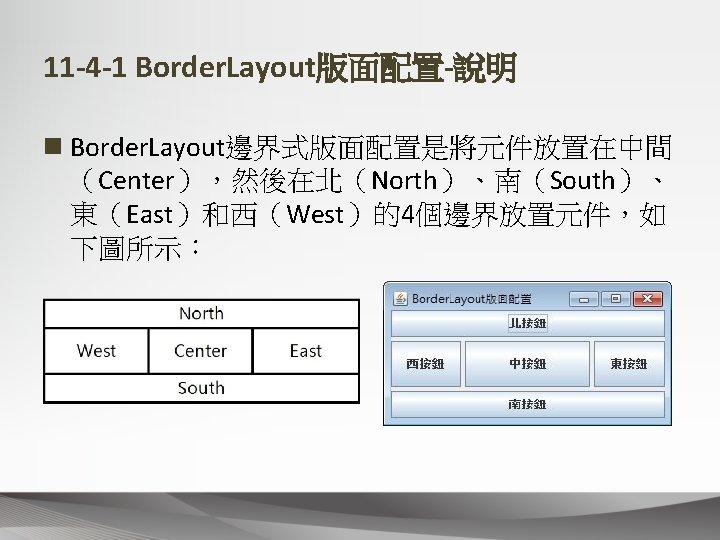
11 -4 -1 Border. Layout版面配置-範例 Container c = get. Content. Pane(); c. set. Layout(new Border. Layout(4, 4)); c. add(new JButton("北按鈕"), Border. Layout. NORTH); c. add(new JButton("中按鈕"), Border. Layout. CENTER); c. add(new JButton("西按鈕"), Border. Layout. WEST); c. add(new JButton("南按鈕"), Border. Layout. SOUTH); c. add(new JButton("東按鈕"), Border. Layout. EAST);
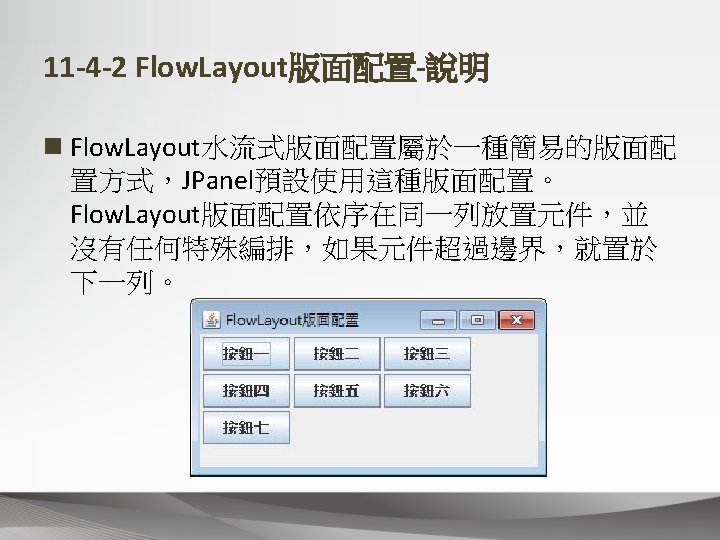
11 -4 -2 Flow. Layout版面配置-範例 Container c = get. Content. Pane(); c. set. Layout( new Flow. Layout(Flow. Layout. LEFT, 3, 3)); c. add(new JButton("按鈕一")); c. add(new JButton("按鈕二")); c. add(new JButton("按鈕三")); c. add(new JButton("按鈕四")); c. add(new JButton("按鈕五")); c. add(new JButton("按鈕六")); c. add(new JButton("按鈕七"));
11 -4 -3 Card. Layout版面配置-範例 Container c = get. Content. Pane(); JButton button = new JButton("下一頁"); button. add. Action. Listener(this); c. add(button, Border. Layout. NORTH); cards = new JPanel(); cards. set. Layout(new Card. Layout()); JPanel jp 1 = new JPanel(); // 第一組卡片 jp 1. add(new JButton("按鈕一")); jp 1. add(new JButton("按鈕二")); jp 1. add(new JButton("按鈕三")); JPanel jp 2 = new JPanel(); // 第二組卡片 jp 2. add(new JLabel("標籤四")); jp 2. add(new JLabel("標籤五")); cards. add(jp 1, "按鈕卡片"); cards. add(jp 2, "標籤卡片"); c. add(cards, Border. Layout. SOUTH);
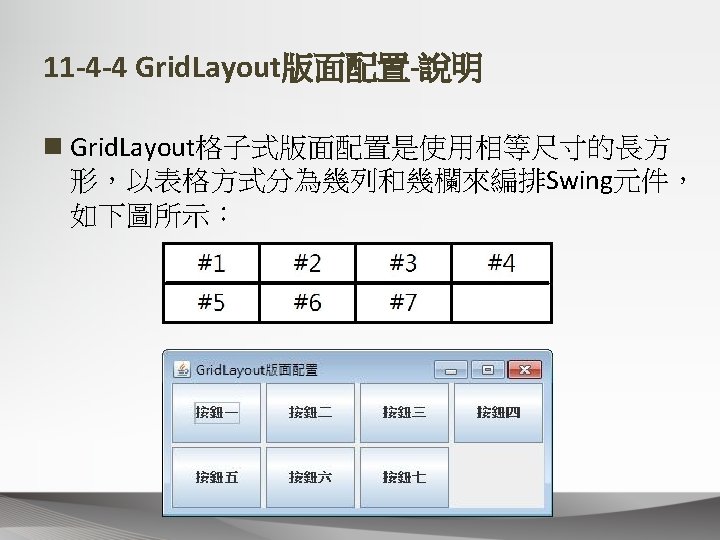
11 -4 -4 Grid. Layout版面配置-範例 Container c = get. Content. Pane(); c. set. Layout(new Grid. Layout(2, 4, 4, 4)); c. add(new JButton("按鈕一")); c. add(new JButton("按鈕二")); c. add(new JButton("按鈕三")); c. add(new JButton("按鈕四")); c. add(new JButton("按鈕五")); c. add(new JButton("按鈕六")); c. add(new JButton("按鈕七"));
11 -4 -5 Grid. Bag. Layout版面配置-成員變數 1
11 -4 -5 Grid. Bag. Layout版面配置-成員變數 2
11 -4 -5 Grid. Bag. Layout版面配置-範例1 Container c = get. Content. Pane(); Grid. Bag. Layout gridbag = new Grid. Bag. Layout(); Grid. Bag. Constraints gbc = new Grid. Bag. Constraints(); c. set. Layout(gridbag); // 設定容器預設的版面配置 gbc. fill=Grid. Bag. Constraints. HORIZONTAL; // 填滿方式 JButton button 1 = new JButton("按鈕一"); gbc. gridx = 0; gbc. gridy = 0; // 第幾欄, 第幾列 gridbag. set. Constraints(button 1, gbc); c. add(button 1); JButton button 2 = new JButton("按鈕二"); gbc. gridx = 1; gbc. gridy = 0; gridbag. set. Constraints(button 2, gbc);
11 -4 -5 Grid. Bag. Layout版面配置-範例2 c. add(button 2); JButton button 3 = new JButton("按鈕三"); gbc. gridx = 2; gbc. gridy = 0; gridbag. set. Constraints(button 3, gbc); c. add(button 3); JButton button 4 = new JButton("按鈕四"); gbc. ipady = 30; // 設定內部墊充 gbc. weightx = 0. 5; // 尺寸變更的權值 gbc. gridwidth = 3; // 使用幾欄 gbc. gridx = 0; gbc. gridy = 1; gridbag. set. Constraints(button 4, gbc); c. add(button 4);
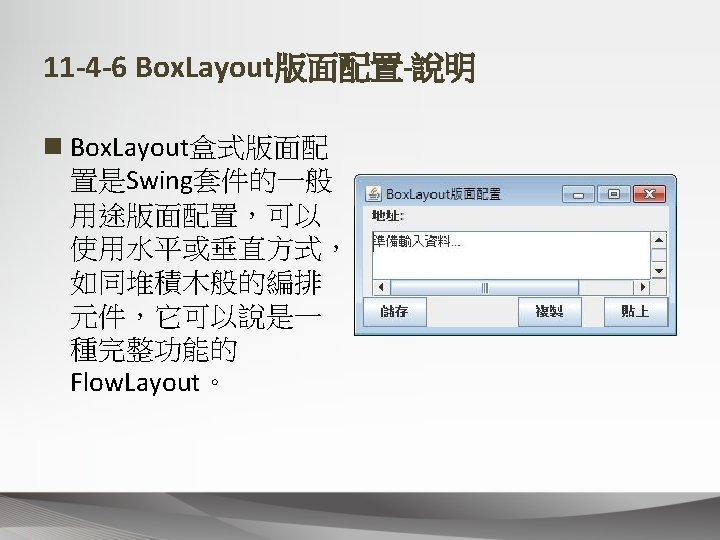
11 -4 -6 Box. Layout版面配置-範例1 Container c = get. Content. Pane(); JPanel jpane 1 = new JPanel(); // 第一個JPanel Box. Layout bl 1, bl 2; bl 1 = new Box. Layout(jpane 1, Box. Layout. Y_AXIS); jpane 1. set. Layout(bl 1); // 設定容器預設的版面配置 JLabel label = new JLabel("地址: "); jpane 1. add(label); jpane 1. add( Box. create. Rigid. Area(new Dimension(2, 5))); JText. Area area = new JText. Area("準備輸入資料. . . n", 15, 30); JScroll. Pane scroll = new JScroll. Pane(area); scroll. set. Alignment. X(LEFT_ALIGNMENT); jpane 1. add(scroll);
11 -4 -6 Box. Layout版面配置-範例2 JPanel jpane 2 = new JPanel(); // 第二個JPanel bl 2 = new Box. Layout(jpane 2, Box. Layout. X_AXIS); jpane 2. set. Layout(bl 2); // 設定容器預設版面配置 JButton button 1 = new JButton("儲存"); jpane 2. add(button 1); jpane 2. add(Box. create. Horizontal. Glue()); JButton button 2 = new JButton("複製"); jpane 2. add(button 2); jpane 2. add( Box. create. Rigid. Area(new Dimension(20, 5))); JButton button 3 = new JButton("貼上"); jpane 2. add(button 3); c. add(jpane 1, Border. Layout. CENTER); c. add(jpane 2, Border. Layout. SOUTH);