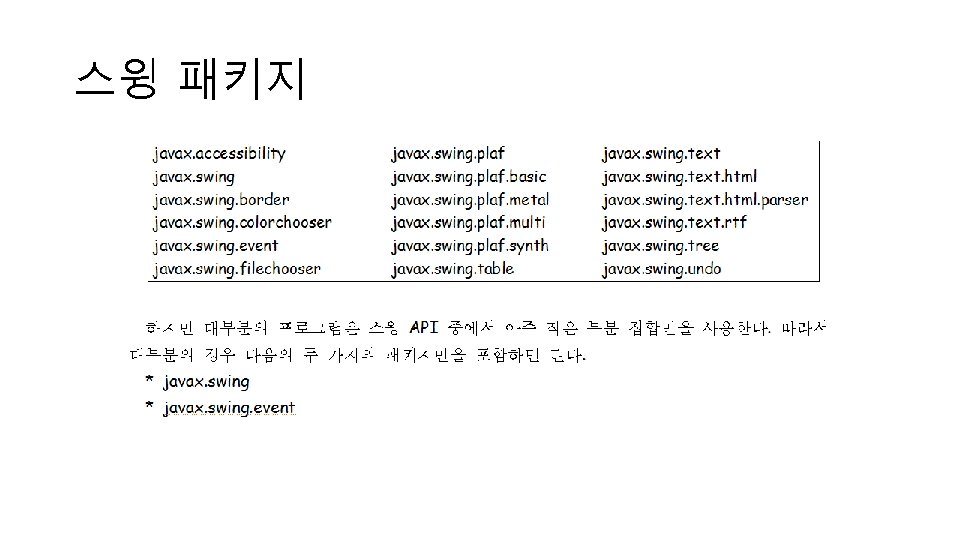
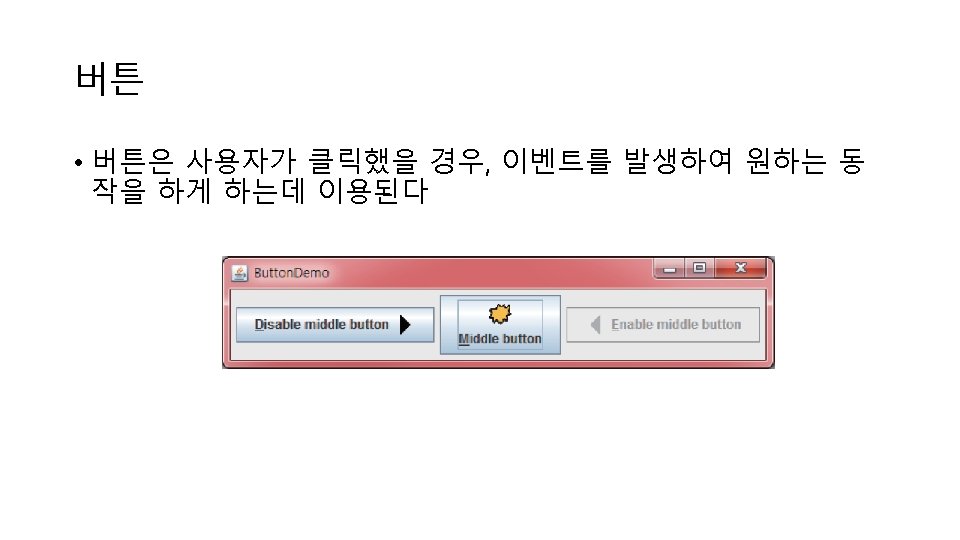
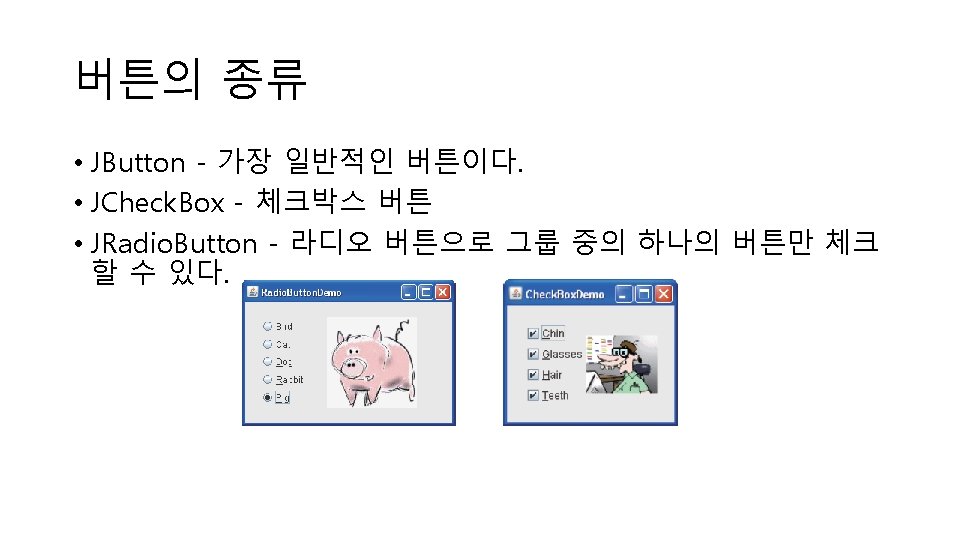
AWT SWING AWT SWING 1 import javax swing


 { Toolkit =")

; panel. add(field 1); panel. add(label 2); panel. add(field 2); panel.")


; JButton button 2 = new JButton(\"포테이토피자\"); JButton")
![SOURCE public class My. Frame. Test { public static void main(String[] args) { My.](https://slidetodoc.com/presentation_image_h/f802a5cb28570e267dde6c8d21016321/image-42.jpg "SOURCE public class My. Frame. Test { public static void main(String[] args) { My.")


);")

을 사용하던 지 apply. Component. Orientation()을")


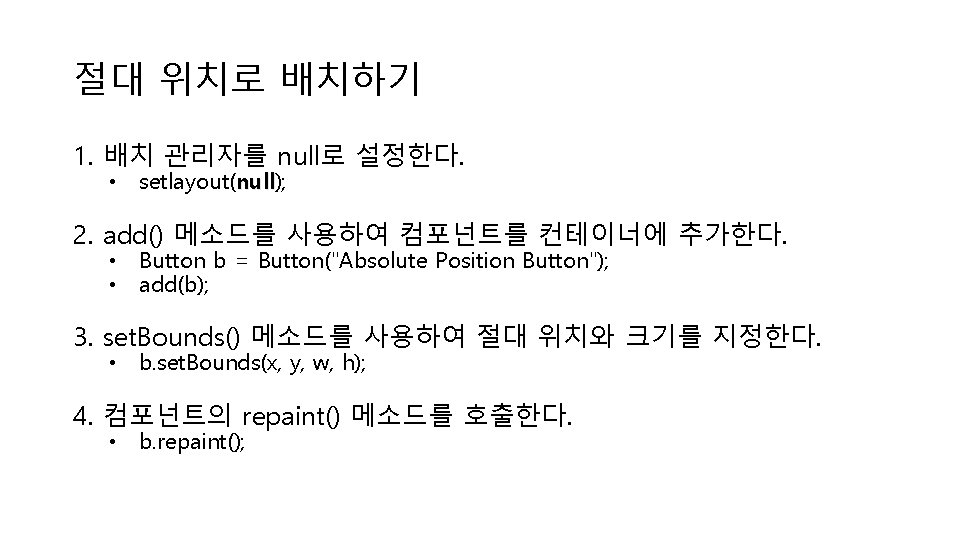

; b 2. set. Bounds(55,")

 { t. Field = new JText. Field(35); panel = new JPanel();")
; add(panel, Border. Layout. CENTER); set. Visible(true); pack(); }")

![SOLUTION public class My. Frame. Test { public static void main(String args[]) { My.](https://slidetodoc.com/presentation_image_h/f802a5cb28570e267dde6c8d21016321/image-70.jpg "SOLUTION public class My. Frame. Test { public static void main(String args[]) { My.")
![SOLUTION public class My. Frame extends JFrame { JPanel p = new JPanel(); JLabel[]](https://slidetodoc.com/presentation_image_h/f802a5cb28570e267dde6c8d21016321/image-72.jpg "SOLUTION public class My. Frame extends JFrame { JPanel p = new JPanel(); JLabel[]")
![SOLUTION public class My. Frame. Test { public static void main(String args[]) { My.](https://slidetodoc.com/presentation_image_h/f802a5cb28570e267dde6c8d21016321/image-73.jpg "SOLUTION public class My. Frame. Test { public static void main(String args[]) { My.")

- Slides: 74
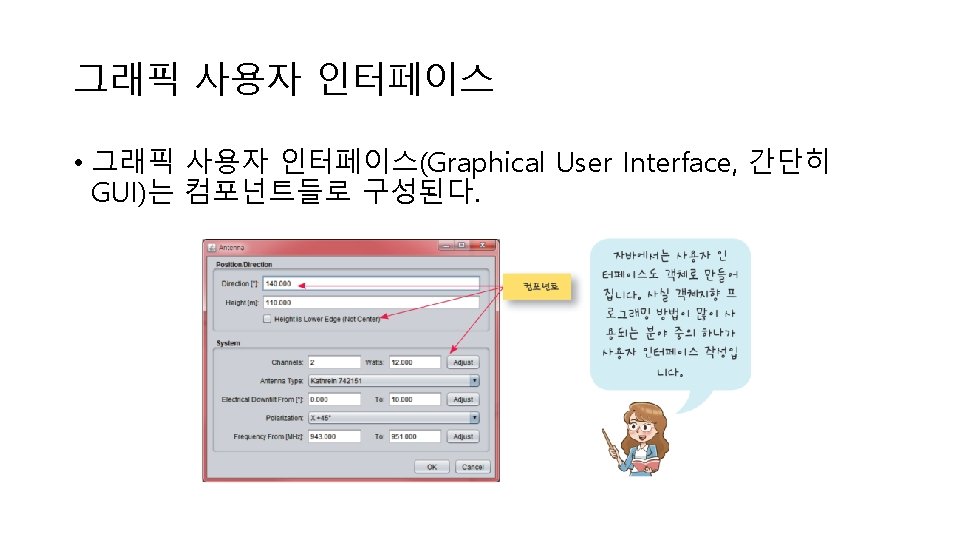
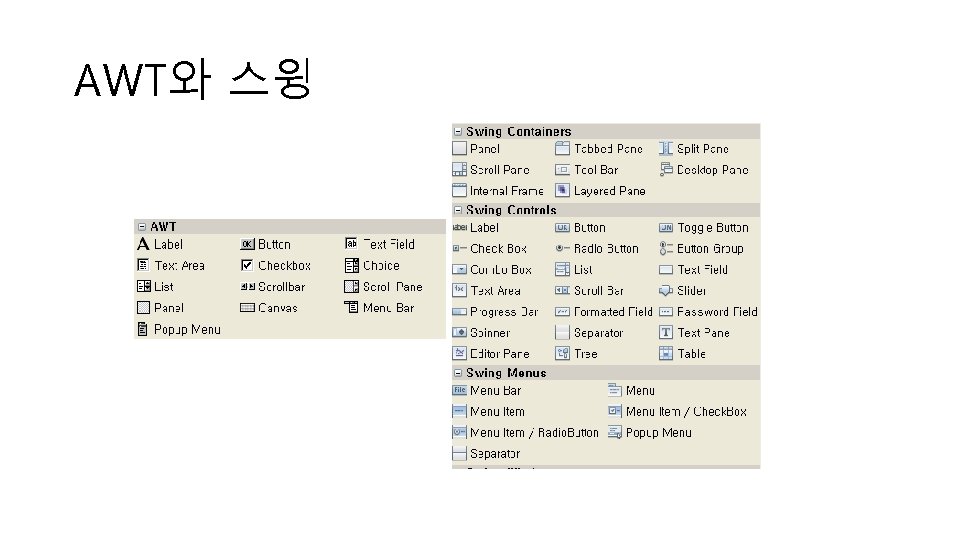
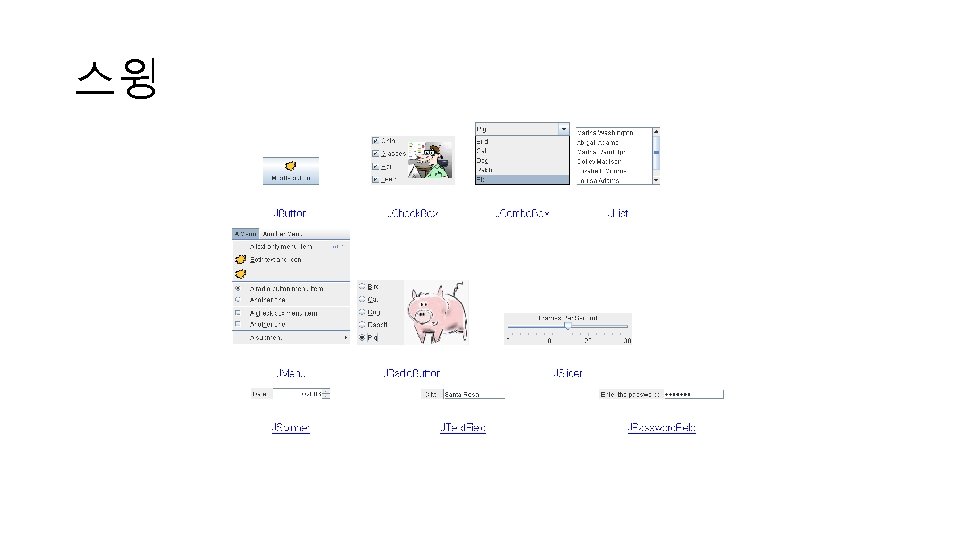
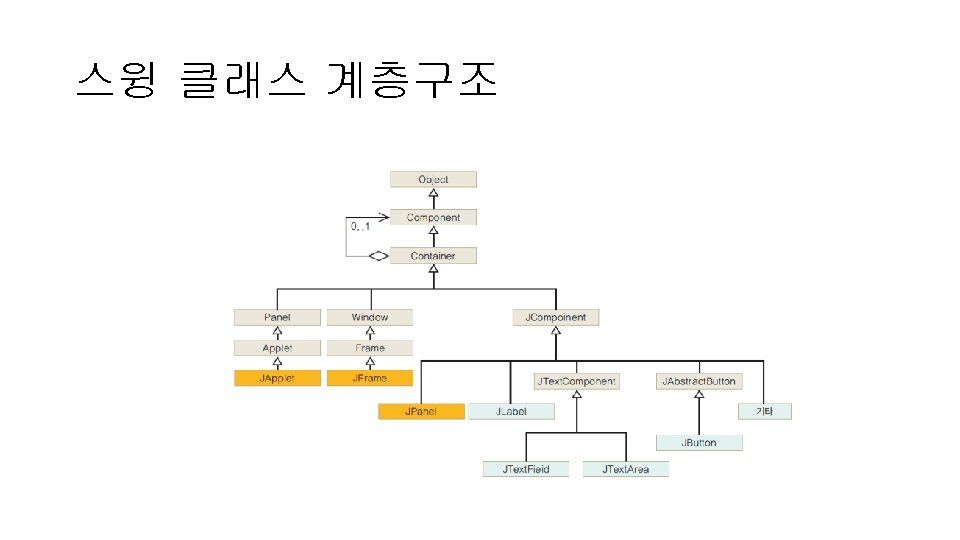
AWT와 SWING의 비교 AWT SWING
프레임 생성 #1 import javax. swing. *; public class Frame. Test { public static void main(String[] args) { JFrame f = new JFrame("Frame Test"); f. set. Size(300, 200); f. set. Default. Close. Operation(JFrame. EXIT_ON_CLOSE); f. set. Visible(true); } } JFrame의 객체 생 성
프레임 생성 #2 import javax. swing. *; public class My. Frame extends JFrame { Jframe을 상속하여서 My. Frame을 정의 public My. Frame() { set. Size(300, 200); set. Default. Close. Operation(JFrame. EXIT_ON_CLOSE); set. Title("My. Frame"); set. Visible(true); } } public class My. Frame. Test { public static void main(String[] args) { My. Frame f = new My. Frame(); } } My. Frame의 객체 생성
프레임 생성 #3 Jframe을 상속하여서 My. Frame을 정의 import javax. swing. *; public class My. Frame extends JFrame { public My. Frame() { set. Size(300, 200); set. Default. Close. Operation(JFrame. EXIT_ON_CLOSE); set. Title("My. Frame"); set. Visible(true); } public static void main(String[] args) { My. Frame f = new My. Frame(); } } main()이 My. Frame 안으로 이동
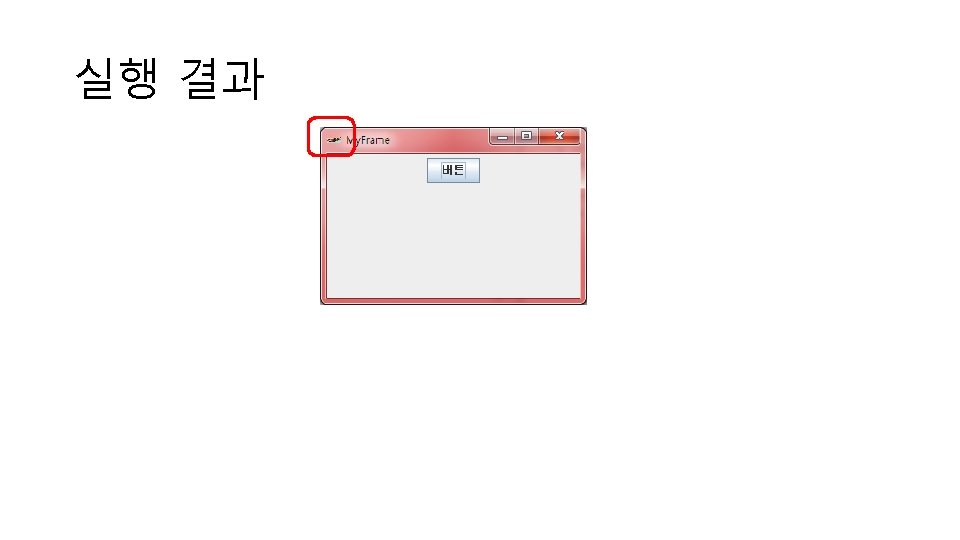
컴포넌트 생성과 추가 import javax. swing. *; import java. awt. Flow. Layout; public class My. Frame extends JFrame { public My. Frame() { set. Size(300, 200); set. Default. Close. Operation(JFrame. EXIT_ON_CLOSE); set. Title("My. Frame"); set. Layout(new Flow. Layout()); JButton button = new JButton("버튼"); this. add(button); set. Visible(true); } } public class My. Frame. Test { public static void main(String[] args) { My. Frame f = new My. Frame(); } } 배치 관리자 설정! 컴포넌트 생성 및 추가
예제 public class My. Frame extends JFrame { public My. Frame() { Toolkit = Toolkit. get. Default. Toolkit(); Dimension screen. Size = kit. get. Screen. Size(); set. Size(300, 200); set. Location(screen. Size. width / 2, screen. Size. height / 2); set. Default. Close. Operation(JFrame. EXIT_ON_CLOSE); set. Title("My. Frame"); Image img = kit. get. Image("icon. gif"); set. Icon. Image(img); set. Layout(new Flow. Layout()); JButton button = new JButton("버튼"); this. add(button); set. Visible(true); } }
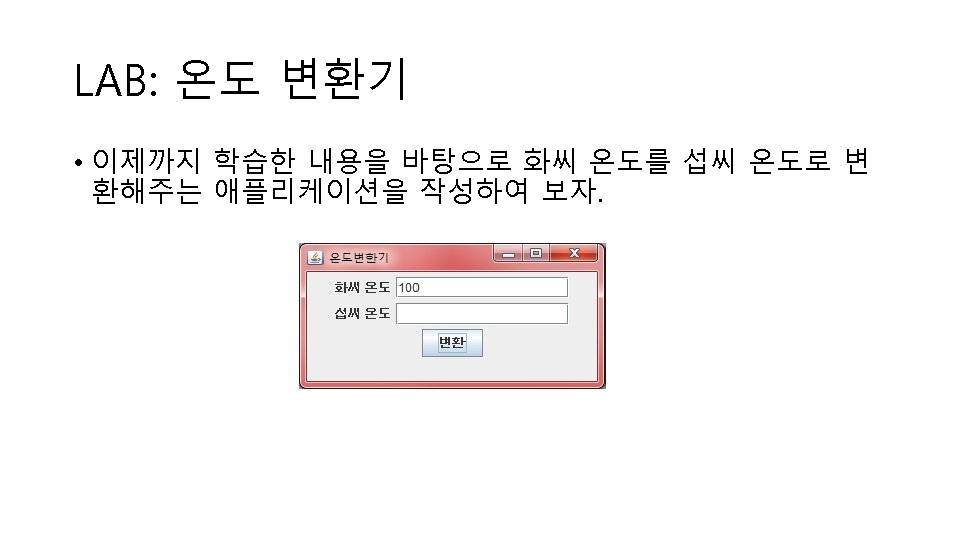
SOLUTION // 소스를 입력하고 Ctrl+Shift+O를 눌러서 필요한 파일을 포함한다. public class Mylab { public static void main(String[] args) { JFrame f = new JFrame(); JPanel panel = new JPanel(); f. add(panel); JLabel label 1 = new JLabel("화씨 온도"); JLabel label 2 = new JLabel("섭씨 온도"); JText. Field field 1 = new JText. Field(15); JText. Field field 2 = new JText. Field(15); JButton button = new JButton("변환");
SOLUTION panel. add(label 1); panel. add(field 1); panel. add(label 2); panel. add(field 2); panel. add(button); f. set. Size(300, 150); f. set. Default. Close. Operation(JFrame. EXIT_ON_CLOSE); f. set. Title("온도변환기"); f. set. Visible(true); } }
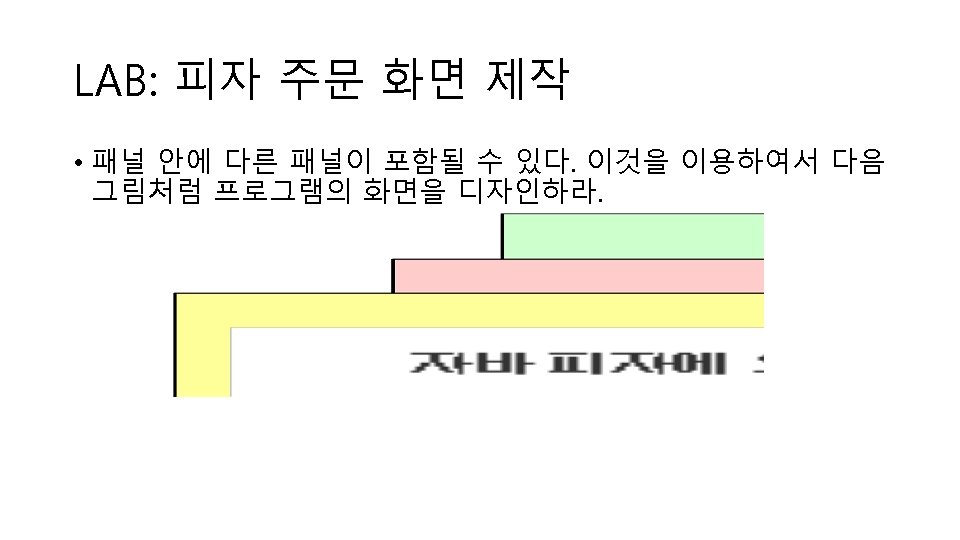
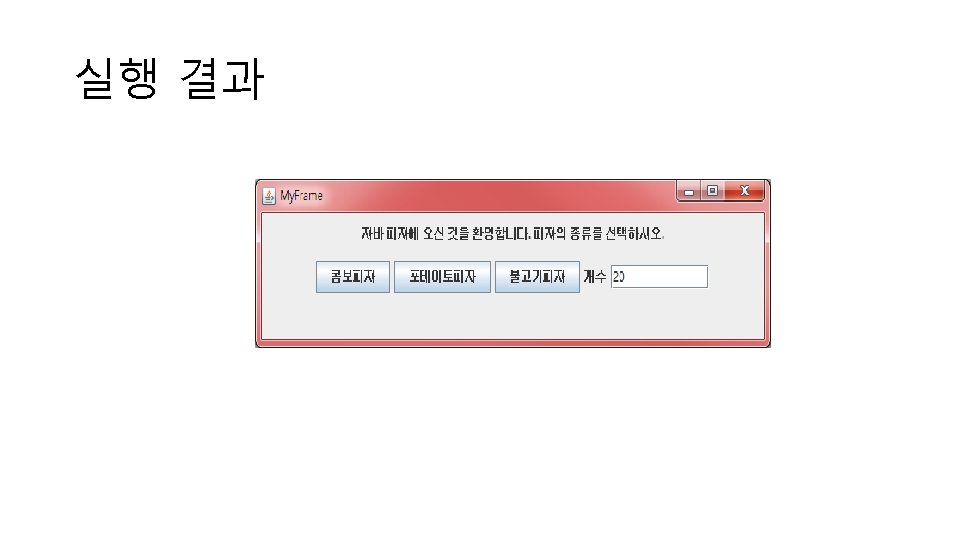
SOURCE // 소스만 입력하고 Ctrl+Shift+O를 누른다. public class My. Frame extends JFrame { public My. Frame() { set. Size(600, 150); set. Default. Close. Operation(JFrame. EXIT_ON_CLOSE); set. Title("My. Frame"); JPanel panel = new JPanel(); JPanel panel. A = new JPanel(); JPanel panel. B = new JPanel(); JLabel label 1 = new JLabel("자바 피자에 오신 것을 환영합니다. 피자의 종류를 선택하시오. "); panel. A. add(label 1);
SOURCE JButton button 1 = new JButton("콤보피자"); JButton button 2 = new JButton("포테이토피자"); JButton button 3 = new JButton("불고기피자"); panel. B. add(button 1); panel. B. add(button 2); panel. B. add(button 3); JLabel label 2 = new JLabel("개수"); JText. Field field 1 = new JText. Field(10); panel. B. add(label 2); panel. B. add(field 1); panel. add(panel. A); panel. add(panel. B); add(panel); set. Visible(true); } }
SOURCE public class My. Frame. Test { public static void main(String[] args) { My. Frame f = new My. Frame(); } }
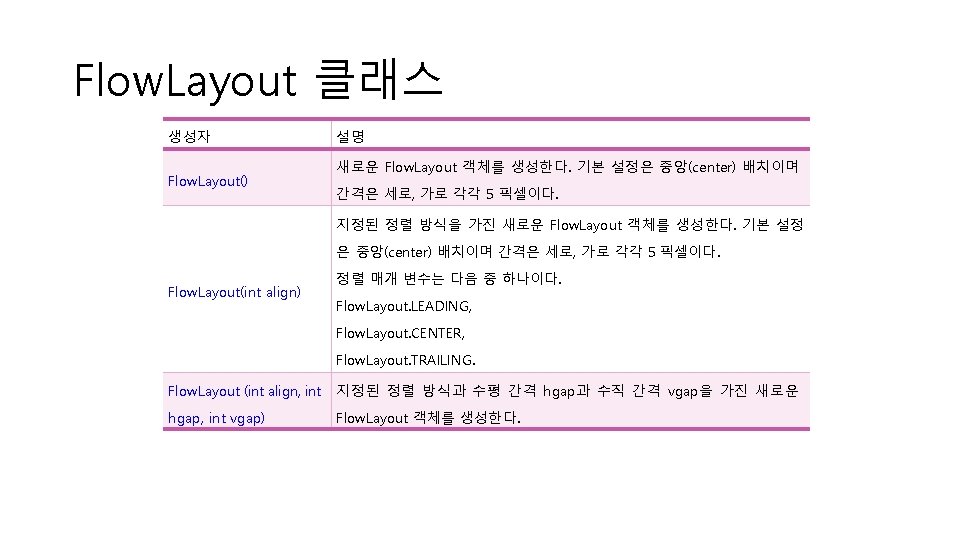
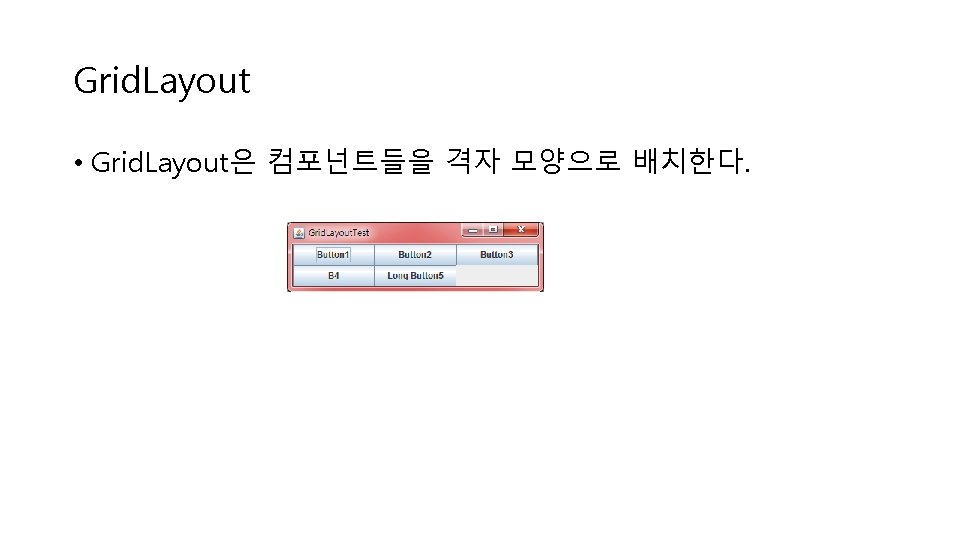
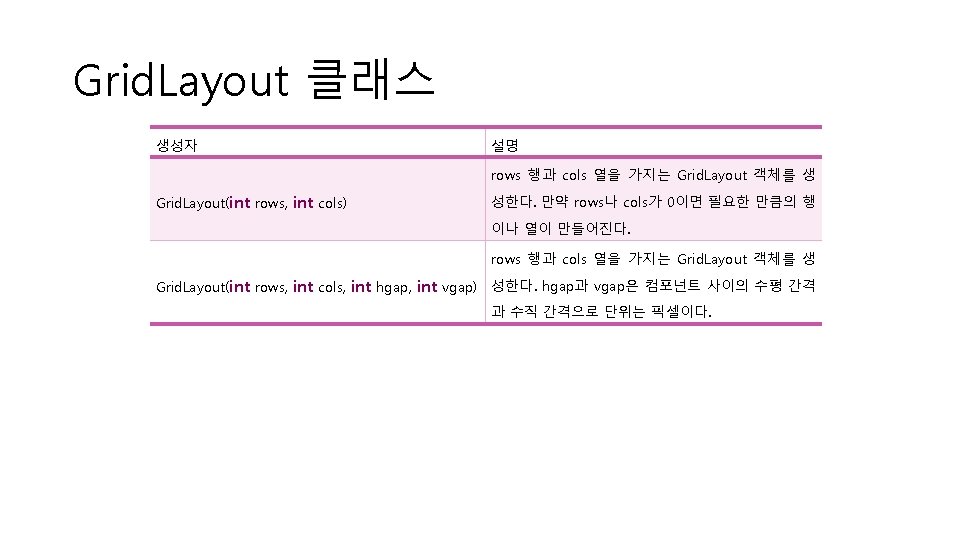
배치 관리자의 종류 Flow. Layout Grid. Bag. Layout Grid. Layout
배치 관리자의 종류 Border. Layout Box. Layout Card. Layout
배치 관리자의 설정 1. 생성자를 이용하는 방법 JPanel panel = new JPanel(new Border. Layout()); 2. set. Layout() 메소드 이용 panel. set. Layout(new Flow. Layout());
크기와 정렬 힌트 • 프로그래머가 컴포넌트의 크기와 힌트를 배치 관리자에게 주고 싶은 경우에는 set. Minimum. Size(), set. Preferred. Size(), set. Maximum. Size() 메소드를 사용 • (예) button. set. Maximum. Size(new Dimension(300, 200)); // 최대 크기 힌트 • button. set. Alignment. X(JComponent. CENTER_ALIGNMENT); // 중앙 정렬 힌트
배치 방향 설정 • 컴포넌트의 메소드인 set. Component. Orientation()을 사용하던 지 apply. Component. Orientation()을 사용 • (예) panel. apply. Component. Orientation( Component. Orientation. RIGHT_TO_LEFT);
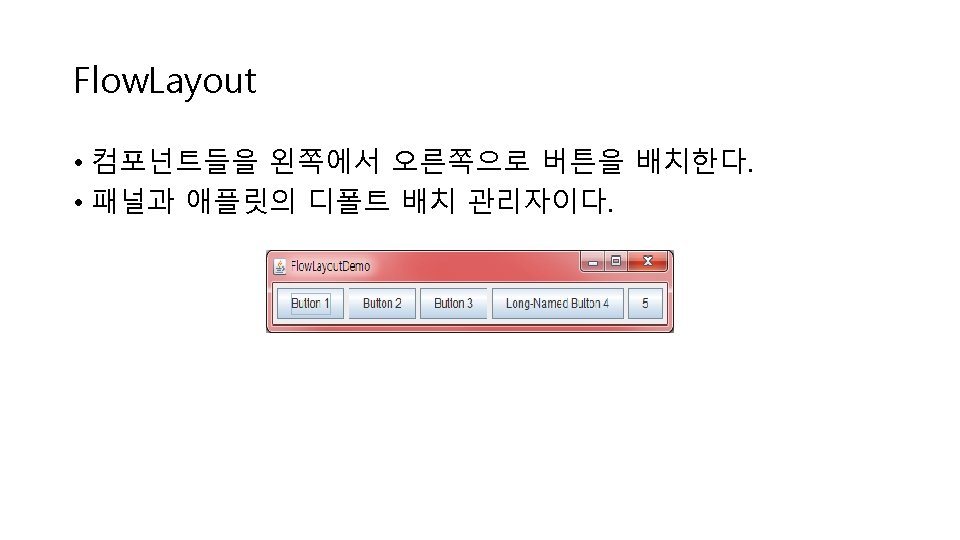
Flow. Layout 예제 import java. awt. *; import javax. swing. *; class My. Frame extends JFrame { public My. Frame() { set. Title("Flow. Layout. Test"); set. Default. Close. Operation(JFrame. EXIT_ON_CLOSE); JPanel panel; // 패널을 생성하고 배치 관리자를 Flow. Layout으로 설정 panel = new JPanel(); panel. set. Layout(new Flow. Layout(Flow. Layout. CENTER)); // 패널에 버튼을 생성하여 추가 panel. add(new JButton("Button 1")); panel. add(new JButton("Button 2")); panel. add(new JButton("Button 3")); panel. add(new JButton("B 4")); panel. add(new JButton("Long Button 5")); add(panel); pack(); set. Visible(true); } }
Border. Layout • Border. Layout은 5개의 영역으로 구분하고 각각의 영역에 컴포 넌트를 배치 • PAGE_START (또는 NORTH) • PAGE_END (또는 SOUTH) • LINE_START (또는 WEST) • LINE_END (또는 EAST) • CENTER
Border. Layout 예제 import java. awt. *; import javax. swing. *; class My. Frame extends JFrame { public My. Frame() { set. Title("Border. Layout. Test"); set. Default. Close. Operation(JFrame. EXIT_ON_CLOSE); // 프레임은 디폴트로 Border. Layout 이므로 사실은 불필요 set. Layout(new Border. Layout()); // 버튼을 추가한다. add(new JButton("Center"), Border. Layout. CENTER); add(new JButton("Line Start"), Border. Layout. LINE_START); add(new JButton("Line End"), Border. Layout. LINE_END); add(new JButton("Page Start"), Border. Layout. PAGE_START); add(new JButton("Page End"), Border. Layout. PAGE_END); pack(); set. Visible(true); } }
Grid. Layout 예제 import java. awt. *; import javax. swing. *; class My. Frame extends JFrame { public My. Frame() { set. Title("Grid. Layout. Test"); set. Default. Close. Operation(JFrame. EXIT_ON_CLOSE); set. Layout(new Grid. Layout(0, 3)); add(new JButton("Button 1")); add(new JButton("Button 2")); add(new JButton("Button 3")); add(new JButton("B 4")); add(new JButton("Long Button 5")); pack(); set. Visible(true); } } // 3개의 열과 필요한 만큼의 행
절대 위치 예제 import java. awt. *; import java. awt. event. *; import javax. swing. *; class My. Frame extends JFrame { JButton b 1; private JButton b 2, b 3; public My. Frame() { set. Title("Absolute Position Test"); set. Default. Close. Operation(JFrame. EXIT_ON_CLOSE); set. Size(300, 200); JPanel p = new JPanel(); p. set. Layout(null); b 1 = new JButton("Button #1"); p. add(b 1); b 2 = new JButton("Button #2"); p. add(b 2); b 3 = new JButton("Button #3"); p. add(b 3);
절대 위치 예제 b 1. set. Bounds(20, 5, 95, 30); b 2. set. Bounds(55, 45, 105, 70); b 3. set. Bounds(180, 15, 105, 90); add(p); set. Visible(true); } } public class Absolute. Test { public static void main(String args[]) { My. Frame f=new My. Frame(); } }
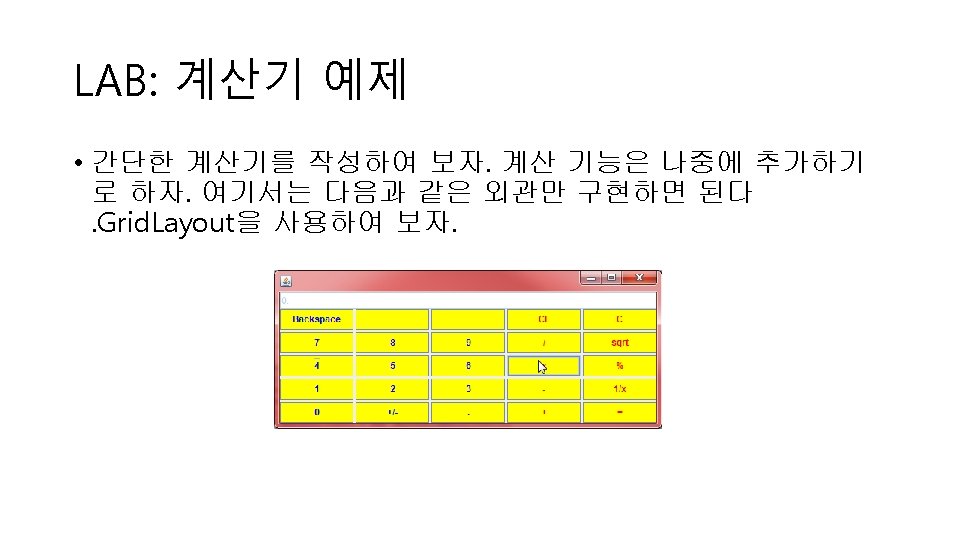
SOLUTION // 소스만 입력하고 Ctrl+Shift+O를 누른다. public class Calculator extends JFrame { private }; JPanel panel; JText. Field; JButton[] buttons; String[] labels = { "Backspace", "", "CE", "C", "7", "8", "9", "/", "sqrt", "4", "5", "6", "x", "%", "1", "2", "3", "-", "1/x", "0", "+/-", "+", "=",
SOLUTION public Calculator() { t. Field = new JText. Field(35); panel = new JPanel(); t. Field. set. Text("0. "); t. Field. set. Enabled(false); panel. set. Layout(new Grid. Layout(0, 5, 3, 3)); buttons = new JButton[25]; int index = 0; for (int rows = 0; rows < 5; rows++) { for (int cols = 0; cols < 5; cols++) { buttons[index] = new JButton(labels[index]); if( cols >= 3 ) buttons[index]. set. Foreground(Color. red); else buttons[index]. set. Foreground(Color. blue); buttons[index]. set. Background(Color. yellow); panel. add(buttons[index]); index++; } }
SOLUTION add(t. Field, Border. Layout. NORTH); add(panel, Border. Layout. CENTER); set. Visible(true); pack(); } public static void main(String args[]) { Calculator s = new Calculator(); } }
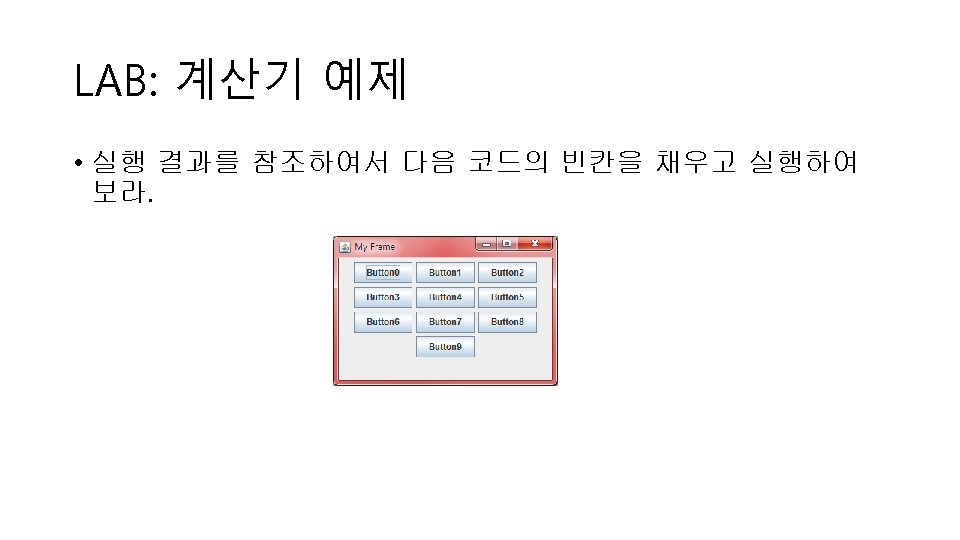
SOLUTION import java. awt. Flow. Layout; import javax. swing. *; public class My. Frame extends JFrame { JPanel p 1; public My. Frame() { set. Size(300, 200); set. Title("My Frame"); p 1 = new JPanel(); p 1. set. Layout(new Flow. Layout()); for (int i = 0; i < 10; i++) p 1. add(new JButton("Button" + i)); add(p 1); set. Visible(true); // 프레임을 화면에 표시한다. } }
SOLUTION public class My. Frame. Test { public static void main(String args[]) { My. Frame f = new My. Frame(); } }
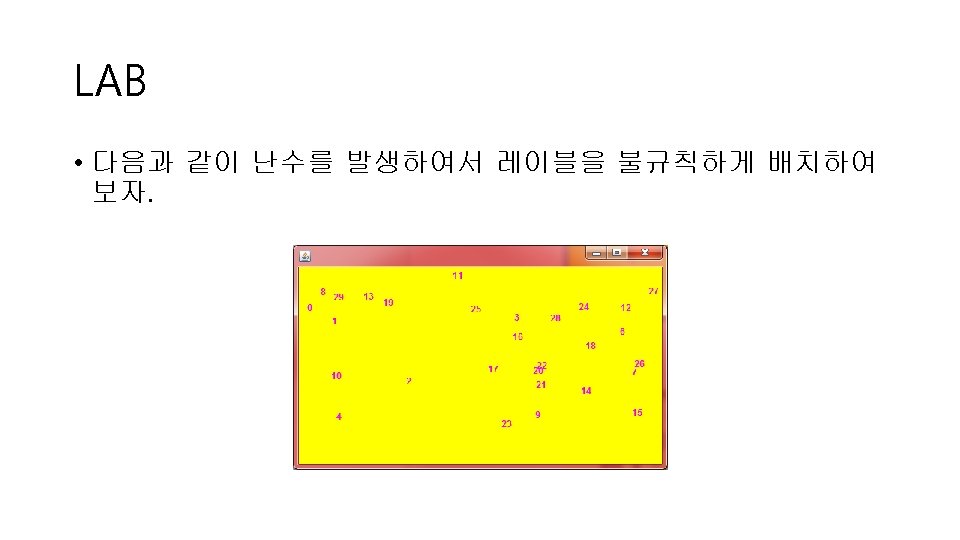
SOLUTION public class My. Frame extends JFrame { JPanel p = new JPanel(); JLabel[] labels = new JLabel[30]; public My. Frame() { p. set. Layout(null); p. set. Background(Color. YELLOW); for (int i = 0; i < 30; i++) { labels[i] = new JLabel("" + i); int x = (int) (500 * Math. random()); int y = (int) (200 * Math. random()); labels[i]. set. Foreground(Color. MAGENTA); labels[i]. set. Location(x, y); labels[i]. set. Size(20, 20); p. add(labels[i]); } set. Size(500, 300); add(p); set. Visible(true); // 프레임을 화면에 표시한다. } }
SOLUTION public class My. Frame. Test { public static void main(String args[]) { My. Frame f = new My. Frame(); } }
Q&A