VELO RF Foil Thinning Chemical Etching Lucia Lain


- Slides: 23

VELO RF Foil Thinning Chemical Etching Lucia Lain Amador Leonel Marques Antunes Ferreira TE-VSC-SCC Massimiliano Ferro-Luzzi PH-LHCb Vacuum, Surfaces & Coatings Group Technology Department

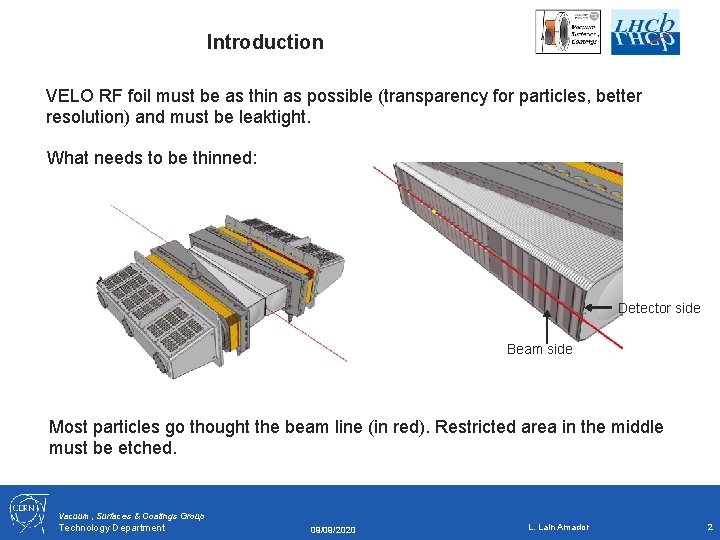
Introduction VELO RF foil must be as thin as possible (transparency for particles, better resolution) and must be leaktight. What needs to be thinned: Detector side Beam side Most particles go thought the beam line (in red). Restricted area in the middle must be etched. Vacuum, Surfaces & Coatings Group Technology Department 09/09/2020 L. Lain Amador 2

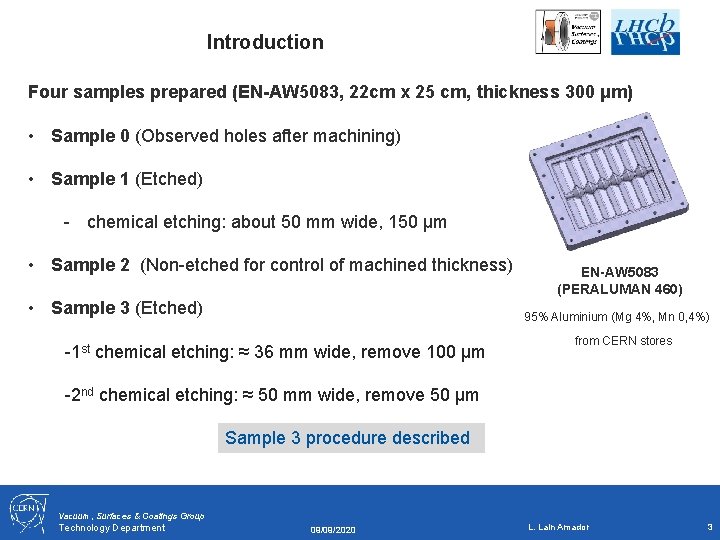
Introduction Four samples prepared (EN-AW 5083, 22 cm x 25 cm, thickness 300 μm) • Sample 0 (Observed holes after machining) • Sample 1 (Etched) - chemical etching: about 50 mm wide, 150 μm • Sample 2 (Non-etched for control of machined thickness) • Sample 3 (Etched) EN-AW 5083 (PERALUMAN 460) 95% Aluminium (Mg 4%, Mn 0, 4%) -1 st chemical etching: ≈ 36 mm wide, remove 100 μm from CERN stores -2 nd chemical etching: ≈ 50 mm wide, remove 50 μm Sample 3 procedure described Vacuum, Surfaces & Coatings Group Technology Department 09/09/2020 L. Lain Amador 3

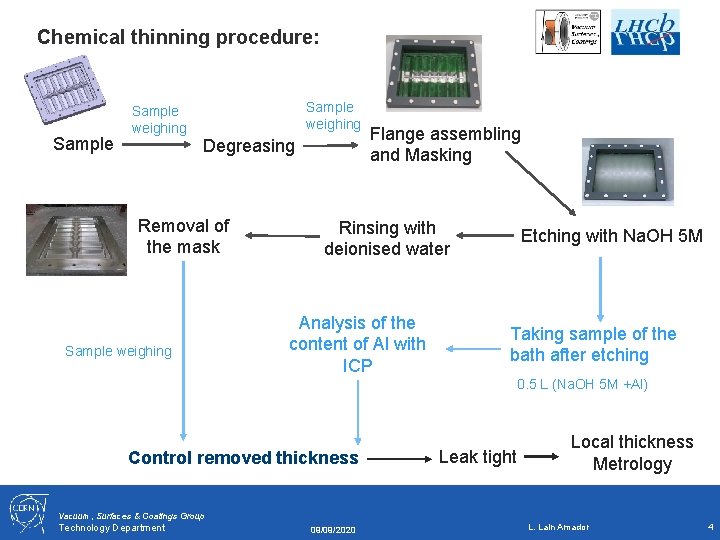
Chemical thinning procedure: Sample weighing Degreasing Removal of the mask Sample weighing Flange assembling and Masking Rinsing with deionised water Analysis of the content of Al with ICP Etching with Na. OH 5 M Taking sample of the bath after etching 0. 5 L (Na. OH 5 M +Al) Control removed thickness Leak tight Local thickness Metrology Vacuum, Surfaces & Coatings Group Technology Department 09/09/2020 L. Lain Amador 4

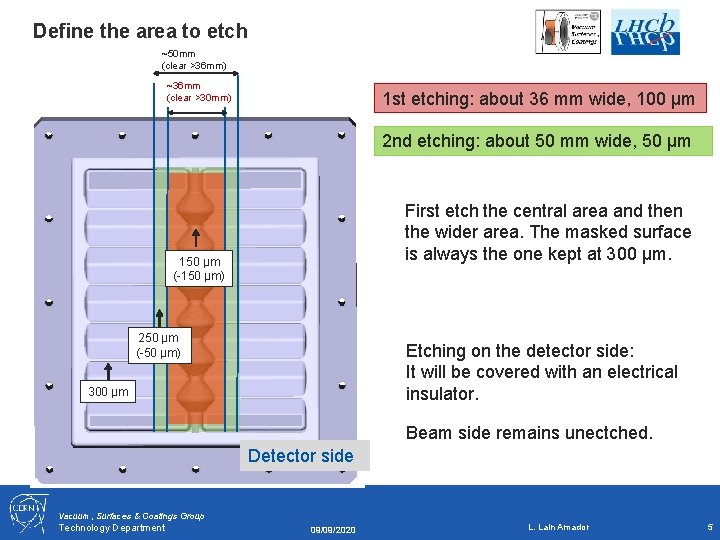
Define the area to etch ~50 mm (clear >36 mm) ~36 mm (clear >30 mm) 1 st etching: about 36 mm wide, 100 μm 2 nd etching: about 50 mm wide, 50 μm First etch the central area and then the wider area. The masked surface is always the one kept at 300 μm. 150 μm (-150 μm) 250 μm (-50 μm) Etching on the detector side: It will be covered with an electrical insulator. 300 μm Beam side remains unectched. Detector side Vacuum, Surfaces & Coatings Group Technology Department 09/09/2020 L. Lain Amador 5

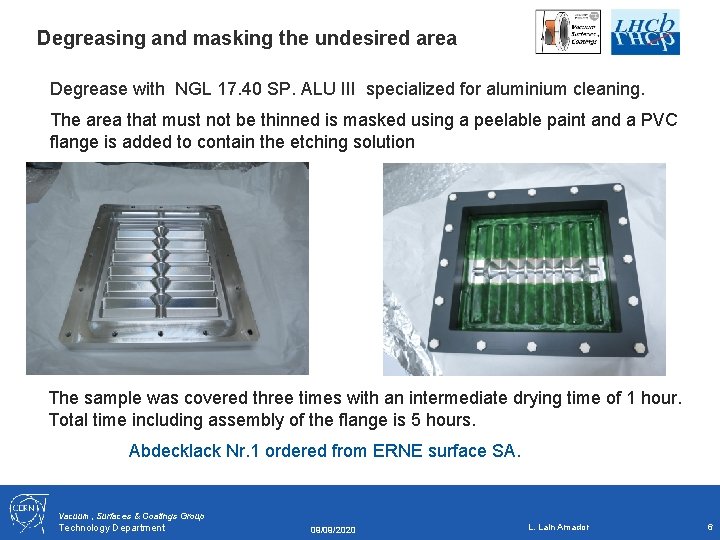
Degreasing and masking the undesired area Degrease with NGL 17. 40 SP. ALU III specialized for aluminium cleaning. The area that must not be thinned is masked using a peelable paint and a PVC flange is added to contain the etching solution The sample was covered three times with an intermediate drying time of 1 hour. Total time including assembly of the flange is 5 hours. Abdecklack Nr. 1 ordered from ERNE surface SA. Vacuum, Surfaces & Coatings Group Technology Department 09/09/2020 L. Lain Amador 6

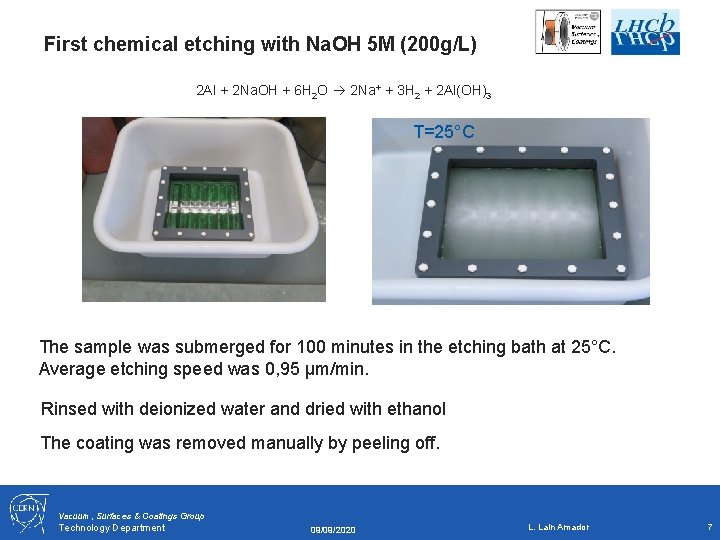
First chemical etching with Na. OH 5 M (200 g/L) 2 Al + 2 Na. OH + 6 H 2 O 2 Na+ + 3 H 2 + 2 Al(OH)3 T=25°C The sample was submerged for 100 minutes in the etching bath at 25°C. Average etching speed was 0, 95 μm/min. Rinsed with deionized water and dried with ethanol The coating was removed manually by peeling off. Vacuum, Surfaces & Coatings Group Technology Department 09/09/2020 L. Lain Amador 7

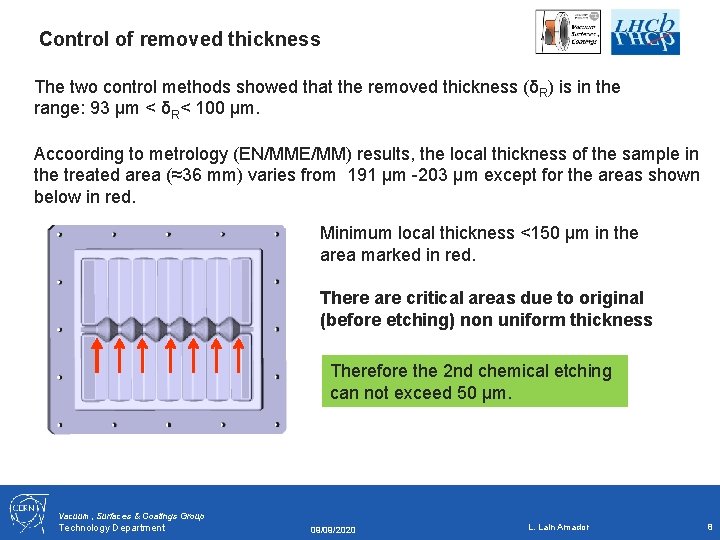
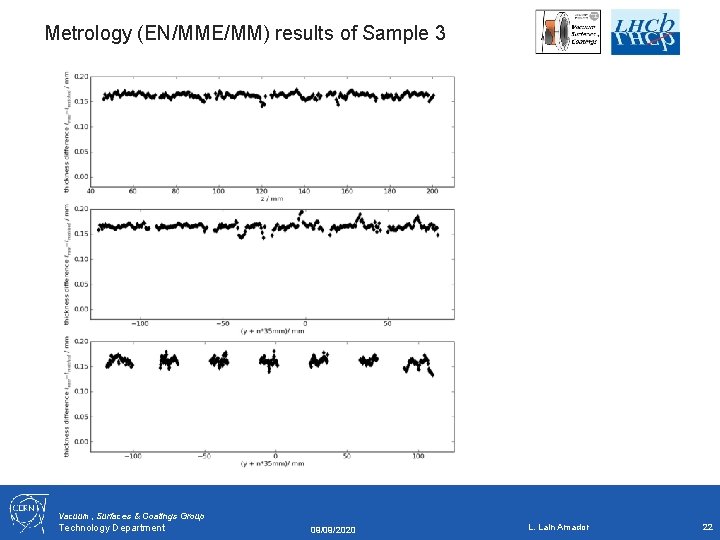
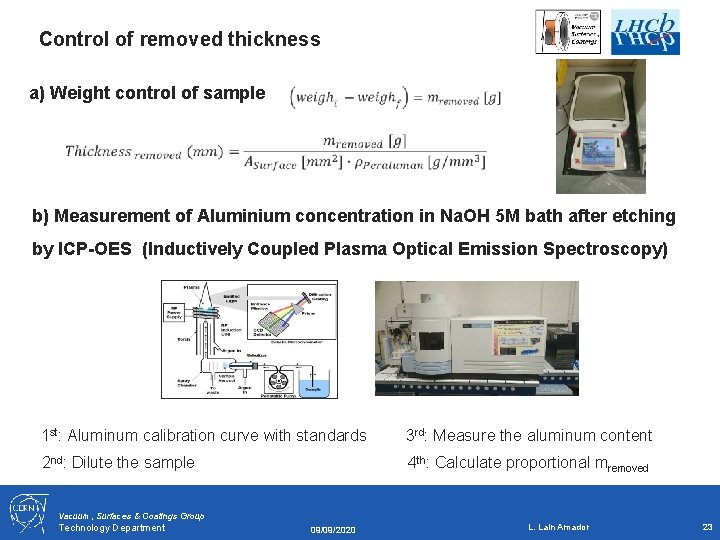
Control of removed thickness The two control methods showed that the removed thickness (δR) is in the range: 93 μm < δR< 100 µm. Accoording to metrology (EN/MME/MM) results, the local thickness of the sample in the treated area (≈36 mm) varies from 191 μm -203 µm except for the areas shown below in red. Minimum local thickness <150 μm in the area marked in red. There are critical areas due to original (before etching) non uniform thickness Therefore the 2 nd chemical etching can not exceed 50 μm. Vacuum, Surfaces & Coatings Group Technology Department 09/09/2020 L. Lain Amador 8

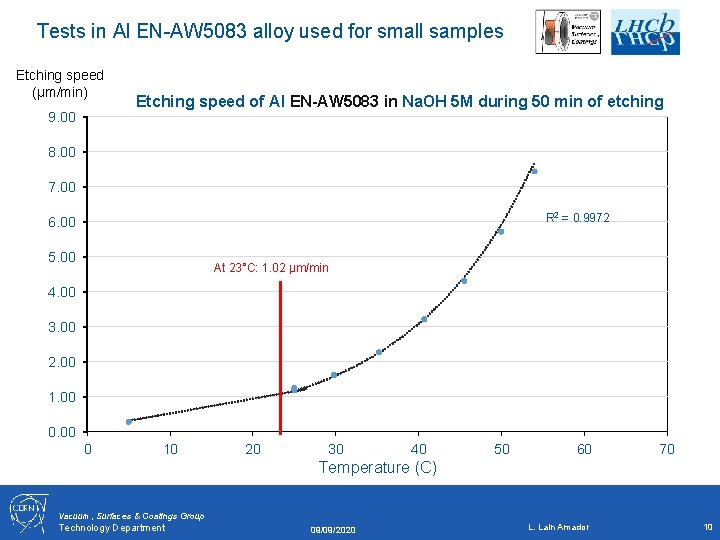
What we have learnt • From the chemical etching process Process is very sensitive to the temperature of the etching bath. The temperature • should be always controlled during the etching. Etching is not sensitive to the surface shape (uniform removed thickness). • • How to mask / unmask areas that must not be thinned Make several coatings with Abdecklack Nr. 1. Mask shows very good results: No • residues, no plastic deformation and easy to remove if thicker enough. How to control the average removed thickness • By weighing or measuring the aluminium concentration of the bath. Good correlation with metrology results. Vacuum, Surfaces & Coatings Group Technology Department 09/09/2020 L. Lain Amador 9

Tests in Al EN-AW 5083 alloy used for small samples Etching speed (µm/min) 9. 00 Etching speed of Al EN-AW 5083 in Na. OH 5 M during 50 min of etching 8. 00 7. 00 R 2 = 0. 9972 6. 00 5. 00 At 23°C: 1. 02 µm/min 4. 00 3. 00 2. 00 1. 00 0 10 20 30 40 50 60 70 Temperature (C) Vacuum, Surfaces & Coatings Group Technology Department 09/09/2020 L. Lain Amador 10

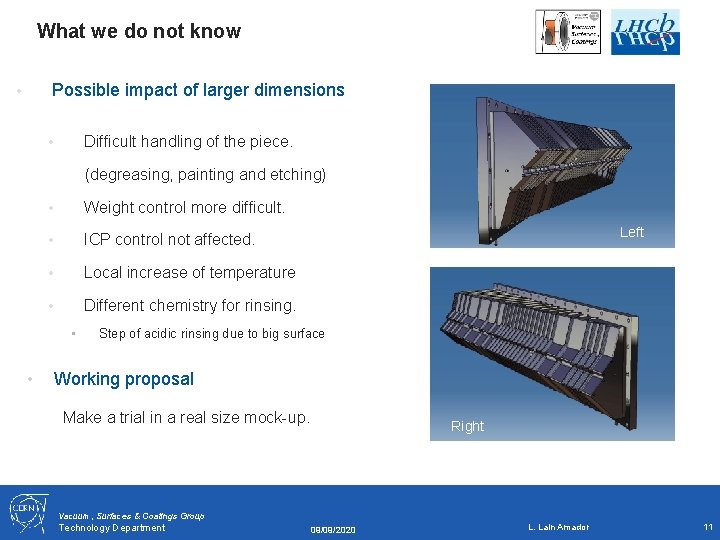
What we do not know • Possible impact of larger dimensions Difficult handling of the piece. • (degreasing, painting and etching) • Weight control more difficult. • ICP control not affected. • Local increase of temperature • Different chemistry for rinsing. • Left Step of acidic rinsing due to big surface • Working proposal Make a trial in a real size mock-up. Right Vacuum, Surfaces & Coatings Group Technology Department 09/09/2020 L. Lain Amador 11

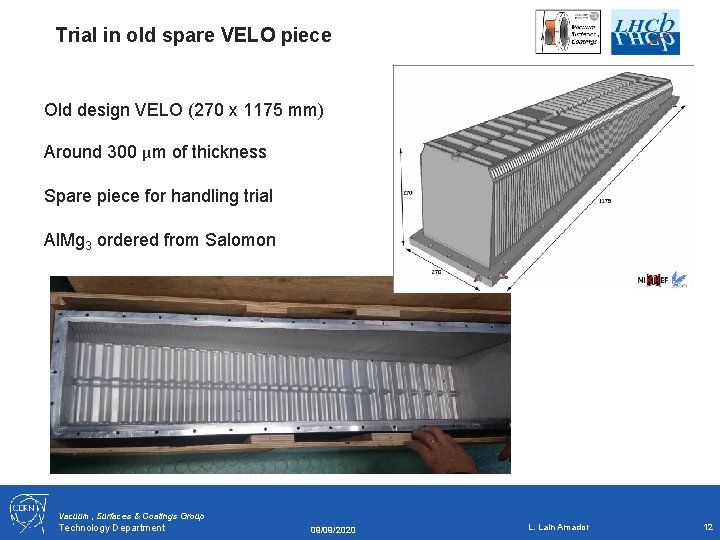
Trial in old spare VELO piece Old design VELO (270 x 1175 mm) Around 300 µm of thickness Spare piece for handling trial Al. Mg 3 ordered from Salomon Vacuum, Surfaces & Coatings Group Technology Department 09/09/2020 L. Lain Amador 12

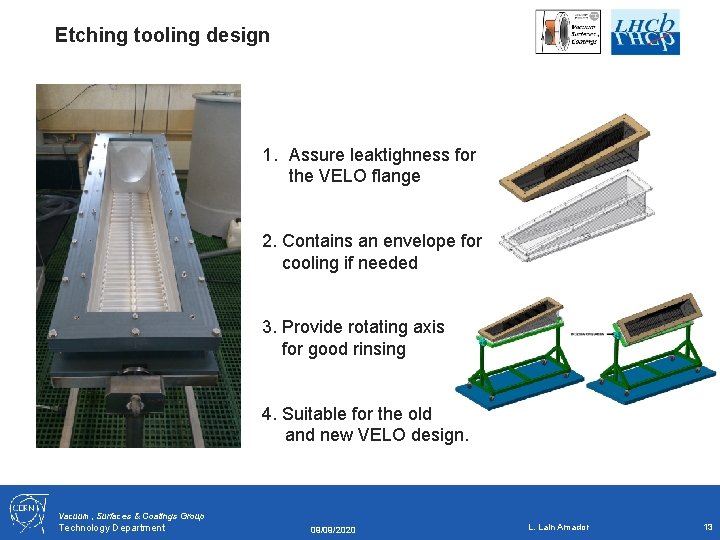
Etching tooling design 1. Assure leaktighness for the VELO flange 2. Contains an envelope for cooling if needed 3. Provide rotating axis for good rinsing 4. Suitable for the old D and new VELO design. Vacuum, Surfaces & Coatings Group Technology Department 09/09/2020 L. Lain Amador 13

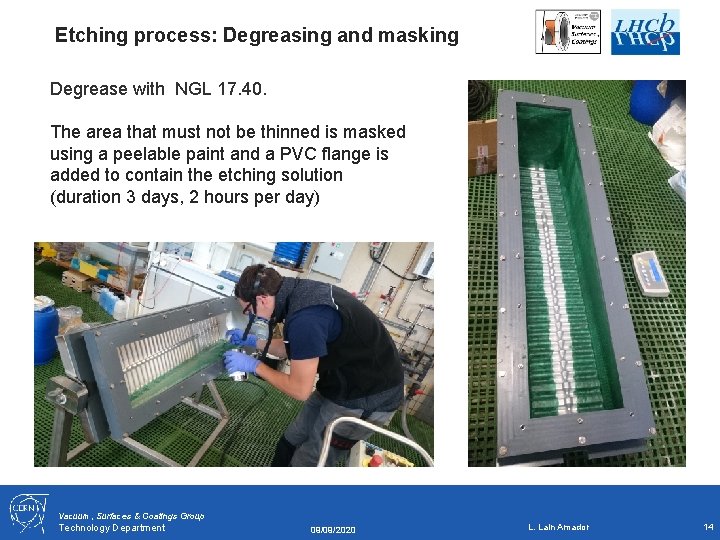
Etching process: Degreasing and masking Degrease with NGL 17. 40. The area that must not be thinned is masked using a peelable paint and a PVC flange is added to contain the etching solution (duration 3 days, 2 hours per day) Vacuum, Surfaces & Coatings Group Technology Department 09/09/2020 L. Lain Amador 14

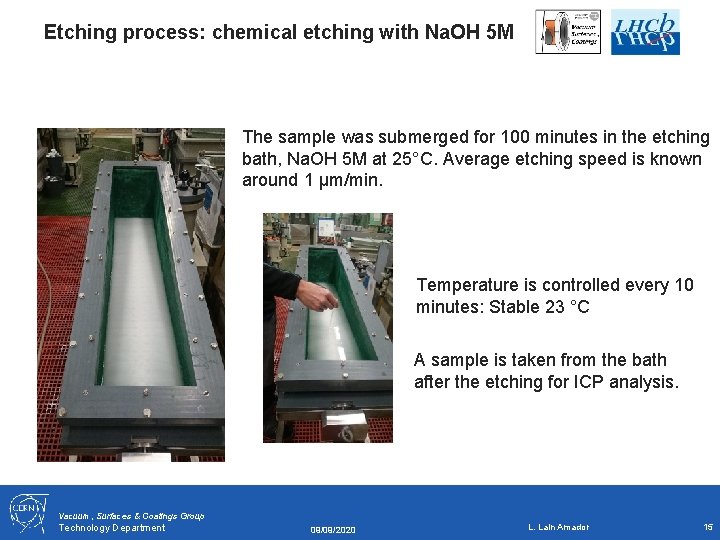
Etching process: chemical etching with Na. OH 5 M The sample was submerged for 100 minutes in the etching bath, Na. OH 5 M at 25°C. Average etching speed is known around 1 μm/min. Temperature is controlled every 10 minutes: Stable 23 °C A sample is taken from the bath after the etching for ICP analysis. Vacuum, Surfaces & Coatings Group Technology Department 09/09/2020 L. Lain Amador 15

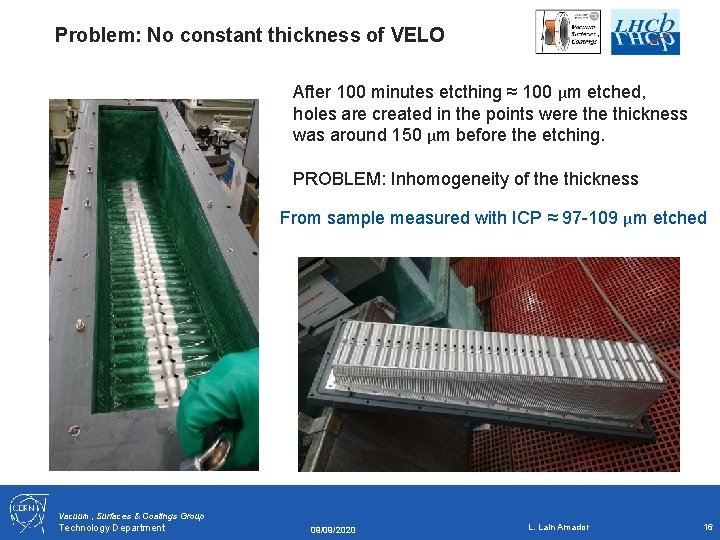
Problem: No constant thickness of VELO After 100 minutes etcthing ≈ 100 µm etched, holes are created in the points were thickness was around 150 µm before the etching. PROBLEM: Inhomogeneity of the thickness From sample measured with ICP ≈ 97 -109 µm etched Vacuum, Surfaces & Coatings Group Technology Department 09/09/2020 L. Lain Amador 16

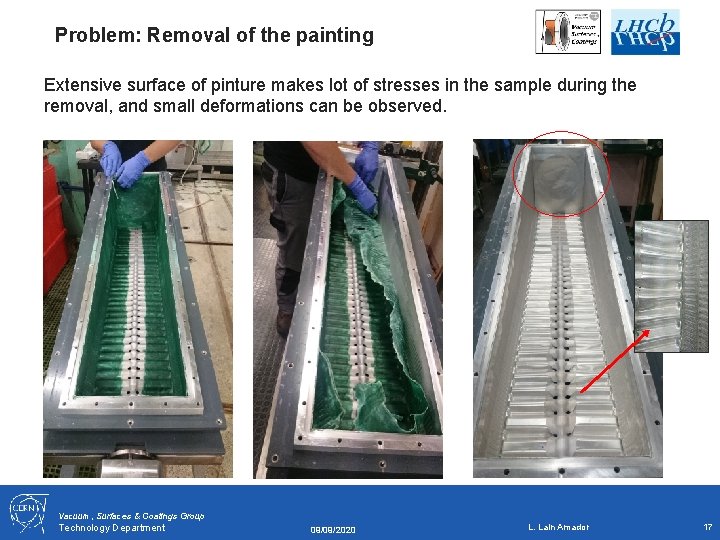
Problem: Removal of the painting Extensive surface of pinture makes lot of stresses in the sample during the removal, and small deformations can be observed. Vacuum, Surfaces & Coatings Group Technology Department 09/09/2020 L. Lain Amador 17

What we have learnt • Impact of larger dimensions • Difficult handling of the piece: degreasing, painting and etching • Weight control is accessible : Balance limit 6 Kg sensibility 1 g. • No local increase of temperature • Fast rinsing, use of same procedure as with small samples • • No neccesity of covering everything with a mask Removal of mask very critical: the minimum amount of mask should be used (just covering the area in contact with the bath) • More samples should be tested! Vacuum, Surfaces & Coatings Group Technology Department 09/09/2020 L. Lain Amador 18

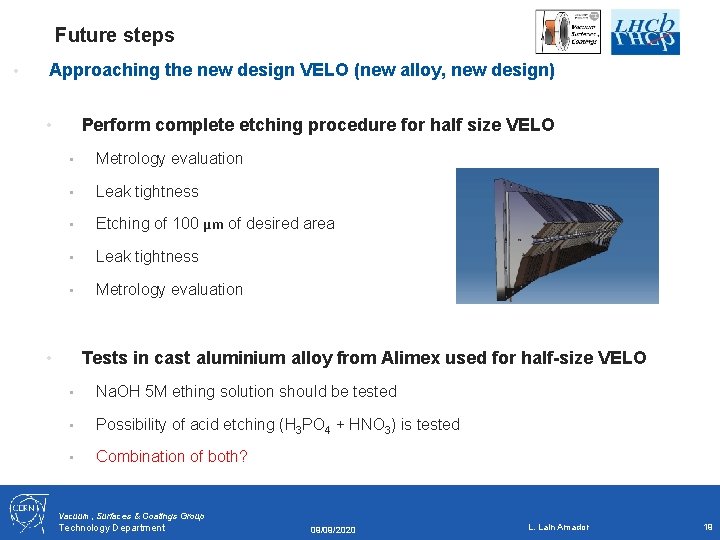
Future steps • Approaching the new design VELO (new alloy, new design) Perform complete etching procedure for half size VELO • • Metrology evaluation • Leak tightness • Etching of 100 µm of desired area • Leak tightness • Metrology evaluation Tests in cast aluminium alloy from Alimex used for half-size VELO • • Na. OH 5 M ething solution should be tested • Possibility of acid etching (H 3 PO 4 + HNO 3) is tested • Combination of both? Vacuum, Surfaces & Coatings Group Technology Department 09/09/2020 L. Lain Amador 19

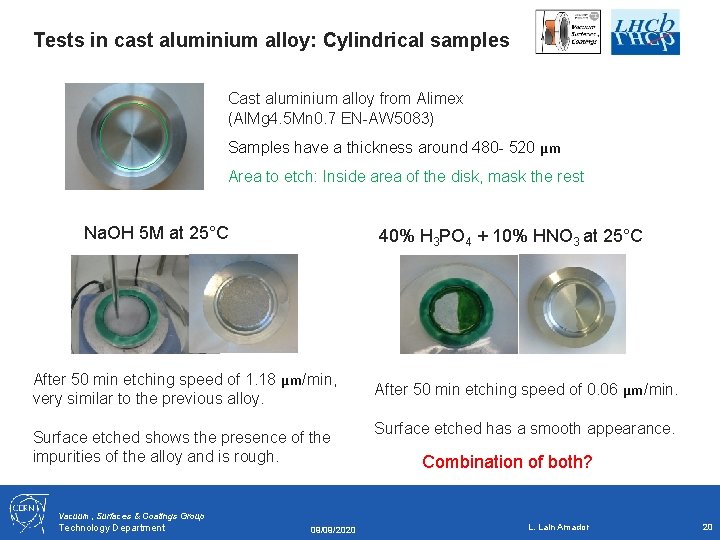
Tests in cast aluminium alloy: Cylindrical samples Cast aluminium alloy from Alimex (Al. Mg 4. 5 Mn 0. 7 EN-AW 5083) Samples have a thickness around 480 - 520 µm Area to etch: Inside area of the disk, mask the rest Na. OH 5 M at 25°C 40% H 3 PO 4 + 10% HNO 3 at 25°C After 50 min etching speed of 1. 18 µm/min, very similar to the previous alloy. Surface etched shows the presence of the impurities of the alloy and is rough. After 50 min etching speed of 0. 06 µm/min. Surface etched has a smooth appearance. Combination of both? Vacuum, Surfaces & Coatings Group Technology Department 09/09/2020 L. Lain Amador 20

Thank you very much for the attention! Vacuum, Surfaces & Coatings Group Technology Department 09/09/2020 L. Lain Amador 21

Metrology (EN/MME/MM) results of Sample 3 Vacuum, Surfaces & Coatings Group Technology Department 09/09/2020 L. Lain Amador 22

Control of removed thickness a) Weight control of sample b) Measurement of Aluminium concentration in Na. OH 5 M bath after etching by ICP-OES (Inductively Coupled Plasma Optical Emission Spectroscopy) 1 st: Aluminum calibration curve with standards 3 rd: Measure the aluminum content 2 nd: Dilute the sample 4 th: Calculate proportional mremoved Vacuum, Surfaces & Coatings Group Technology Department 09/09/2020 L. Lain Amador 23