Introduction week 5 Hi all First of all


 Using a scale of 1 cm : 9 m")


- Slides: 71
Introduction- week 5 Hi all First of all I hope you are all still keeping safe, healthy and looking after yourselves. Now to the boring bit…. Work… My expectation…. I will be expecting you to be doing 5 hours of maths a week. This is no more than what you do in school so it should be relatively straight forward. Now this can be completed by doing an hour a day or spending a few hours on 2 or 3 days completing the entirety of the work, the choice is yours, however, I will be expecting the work to be completed. There will be 4 lessons of NEW CONTENT a week with the 5 th lesson having to complete questions on everything you’ve just learnt (Each lesson 1 hr long). There will be an instruction of how I expect these questions to be completed when you go to lesson 5. I will be providing you with lessons to go through and will be expecting each of you to take notes and answer any questions which are within the slides to help develop your understanding. The week will be topic based so lesson 1 will help with lesson 2 and 3 and so on, so PLEASE DO NOT skip slides. All the lessons will provide you with material on topics that we were yet to cover during your first year at LEEP. If you feel you get stuck or are confused please do not hesitate to contact me. I will be allocating every Wednesday for you to contact with any questions or concerns and will respond to them as soon as I can on the day. However if you have any questions outside of that day I will get back to you as soon as I possibly can. Email: s. rivera@leep. org. uk Please continue to look after yourselves and work hard to ensure we are not having to play catch up when we are back. Mr Rivera
Timetable: Monday – Lesson 1 material New Topic Tuesday – Lesson 2 material Wednesday – Lesson 3 material Thursday – Lesson 4 material Friday – Questions through the Lessons must be completed
Please look at these slides in full screen so you get all the content material. Not a lot of slides this week so please make sure you write all the information. Lesson 1, 2, 3 & 4 are all Lessons. Lesson 5 will be to answer all questions in the lessons you have gone through. Information: Go Full Screen Remember, if you have any questions you will be able to send an email to me. I will respond as soon as possible. Email: s. rivera@leep. org. uk
Lesson 1
Plans and Elevations 02/12/2020 • Understand draw front and side elevations and plans of shapes made from simple solids • Given the front and side elevations and the plan of a solid, draw the sketch of the 3 D solid Keywords Draw the net of this cuboid. Draw the net of this shape. Front elevation Isometric paper Side elevation Solid Plan
Plans and Elevations 3 D View: 02/12/2020
Plans and Elevations Front Elevation: 02/12/2020
Plans and Elevations Side Elevation: 02/12/2020
Plans and Elevations Plan View: 02/12/2020
Plans and Elevations 02/12/2020 Big Picture: Designing Cars Designing Aircraft Plans and Elevations Designing Buildings Designing games
Plans and Elevations Big Picture: 02/12/2020
• For the following questions draw a side elevation and a plan view
Plans and Elevations 02/12/2020
Plans and Elevations 02/12/2020
3 D drawings from plans and Elevations: Front Side Plan
3 D drawings from plans and Elevations: Front Side Plan
Plans and Elevations Draw the 3 D shape 02/12/2020
Plans and Elevations 02/12/2020
Plans and Elevations 02/12/2020
Plans and Elevations 02/12/2020
Lesson 2
02/12/2020 LOs: Scale Drawing • Estimate lengths using a scale diagram. • Use and interpret maps and scale drawings • Read and construct scale drawings; drawing lines and shapes to scale Starter a) On square paper draw a simple shape using 5 by 5 (25 square boxes). b) Using a scale factor of 2 and 3 draw the shape two more times Examples of simple shapes
What are scale drawings? Scale drawings are everywhere! Write down as many examples as you can where we would use a scale.
What are scale drawings? Scale drawings are everywhere! On Maps Historical monuments
Scale Drawing • Scale drawing allows us to draw large objects on a smaller scale while keeping them accurate. • All scale drawings must have a scale written on them. Scales are usually expressed as ratios. • Example: 1 cm : 100 cm • The ratio 1 cm: 100 cm means that for every 1 cm on the scale drawing the length will be 100 cm in real life
Scale Drawings Definition A scale of 1 cm = 2 m 1 cm : 200 cm …means for every 1 cm measured on a drawing this represents 2 m in real-life.
Scale Drawings 4 cm 4 x 25= 100 cm 2 x 25 = 50 cm The scale of this drawing is 1 : 25 What is the actual width and height of the TV ?
Question 1 Images are not to scale The scale of this drawing is 1: 90 The scale of this drawing is 1 mm = 5 m 20 mm 5 cm What is the actual length of the bus in metres ? What is the actual height of the tree ?
Question 1: Solution The scale of this drawing is 1 cm = 90 cm Images are not to scale The scale of this drawing is 1 mm = 5 m 20 mm 5 cm What is the actual length of the bus in metres ? 5 x 90 = 450 cm 4. 5 m What is the actual height of the tree ? 20 x 5 = 100 m
Constructing scaled diagrams Q 1) Using a scale of 1 cm : 9 m accurately draw this right angled triangle in your books. 45 m 27 m 5 cm 36 m 4 cm
Lesson 3
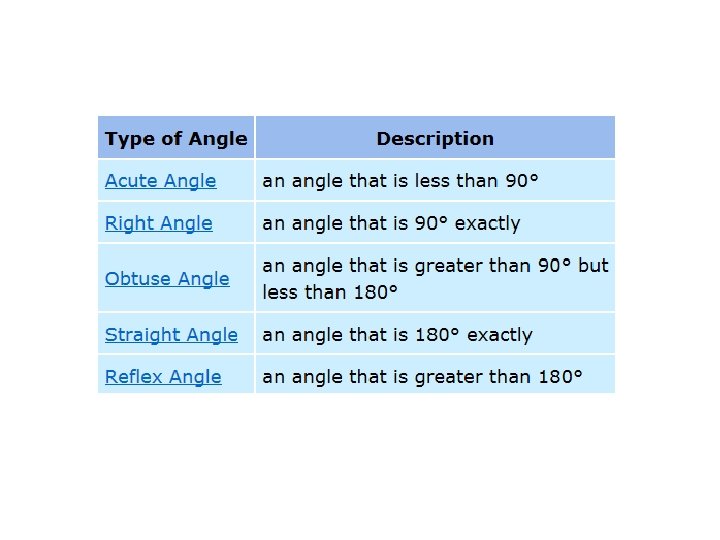
02/12/2020 Bearings • Learning objectives • Understand, draw and measure bearings • Calculate bearings and solve bearing KEYWORDS: Angle, North, Direction problems, including on scaled maps, and find/mark and measure bearings
Bearings 360/000 o N 1. Measured from North. 060 o 2. In a clockwise direction. 270 o 60 o W 090 o E 3. Written as 3 figures. S 180 o N W 145 o S N N E 145 o W 230 o S 315 o E W 315 o S E
s et e h W k or
N 360/000 o 7 325 o 010 o 8 310 o 040 o 1 ACE 060 o Controller contest 4 280 o 1 1 1 2 2 Estimate the bearing of each aircraft from the centre of the radar screen. 090 o E W 270 o 3 Control Tower 250 o 235 o 5 1 0 9 120 o 6 195 o 180 o S 155 o Air Traffic Controller
Where you want to end up OF and FROM Where you start from What is the bearing of B from A? A B
OF and FROM Where you want to end up Where you start from What is the bearing of B N from A? 105° A B
OF and FROM Where you want to end up Where you start from What is the bearing of A from B? N A 285° B
Thumbs?
1. Find the position of a point C, if it is on a bearing of 045 o from A and 290 o from B. 2. Find the position of a point D if it is on a bearing of 120 o from A and 215 o from B. C B A D Worksheet Answer
1. Find the position of a point C, if it is on a bearing of 045 o from A and 290 o from B. 2. Find the position of a point D if it is on a bearing of 120 o from A and 215 o from B. B A Worksheet
Exam Questi on
Exam Questi on
Plenary Bearings 5 Quick Questions D. Watson© 2006
Work out the bearing of B from A 1. 85° A Year 11 D. Watson© 2006 95° B
Work out the bearing of B from A 1. 85° 95° B A ANSWER : 085° D. Watson© 2006
Work out the bearing of B from A 2. A 120 ° 60° B D. Watson© 2006
Work out the bearing of B from A 2. A 120 ° 60° B ANSWER : 120° D. Watson© 2006
Work out the bearing of B from A 45° C D. Watson© 2006 115 ° B 260 °
Work out the bearing of B from A 4. A 115 ° 45° B C ANSWER : 115° D. Watson© 2006 260 °
Work out the bearing of B from A 5. B 150 ° 30° A D. Watson© 2006
Work out the bearing of B from A 5. B 150 ° 30° A ANSWER : 330° D. Watson© 2006
Lesson 4
Constructions L. O: To use a ruler and compass to • construct a perpendicular to a given line from/at a given point • bisect a given angle • Construct angles 90, 45, 60 and 30 degrees STARTER ACTIVITY: Use your geometry sets to accurately construct the following triangles
Perpendicular bisector Draw a line AB as shown below. 1. Place compass at A, set over halfway and draw 2 arcs. 2. Place compass at B, with same distance set and draw 2 arcs to intersect first two. 3. Draw the perpendicular bisector through the points of intersection. A Perpendicular B
Angle Bisector Draw an angle as shown below. 1. Place compass at A, and draw an arc crossing AB and AC. 2. Place compass at intersections and (with the same distance set) draw 2 arcs that intersect. A 3. Draw the angle bisector from A through the point of intersection. B C Angle
Constructing 45 o Draw a line as shown below and follow the instructions. 1. Draw base line AB of any length. 2. Mark a point P anywhere 3. Construct the perpendicular to P. on AB. E 4. Bisect angle BPD. 5. Angle BPE = 45 o. D A P C 45 deg B
Constructing 60 o Draw a line as shown below and follow the instructions. 1. Draw base line AB of any length. 2. Place compass at A, set to distance AB and draw arc. 3. Place compass at B, with same distance set and draw an arc 4. Draw straight line from A through point of intersection. to intersect first one. C Angle BAC = 60 o. 60 deg A B
Constructing 30 o. Draw a line as shown below and follow the instructions. 1. Draw base line AB of any length. 2. Construct an angle of 60 o at A. 3. Bisect angle BAC. 4. Angle BAD = 30 o C 30 deg D A B
Constructions To construct the perpendicular to a given line from a given point, not on the line. 1. With centre P, draw an arc of a circle that 2. With centre C and compass set over ½ distance CD intersects AB at 2 points. 3. With centre D and same distance set, draw an arc to draw arc below AB. 4. The line through P and the intersecting arcs is perpendicular intersect the previous one. to AB. P A D C B
Lesson 5
PLENARY – Past paper Question Draw a side elevation of this object Make a 3 D sketch of this object (2 marks) (2 marks)
PLENARY – Past paper Question
Q 2 The sketch shows a flag-pole YT supported by a wire. The distance from X to Y is 6 m and o angle TXY = 55. T Make a scale drawing and work Out the real height of the pole. Use a scale of 1 cm = 2 m X 55 o 6 m Y
Q 2: Solution Using a scale of 1 cm = 2 m Step 1: Draw line XY=3 cm T Step 2: Draw a line straight up from Y. o Step 3: Measure angle 55 from X. Step 4: Draw line from X to vertical line and mark T at crossover point. Step 5: Measure length YT. Step 6: Multiply length YT. by scale factor. 4. 3 cm 4. 3 x 2 = 8. 6 m Flag pole is 8. 6 m high X Y
PLENARY
PLENARY: Solutions
Plenary – past GCSE exam paper questions
Plenary – past GCSE exam paper questions