Construction seams Plain seam Top stitch seam French


 and pin")


 and pin")


- Slides: 26
Construction seams: • Plain seam. • Top stitch seam. • French seam. • Gather seam. • Box pleat. • Accordion pleat. • Darts.
Running Stitch. • The running stitch is the basic stitch use in hand-sewing, on which all other forms of sewing are based. • The stitch is worked by passing the needle in and out of the fabric • Running stitches are used in hand-sewing and tailoring to sew basic seams, in hand patchwork to assemble pieces together.
Plain seam
Plain seam • A plain seam is the most common type of machinesewn seam. • It joins two pieces of fabric together face-toface by sewing through both pieces, leaving a seam allowance with raw edges inside the work. • The seam allowance usually requires some sort of seam finish to prevent ravelling
1. Place the fabric right sides together (with the nice side inside) and pin approximately 1 cm from the edge where you wish to sew. 2. Thread your needle with tacking thread the length of your hand to your elbow. Use a back tack (one stitch on top of another) to start sewing 1 cm from the edge. Your stitches should be approximately 1 cm long, with spaces of 1 cm between each stitch. Finish your line of running stitch with another back to secure. START
3. When you have finished, remove the pins. Set the sewing machine to sew a running or straight stitch as follows; Stitch length = 3 4. Machine your seam and then unpick the tacking thread carefully using a pin. 5. Press/Iron open flat the seam.
Top stitch • Used as a decorative stitch. • Shirt collars and cuffs. • Jeans leg seams.
1. Place the fabric right sides together (with the nice side inside) and pin approximately 1 cm from the edge where you wish to sew. 2. Thread your needle with tacking thread the length of your hand to your elbow. Use a back tack (one stitch on top of another) to start sewing 1 cm from the edge. Your stitches should be approximately 1 cm long, with spaces of 1 cm between each stitch. Finish your line of running stitch with another back to secure. START
3. When you have finished, remove the pins. Set the sewing machine to sew a running or straight stitch as follows; Stitch length = 3 4. Machine your seam and then unpick the tacking thread carefully using a pin. 5. Press/Iron open flat the seam. 6. Now turn the fabric the right side up and Top stitch along the top using the machine foot to guide you – Change the machine setting to B.
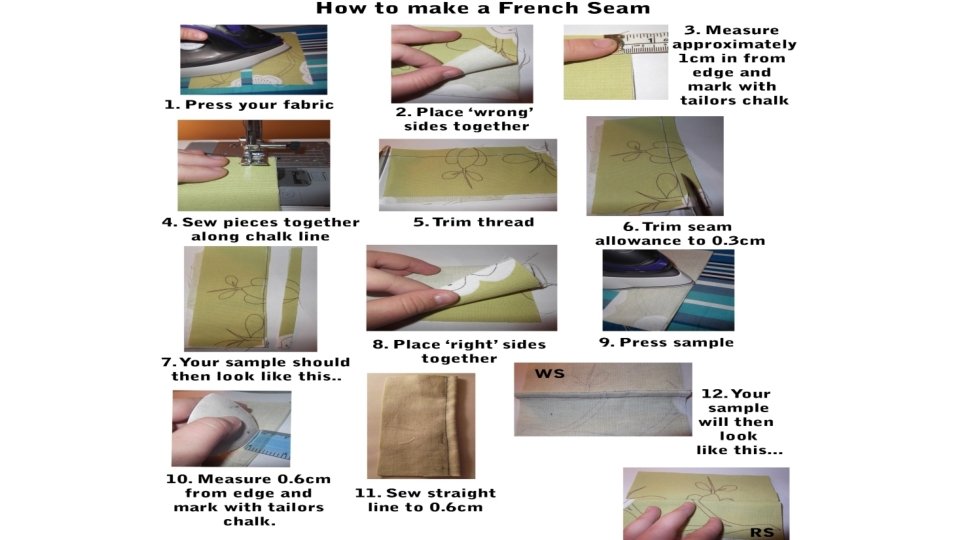
French seam • In a French seam, the raw edges of the fabric are fully enclosed for a neat finish. • Use on fine fabrics to give a neat and professional finish – Silk and Organza.
French Seam
Over-locked edge
To make any garment you need to know the basic techniques that will create just the shape you want! Waistband Dart Pencil skirt with flounce http: //www. infovisual. info/ A must for textile shapes called Visual Diary!
Gather Stitch • Gathering stitches are used as simple ways to create ruffles in fabric. • They can be used in skirts or sleeves to help create a look of volume in a garment. • Ruffles can vary in their appearance, and if creating a gathered ruffle from scratch, the amount of fabric used can have a great deal of impact. • One and a half times your fabric will give a bouncy, fun look, but if you desire a tight, heavier ruffle, usetwice as much fabric as you would need.
Gathers 1. Using stitch length setting 4 stitch two gather sewing lines. One, foot width from the edge of the fabric, the next one foot width from sewing line. 2. Lock stitches in only at the beginning. 3. Pull the two top threads only to create the gather. http: //www. youtube. com/watch? v=4 jl. Xqkwaq TM
1. Box Pleats 2. Accordion pleats Pleats
How to. . Accordion Pleats 1. Mark the pleat with a snip or tailors chalk 2. Lift fabric and place snips on top of each other. Secure into place with vertical pins. 3. Stitch across the top to keep in place.
How to. . Box pleat 1. Mark the pleat with a snip or tailors chalk 2. Place the fabric right sides facing and stitch a 5 -10 cm sewing line parallel to the fold.
How to. . Box pleat 3. Open out the pleat and secure into place with pins 4. Stitch across top to permanently secure.
Gathering
Gather Stitching
1. Gather fabric and pin approximately 1 cm from the edge where you wish to sew. 2. Thread your needle with tacking thread the length of your hand to your elbow. Use a back tack (one stitch on top of another) to start sewing 1 cm from the edge. Your stitches should be approximately 1 cm long, with spaces of 1 cm between each stitch. When you get to the end of your stitching – pull thread to create a gather. 3. Finish your line of running stitch with another back to secure. 4. When you have finished, remove the pins. Set the sewing machine to sew a running or straight stitch as follows; Stitch length = 3 5. Machine your seam and then unpick the tacking thread carefully using a pin.
DARTS 1. Darts are construction details that shape fabric to the curves of the body. Darts are typically found in the bust, waist and hip areas, where the body is the most contoured.
How to sew a dart: Step 1: • Mark the dart with tailors chalk (pencil is also Ok or an air eraser pen) • Pin horizontally to marked line
Step 2: Lock stitches in at the top Step 3: Stitch with 2. 5 all along or lower the stitch length towards the tip. Step 4: Tie a double knot in the end to secure thread.