2 nd ASPERA Technology Forum EGOVIRGO site 20

- Slides: 24

2 nd ASPERA Technology Forum EGO/VIRGO site 20 th – 21 th October 2011 Media Lario Technologies Company Presentation D. Vernani on behalf of MLT team dervis. vernani@media-lario. com

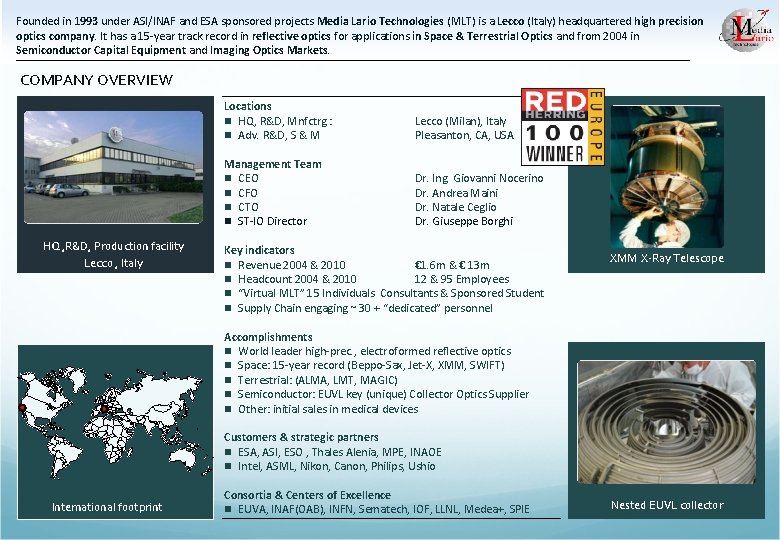
Founded in 1993 under ASI/INAF and ESA sponsored projects Media Lario Technologies (MLT) is a Lecco (Italy) headquartered high precision optics company. It has a 15 -year track record in reflective optics for applications in Space & Terrestrial Optics and from 2004 in Semiconductor Capital Equipment and Imaging Optics Markets. COMPANY OVERVIEW HQ , R&D, Production facility Lecco , Italy Locations n HQ, R&D, Mnfctrg. : n Adv. R&D, S & M Lecco (Milan), Italy Pleasanton, CA, USA Management Team n CEO n CFO n CTO n ST-IO Director Dr. Ing. Giovanni Nocerino Dr. Andrea Maini Dr. Natale Ceglio Dr. Giuseppe Borghi Key indicators n Revenue 2004 & 2010 € 1. 6 m & € 13 m n Headcount 2004 & 2010 12 & 95 Employees n “Virtual MLT” 15 Individuals Consultants & Sponsored Student n Supply Chain engaging ~ 30 + “dedicated” personnel XMM X-Ray Telescope Accomplishments n World leader high-prec. , electroformed reflective optics n Space: 15 -year record (Beppo-Sax, Jet-X, XMM, SWIFT) n Terrestrial: (ALMA, LMT, MAGIC) n Semiconductor: EUVL key (unique) Collector Optics Supplier n Other: initial sales in medical devices Customers & strategic partners n ESA, ASI, ESO , Thales Alenia, MPE, INAOE n Intel, ASML, Nikon, Canon, Philips, Ushio International footprint Consortia & Centers of Excellence n EUVA, INAF(OAB), INFN, Sematech, IOF, LLNL, Medea+, SPIE Nested EUVL collector

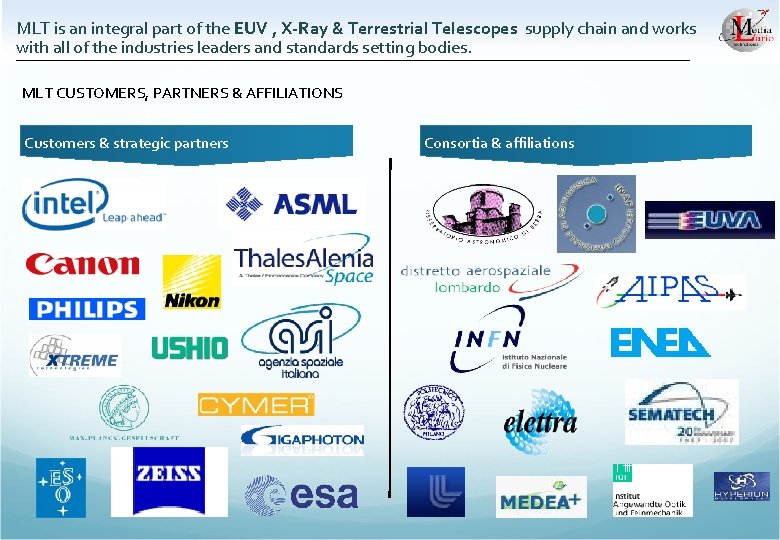
MLT is an integral part of the EUV , X-Ray & Terrestrial Telescopes supply chain and works with all of the industries leaders and standards setting bodies. MLT CUSTOMERS, PARTNERS & AFFILIATIONS Customers & strategic partners Consortia & affiliations

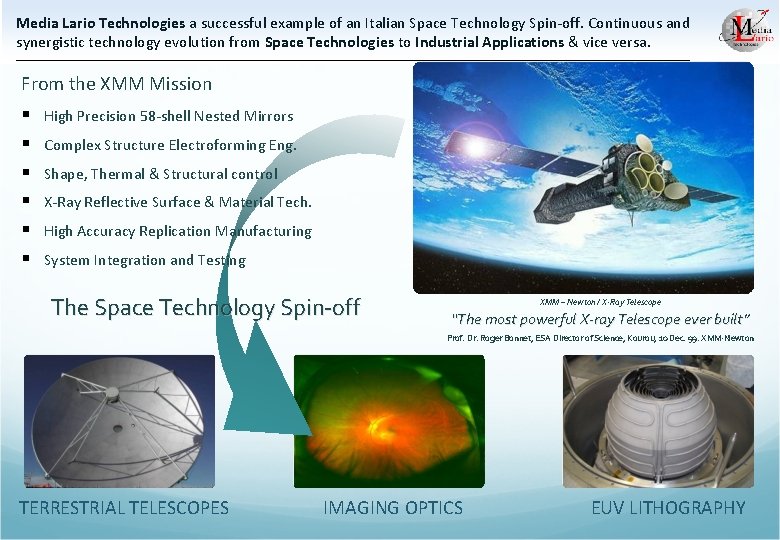
Media Lario Technologies a successful example of an Italian Space Technology Spin-off. Continuous and synergistic technology evolution from Space Technologies to Industrial Applications & vice versa. From the XMM Mission § § § High Precision 58 -shell Nested Mirrors Complex Structure Electroforming Eng. Shape, Thermal & Structural control X-Ray Reflective Surface & Material Tech. High Accuracy Replication Manufacturing System Integration and Testing The Space Technology Spin-off XMM – Newton / X-Ray Telescope “The most powerful X-ray Telescope ever built” Prof. Dr. Roger Bonnet, ESA Director of Science, Kourou, 10 Dec. 99. XMM-Newton TERRESTRIAL TELESCOPES IMAGING OPTICS EUV LITHOGRAPHY

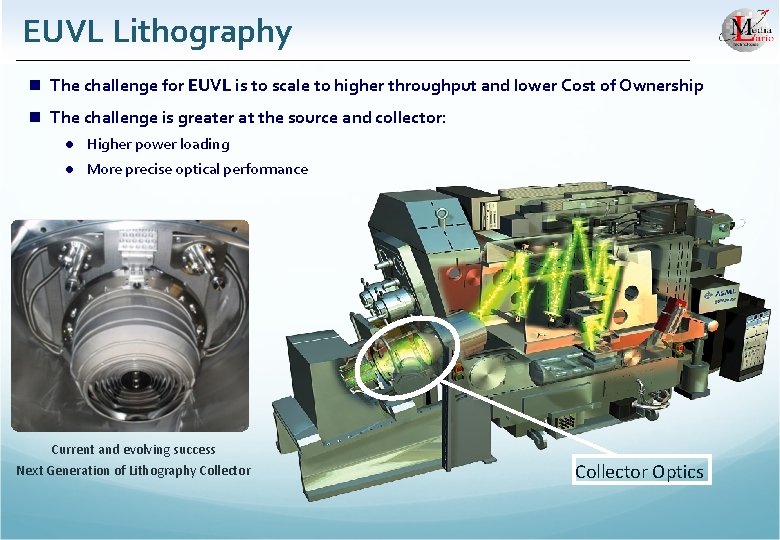
EUVL Lithography n The challenge for EUVL is to scale to higher throughput and lower Cost of Ownership n The challenge is greater at the source and collector: l Higher power loading l More precise optical performance Current and evolving success Next Generation of Lithography Collector Optics

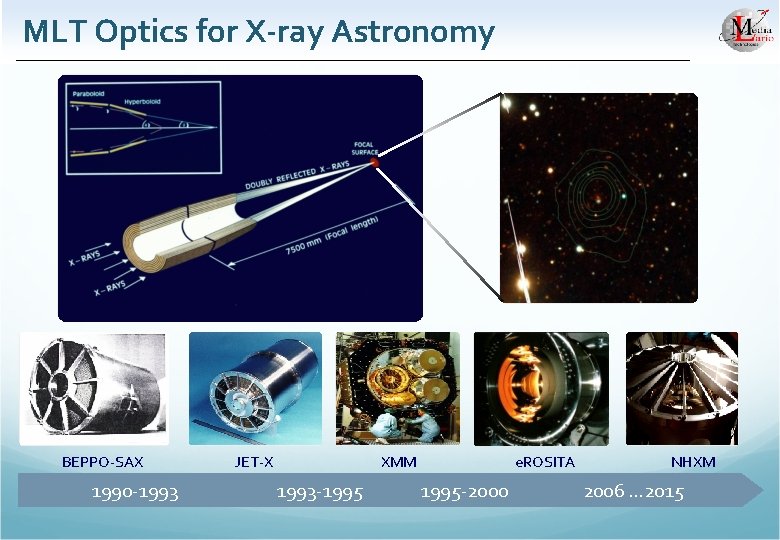
MLT Optics for X-ray Astronomy BEPPO-SAX 1990 -1993 JET-X XMM 1993 -1995 e. ROSITA 1995 -2000 NHXM 2006 … 2015

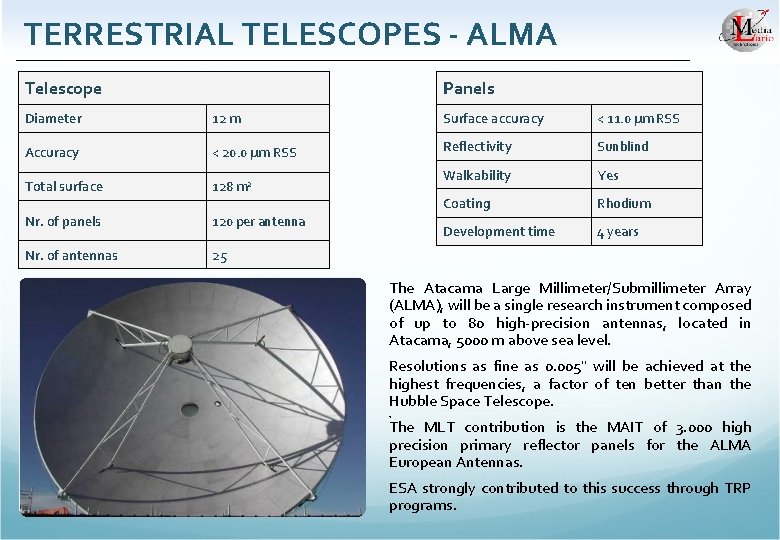
TERRESTRIAL TELESCOPES - ALMA Telescope Panels Diameter 12 m Surface accuracy < 11. 0 µm RSS Accuracy < 20. 0 µm RSS Reflectivity Sunblind Total surface 128 m 2 Walkability Yes Coating Rhodium Nr. of panels 120 per antenna Development time 4 years Nr. of antennas 25 The Atacama Large Millimeter/Submillimeter Array (ALMA), will be a single research instrument composed of up to 80 high-precision antennas, located in Atacama, 5000 m above sea level. Resolutions as fine as 0. 005" will be achieved at the highest frequencies, a factor of ten better than the Hubble Space Telescope. 4 The MLT contribution is the MAIT of 3. 000 high precision primary reflector panels for the ALMA European Antennas. ESA strongly contributed to this success through TRP programs.

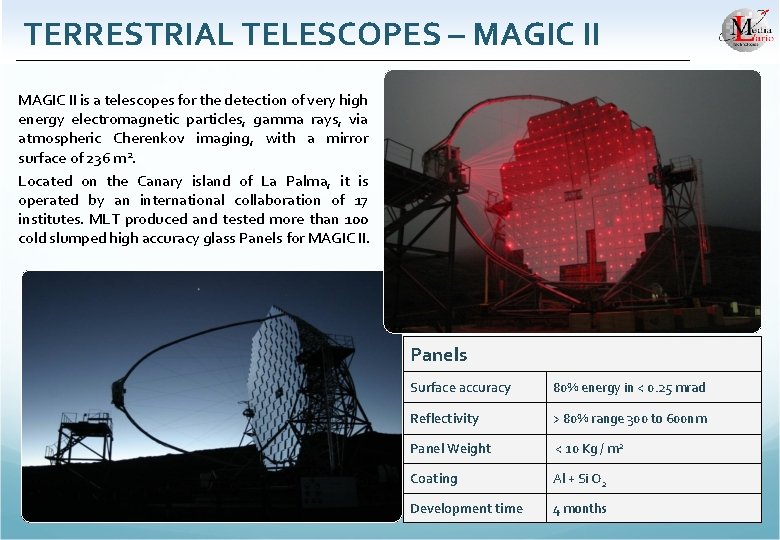
TERRESTRIAL TELESCOPES – MAGIC II is a telescopes for the detection of very high energy electromagnetic particles, gamma rays, via atmospheric Cherenkov imaging, with a mirror surface of 236 m 2. Located on the Canary island of La Palma, it is operated by an international collaboration of 17 institutes. MLT produced and tested more than 100 cold slumped high accuracy glass Panels for MAGIC II. Panels Surface accuracy 80% energy in < 0. 25 mrad Reflectivity > 80% range 300 to 600 nm Panel Weight < 10 Kg / m 2 Coating Al + Si O 2 Development time 4 months

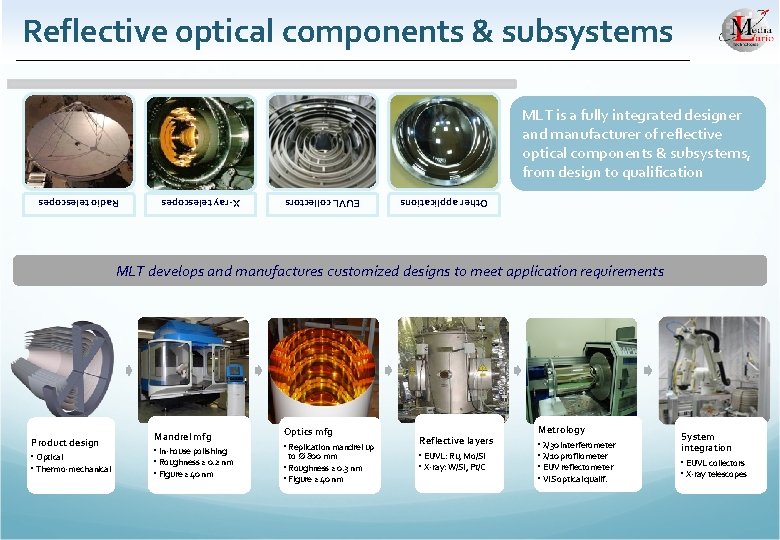
Reflective optical components & subsystems MLT is a fully integrated designer and manufacturer of reflective optical components & subsystems, from design to qualification Other applications EUVL collectors X-ray telescopes Radio telescopes MLT develops and manufactures customized designs to meet application requirements Product design • Optical • Thermo-mechanical Mandrel mfg • In-house polishing • Roughness ≥ 0. 2 nm • Figure ≥ 40 nm Optics mfg • Replication mandrel up to 800 mm • Roughness ≥ 0. 3 nm • Figure ≥ 40 nm Reflective layers • EUVL: Ru, Mo/Si • X-ray: W/Si, Pt/C Metrology • λ/30 interferometer • λ/10 profilometer • EUV reflectometer • VIS optical qualif. System integration • EUVL collectors • X-ray telescopes

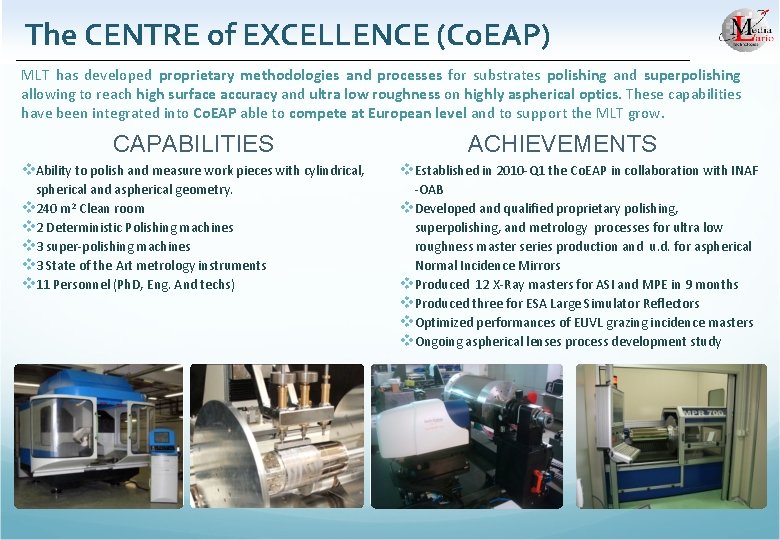
The CENTRE of EXCELLENCE (Co. EAP) MLT has developed proprietary methodologies and processes for substrates polishing and superpolishing allowing to reach high surface accuracy and ultra low roughness on highly aspherical optics. These capabilities have been integrated into Co. EAP able to compete at European level and to support the MLT grow. CAPABILITIES ACHIEVEMENTS v. Ability to polish and measure work pieces with cylindrical, v. Established in 2010 -Q 1 the Co. EAP in collaboration with INAF spherical and aspherical geometry. v 240 m 2 Clean room v 2 Deterministic Polishing machines v 3 super-polishing machines v 3 State of the Art metrology instruments v 11 Personnel (Ph. D, Eng. And techs) -OAB v. Developed and qualified proprietary polishing, superpolishing, and metrology processes for ultra low roughness master series production and u. d. for aspherical Normal Incidence Mirrors v. Produced 12 X-Ray masters for ASI and MPE in 9 months v. Produced three for ESA Large Simulator Reflectors v. Optimized performances of EUVL grazing incidence masters v. Ongoing aspherical lenses process development study

THANK YOU VERY MUCH FOR YOUR ATTENTION

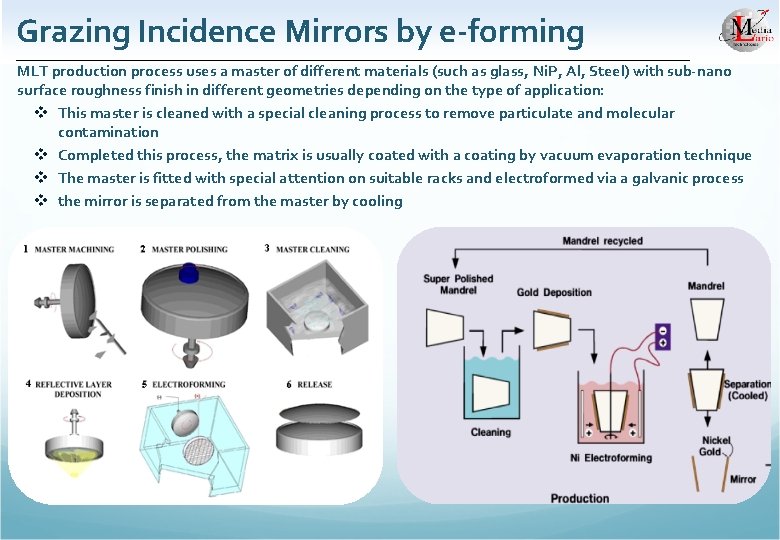
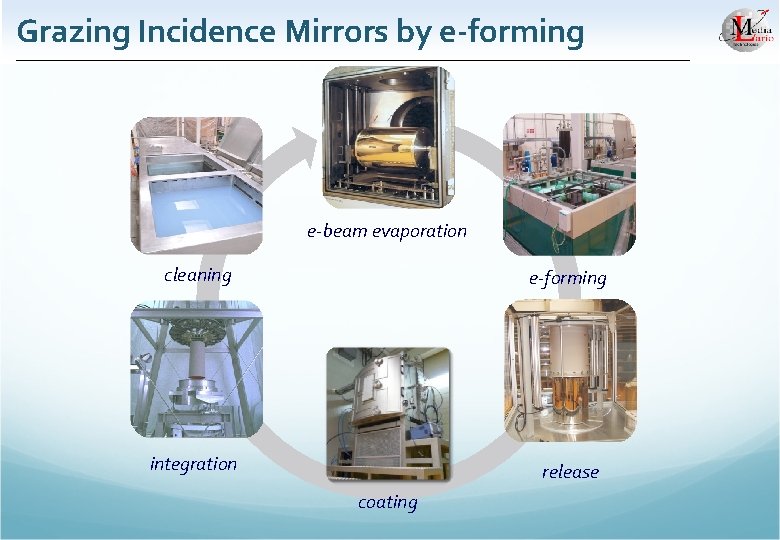
Grazing Incidence Mirrors by e-forming MLT production process uses a master of different materials (such as glass, Ni. P, Al, Steel) with sub-nano surface roughness finish in different geometries depending on the type of application: v This master is cleaned with a special cleaning process to remove particulate and molecular contamination v Completed this process, the matrix is usually coated with a coating by vacuum evaporation technique v The master is fitted with special attention on suitable racks and electroformed via a galvanic process v the mirror is separated from the master by cooling

Grazing Incidence Mirrors by e-forming e-beam evaporation cleaning e-forming integration release coating

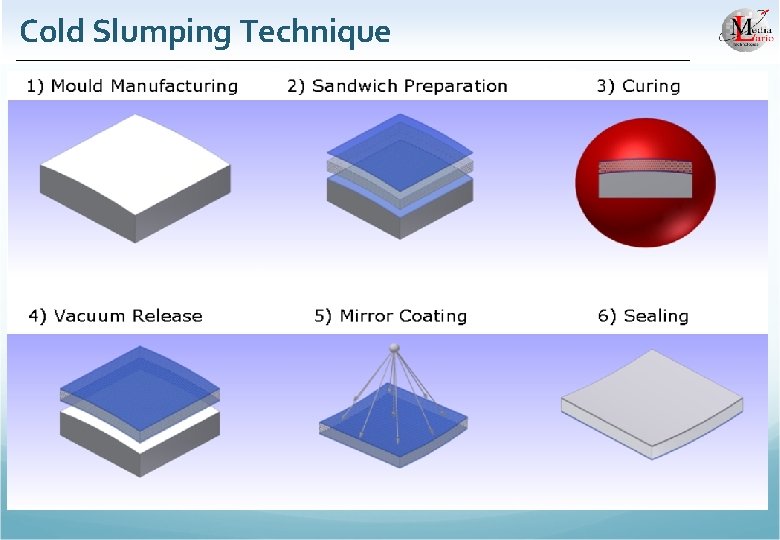
Cold Slumping Technique

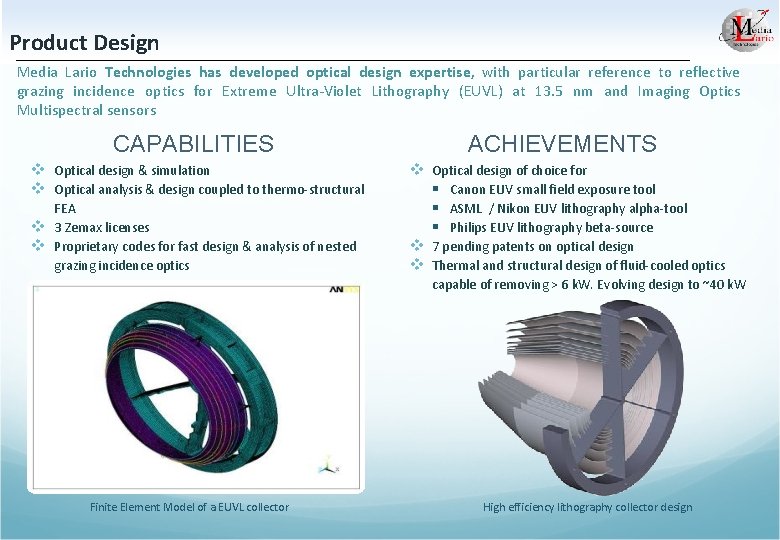
Product Design Media Lario Technologies has developed optical design expertise, with particular reference to reflective grazing incidence optics for Extreme Ultra-Violet Lithography (EUVL) at 13. 5 nm and Imaging Optics Multispectral sensors CAPABILITIES ACHIEVEMENTS v Optical design & simulation v Optical analysis & design coupled to thermo-structural v Optical design of choice for § Canon EUV small field exposure tool § ASML / Nikon EUV lithography alpha-tool § Philips EUV lithography beta-source v 7 pending patents on optical design v Thermal and structural design of fluid-cooled optics FEA v 3 Zemax licenses v Proprietary codes for fast design & analysis of nested grazing incidence optics capable of removing > 6 k. W. Evolving design to ~40 k. W Finite Element Model of a EUVL collector High efficiency lithography collector design

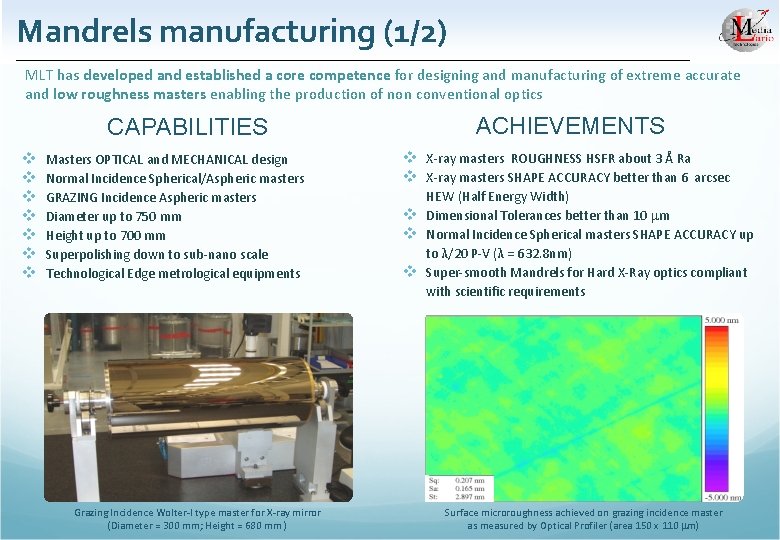
Mandrels manufacturing (1/2) MLT has developed and established a core competence for designing and manufacturing of extreme accurate and low roughness masters enabling the production of non conventional optics CAPABILITIES v v v v Masters OPTICAL and MECHANICAL design Normal Incidence Spherical/Aspheric masters GRAZING Incidence Aspheric masters Diameter up to 750 mm Height up to 700 mm Superpolishing down to sub-nano scale Technological Edge metrological equipments Grazing Incidence Wolter-I type master for X-ray mirror (Diameter = 300 mm; Height = 680 mm ) ACHIEVEMENTS v X-ray masters ROUGHNESS HSFR about 3 Å Ra v X-ray masters SHAPE ACCURACY better than 6 arcsec HEW (Half Energy Width) v Dimensional Tolerances better than 10 m v Normal Incidence Spherical masters SHAPE ACCURACY up to λ/20 P-V (λ = 632. 8 nm) v Super-smooth Mandrels for Hard X-Ray optics compliant with scientific requirements Surface microroughness achieved on grazing incidence master as measured by Optical Profiler (area 150 x 110 m)

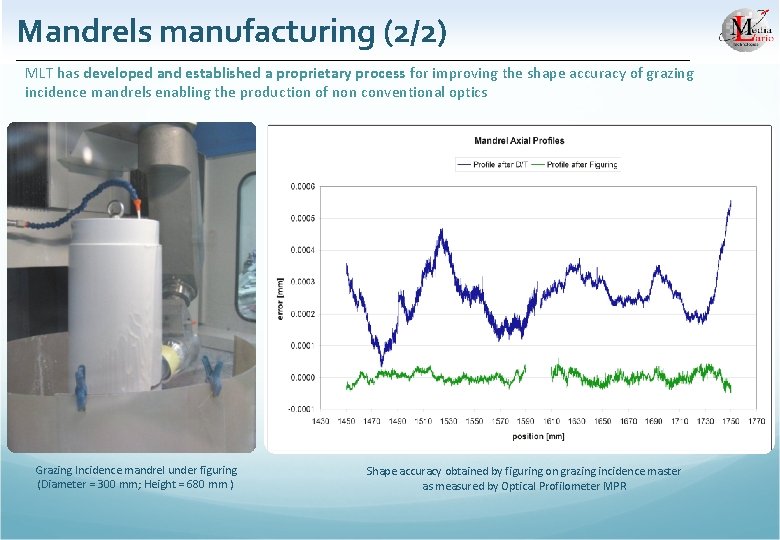
Mandrels manufacturing (2/2) MLT has developed and established a proprietary process for improving the shape accuracy of grazing incidence mandrels enabling the production of non conventional optics Grazing Incidence mandrel under figuring (Diameter = 300 mm; Height = 680 mm ) Shape accuracy obtained by figuring on grazing incidence master as measured by Optical Profilometer MPR

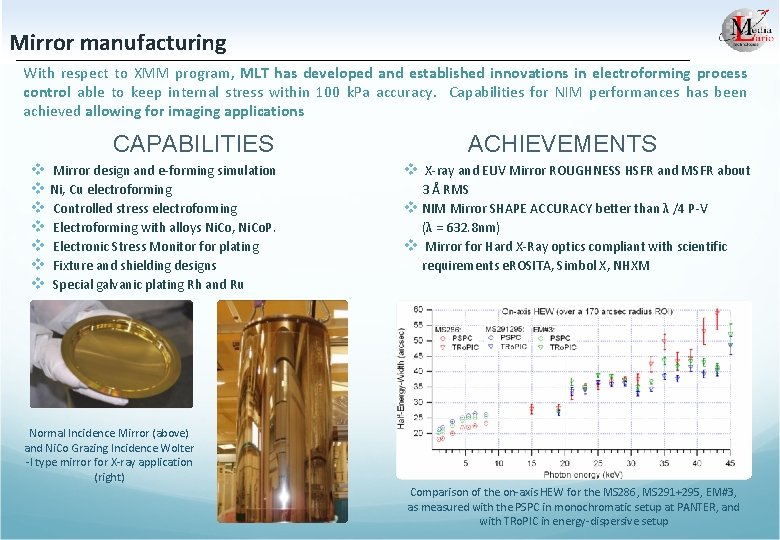
Mirror manufacturing With respect to XMM program, MLT has developed and established innovations in electroforming process control able to keep internal stress within 100 k. Pa accuracy. Capabilities for NIM performances has been achieved allowing for imaging applications CAPABILITIES v Mirror design and e-forming simulation v Ni, Cu electroforming v Controlled stress electroforming v Electroforming with alloys Ni. Co, Ni. Co. P. v Electronic Stress Monitor for plating v Fixture and shielding designs v Special galvanic plating Rh and Ru ACHIEVEMENTS v X-ray and EUV Mirror ROUGHNESS HSFR and MSFR about 3 Å RMS v NIM Mirror SHAPE ACCURACY better than λ /4 P-V (λ = 632. 8 nm) v Mirror for Hard X-Ray optics compliant with scientific requirements e. ROSITA, Simbol X, NHXM Normal Incidence Mirror (above) and Ni. Co Grazing Incidence Wolter -I type mirror for X-ray application (right) Comparison of the on-axis HEW for the MS 286, MS 291+295, EM#3, as measured with the PSPC in monochromatic setup at PANTER, and with TRo. PIC in energy-dispersive setup

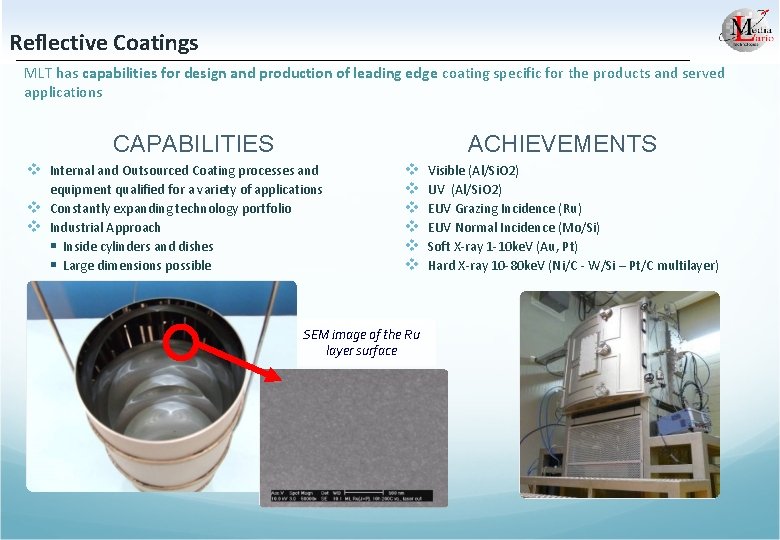
Reflective Coatings MLT has capabilities for design and production of leading edge coating specific for the products and served applications CAPABILITIES ACHIEVEMENTS v Internal and Outsourced Coating processes and equipment qualified for a variety of applications v Constantly expanding technology portfolio v Industrial Approach § Inside cylinders and dishes § Large dimensions possible v v v SEM image of the Ru layer surface Visible (Al/Si. O 2) UV (Al/Si. O 2) EUV Grazing Incidence (Ru) EUV Normal Incidence (Mo/Si) Soft X-ray 1 -10 ke. V (Au, Pt) Hard X-ray 10 -80 ke. V (Ni/C - W/Si – Pt/C multilayer)

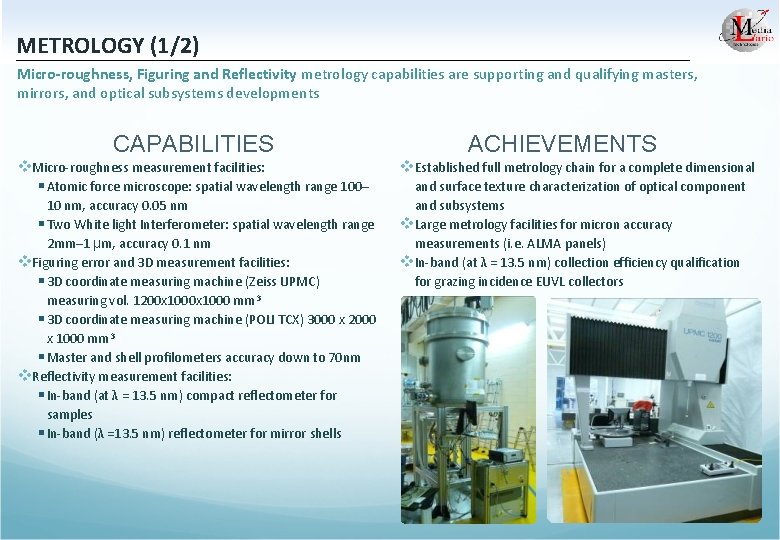
METROLOGY (1/2) Micro-roughness, Figuring and Reflectivity metrology capabilities are supporting and qualifying masters, mirrors, and optical subsystems developments CAPABILITIES v. Micro-roughness measurement facilities: § Atomic force microscope: spatial wavelength range 100– 10 nm, accuracy 0. 05 nm § Two White light Interferometer: spatial wavelength range 2 mm– 1 µm, accuracy 0. 1 nm v. Figuring error and 3 D measurement facilities: § 3 D coordinate measuring machine (Zeiss UPMC) measuring vol. 1200 x 1000 mm 3 § 3 D coordinate measuring machine (POLI TCX) 3000 x 2000 x 1000 mm 3 § Master and shell profilometers accuracy down to 70 nm v. Reflectivity measurement facilities: § In-band (at λ = 13. 5 nm) compact reflectometer for samples § In-band (λ =13. 5 nm) reflectometer for mirror shells ACHIEVEMENTS v. Established full metrology chain for a complete dimensional and surface texture characterization of optical component and subsystems v. Large metrology facilities for micron accuracy measurements (i. e. ALMA panels) v. In-band (at λ = 13. 5 nm) collection efficiency qualification for grazing incidence EUVL collectors

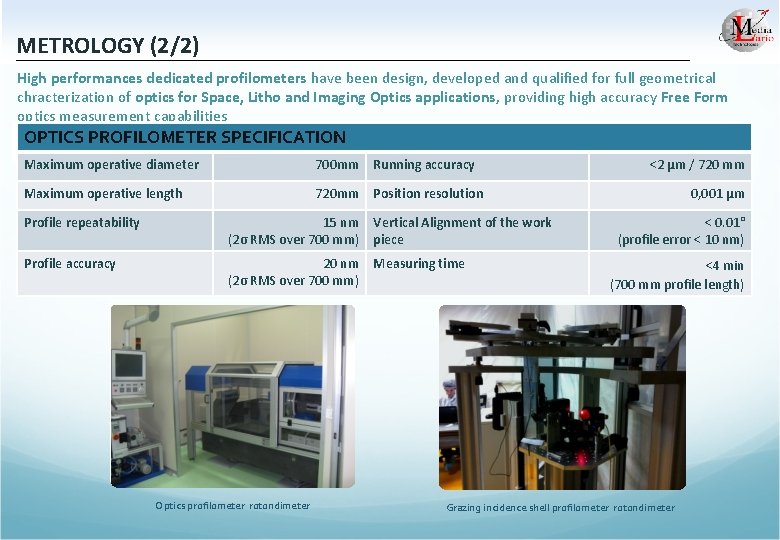
METROLOGY (2/2) High performances dedicated profilometers have been design, developed and qualified for full geometrical chracterization of optics for Space, Litho and Imaging Optics applications, providing high accuracy Free Form optics measurement capabilities OPTICS PROFILOMETER SPECIFICATION CAPABILITIES ACHIEVEMENTS Maximum operative diameter 700 mm Running accuracy Maximum operative length 720 mm Position resolution Profile repeatability 15 nm (2σ RMS over 700 mm) Vertical Alignment of the work piece Profile accuracy 20 nm (2σ RMS over 700 mm) Measuring time Optics profilometer rotondimeter <2 μm / 720 mm 0, 001 μm < 0. 01° (profile error < 10 nm) <4 min (700 mm profile length) Grazing incidence shell profilometer rotondimeter

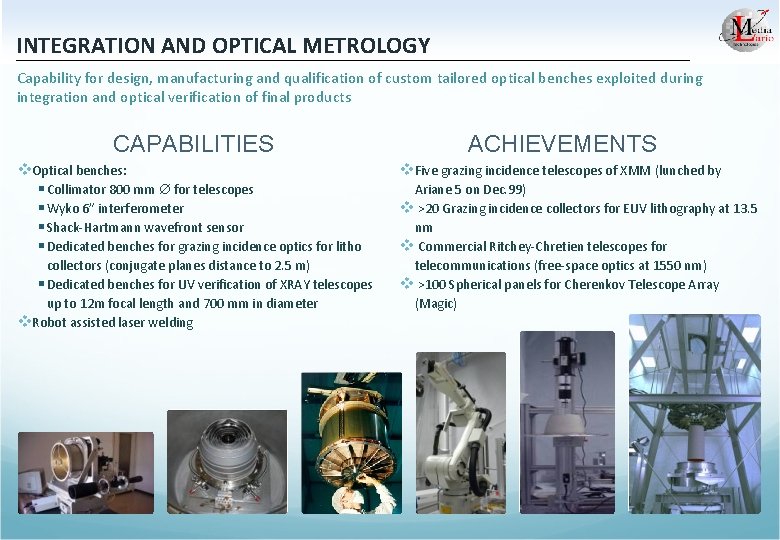
INTEGRATION AND OPTICAL METROLOGY Capability for design, manufacturing and qualification of custom tailored optical benches exploited during integration and optical verification of final products CAPABILITIES ACHIEVEMENTS v. Optical benches: § Collimator 800 mm for telescopes § Wyko 6” interferometer § Shack-Hartmann wavefront sensor § Dedicated benches for grazing incidence optics for litho v. Five grazing incidence telescopes of XMM (lunched by collectors (conjugate planes distance to 2. 5 m) § Dedicated benches for UV verification of XRAY telescopes up to 12 m focal length and 700 mm in diameter v. Robot assisted laser welding Ariane 5 on Dec. 99) v >20 Grazing incidence collectors for EUV lithography at 13. 5 nm v Commercial Ritchey-Chretien telescopes for telecommunications (free-space optics at 1550 nm) v >100 Spherical panels for Cherenkov Telescope Array (Magic)

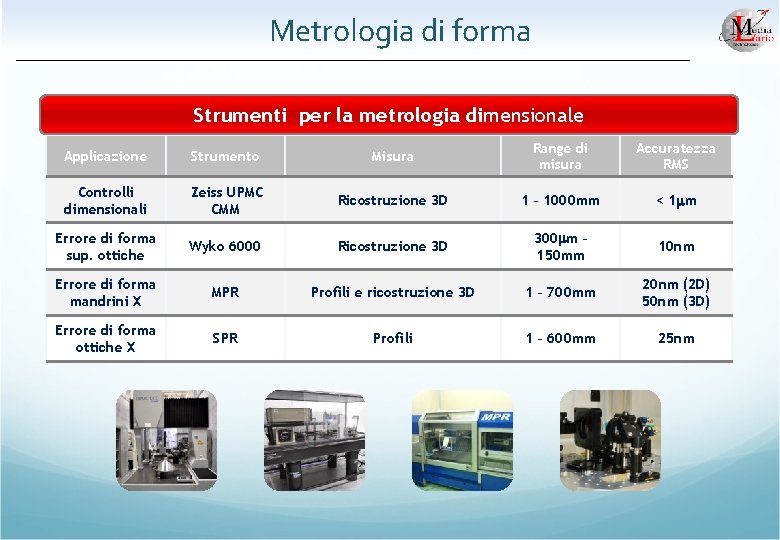
Metrologia di forma Strumenti per la metrologia Shapedimensionale Applicazione Strumento Misura Range di misura Accuratezza RMS Controlli dimensionali Zeiss UPMC CMM Ricostruzione 3 D 1 – 1000 mm < 1 mm Errore di forma sup. ottiche Wyko 6000 Ricostruzione 3 D 300 mm – 150 mm 10 nm Errore di forma mandrini X MPR Profili e ricostruzione 3 D 1 – 700 mm 20 nm (2 D) 50 nm (3 D) Errore di forma ottiche X SPR Profili 1 – 600 mm 25 nm

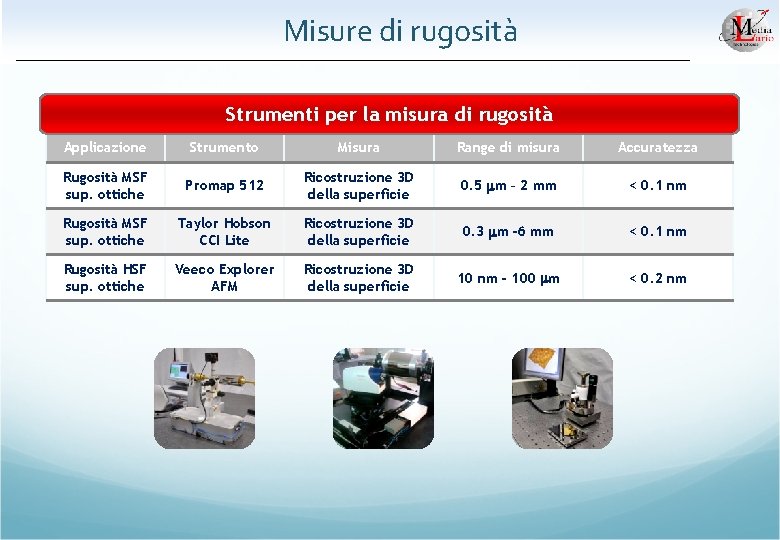
Misure di rugosità Strumenti per la misura di rugosità Roughness Applicazione Strumento Misura Range di misura Accuratezza Rugosità MSF sup. ottiche Promap 512 Ricostruzione 3 D della superficie 0. 5 mm – 2 mm < 0. 1 nm Rugosità MSF sup. ottiche Taylor Hobson CCI Lite Ricostruzione 3 D della superficie 0. 3 mm -6 mm < 0. 1 nm Rugosità HSF sup. ottiche Veeco Explorer AFM Ricostruzione 3 D della superficie 10 nm - 100 mm < 0. 2 nm