Capacitive load gauge development for magnet application TEMSCLMF


![Basic model for capacitance variation Polyimide AV 100 [3] Property Value 3. 1 GPa Basic model for capacitance variation Polyimide AV 100 [3] Property Value 3. 1 GPa](https://slidetodoc.com/presentation_image_h/252045fe12f396854e3f3100dc06fea9/image-12.jpg)
![Stress state in the capacitive gauge 70 MPa 140 MPa Polyimide AV 100 [3] Stress state in the capacitive gauge 70 MPa 140 MPa Polyimide AV 100 [3]](https://slidetodoc.com/presentation_image_h/252045fe12f396854e3f3100dc06fea9/image-15.jpg)


![11 T mock-up Instrumented area DIC of an 11 T mock-up [1] and instrumented 11 T mock-up Instrumented area DIC of an 11 T mock-up [1] and instrumented](https://slidetodoc.com/presentation_image_h/252045fe12f396854e3f3100dc06fea9/image-28.jpg)

- Slides: 31

Capacitive load gauge development for magnet application TE-MSC-LMF Felix Wolf supervised by Arnaud Foussat 15. 05. 2020

Remarks for capacitive gauge application Contra Pro § § § Sensor is sensitive to shear stress, limited by glue and polyimide Requires shear reduced integration design of the sensor in the magnet § Special Design § Lubricant / Teflon coating § § § Sensor can identify an applied load above 150 MPa Sensor design can be adapted to requirements Online stress monitoring possible (compared to pressure sensitive films) Sensor effects the assembly stiffness as it is in the load line (specially for Nb 3 Sn coils which have higher stiffness by a factor of 5 to Nb. Ti coils) 2

Purpose and objective Stress determination applied on a coil in a magnet Retrieve the manufacturing procedure of gauges Manufacture gauges with all relevant tools and components EDMS: 2361251 Test and validate capacitive gauges EDMS: 2330901 Integrate capacitive gages in a magnet or coil assembly 3

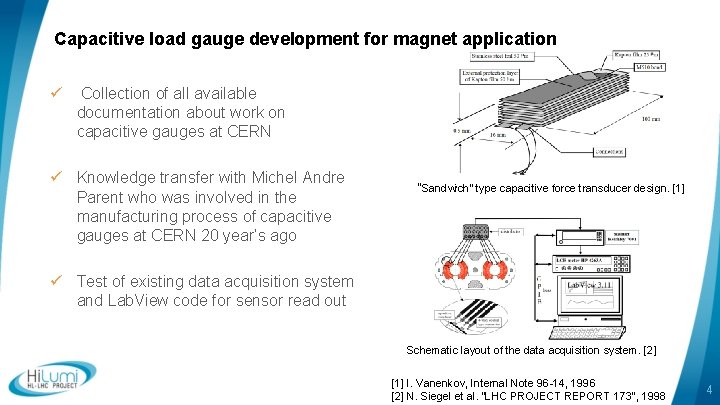
Capacitive load gauge development for magnet application ü Collection of all available documentation about work on capacitive gauges at CERN ü Knowledge transfer with Michel Andre Parent who was involved in the manufacturing process of capacitive gauges at CERN 20 year’s ago “Sandwich” type capacitive force transducer design. [1] ü Test of existing data acquisition system and Lab. View code for sensor read out Schematic layout of the data acquisition system. [2] [1] I. Vanenkov, Internal Note 96 -14, 1996 [2] N. Siegel et al. “LHC PROJECT REPORT 173”, 1998 4

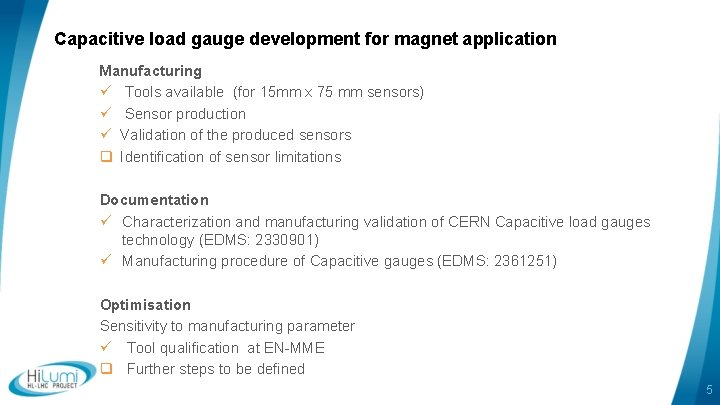
Capacitive load gauge development for magnet application Manufacturing ü Tools available (for 15 mm x 75 mm sensors) ü Sensor production ü Validation of the produced sensors q Identification of sensor limitations Documentation ü Characterization and manufacturing validation of CERN Capacitive load gauges technology (EDMS: 2330901) ü Manufacturing procedure of Capacitive gauges (EDMS: 2361251) Optimisation Sensitivity to manufacturing parameter ü Tool qualification at EN-MME q Further steps to be defined 5

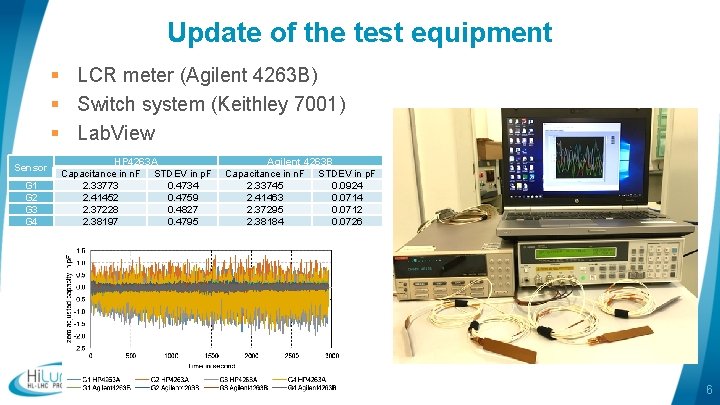
Update of the test equipment § LCR meter (Agilent 4263 B) § Switch system (Keithley 7001) § Lab. View Sensor G 1 G 2 G 3 G 4 HP 4263 A Capacitance in n. F STDEV in p. F 2. 33773 0. 4734 2. 41452 0. 4759 2. 37228 0. 4827 2. 38197 0. 4795 Agilent 4263 B Capacitance in n. F STDEV in p. F 2. 33745 0. 0924 2. 41463 0. 0714 2. 37295 0. 0712 2. 38184 0. 0726 6

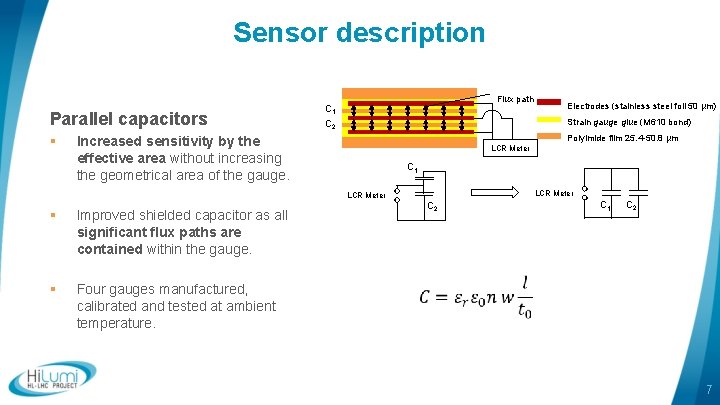
Sensor description Parallel capacitors § Flux path C 1 C 2 Strain gauge glue (M 610 bond) Polyimide film 25. 4 -50. 8 µm Increased sensitivity by the effective area without increasing the geometrical area of the gauge. LCR Meter C 1 LCR Meter § Improved shielded capacitor as all significant flux paths are contained within the gauge. § Four gauges manufactured, calibrated and tested at ambient temperature. Electrodes (stainless steel foil 50 µm) C 2 C 1 C 2 7

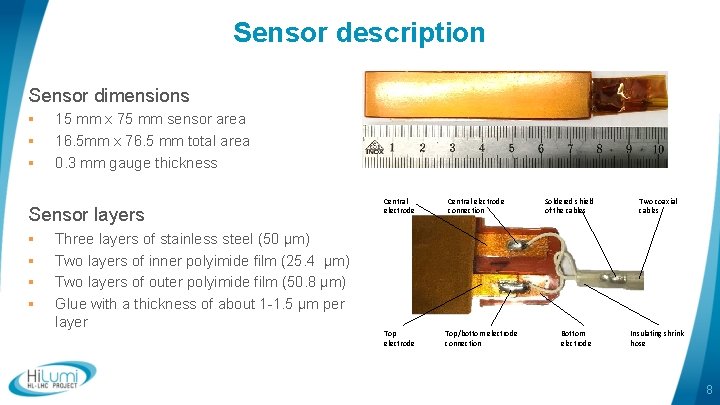
Sensor description Sensor dimensions § § § 15 mm x 75 mm sensor area 16. 5 mm x 76. 5 mm total area 0. 3 mm gauge thickness Sensor layers § § Three layers of stainless steel (50 µm) Two layers of inner polyimide film (25. 4 µm) Two layers of outer polyimide film (50. 8 µm) Glue with a thickness of about 1 -1. 5 µm per layer Central electrode Top electrode Central electrode connection Top/bottom electrode connection Soldered shield of the cables Bottom electrode Two coaxial cables Insulating shrink hose 8

Fundamental analytics of the sensor 9

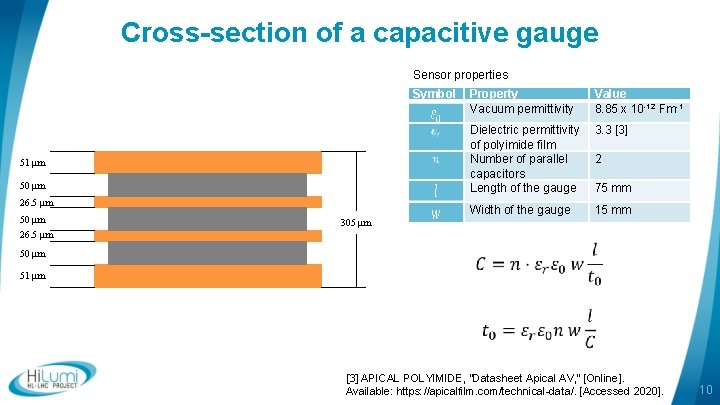
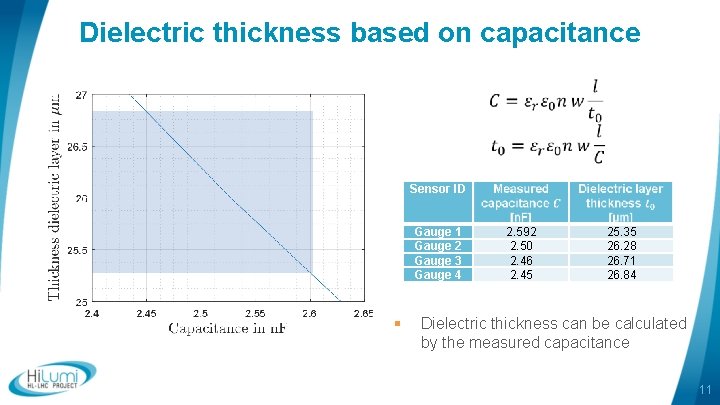
Cross-section of a capacitive gauge Sensor properties Symbol Value 8. 85 x 10 -12 Fm-1 Dielectric permittivity 3. 3 [3] of polyimide film Number of parallel 2 capacitors Length of the gauge 75 mm 51 µm 50 µm 26. 5 µm 50 µm Property Vacuum permittivity Width of the gauge 15 mm 305 µm 26. 5 µm 50 µm 51 µm [3] APICAL POLYIMIDE, “Datasheet Apical AV, ” [Online]. Available: https: //apicalfilm. com/technical-data/. [Accessed 2020]. 10

Dielectric thickness based on capacitance Sensor ID Gauge 1 Gauge 2 Gauge 3 Gauge 4 § 2. 592 2. 50 2. 46 2. 45 25. 35 26. 28 26. 71 26. 84 Dielectric thickness can be calculated by the measured capacitance 11
![Basic model for capacitance variation Polyimide AV 100 3 Property Value 3 1 GPa Basic model for capacitance variation Polyimide AV 100 [3] Property Value 3. 1 GPa](https://slidetodoc.com/presentation_image_h/252045fe12f396854e3f3100dc06fea9/image-12.jpg)
Basic model for capacitance variation Polyimide AV 100 [3] Property Value 3. 1 GPa 3. 3 at 100 MPa § § Stiffness of polyimide in the sandwich of the gauge is higher than documented in the datasheet The K-factor follows the physical equations 12

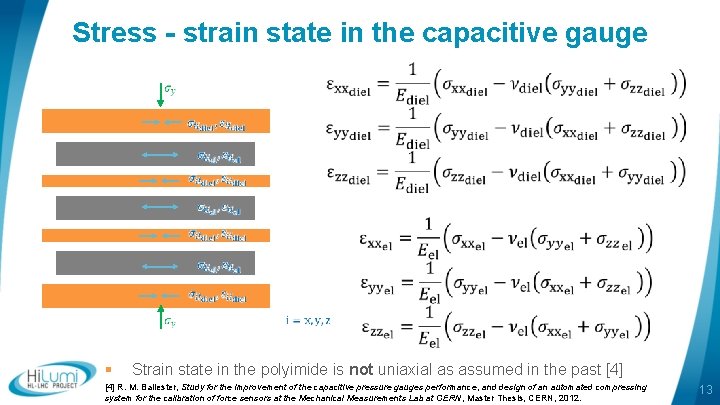
Stress - strain state in the capacitive gauge § Strain state in the polyimide is not uniaxial as assumed in the past [4] R. M. Ballester, Study for the improvement of the capacitive pressure gauges performance, and design of an automated compressing system for the calibration of force sensors at the Mechanical Measurements Lab at CERN, Master Thesis, CERN, 2012. 13

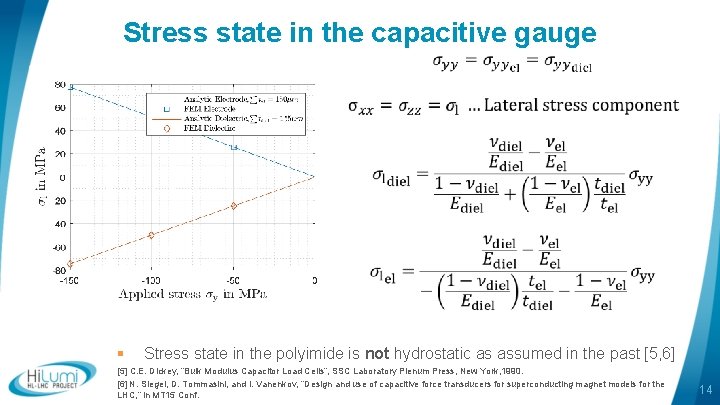
Stress state in the capacitive gauge § Stress state in the polyimide is not hydrostatic as assumed in the past [5, 6] [5] C. E. Dickey, “Bulk Modulus Capacitor Load Cells”, SSC Laboratory Plenum Press, New York, 1990. [6] N. Siegel, D. Tommasini, and I. Vanenkov, “Design and use of capacitive force transducers for superconducting magnet models for the LHC, ” in MT 15 Conf. 14
![Stress state in the capacitive gauge 70 MPa 140 MPa Polyimide AV 100 3 Stress state in the capacitive gauge 70 MPa 140 MPa Polyimide AV 100 [3]](https://slidetodoc.com/presentation_image_h/252045fe12f396854e3f3100dc06fea9/image-15.jpg)
Stress state in the capacitive gauge 70 MPa 140 MPa Polyimide AV 100 [3] Symbol Stainless steel 316 L [7] Symbol Property Elastic modulus Value 191 GPa Property Elastic modulus Value 3. 1 GPa Poisson ratio 0. 34 Poisson ratio 0. 3 [8] Yield strength 69 MPa Yield strength 320 MPa [7] C. Scheuerlein, et al. , “Mechanical Properties of the HL-LHC 11 T Nb 3 Sn Magnet Constituent Materials, ” IEEE Transactions on Applied Superconductivity, 2017, . 15 [8] P. Shankar, et al. , “Nitrogen redistribution, microstructure, and elastic constant evaluation using ultrasonics in aged 316 LN stainless steels, ” Metall and Mat Trans A 32, (2001).

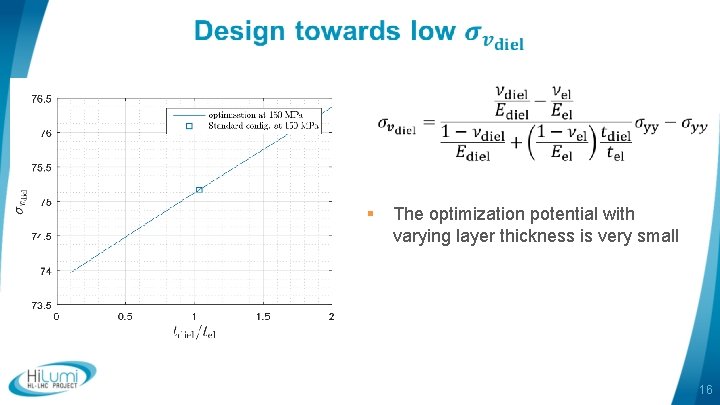
§ The optimization potential with varying layer thickness is very small 16

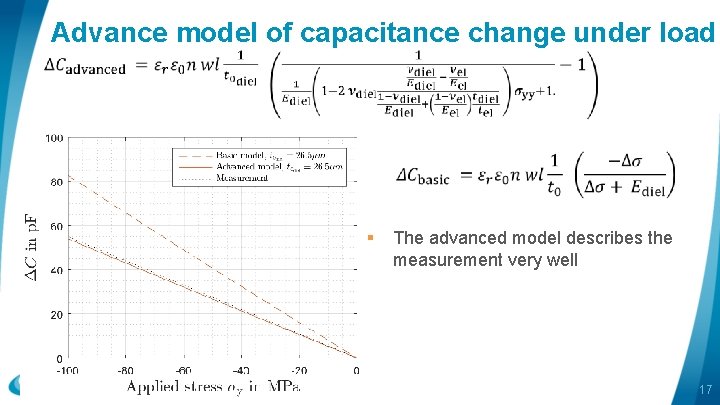
Advance model of capacitance change under load § The advanced model describes the measurement very well 17

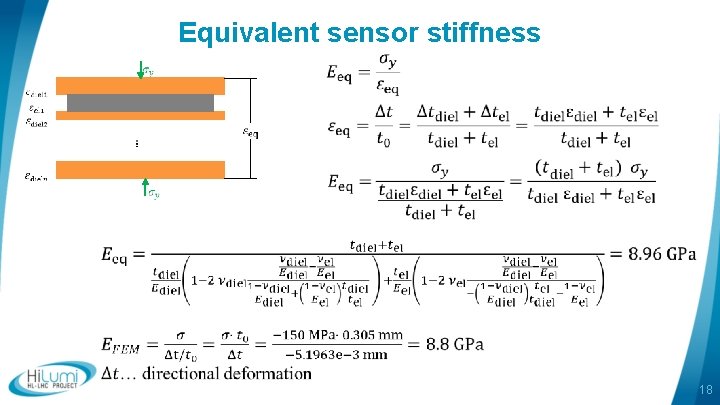
Equivalent sensor stiffness 18

Validation measurements 19

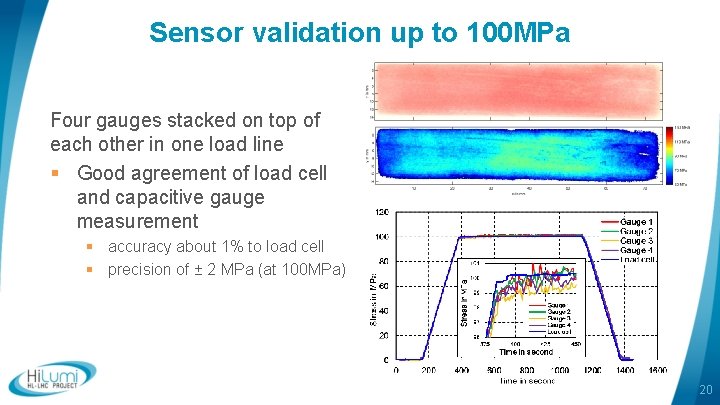
Sensor validation up to 100 MPa Four gauges stacked on top of each other in one load line § Good agreement of load cell and capacitive gauge measurement § accuracy about 1% to load cell § precision of ± 2 MPa (at 100 MPa) 20

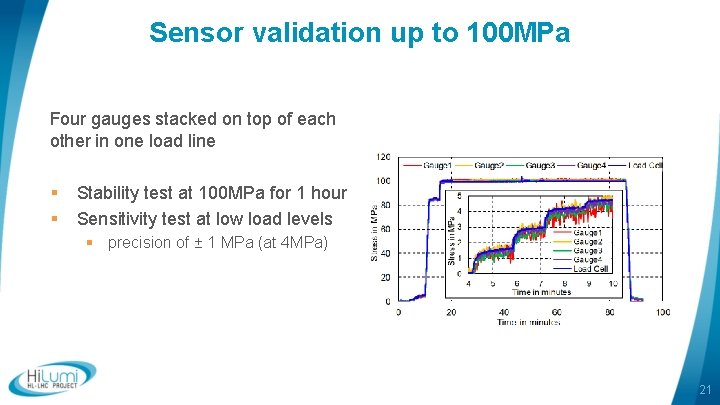
Sensor validation up to 100 MPa Four gauges stacked on top of each other in one load line § § Stability test at 100 MPa for 1 hour Sensitivity test at low load levels § precision of ± 1 MPa (at 4 MPa) 21

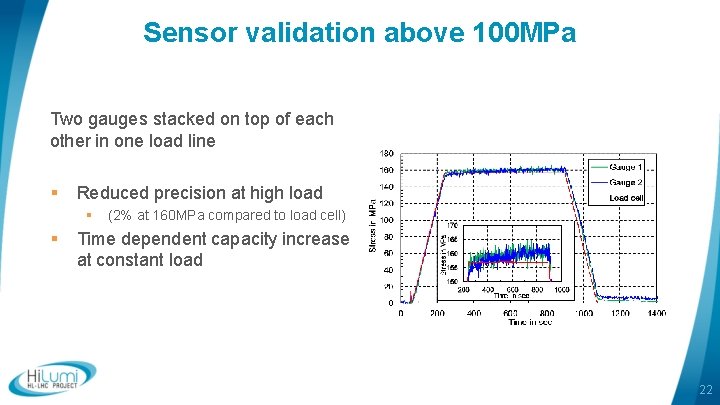
Sensor validation above 100 MPa Two gauges stacked on top of each other in one load line § Reduced precision at high load § § (2% at 160 MPa compared to load cell) Time dependent capacity increase at constant load 22

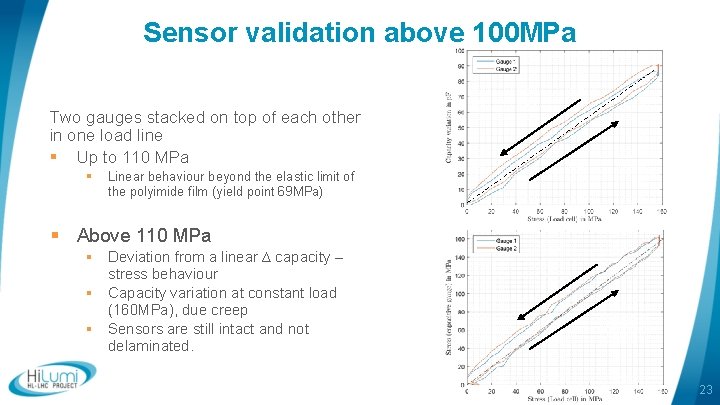
Sensor validation above 100 MPa Two gauges stacked on top of each other in one load line § Up to 110 MPa § Linear behaviour beyond the elastic limit of the polyimide film (yield point 69 MPa) § Above 110 MPa § Deviation from a linear ∆ capacity – stress behaviour § Capacity variation at constant load (160 MPa), due creep § Sensors are still intact and not delaminated. 23

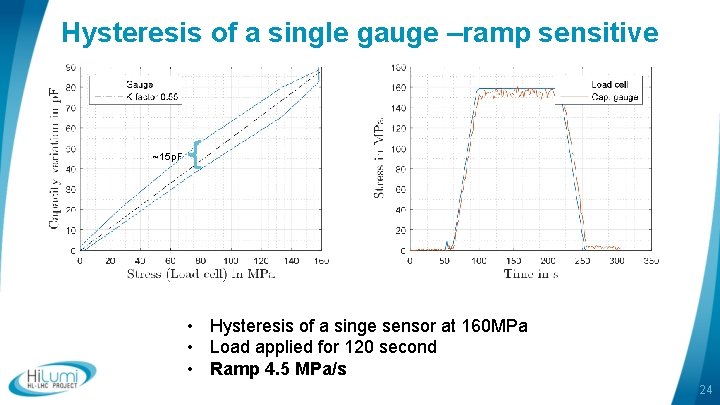
Hysteresis of a single gauge –ramp sensitive ~15 p. F • Hysteresis of a singe sensor at 160 MPa • Load applied for 120 second • Ramp 4. 5 MPa/s 24

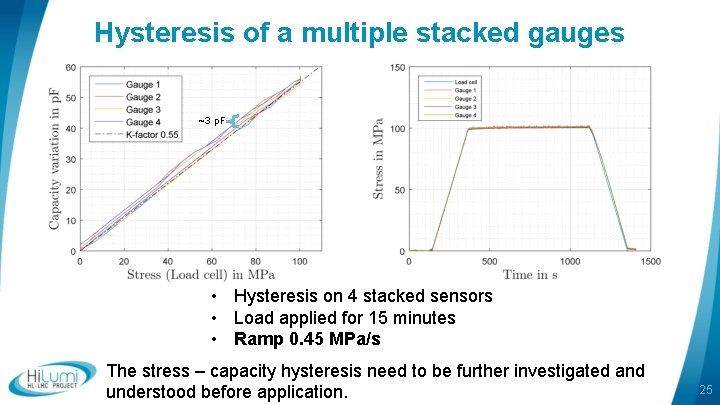
Hysteresis of a multiple stacked gauges ~3 p. F • Hysteresis on 4 stacked sensors • Load applied for 15 minutes • Ramp 0. 45 MPa/s The stress – capacity hysteresis need to be further investigated and understood before application. 25

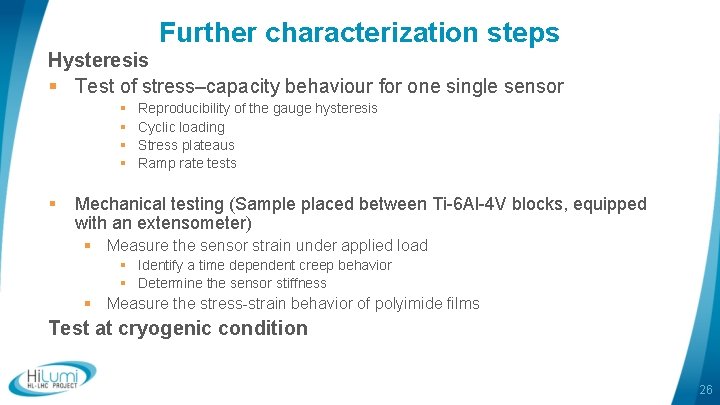
Further characterization steps Hysteresis § Test of stress–capacity behaviour for one single sensor § § § Reproducibility of the gauge hysteresis Cyclic loading Stress plateaus Ramp rate tests Mechanical testing (Sample placed between Ti-6 Al-4 V blocks, equipped with an extensometer) § Measure the sensor strain under applied load § Identify a time dependent creep behavior § Determine the sensor stiffness § Measure the stress-strain behavior of polyimide films Test at cryogenic condition 26

Magnet mock-up integration 27
![11 T mockup Instrumented area DIC of an 11 T mockup 1 and instrumented 11 T mock-up Instrumented area DIC of an 11 T mock-up [1] and instrumented](https://slidetodoc.com/presentation_image_h/252045fe12f396854e3f3100dc06fea9/image-28.jpg)
11 T mock-up Instrumented area DIC of an 11 T mock-up [1] and instrumented area of the mid-plane by capacitive gauges. • DIC indicates a lowest shear strain in the mid-plane of a mock-up • Pole integration of the sensors failed in the past • Mid-plane instrumentation is chosen with small shear stress [1] M. Guinchard, History of 11 T mock-ups, https: //indico. cern. ch/event/897163/ 28

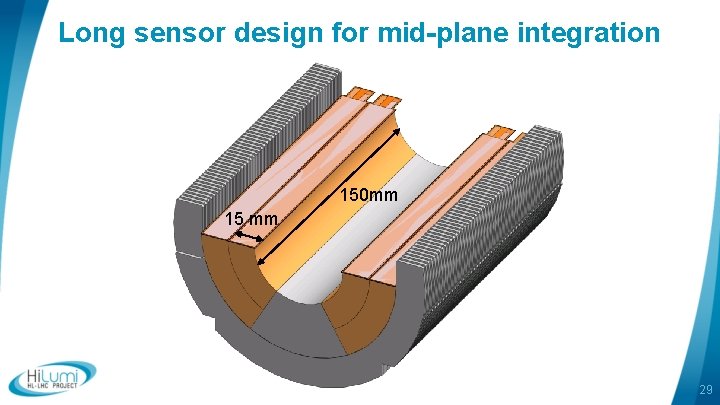
Long sensor design for mid-plane integration 150 mm 15 mm 29

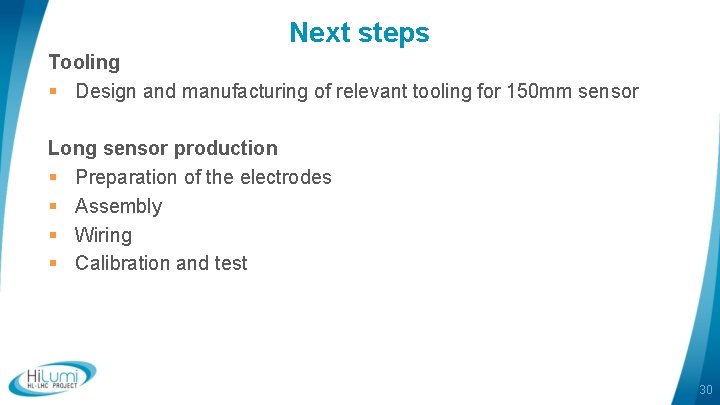
Next steps Tooling § Design and manufacturing of relevant tooling for 150 mm sensor Long sensor production § Preparation of the electrodes § Assembly § Wiring § Calibration and test 30

Thank you for your attention. 31