Workforce Timekeeper 8 0 TTT KRONOS FOR SERVICES


- Slides: 30
Workforce Timekeeper 8. 0 TTT KRONOS FOR SERVICES & DISTRIBUTION Chris Dunn User Adoption Consultant © KRONOS INCORPORATED November 9, 2020
What are we going to cover today? • • Navigation Timecard Exceptions Pay period close tasks Approve Leave Requests 2 © Copyright 2013 Kronos Incorporated
Using your Navigator © Copyright 2013 Kronos Incorporated
Navigating the Navigator • What is a Navigator? – A user interface that allows you to access, view, and modify time and labor data through a web browser – Configured to reflect responsibilities and tasks for specific roles – Available workspaces, widgets, and alerts as determined by your organization Reference: Navigating the navigator job aid (Continued) 4
Search Active Bar Workspace Name / Sign Out Alerts Views and Widgets Carousel Related Items Pane
Screen Area Description Active Bar A horizontal area at the top of the navigator that displays the currently opened workspaces as tabs. Click a tab to bring a workspace into focus. Click the Refresh icon next to the title to reload the workspace with its default information. Identifies the user and provides a link to log out of navigator. Your photo may also appear here. Links, which appear as icons, enabling you to quickly view the type and number of tasks and issues that require your immediate attention. (Note: Alerts are optional) Name/Sign Out Alerts Carousel Container for one or more workspaces (Note: Carousel appears only if you have been assigned another workspace in addition to your home workspace. ) Search Click to open the Search widget, to locate employees and their information. Workspaces A work area made up of one or more views and the Related Items pane. Views and Widgets A workspace can have one or more pre-sized views. Views are holding areas for widgets, which are the task-oriented tools you use to review data and perform actions. In this example, there are two views, and each one currently holds a widget. When you need to work with a different widget, you can swap it into either view, replacing the current occupant. Includes one or more additional widgets that are part of the workspace; the Related Items pane contains different widgets for each workspace. Related Items Pane
Managing Active Workspace Primary and Secondary Widgets • All workspaces have at least one primary view, and some also have one or more secondary views. Normally, to work in a widget you must move it into a primary view.
Managing Active Workspace Primary and Secondary Widgets • Multiple Primary Views – Some workspaces feature two equally-sized views in a side-by-side or top-andbottom layout. In this case, both views act as primary views, and widgets in those views are fully functional. • Repositioning Widgets – Move a secondary widget into a primary position by clicking the title bar, dragging it over the primary widget, and releasing. • Hovering for Details – Hover the mouse to see a tool tip containing details, where applicable. • Contextual Callouts – Right-click a cell within a widget; in many cases, this opens a callout with detailed information and icons for any actions you are allowed to perform on that cell. • Using the Go. To Control – Click the Go. To control, and then access the employees’ timecards, the Schedule Planner, or another Workforce Central page where you can perform an action.
Managing Active Workspace Tabs Each active workspace gets its own tab. You can switch back and forth between workspaces by selecting the tab you want to view. You must always have at least one workspace open, but you can close any additional workspaces by hovering over its tab and clicking the Close (X) button.
Managing Active Workspace Opening Workspaces and Widgets Opening Workspaces • • • If you have been assigned more than one workspace, you can: Access all available workspaces by clicking the carousel. Use the arrows to toggle between available workspaces. Click a workspace to make it active. Click the X in the workspace tab to close the workspace (other than your default workspace). Closing the Carousel Click the Workspaces tab to close the carousel Closing the Carousel Cycling the Carousel Click the Workspaces tab to close the carousel If there is more than one workspace in the carousel, use the arrows to cycle through the additional workspaces
Managing Active Workspace Opening Widgets Activating a Widget There are two ways to activate a widget in the Related Items pane To add it to the current workspace, drag it out of the pane and release it over a widget in the workspace. To work with the widget in a temporary workspace, click the widget while it is still in the pane. To close that workspace later, hover its tab and click the Close (X) button. Closing the Related Items Pane Click the right arrow to close the Related Items pane. When closed, click the left arrow to open it. Active Widgets already in an open workspace appear grayed out in widget list.
Timecard Exceptions © Copyright 2013 Kronos Incorporated
Reviewing Notifications of Time Data Using the Exceptions Alert and Widget • You can access the widget using the following methods: – Clicking the Exceptions alert; this activates the Exceptions widget and moves the data to an open workspace. – Clicking and dragging the Exceptions widget to the open workspace. – Clicking the widget to open it in a temporary workspace. The Exceptions Alert • The Exceptions alert quickly draws your attention to time data issues in timecards for hourly employees. It is: – Available when you log in; it displays an alerts indicator in the top center or your navigator. – Time data exceptions alerts can notify you about issues such as missed punches, late or early in punches, and late or early out punches that require your immediate attention. – Select an employee from the list to access the Summary and Details views of the exceptions widget. When you click an employee’s name, you are brought to the Details view of the Exceptions widget.
Refresh Click the Refresh icon to get immediate updates to your alerts. Alert Details Click an item in the details of an alert to open the relevant widget. You can then take whatever actions are needed in the open widget. Alert Icons Each type of alert has its own icon. A number in the icon’s corner indicates that there are items you should review. Click an icon to view details. View All Click to open the Alerts and Notifications widget. This provides more room for reviewing alerts, and may also include uncategorized alerts and notifications that are not actionable.
Exceptions Summary View • Selecting an employee activates the Details button, which allows you to view details for one employee at a time. When you hover any column, the Details button is enabled. Selecting the Details button allows you to view details for all employees who have that type of exception
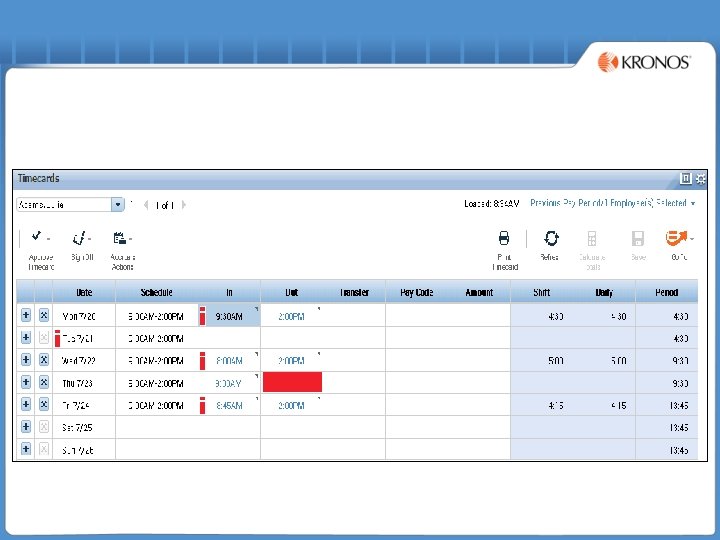
Exceptions Summary View Details View • The Details view is populated only when an employee has an exception. If there are no exceptions, the Details view for the employee is blank. From this view, you can: See the dates and exception details Access an employee’s hourly timecard view Toggle to display or hide an employee’s schedule Resolve exceptions manually or by using one of the available action buttons Accessed from Summary view, the Details view provides access to in and out punches, schedule data, and more details about exceptions. In this view, you can also resolve exceptions and enter comments. Visual Indicators in the Details View – – – Exception Type Details View Visual Indicator Unexcused absence Date displayed in red text Early in/out or late in/out In or out time displayed in red text Missed punch In or out time cell filled with solid red Reviewed exception In or out time displayed in green
Resolving Exceptions in the Exceptions Widget Action Buttons in the Exceptions Widget • Depending on the type of exception and its status, action buttons appear along the bottom of the page. Only the relevant actions are available. The following table lists and describes the action buttons you will see in the Exceptions widget. Action button Description Save Cancel Justify Save your changes to the database. Mark as Reviewed Indicates that you have reviewed the exception, and that no further action is required. The color of the exception changes to green and the Mark as Reviewed button changes to Unmark as Reviewed. Changes a missed in or out punch to the scheduled time. This feature only works for employees who have assigned schedules. Change to Scheduled Comment Add Punch Remove Cancels changes that you made prior to saving. Allows you to review exceptions that were either justified by employees or that need to be justified by you. You can approve the employee change, approve application-delivered resolution, or justify the exception. Once justified, the exception color changes to green. Adds a comment, and optionally a note, to an employee’s punch data. Opens the Add Punch dialog box and inserts a punch time. Removes punch data.
Resolving Punch Issues Using Change to Scheduled To fix a missed punch exception, you can use the Change to Scheduled option. This button is available only with missed punch exceptions for employees who have schedules assigned to them. • If you know that the employee started work or left on time and simply forgot to punch, click the cell containing the missed punch to activate the Change to Scheduled button. The button is available only when the missing punch is either the first punch of the day or last punch of the day. For missing punches in the middle of the day, only the Add Punch option is available. Resolving a Missed Punch with Change to Scheduled • Access the Time Exceptions widget. • From the Time Period drop-down list, select the applicable pay period. • Select the applicable group. • Select the applicable employee and then click View Details. • Click the cell with the missing punch and click Change to Scheduled. • Click Save. •
Resolving Punch Issues Adding a Punch in the Exceptions Widget • In the Details view in the Exceptions widget, click the cell containing the exception and then click Add Punch. • In the Add Punch dialog box, confirm the date. From the Insert drop-down list, select the applicable punch option. • Enter the appropriate punch time and click Add. • Click Save. Confirm that the exception no longer appears in the time detail view. • You can also double-click a punch cell and enter a punch.
Accessing Hourly and Project Timecards • 2 Ways: – Accessing Timecards via the View Timecard Link In the Exceptions Widget Details View – Accessing Timecards via a Genie • Double click the employee’s name
Leave Requests © Copyright 2013 Kronos Incorporated
Leave Requests • Head to the Related Items Pane: – Select Requests – Select your time frame that you are approving for (current pay period, etc) – Choose the employee(s) that you want to approve or hyperfind the employee name – Select that you want to view time-off – Review request details – Click • Approve • Refuse • Pending • retract – We will review this through the job aid!
Pay Period Close Tasks © Copyright 2013 Kronos Incorporated
Approving Employee Timecards Using the Approval Wizard 1. Access the Timecard Approval wizard. 2. Confirm or modify the values in the Time Period and Hyper. Find field. If you make any changes, click Save.
3. Review the Exceptions widget for any exceptions that have not been addressed. Correct the exceptions as necessary. Click Next. 4. Select one employee whose timecards you want to approve. Hint: If you are not viewing the applicable Genie, select the applicable Genie from the drop-down list. 5. Select Approval > Approve Timecard.
7. Click Yes on the pop-up message. Then click Next. 8. Review the results of your time approvals. To start a new timecard approval, click Clear. 9. Click OK on the pop-up message.
Removing your Approval • After you apply an approval to one or more employee timecards, those employees can no longer edit their timecards for that time period. However, there might be circumstances when an employee needs to make further edits to a timecard after a manager has applied an approval. • Removing your approval from a timecard allows other managers—and possibly the employee—to edit time data for the dates from which you removed your approval.
Next Steps Review Job Aids: • • Navigator aid Common Manger tasks aid Approving Leave Job Aid Mobile Phone aids-if available 29 © Copyright 2013 Kronos Incorporated
Questions? ? • Call your ASC Liaison if you have any questions. • Please remember that this is simpler then it seems, I promise!! • Please give this time. • There is a website for all training materials at: • The URL (website) is: