TM 720 Lecture 10 Short Run SPC and
- Slides: 35

TM 720 - Lecture 10 Short Run SPC and Gage Reproducibility & Repeatability 9/10/2020 TM 720: Statistical Process Control 1

Assignment: l l Reading: • Finish Chapters 7 and 9 • • Sections 7. 4 – 7. 8 Sections 9 – 9. 2 Assignment: • • • Access Excel Template for Individuals Control Charts: • • Download Assignment 7 for practice Use the data on the HW 7 Excel sheet to do the charting, verify the control limits by hand calculations Solutions for 6 and 7 will post on Thursday Review for Exam II 9/10/2020 TM 720: Statistical Process Control 2

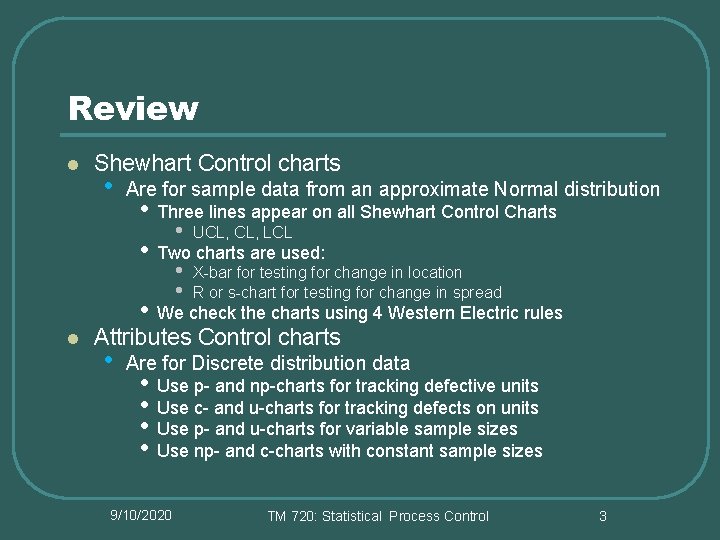
Review l Shewhart Control charts • Are for sample data from an approximate Normal distribution • Three lines appear on all Shewhart Control Charts • UCL, LCL • Two charts are used: • l • • X-bar for testing for change in location R or s-chart for testing for change in spread We check the charts using 4 Western Electric rules Attributes Control charts • Are for Discrete distribution data • • Use p- and np-charts for tracking defective units Use c- and u-charts for tracking defects on units Use p- and u-charts for variable sample sizes Use np- and c-charts with constant sample sizes 9/10/2020 TM 720: Statistical Process Control 3

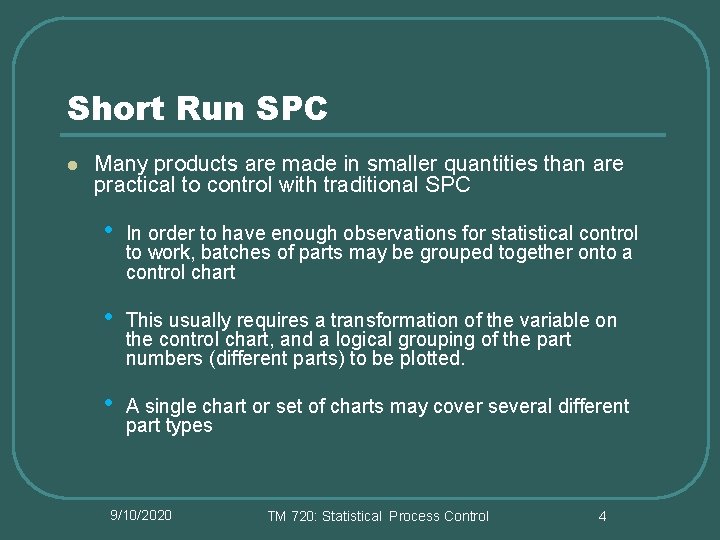
Short Run SPC l Many products are made in smaller quantities than are practical to control with traditional SPC • In order to have enough observations for statistical control to work, batches of parts may be grouped together onto a control chart • This usually requires a transformation of the variable on the control chart, and a logical grouping of the part numbers (different parts) to be plotted. • A single chart or set of charts may cover several different part types 9/10/2020 TM 720: Statistical Process Control 4

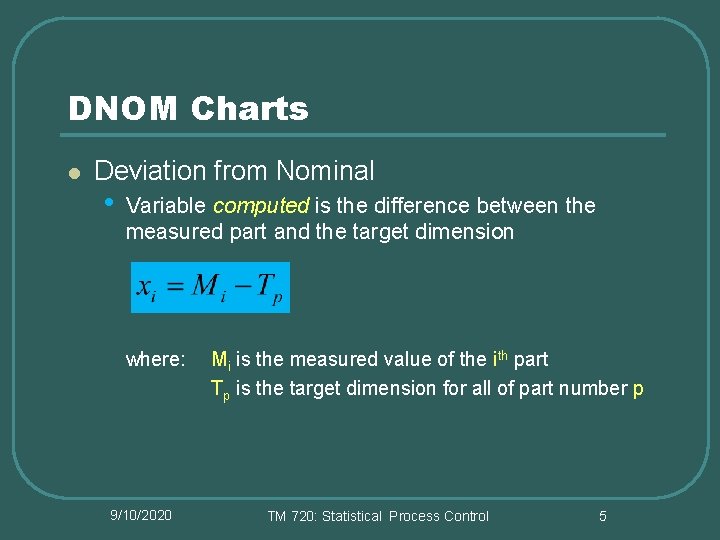
DNOM Charts l Deviation from Nominal • Variable computed is the difference between the measured part and the target dimension where: 9/10/2020 Mi is the measured value of the ith part Tp is the target dimension for all of part number p TM 720: Statistical Process Control 5

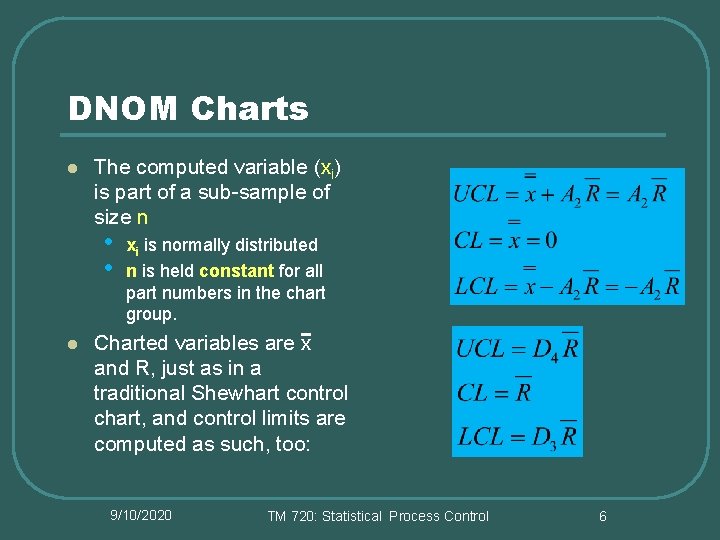
DNOM Charts l The computed variable (xi) is part of a sub-sample of size n • • l xi is normally distributed n is held constant for all part numbers in the chart group. Charted variables are x and R, just as in a traditional Shewhart control chart, and control limits are computed as such, too: 9/10/2020 TM 720: Statistical Process Control 6

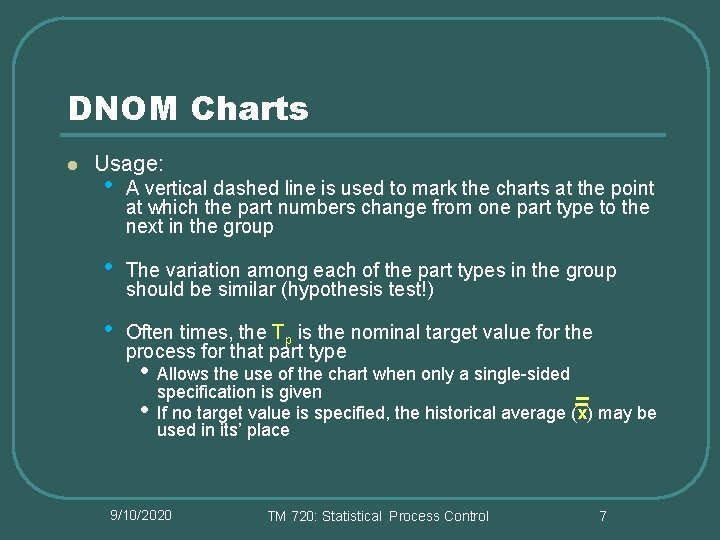
DNOM Charts l Usage: • A vertical dashed line is used to mark the charts at the point at which the part numbers change from one part type to the next in the group • The variation among each of the part types in the group should be similar (hypothesis test!) • Often times, the Tp is the nominal target value for the process for that part type • • Allows the use of the chart when only a single-sided specification is given If no target value is specified, the historical average (x) may be used in its’ place 9/10/2020 TM 720: Statistical Process Control 7

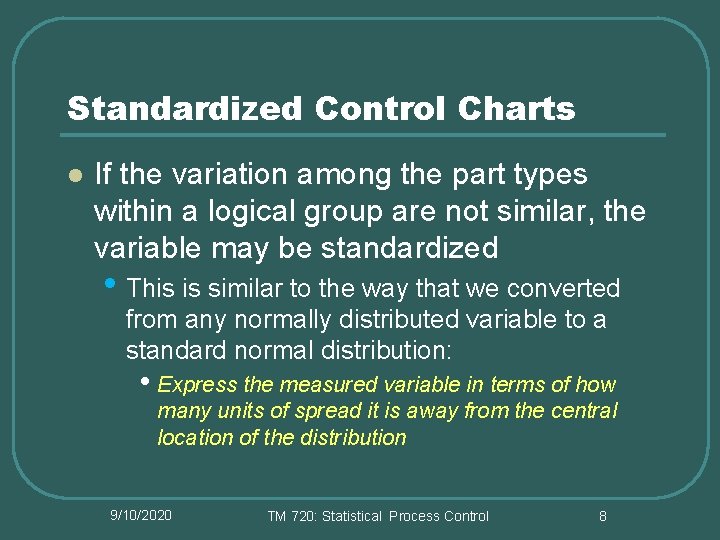
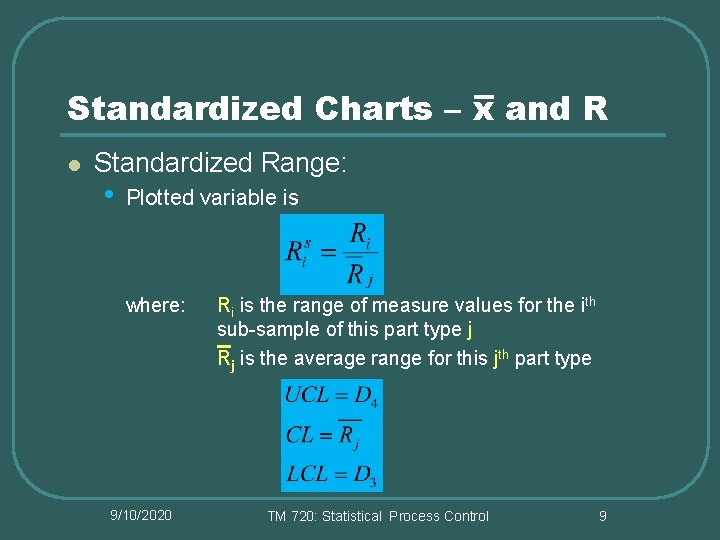
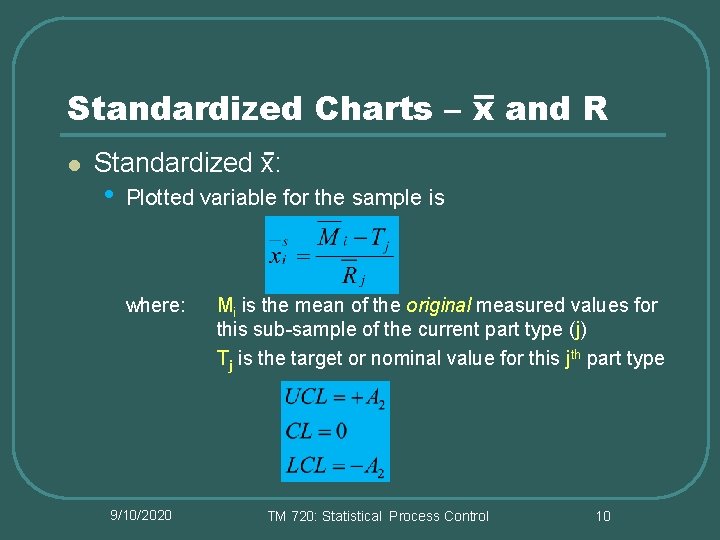
Standardized Control Charts l If the variation among the part types within a logical group are not similar, the variable may be standardized • This is similar to the way that we converted from any normally distributed variable to a standard normal distribution: • Express the measured variable in terms of how many units of spread it is away from the central location of the distribution 9/10/2020 TM 720: Statistical Process Control 8

Standardized Charts – x and R l Standardized Range: • Plotted variable is where: 9/10/2020 Ri is the range of measure values for the ith sub-sample of this part type j Rj is the average range for this jth part type TM 720: Statistical Process Control 9

Standardized Charts – x and R l Standardized x: • Plotted variable for the sample is where: 9/10/2020 Mi is the mean of the original measured values for this sub-sample of the current part type (j) Tj is the target or nominal value for this jth part type TM 720: Statistical Process Control 10

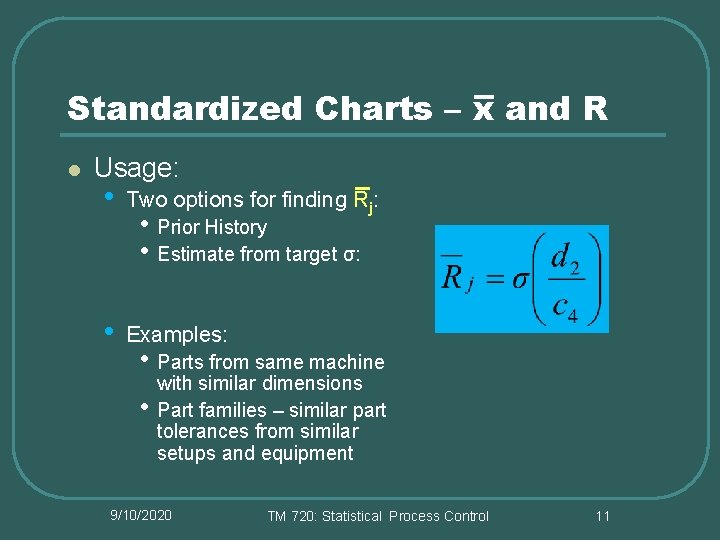
Standardized Charts – x and R l Usage: • Two options for finding Rj: • Examples: • Prior History • Estimate from target σ: • Parts from same machine • with similar dimensions Part families – similar part tolerances from similar setups and equipment 9/10/2020 TM 720: Statistical Process Control 11

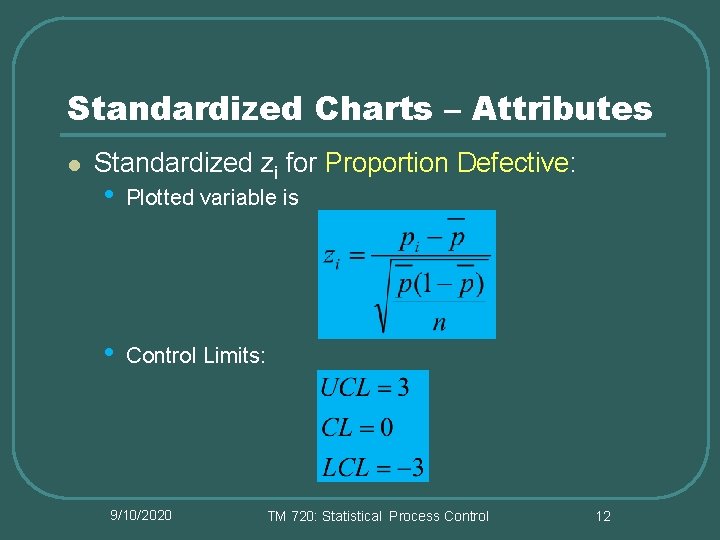
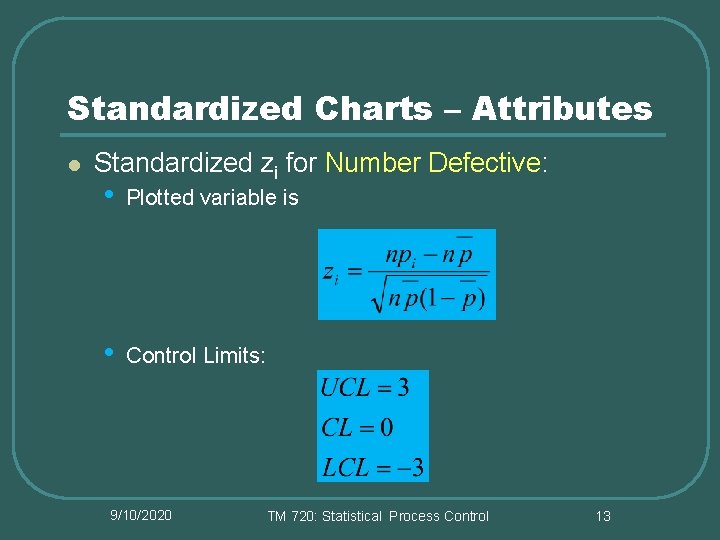
Standardized Charts – Attributes l Standardized zi for Proportion Defective: • Plotted variable is • Control Limits: 9/10/2020 TM 720: Statistical Process Control 12

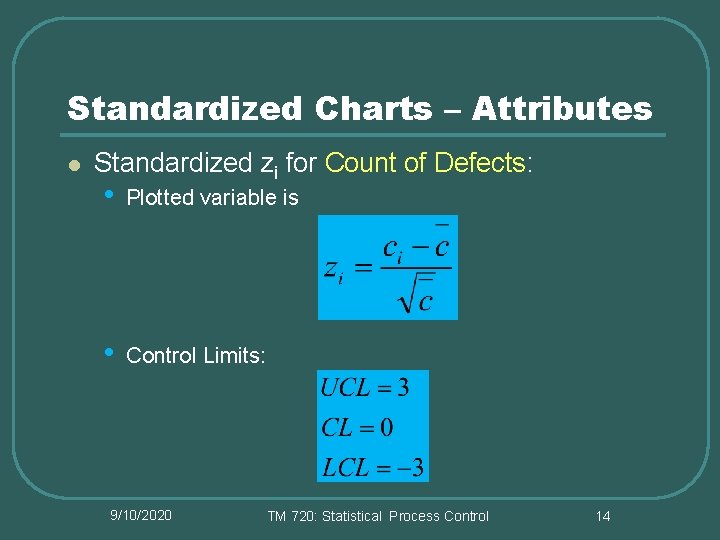
Standardized Charts – Attributes l Standardized zi for Number Defective: • Plotted variable is • Control Limits: 9/10/2020 TM 720: Statistical Process Control 13

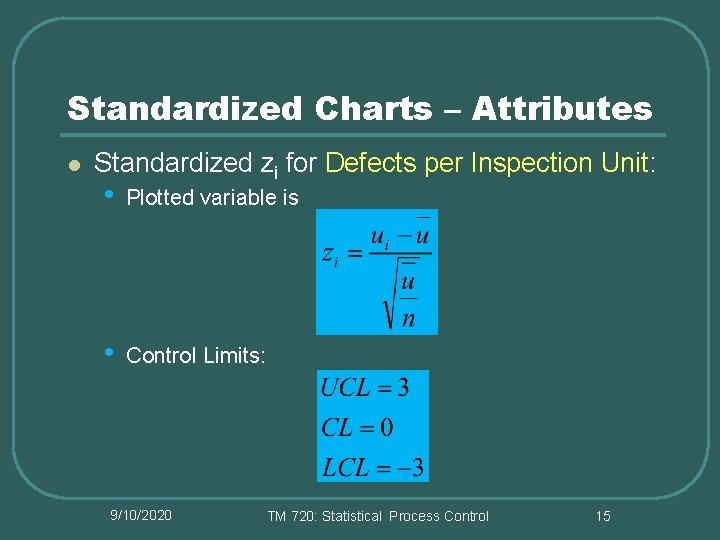
Standardized Charts – Attributes l Standardized zi for Count of Defects: • Plotted variable is • Control Limits: 9/10/2020 TM 720: Statistical Process Control 14

Standardized Charts – Attributes l Standardized zi for Defects per Inspection Unit: • Plotted variable is • Control Limits: 9/10/2020 TM 720: Statistical Process Control 15

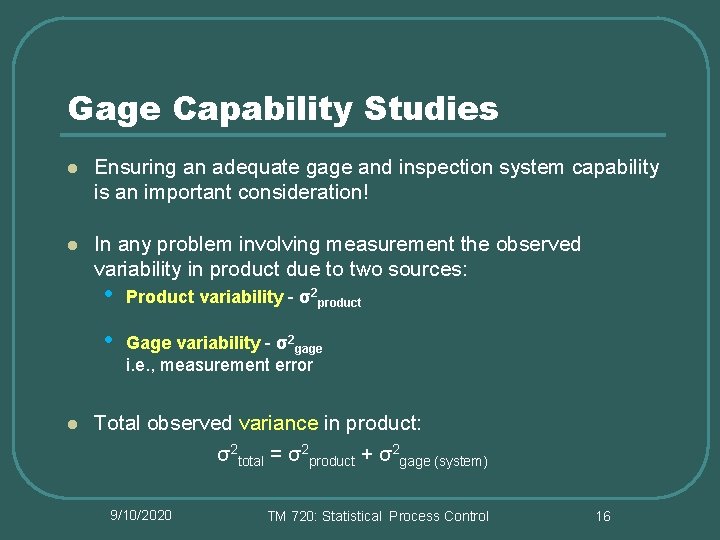
Gage Capability Studies l Ensuring an adequate gage and inspection system capability is an important consideration! l In any problem involving measurement the observed variability in product due to two sources: l • Product variability - σ2 product • Gage variability - σ2 gage i. e. , measurement error Total observed variance in product: σ2 total = σ2 product + σ2 gage (system) 9/10/2020 TM 720: Statistical Process Control 16

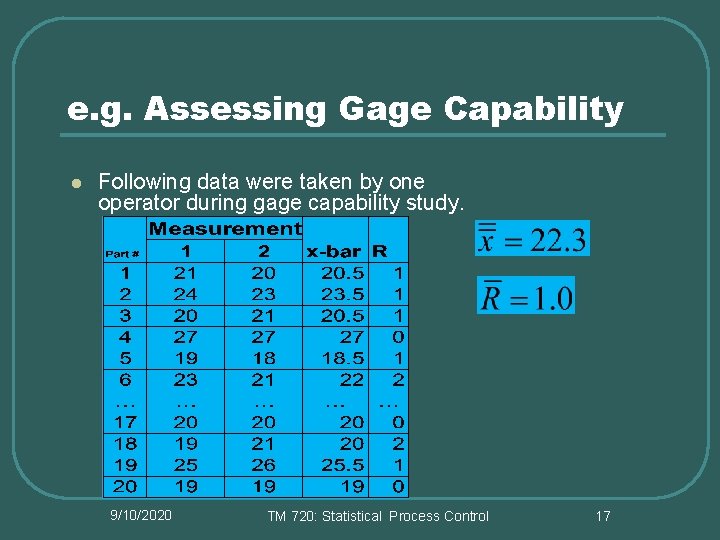
e. g. Assessing Gage Capability l Following data were taken by one operator during gage capability study. 9/10/2020 TM 720: Statistical Process Control 17

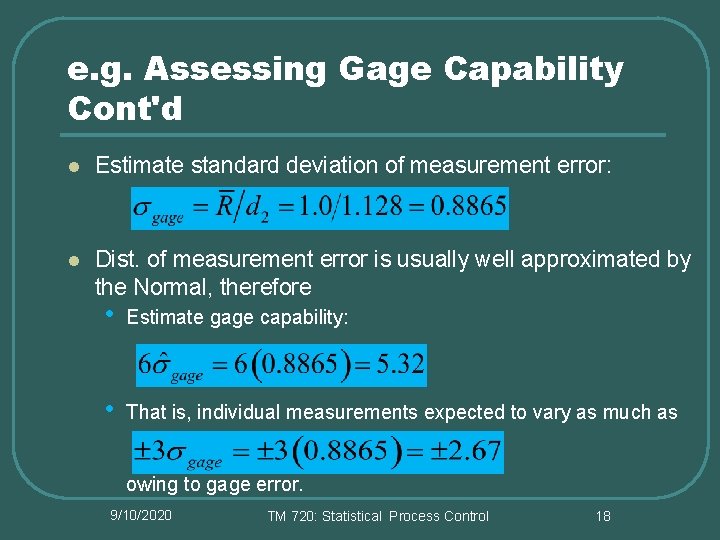
e. g. Assessing Gage Capability Cont'd l Estimate standard deviation of measurement error: l Dist. of measurement error is usually well approximated by the Normal, therefore • Estimate gage capability: • That is, individual measurements expected to vary as much as owing to gage error. 9/10/2020 TM 720: Statistical Process Control 18

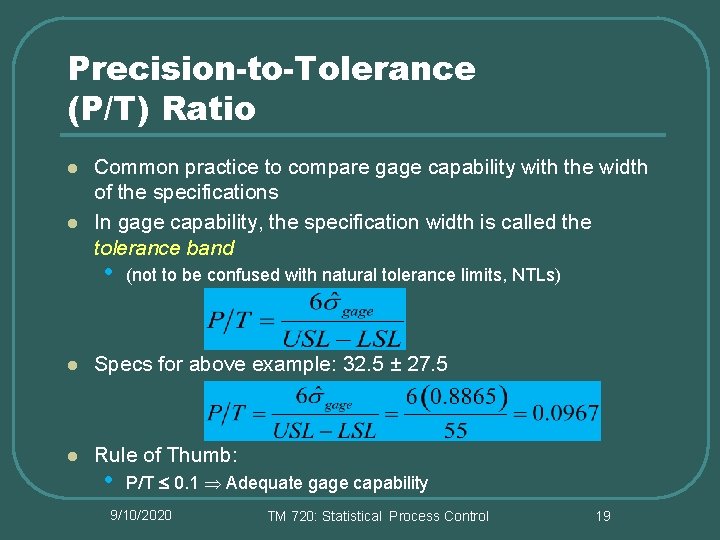
Precision-to-Tolerance (P/T) Ratio l l Common practice to compare gage capability with the width of the specifications In gage capability, the specification width is called the tolerance band • (not to be confused with natural tolerance limits, NTLs) l Specs for above example: 32. 5 ± 27. 5 l Rule of Thumb: • P/T 0. 1 Adequate gage capability 9/10/2020 TM 720: Statistical Process Control 19

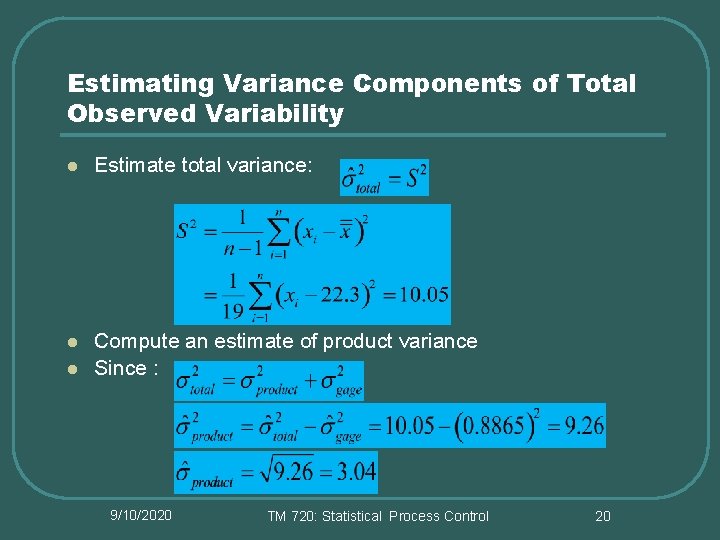
Estimating Variance Components of Total Observed Variability l Estimate total variance: l Compute an estimate of product variance Since : l 9/10/2020 TM 720: Statistical Process Control 20

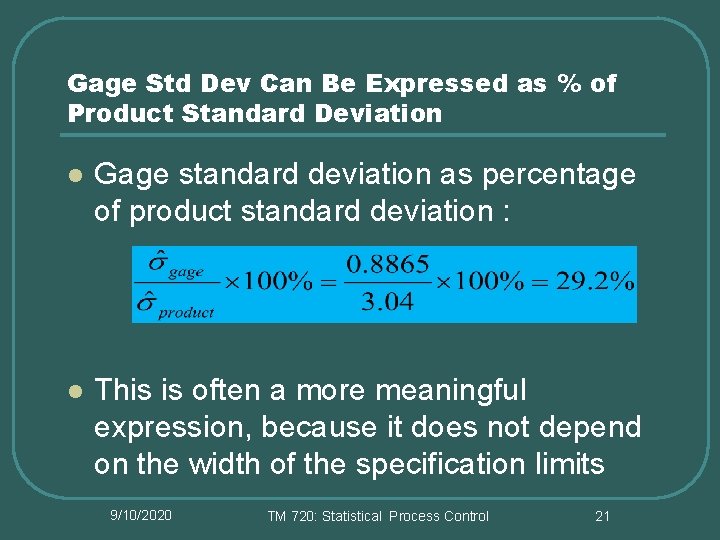
Gage Std Dev Can Be Expressed as % of Product Standard Deviation l Gage standard deviation as percentage of product standard deviation : l This is often a more meaningful expression, because it does not depend on the width of the specification limits 9/10/2020 TM 720: Statistical Process Control 21

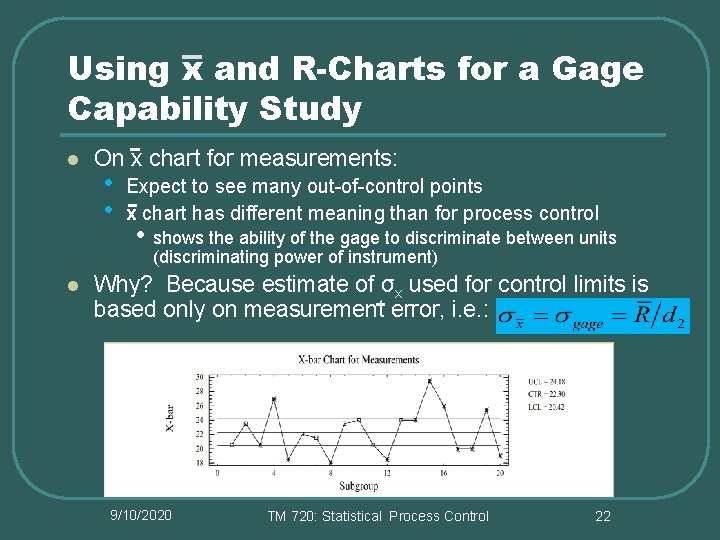
Using x and R-Charts for a Gage Capability Study l l On x chart for measurements: • • Expect to see many out-of-control points x chart has different meaning than for process control • shows the ability of the gage to discriminate between units (discriminating power of instrument) Why? Because estimate of σx used for control limits is based only on measurement error, i. e. : 9/10/2020 TM 720: Statistical Process Control 22

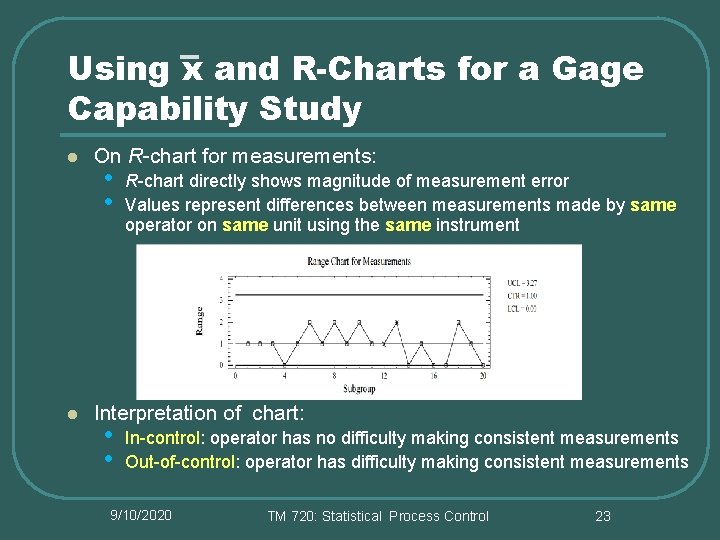
Using x and R-Charts for a Gage Capability Study l l On R-chart for measurements: • • R-chart directly shows magnitude of measurement error Values represent differences between measurements made by same operator on same unit using the same instrument Interpretation of chart: • • In-control: operator has no difficulty making consistent measurements Out-of-control: operator has difficulty making consistent measurements 9/10/2020 TM 720: Statistical Process Control 23

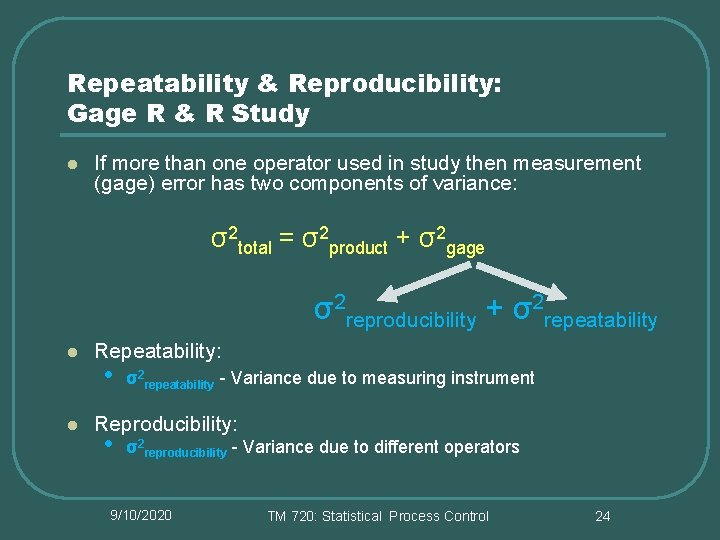
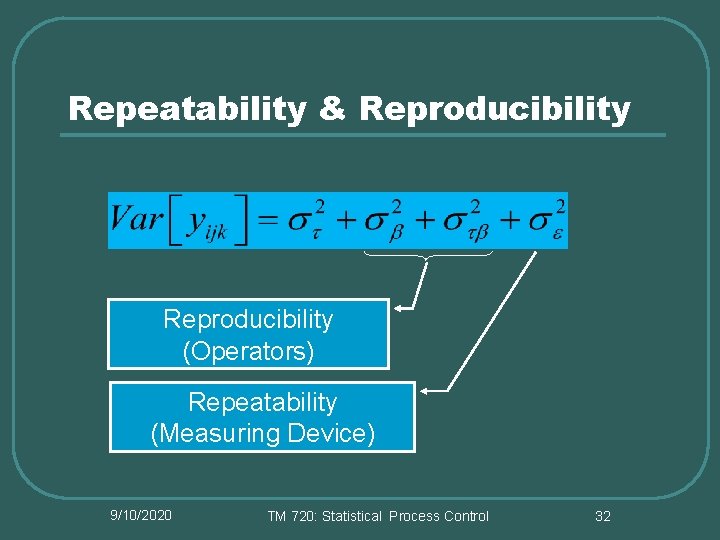
Repeatability & Reproducibility: Gage R & R Study l If more than one operator used in study then measurement (gage) error has two components of variance: σ2 total = σ2 product + σ2 gage σ2 reproducibility + σ2 repeatability l l Repeatability: • σ2 repeatability - Variance due to measuring instrument Reproducibility: • σ2 reproducibility - Variance due to different operators 9/10/2020 TM 720: Statistical Process Control 24

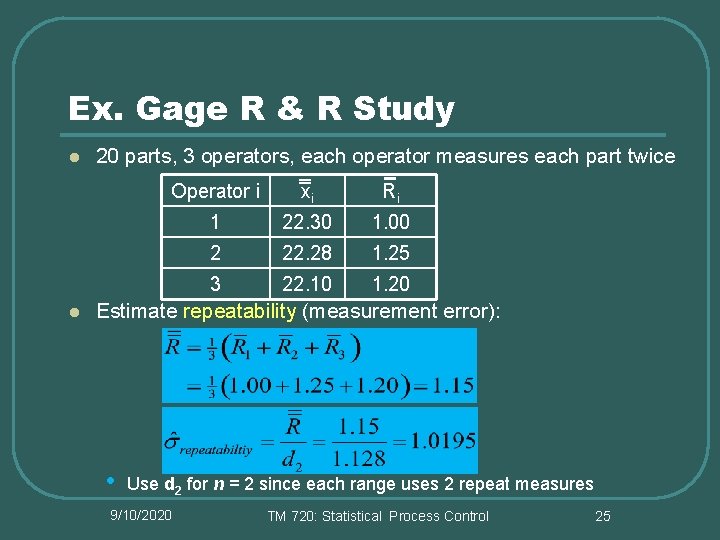
Ex. Gage R & R Study l l 20 parts, 3 operators, each operator measures each part twice Operator i xi Ri 1 22. 30 1. 00 2 22. 28 1. 25 3 22. 10 1. 20 Estimate repeatability (measurement error): • Use d 2 for n = 2 since each range uses 2 repeat measures 9/10/2020 TM 720: Statistical Process Control 25

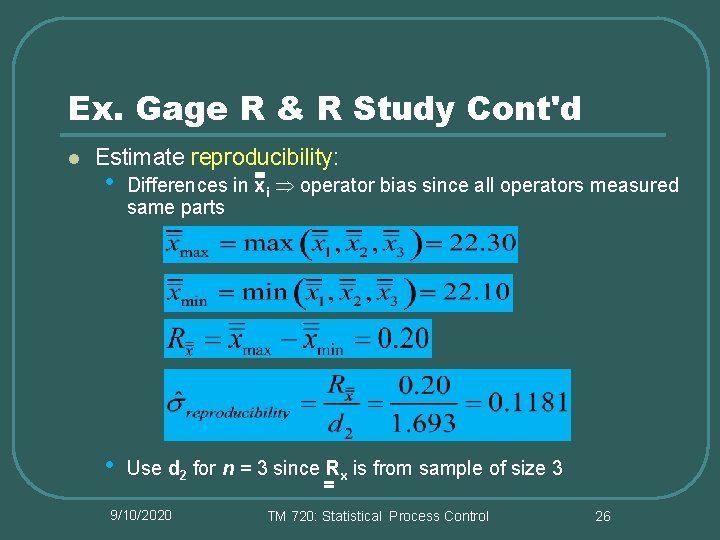
Ex. Gage R & R Study Cont'd l Estimate reproducibility: • Differences in xi operator bias since all operators measured same parts • Use d 2 for n = 3 since Rx is from sample of size 3 9/10/2020 TM 720: Statistical Process Control 26

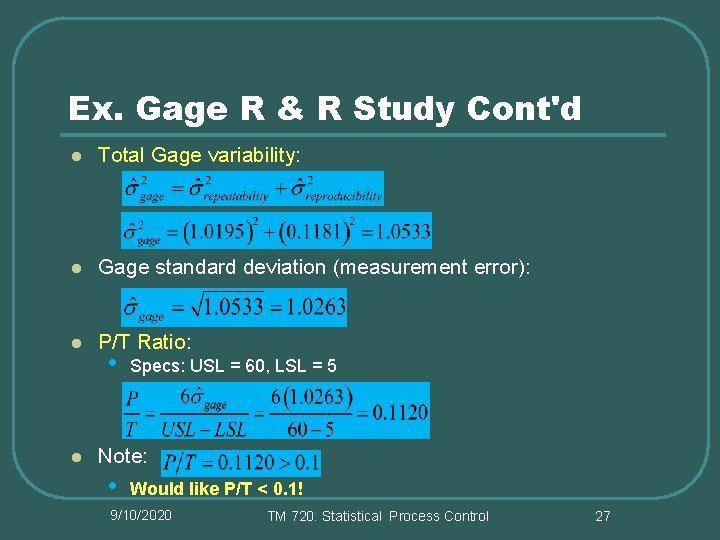
Ex. Gage R & R Study Cont'd l Total Gage variability: l Gage standard deviation (measurement error): l P/T Ratio: l • Specs: USL = 60, LSL = 5 Note: • Would like P/T < 0. 1! 9/10/2020 TM 720: Statistical Process Control 27

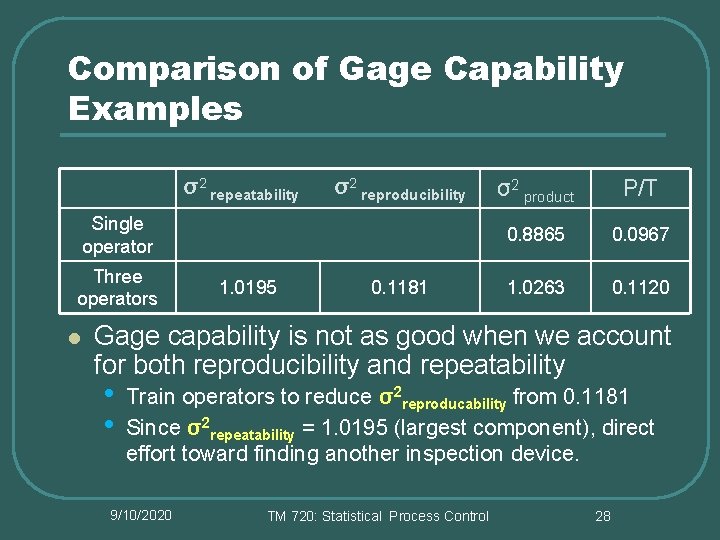
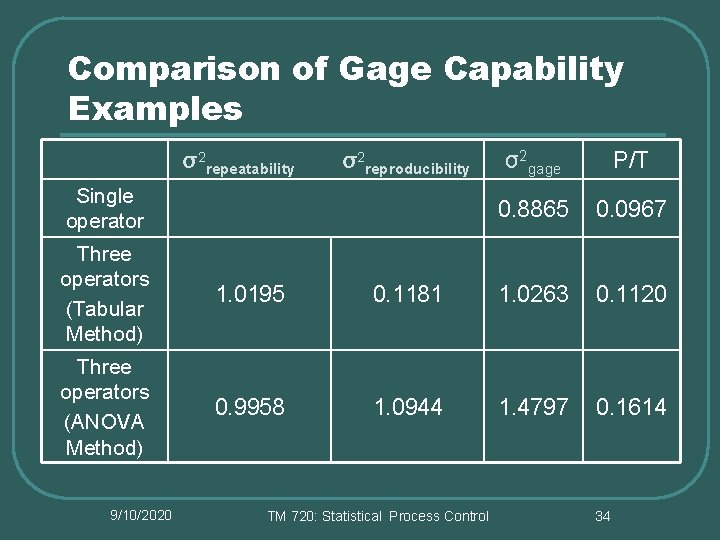
Comparison of Gage Capability Examples σ2 repeatability σ2 reproducibility Single operator Three operators l 1. 0195 0. 1181 σ2 product P/T 0. 8865 0. 0967 1. 0263 0. 1120 Gage capability is not as good when we account for both reproducibility and repeatability • • Train operators to reduce σ2 reproducability from 0. 1181 Since σ2 repeatability = 1. 0195 (largest component), direct effort toward finding another inspection device. 9/10/2020 TM 720: Statistical Process Control 28

Gage Capability Based on Analysis of Variance l A gage R & R study is actually a designed experiment l Therefore ANOVA can be used to analyze the data from an experiment and to estimate the appropriate components of gage variability l Assume there are: • • • a parts b operators each operator measures every part n times 9/10/2020 TM 720: Statistical Process Control 29

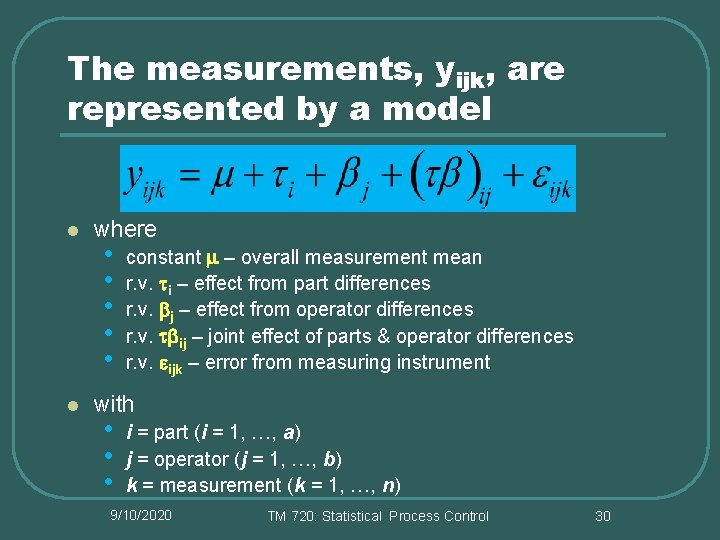
The measurements, yijk, are represented by a model l l where • • • constant m – overall measurement mean r. v. ti – effect from part differences r. v. bj – effect from operator differences r. v. tbij – joint effect of parts & operator differences r. v. eijk – error from measuring instrument with • • • i = part (i = 1, …, a) j = operator (j = 1, …, b) k = measurement (k = 1, …, n) 9/10/2020 TM 720: Statistical Process Control 30

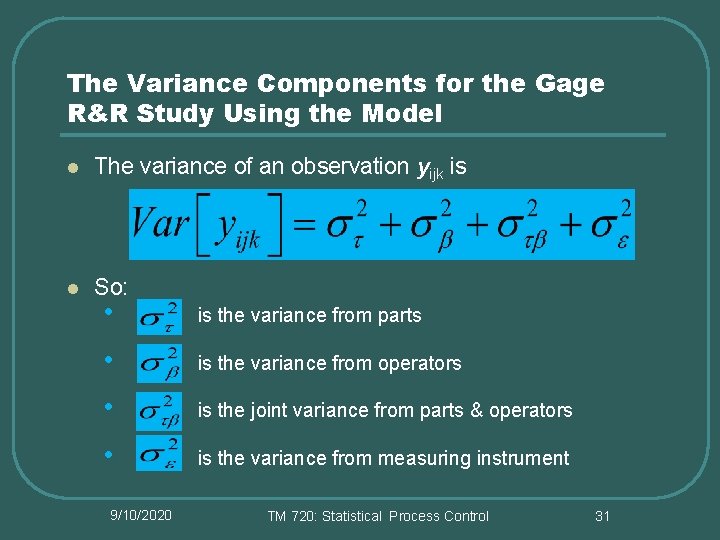
The Variance Components for the Gage R&R Study Using the Model l The variance of an observation yijk is l So: • is the variance from parts • is the variance from operators • is the joint variance from parts & operators • is the variance from measuring instrument 9/10/2020 TM 720: Statistical Process Control 31

Repeatability & Reproducibility (Operators) Repeatability (Measuring Device) 9/10/2020 TM 720: Statistical Process Control 32

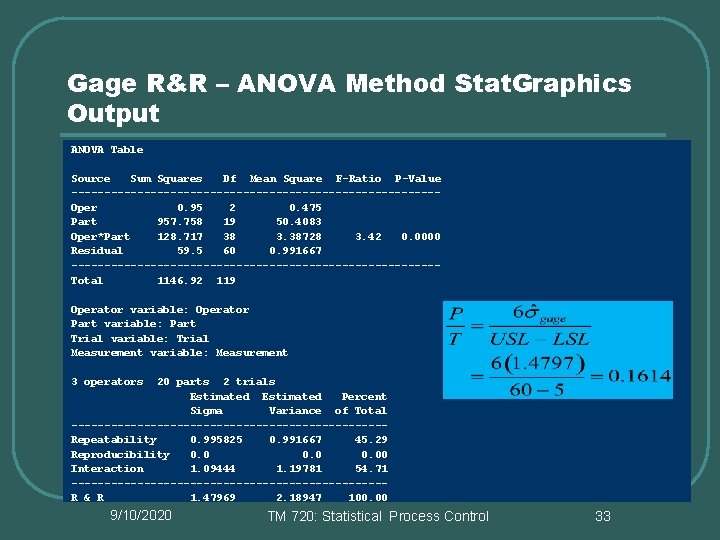
Gage R&R – ANOVA Method Stat. Graphics Output ANOVA Table Source Sum Squares Df Mean Square F-Ratio P-Value ----------------------------Oper 0. 95 2 0. 475 Part 957. 758 19 50. 4083 Oper*Part 128. 717 38 3. 38728 3. 42 0. 0000 Residual 59. 5 60 0. 991667 ----------------------------Total 1146. 92 119 Operator variable: Operator Part variable: Part Trial variable: Trial Measurement variable: Measurement 3 operators 20 parts 2 trials Estimated Percent Sigma Variance of Total ------------------------Repeatability 0. 995825 0. 991667 45. 29 Reproducibility 0. 00 Interaction 1. 09444 1. 19781 54. 71 ------------------------R & R 1. 47969 2. 18947 100. 00 9/10/2020 TM 720: Statistical Process Control 33

Comparison of Gage Capability Examples σ2 repeatability σ2 reproducibility Single operator σ2 gage P/T 0. 8865 0. 0967 Three operators (Tabular Method) 1. 0195 0. 1181 1. 0263 0. 1120 Three operators (ANOVA Method) 0. 9958 1. 0944 1. 4797 0. 1614 9/10/2020 TM 720: Statistical Process Control 34

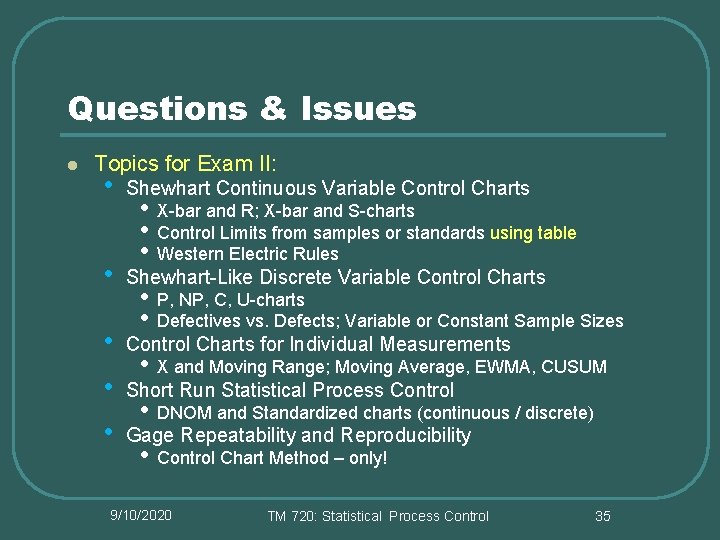
Questions & Issues l Topics for Exam II: • Shewhart Continuous Variable Control Charts • Shewhart-Like Discrete Variable Control Charts • • • X-bar and R; X-bar and S-charts Control Limits from samples or standards using table Western Electric Rules • • P, NP, C, U-charts Defectives vs. Defects; Variable or Constant Sample Sizes • Control Chart Method – only! • Control Charts for Individual Measurements • X and Moving Range; Moving Average, EWMA, CUSUM • Short Run Statistical Process Control • DNOM and Standardized charts (continuous / discrete) • Gage Repeatability and Reproducibility 9/10/2020 TM 720: Statistical Process Control 35