Geometric Line Drawings Cont Finishing Up Finishing up


 •")


 this shows space")


- Slides: 20
Geometric Line Drawings Con’t Finishing Up!
Finishing up from last week: Instructions: 1. Divide your page into fourths. 2. Divide each fourth in half using a straight diagonal line. 3. Use your felt tip pens to colour in each geometric section. 4. Change the colour each time the felt pen crosses a line.
Gallery Walk and Exit Slip • Put all materials away. • Stand up, tuck your chair in, and hands behind your back. • Check out your classmate’s geometric works. • Back at your desk, fill in the exit slip! • Glue it to the back of your work.
Introducing One-Point Perspective
What is ‘perspective’? • Perspective is the art of making 2 D lines on paper turn into a 3 D form. • It creates the illusion of receding space. • One-point perspective contains only one vanishing point.
What is the history of perspective? • Started in the Renaissance (1400 -1600) • Artists, writers, musicians, architects, scientists, and mathematicians clamored for knowledge and new ways of looking at the world. It was one of the most exciting times in history. • Artists wanted to start painting their surroundings realistically – but they didn’t have the tools to do this. Michelangelo Raphael Titian Jan van Eyck Caravaggio
• • • Flat Floating Same size Stacked in rows Horizon line at top Paradise Giovanni di Paolo 1445.
During the Renaissance: • Artists started to experiment with illusion and deep space on a flat surface. • Figured out that lines appear to converge as they recede into the horizon. • Figured out that closer objects appear larger and clearer than those behind them. • Artists could now mimic the way the world looked around them! • They used a mathematical system of using lines to create realistic-looking depth called linear perspective.
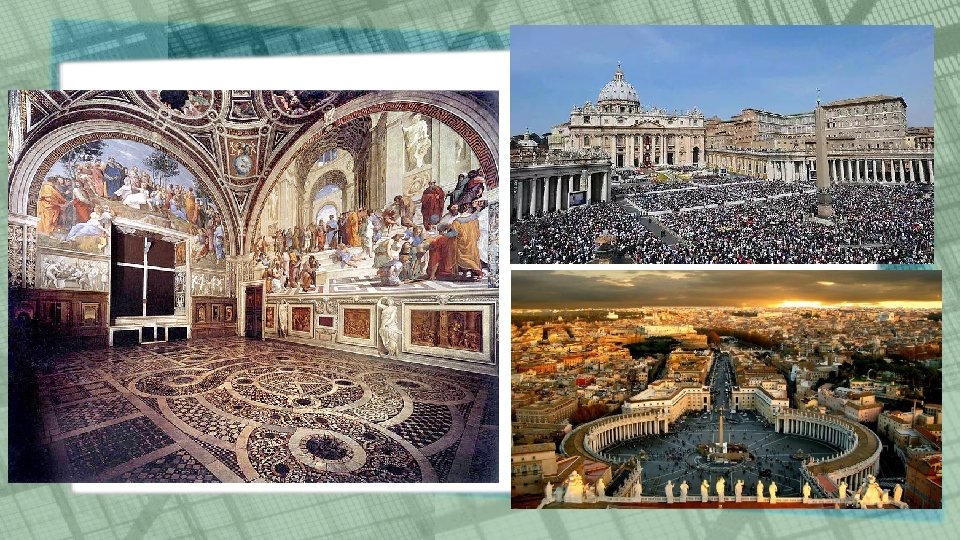
• One of the best examples of onepoint perspective. • Lines on the floor tiles and the pillars converge at a single vanishing point • Horizon line between the heads. • Center figures the most important. Raphael The School of Athens 1509 -1511
Principles of One-Point Perspective • Forms appear as their true shape without any distortion. • Surfaces travel away from our eyes toward a vanishing point. • The vanishing point is located on the horizon line (the eye level line). Vincent van Gogh The Night Cafe 1888
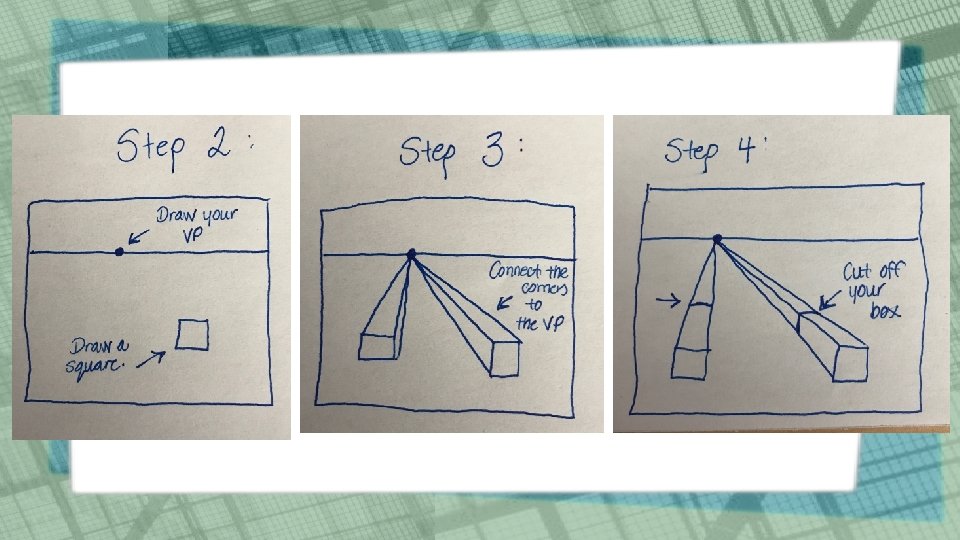
Sketchbook Page 1: What We’re Doing Step A: 1. On your first page, create Square #1 (each side should be two inches long) 2. Draw Square #2. Measure one inch down the right vertical side of Square #1 and draw a horizonal line. This is the top of your second square.
Step B: • Use diagonal lines to connect the two squares: connect the same corners between Square #1 and Square #2.
Below your box, please write: When diagonal lines converge (come together) this shows space receding.
Sketchbook Page 2: Vanishing Point & the Horizon • To draw in perspective: All diagonal lines will vanish to a point on the horizon. • The VP is where the diagonal lines converge on the horizon. • One-point perspective: 1 VP
On your paper: • Step 1: Draw your horizontal line. • Step 2: Put a vanishing point on the horizon in the middle of the paper (small dot)
• Step 3: From the front edge of your paper, draw #1 diagonal line to the VP • Step 4: From the front edge of your paper, draw #2 diagonal line to the VP • Step 5: From the top edge of your paper, draw #3 diagonal line to the VP • Step 6: From the top edge of your paper, draw #4 diagonal line to the VP
• Step 7: Draw a tree in the widest area at the front. Move backwards, but all trees must stay within the two diagonal lines.
In your sketchbook, write down two things you learned today.