Gateway 192 168 102 254 LAN 2 LAN


 LAN 4 src: google dst: 192. 168. 10. 1 3")
![Linux防火牆iptables 圖片來源:[2]](https://slidetodoc.com/presentation_image_h2/eb4193d8b14059d09d56742530395a1d/image-5.jpg "Linux防火牆iptables 圖片來源:[2]")


![iptables基本指令 • iptables -L [-t table] #列出特定table的規則,預設顯示Filter table • iptables-save #列出所有table的規則 • iptables -A](https://slidetodoc.com/presentation_image_h2/eb4193d8b14059d09d56742530395a1d/image-12.jpg "iptables基本指令 • iptables -L [-t table] #列出特定table的規則,預設顯示Filter table • iptables-save #列出所有table的規則 • iptables -A")


![設定NAT規則 • iptables -t nat -A POSTROUTING -s [subnet/netmask] -o eth 0 -j MASQUERADE](https://slidetodoc.com/presentation_image_h2/eb4193d8b14059d09d56742530395a1d/image-15.jpg "設定NAT規則 • iptables -t nat -A POSTROUTING -s [subnet/netmask] -o eth 0 -j MASQUERADE")


![參考資料 [1]https: //gigenchang. wordpress. com/2014/04/19/10%E 5%88%86%E 9%90%9 8%E 5%AD%B 8%E 6%9 C%83 iptables/ [2]http:](https://slidetodoc.com/presentation_image_h2/eb4193d8b14059d09d56742530395a1d/image-21.jpg "參考資料 [1]https: //gigenchang. wordpress. com/2014/04/19/10%E 5%88%86%E 9%90%9 8%E 5%AD%B 8%E 6%9 C%83 iptables/ [2]http:")
- Slides: 21
系統架構 Gateway: 192. 168. 102. 254 LAN 2 LAN 1 Client 1 Server Client 2 eth 0 eth 1: 192. 168. 10. 1 eth 2: 192. 168. 20. 254 eth 1: 192. 168. 10. 254 eth 1: 192. 168. 20. 1
NAT (Network Address Translation) LAN 4 src: google dst: 192. 168. 10. 1 3 src: google dst: 140. 120. 1. 2 192. 168. 10. 254 140. 120. 1. 2 Internet router Client 1 src: 192. 168. 10. 1 dst: google 2 src: 140. 120. 1. 2 dst: google
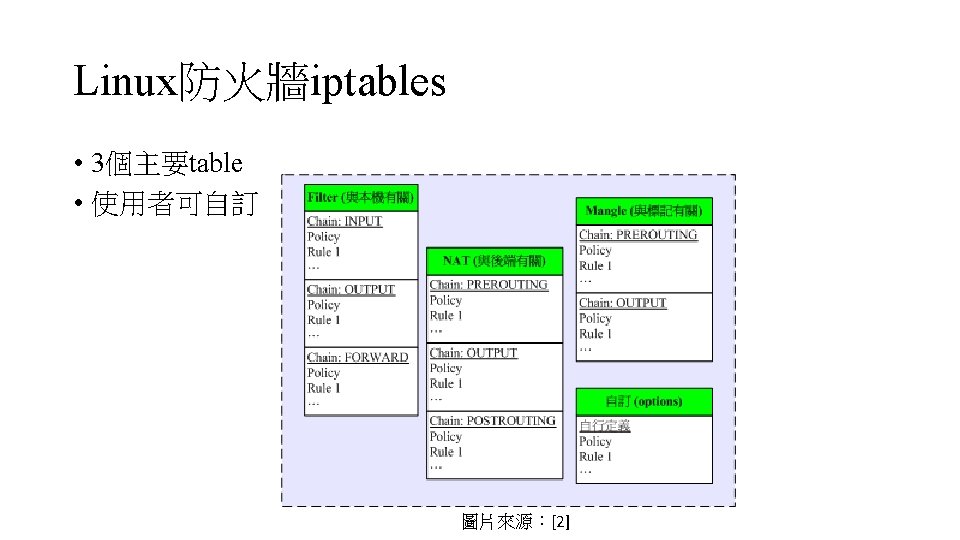
Linux防火牆iptables 圖片來源:[2]
Linux Server設定網卡 • /etc/init. d/networking restart #重新啟動網路 • ip addr #查看所有網路介面資訊
Linux Server設定封包轉送功能 • cd /etc #進入設定封包轉送的目錄 • cp sysctl. conf. copy #備份設定檔 • 編輯 /etc/sysctl. conf,將 net. ipv 4. ip_forward = 1前面的註解符號移 除 • 檢查是否設定成功 • sysctl -p /etc/sysctl. conf #需印出net. ipv 4. ip_forward = 1 • cat /proc/sys/net/ipv 4/ip_forward #需印出 1
Linux Server確認routing table • netstat -nr #列出routing table • 網卡設定完成後的routing table如下圖 • Iface eth 0連到Internet • Iface eth 1連到 192. 168. 10. 0子網域 • Iface eth 2連到 192. 168. 20. 0子網域
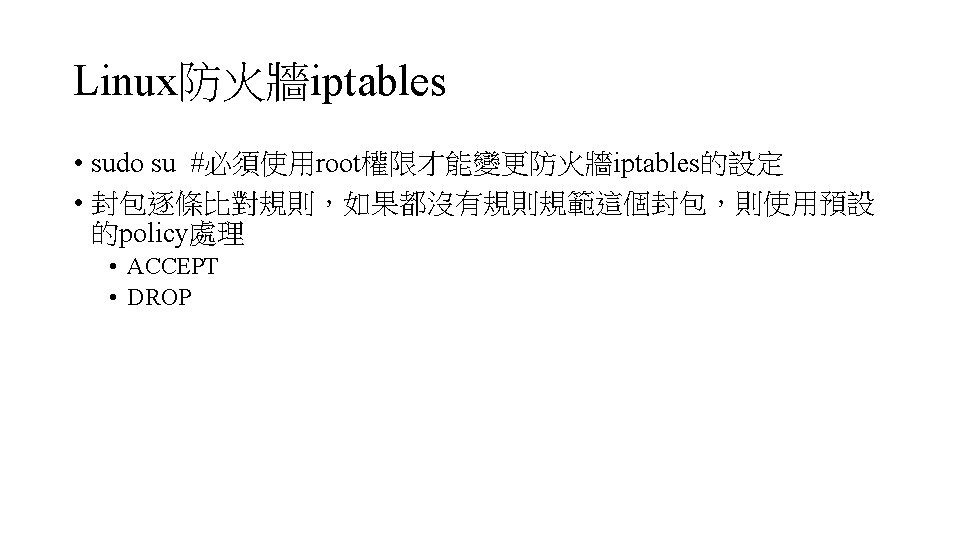
iptables基本指令 • iptables -L [-t table] #列出特定table的規則,預設顯示Filter table • iptables-save #列出所有table的規則 • iptables -A [chain] … #新增規則到某個chain的最後面 • iptables -I [chain] [row] … #插入規則到某個chain的第row列
清除並重設iptables規則 • 重設Filter table • • • iptables -F iptables -X iptables -Z iptables -P INPUT ACCEPT iptables -P OUTPUT ACCEPT iptables -P FORWARD ACCEPT • 重設NAT table • • • iptables -F -t nat iptables -X -t nat iptables -Z -t nat iptables -t nat -P PREROUTING ACCEPT iptables -t nat -P POSTROUTING ACCEPT iptables -t nat -P OUTPUT ACCEPT
設定NAT規則 • iptables -L -t nat #列出NAT table的規則
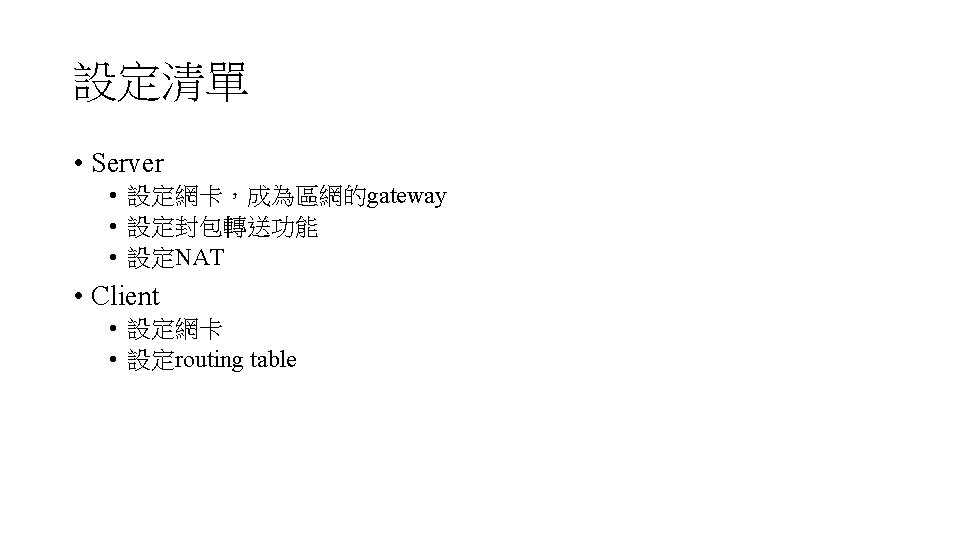
設定NAT規則 • iptables -t nat -A POSTROUTING -s [subnet/netmask] -o eth 0 -j MASQUERADE #設定內網封包做NAT後,從eth 0網卡送出去 • [subnet/netmask],例: 192. 168. 10. 0/24 • 請新增 192. 168. 10. 0/24、192. 168. 20. 0/24 • iptables-save #發現在NAT table的POSTROUTING之下多出剛新增 的規則
Linux Client設定網卡 • /etc/init. d/networking restart #重新啟動網路 • ip addr #查看所有網路介面資訊 • 確認eth 1的ip: 192. 168. 10. 1 • 確認state UP • 測試 • ping -c 3 192. 168. 10. 254 #ping server
Linux Client設定routing table • route del default gw 192. 168. 102. 254 #將原有的default router刪除 • route add default gw 192. 168. 10. 254 #新增default router • netstat -nr #列出routing table
復原Server設定 • cd /etc/network • cp -f interfaces. copy interfaces • 確認interfaces還原後,執行rm interfaces. copy • cd /etc • cp -f sysctl. conf. copy sysctl. conf • 確認sysctl. conf還原後,執行rm sysctl. conf. copy • eth 1和eth 2網路線拔除,電腦關機
復原Client設定 • cd /etc/network • cp -f interfaces. copy interfaces • 確認interfaces還原後,執行rm interfaces. copy • eth 1網路線拔除,電腦關機
參考資料 [1]https: //gigenchang. wordpress. com/2014/04/19/10%E 5%88%86%E 9%90%9 8%E 5%AD%B 8%E 6%9 C%83 iptables/ [2]http: //linux. vbird. org/linux_server/0250 simple_firewall. php [3]http: //read-and-thinking. blogspot. tw/2009/06/iptablessnatmasquerade. html