Decomposition of Water Exp 6 2 Exp 6


 __H 2(g) H _____ O _____")


 1 : 1 cm 3 2")


- Slides: 18
Decomposition of Water Exp. 6. 2
Exp. 6. 2 Decomposition of Water Purpose: Water is a pure substance. It cannot be separated into other substances by common methods. Can we separate water into H 2 and O 2 gases by electrolysis and identify the gases by their volume and flame test?
2. Decomposition reaction Breakdown of one substance into smaller parts
Hypothesis: Predict the ratio of hydrogen gas to oxygen gas that you expect to collect: _____________________________________
Decomposition of H 2 O Electrolysis: ◦ Separation of a compound into simpler pure substances using electricity. ◦ Using the positive and negative charges of an electric current to pull a water molecule apart.
Electroplating
Chemical Equation Balance the equation: __H 2 O(l) __H 2(g) H _____ O _____ + __O 2(g) H _____ ADD ENERGY IN! endothermi c reaction O ___
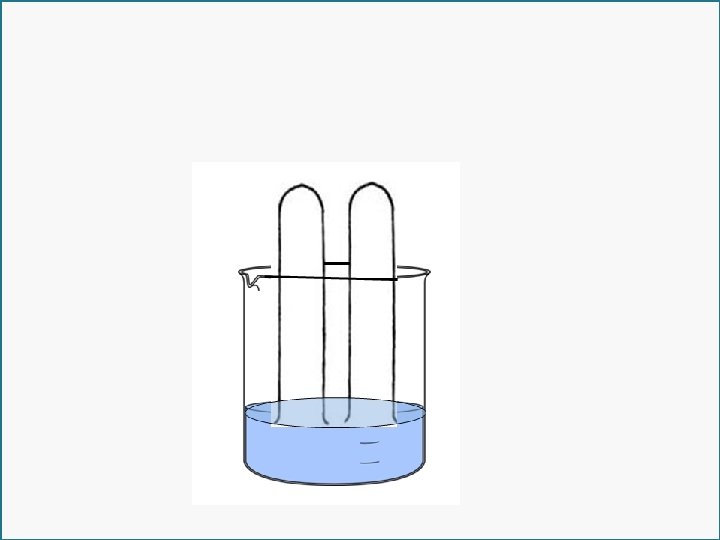
Procedures: 1. 2. 3. 4. 5. 6. 7. Goggles and Aprons. Fill a beaker 2/3 full of water. Fill each test tube with sodium carbonate solution (catalyst). Cover with rubber stopper. Invert the test tubes upside down into the beaker of water. Remove the stoppers and leave the stopper in the beaker. Put an electrode up into each test tube. Move it toward the side. With the machine unplugged, clip an alligator clip on each electrode. Have your teacher check your set-up. Teacher initials _____
8. Plug in, turn on. Check to be sure bubbles are rising in the test tube. If not, check dials on machine. 9. Answer questions #1 -#4 while you wait. Return to your desks while the gas is collecting. 10. When one of the test tubes is nearly full of gas, turn off and unplug the machine. 11. Unhook the alligator clips and remove the electrodes. Do not take the test tubes out of the water!
Testing the gases: With goggles still on, light a Bunsen Burner. Carefully stopper and remove the test tube that has the MOST gas in it. KEEP THE STOPPER ON. 13. Light a wood splint. Remove the stopper and quickly insert it into the mouth of the test tube. Record Results __________________ 12. Carefully stopper and remove the test tube with the LEAST amount of gas in it. KEEP STOPPER ON. Light a wood splint and then blow it out so the end is glowing. Remove the stopper from the test tube and quickly insert the glowing wood splint into the mouth of the test tube. Record Results _______________ 14.
Volume Ratio: Using a graduated cylinder, measure the VOLUME of how much water is left in your test tubes. Record the volume on Data Table. 16. Fill one of the empty test tubes to the top with water; pour the water into a graduate cylinder and measure the total volume of the full test tube. 15. Determine the VOLUME RATIO the volume of hydrogen gas compared to the volume of oxygen gas: H gas _______cm 3 : O gas ____cm 3
Data Table – Volume Ratio Volume of water in FULL test tube Volume of water in the test tube that you think is HYDROGEN Volume of Hydrogen (Final – Initial) Final – Initial = Δ Volume of water in in a full test tube Volume of water in the test tube that you think is OXYGEN. Volume of Oxygen (Final – Initial) Final – Initial = Δ Volume ratio of the gases Volume of Hydrogen Volume of Oxygen _____ : 1
Lab # Ratio H: O gas (cm 3) 1 : 1 cm 3 2 : 1 cm 3 3 : 1 cm 3 4 : 1 cm 3 5 : 1 cm 3 6 : 1 cm 3 7 : 1 cm 8 : 1 cm 3 9 : 1 cm 3 10 : 1 cm 11 : 1 cm 3 12 : 1 cm 3
Analysis Questions: 1. What did you observe happening in the test tubes? 2. Why did you add sodium carbonate to the water in your beaker? 3. Did the catalyst decompose (become part of the chemical equation)? Did it become part of your product? 4. What caused the water level in the test tubes to go down? 5. What did you observe when you put the flaming splint in the test tube? 6. What did you observe when you put the glowing splint in the test tube? 7. Why were different amounts of gas collected in the test tubes? 8. Would you have observed different results if you repeated the lab but reversed the polarities of the J-Hooks (electrodes) and wires that were attached?
Ratio of atoms in H 2 O Video Clip: Ring of Truth (3 min. ) http: //www. youtube. com/watch? v=bu. Fe-Cy. Qct. Q Atoms: ◦ No matter how you mix them, the hydrogen and oxygen combine in a FIXED RATIO of 2 : 1 ◦ Limiting Reactant: There was not enough hydrogen to react fully will all of the oxygen. The reaction was limited by the amount of hydrogen.
Fixed ratio How much of which gas would be left over if you used electrolysis to synthesize: Volume of Which gas Hydrogen 50 cm 3 20 cm 3 75 cm 3 Oxygen 50 cm 3 25 cm 3 40 cm 3 25 cm 3 reaming gas? 25 cm 3 remains? oxygen 0 cm 3 30 cm 3 25 cm 3 hydrogen oxygen
Bell Ringer May 22, 2012 1. What does Electro- mean? What does lysis mean? How did we use this process? 2. How did we identify oxygen in the decomposition of H 2 O lab? 3. How did we identify hydrogen in the decomposition of H 2 O lab?