Conference Centre Centurion August 1 st Denis LOUVEL

- Slides: 27

Conference Centre, Centurion August 1 st Denis LOUVEL, MT-SI denis. louvel@mt. com Risk Management with Minimum Weight

Agenda 1 Introduction 2 Reading, Rounding and Relative error 3 Weighing Range 4 Minimum Weight, MW 5 Safety Factor, SF 6 Safe Weighing Range, SWR 7 GWP Verification® 8 ISO 9001: 2015 2 9 For internal use - Confidential

Introduction § Many companies may be unaware that their weighing instruments do not meet their process accuracy requirements. § An analysis of weighing instruments is imperative in providing data which can be used to minimize non conformity related to accuracy. 3

Agenda 1 Introduction 2 Reading, Rounding and Relative error 3 Weighing Range 4 Minimum Weight, MW 5 Safety Factor, SF 6 Safe Weighing Range, SWR 7 GWP Verification® 8 ISO 9001: 2015 4 9 For internal use - Confidential

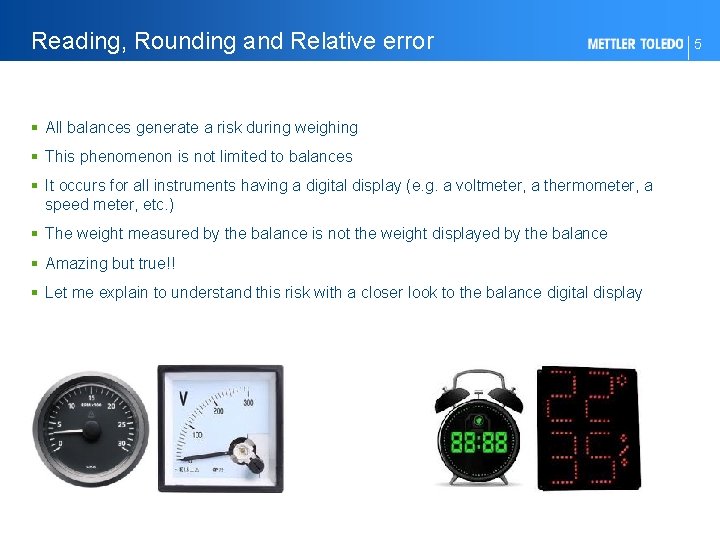
Reading, Rounding and Relative error § All balances generate a risk during weighing § This phenomenon is not limited to balances § It occurs for all instruments having a digital display (e. g. a voltmeter, a thermometer, a speed meter, etc. ) § The weight measured by the balance is not the weight displayed by the balance § Amazing but true!! § Let me explain to understand this risk with a closer look to the balance digital display 5

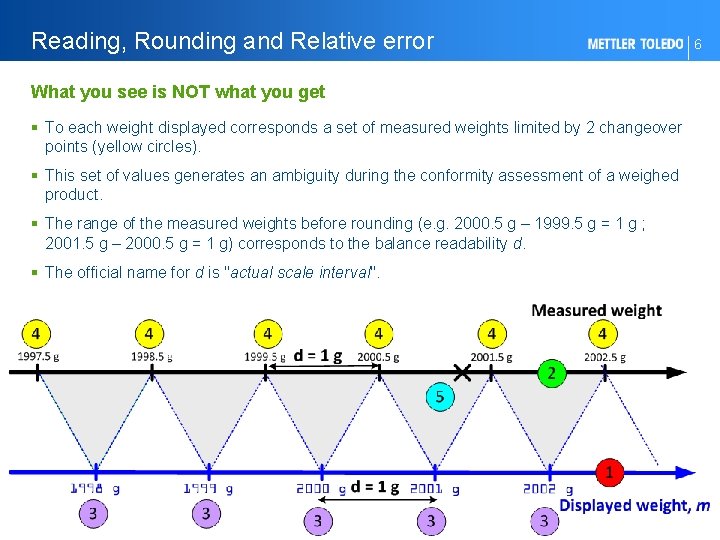
Reading, Rounding and Relative error What you see is NOT what you get § To each weight displayed corresponds a set of measured weights limited by 2 changeover points (yellow circles). § This set of values generates an ambiguity during the conformity assessment of a weighed product. § The range of the measured weights before rounding (e. g. 2000. 5 g – 1999. 5 g = 1 g ; 2001. 5 g – 2000. 5 g = 1 g) corresponds to the balance readability d. § The official name for d is "actual scale interval". 6

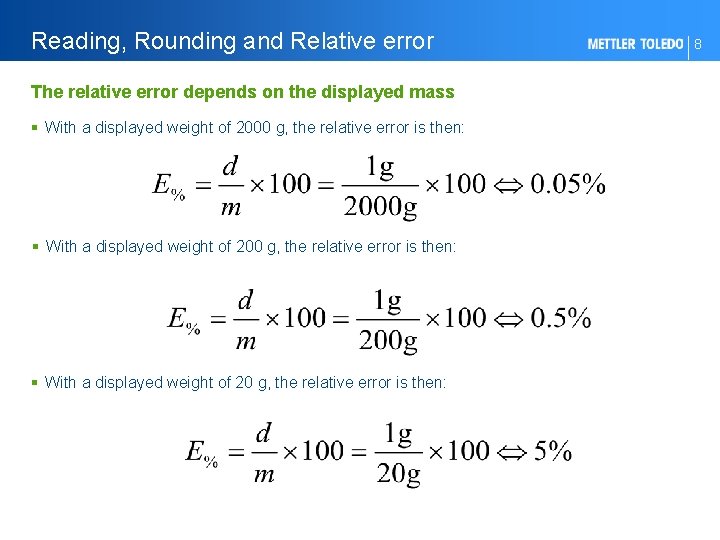
Reading, Rounding and Relative error The relative error depends on the displayed mass § With a displayed weight of 2000 g, the relative error is then: § With a displayed weight of 20 g, the relative error is then: 8

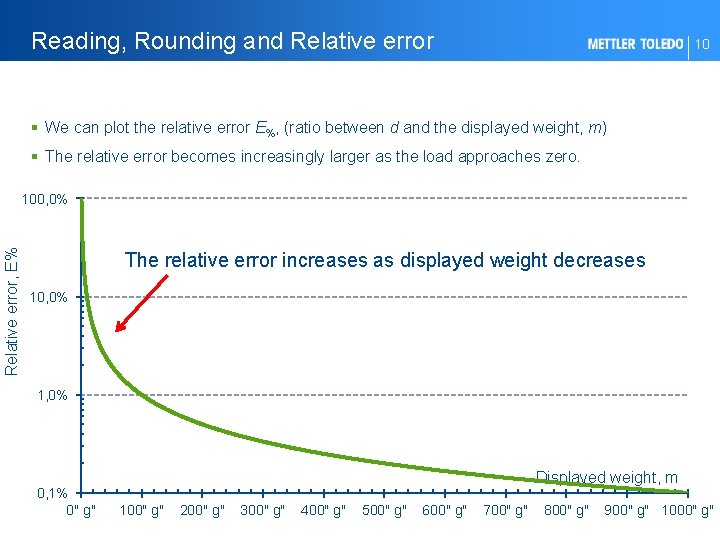
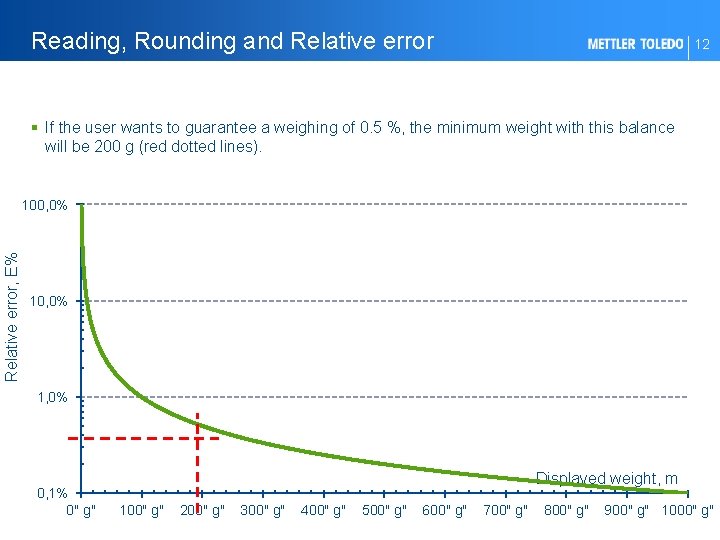
Reading, Rounding and Relative error 10 § We can plot the relative error E%, (ratio between d and the displayed weight, m) § The relative error becomes increasingly larger as the load approaches zero. Relative error, E% 100, 0% The relative error increases as displayed weight decreases 10, 0% 1, 0% 0, 1% 0" g" Displayed weight, m 100" g" 200" g" 300" g" 400" g" 500" g" 600" g" 700" g" 800" g" 900" g" 1000" g"

Reading, Rounding and Relative error 12 § If the user wants to guarantee a weighing of 0. 5 %, the minimum weight with this balance will be 200 g (red dotted lines). Relative error, E% 100, 0% 1, 0% 0, 1% 0" g" Displayed weight, m 100" g" 200" g" 300" g" 400" g" 500" g" 600" g" 700" g" 800" g" 900" g" 1000" g"

Agenda 1 Introduction 2 Reading, Rounding and Relative error 3 Weighing Range 4 Minimum Weight, MW 5 Safety Factor, SF 6 Safe Weighing Range, SWR 7 GWP Verification® 8 ISO 9001: 2015 13 9 For internal use - Confidential

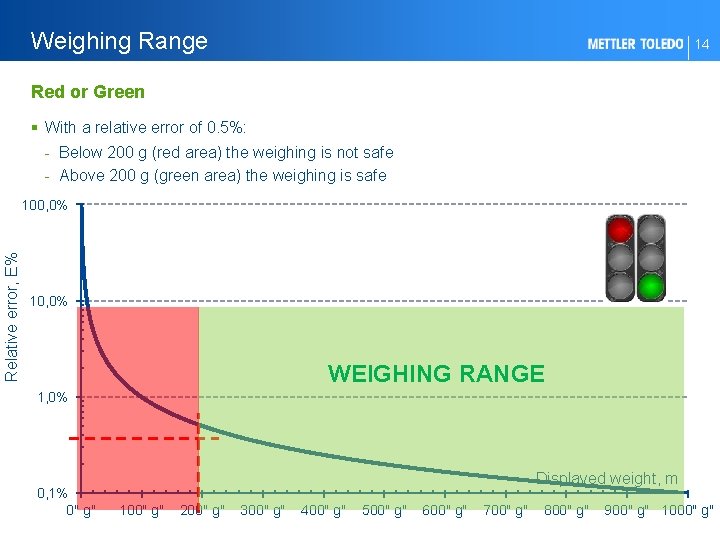
Weighing Range 14 Red or Green § With a relative error of 0. 5%: - Below 200 g (red area) the weighing is not safe - Above 200 g (green area) the weighing is safe Relative error, E% 100, 0% 10, 0% WEIGHING RANGE 1, 0% 0, 1% 0" g" Displayed weight, m 100" g" 200" g" 300" g" 400" g" 500" g" 600" g" 700" g" 800" g" 900" g" 1000" g"

Agenda 1 Introduction 2 Reading, Rounding and Relative error 3 Weighing Range 4 Minimum Weight, MW 5 Safety Factor, SF 6 Safe Weighing Range, SWR 7 GWP Verification® 8 ISO 9001: 2015 15 9 For internal use - Confidential

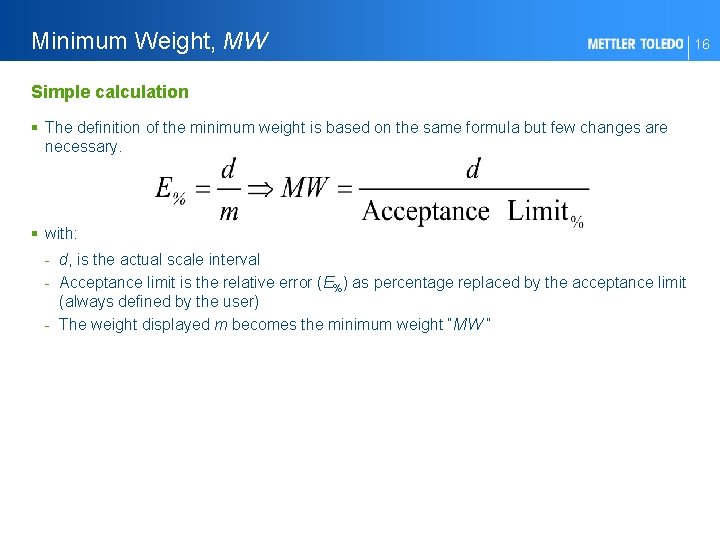
Minimum Weight, MW Simple calculation § The definition of the minimum weight is based on the same formula but few changes are necessary. § with: - d, is the actual scale interval - Acceptance limit is the relative error (E%) as percentage replaced by the acceptance limit (always defined by the user) - The weight displayed m becomes the minimum weight “MW ” 16

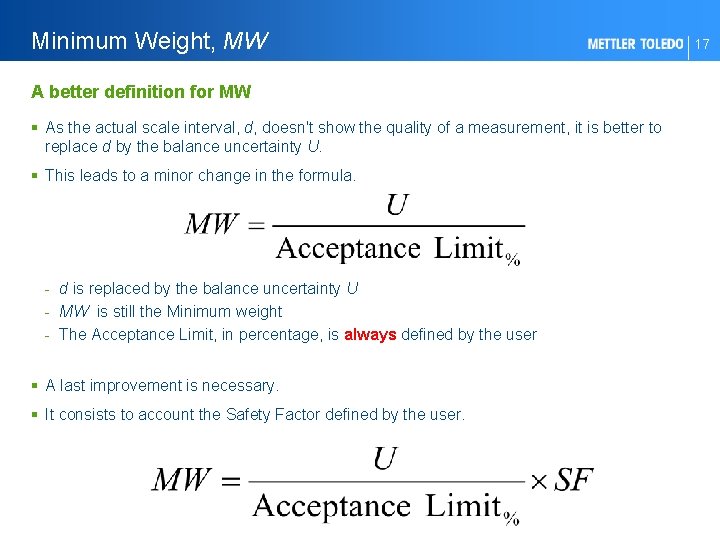
Minimum Weight, MW A better definition for MW § As the actual scale interval, d, doesn't show the quality of a measurement, it is better to replace d by the balance uncertainty U. § This leads to a minor change in the formula. - d is replaced by the balance uncertainty U - MW is still the Minimum weight - The Acceptance Limit, in percentage, is always defined by the user § A last improvement is necessary. § It consists to account the Safety Factor defined by the user. 17

Agenda 1 Introduction 2 Reading, Rounding and Relative error 3 Weighing Range 4 Minimum Weight, MW 5 Safety Factor, SF 6 Safe Weighing Range, SWR 7 GWP Verification® 8 ISO 9001: 2015 19 9 For internal use - Confidential

Safety Factor, SF § The safety factor accounts for: - changes during working conditions different people working with the instruments historical data of the weighing instrument verification therefore and not to be forgotten, economic factors changes that could affect measurement in daily routine use § A safety factor equal to 1 reflects the balance uncertainty only at the point and time when it was last calibrated with standards weights. § In the worst case, it can happen that the temperature vary right after the calibration, thus leading to an increase of the measurement uncertainty and consequently out-ofspecifications results. § Therefore a safety factor >1 adds safety to the manufacturing process. § Typically a safety factor between 2 and 5 is recommended. 20

Safety Factor, SF § The user decides what factor to apply. § If the weighing is critical, a safety > 2 is necessary. § Today, no tables are available to define a safety factor. § As a general rule of thumb, within an industrial context, a safety factor of at least 2 is always suggested – even if everything appears to be under control. 21

Agenda 1 Introduction 2 Reading, Rounding and Relative error 3 Weighing Range 4 Minimum Weight, MW 5 Safety Factor, SF 6 Safe Weighing Range, SWR 7 GWP Verification® 8 ISO 9001: 2015 22 9 For internal use - Confidential

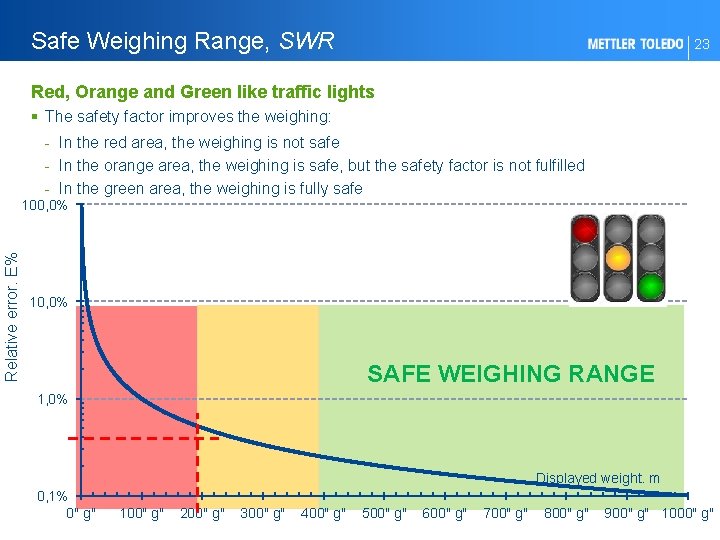
Safe Weighing Range, SWR 23 Red, Orange and Green like traffic lights § The safety factor improves the weighing: - In the red area, the weighing is not safe - In the orange area, the weighing is safe, but the safety factor is not fulfilled - In the green area, the weighing is fully safe Relative error. E% 100, 0% 10, 0% SAFE WEIGHING RANGE 1, 0% Displayed weight. m 0, 1% 0" g" 100" g" 200" g" 300" g" 400" g" 500" g" 600" g" 700" g" 800" g" 900" g" 1000" g"

Agenda 1 Introduction 2 Reading, Rounding and Relative error 3 Weighing Range 4 Minimum Weight, MW 5 Safety Factor, SF 6 Safe Weighing Range, SWR 7 GWP Verification® 8 ISO 9001: 2015 24 9 For internal use - Confidential

GWP Verification® A scientific approach to assess a process § With GWP® (GWP = Good Weighing Practice), the METTLER TOLEDO service, you can assess the risk § GWP Verification® consists to establish the link between the balance performance (its uncertainty) and the acceptance limits defined by the user. § GWP Verification® applies to all models and brands of weighing instruments and to all balances in the production field. 25

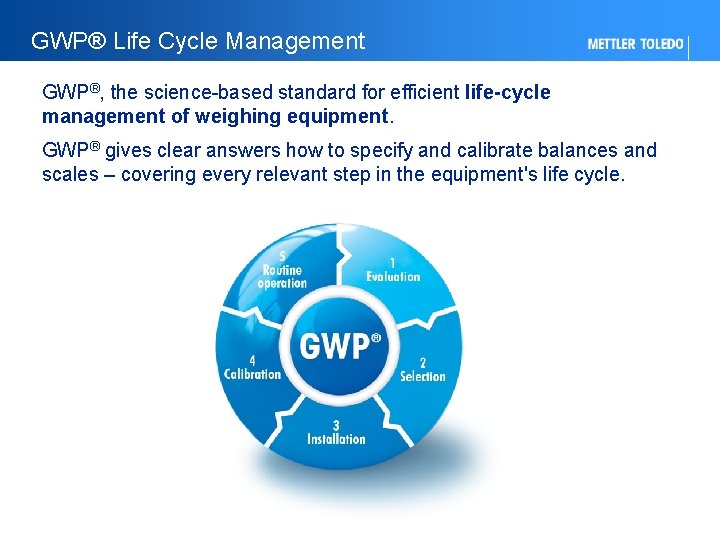
GWP® Life Cycle Management GWP®, the science-based standard for efficient life-cycle management of weighing equipment. GWP® gives clear answers how to specify and calibrate balances and scales – covering every relevant step in the equipment's life cycle.

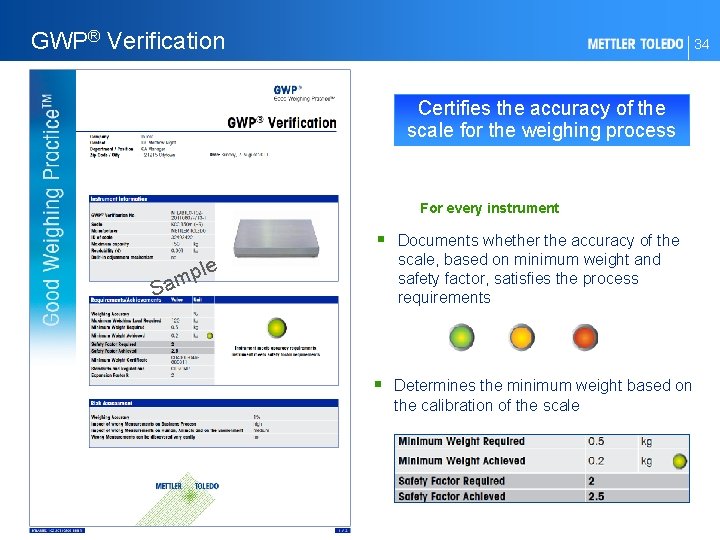
GWP® Verification 34 Certifies the accuracy of the scale for the weighing process For every instrument § Documents whether the accuracy of the Sam ple scale, based on minimum weight and safety factor, satisfies the process requirements § Determines the minimum weight based on the calibration of the scale

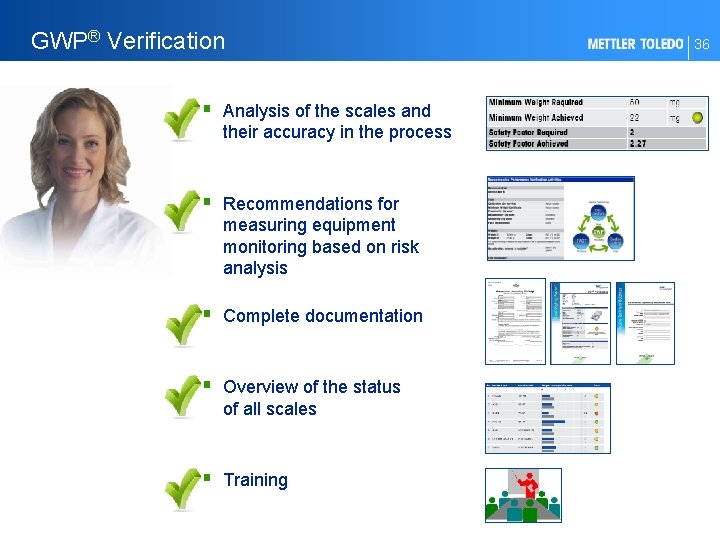
GWP® Verification § Analysis of the scales and their accuracy in the process § Recommendations for measuring equipment monitoring based on risk analysis § Complete documentation § Overview of the status of all scales § Training 36

Agenda 1 Introduction 2 Reading, Rounding and Relative error 3 Weighing Range 4 Minimum Weight, MW 5 Safety Factor, SF 6 Safe Weighing Range, SWR 7 GWP Verification® 8 ISO 9001: 2015 37 9 For internal use - Confidential

ISO 9001: 2015 and Weighing 39 GWP complies with Risk-based thinking § One of the key changes in the 2015 revision of ISO 9001 is a focus on risk-based thinking. § Whilst risk-based thinking has always been a part of ISO 9001, the 2015 version gives it increased prominence by building it into the whole management system. § In previous editions of ISO 9001, a clause on preventive action was separated from the whole. § The aim is to establish a systematic approach to considering risk, rather than treating “prevention” as a separate component of a quality management system. § Risk-based thinking is part of the process approach. ISO 9001: 2015 0. 3. 3 Risk-based thinking is essential for achieving an effective quality management system. […] To conform to the requirements […] an organization needs to plan and implement actions to address risks and opportunities. For internal use - Confidential

Thank you for your attention § Visit us to see our GWP solutions for Risk Management