www themegallery com www themegallery com Service Service


方法,然后还需在 Android. Manifest. xml文件中进行配置,配置时可通过<intentfilter…/>元素指定它可被哪些Intent启动。 <service android: name=“. My. Service”> <intent-filter> <action android:")
方法的完整方法签名为:bind. Service(Intent service, Service. Connection conn, int flags),该方法的三个参数含义如下: service:该参数表示与服务类相关联的Intent对象,用于指定所绑定的 Service; conn:该参数是一个Service. Connection对象,该对象用于监听访问者")
方法,在绑定本地 Service的情况下,on. Bind()方法所返回的IBinder对象将会传给 Service. Connection对象里on. Service. Connected( Component. Name name, IBinder")
![案例总结 1)先启动Service,然后绑定Service。测试步骤:【启动Service】→【 绑定Service】→【启动Service】→【停止Service】→【绑定Service】 →【解绑Service】。 总结:调用顺序如下:on. Create()→[on. Start. Command()1到N次] →on. Bind()→ on. Service. Connected()→on. Unbind()[→](https://slidetodoc.com/presentation_image_h2/b994850302301b444d56e8e5b8357d27/image-13.jpg "案例总结 1)先启动Service,然后绑定Service。测试步骤:【启动Service】→【 绑定Service】→【启动Service】→【停止Service】→【绑定Service】 →【解绑Service】。 总结:调用顺序如下:on. Create()→[on. Start. Command()1到N次] →on. Bind()→ on. Service. Connected()→on. Unbind()[→")
![案例总结 2)先绑定Service,后启动Service。测试步骤:【绑定Service】→【启 动Service】→【绑定Service】→【解绑Service】→【启动Service】→ 【停止Service】。 总结:调用顺序如下:on. Create()→on. Bind()→on. Service. Connected() →[on. Start. Command() 1到N次]→on. Un.](https://slidetodoc.com/presentation_image_h2/b994850302301b444d56e8e5b8357d27/image-14.jpg "案例总结 2)先绑定Service,后启动Service。测试步骤:【绑定Service】→【启 动Service】→【绑定Service】→【解绑Service】→【启动Service】→ 【停止Service】。 总结:调用顺序如下:on. Create()→on. Bind()→on. Service. Connected() →[on. Start. Command() 1到N次]→on. Un.")
、 get. Author()方法,B应用以Service方式向A应用提供服务。(我们可以把A 应用看成是客户端,B应用看成是服务端,分别命名为AIDLClient 、 AIDLServer)。整个过程需要以下几步: 1、在Server端编写AIDL文件 package cn. jxufe. iet. aidlserver;")
, 但并非直接实现接口,而是通过继承接口的Stub来实现(Stub抽象类内部 实现了aidl接口),并且实现接口中的方法。 public class Song. Binder extends Stub{ public String get. Name()")

- Slides: 29
本章知识结构图 www. themegallery. com
本章示例 www. themegallery. com
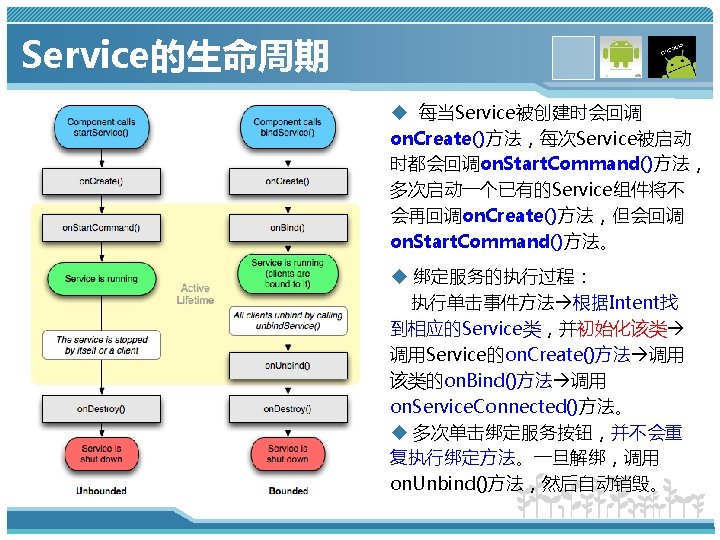
Service简介 什么是Service? A Service is an application component that can perform long-running operations in the background and does not provide a user interface. Another application component can start a service and it will continue to run in the background even if the user switches to another application. Additionally, a component can bind to a service to interact with it and even perform interprocess communication (IPC). For example, a service might handle network transactions, play music, perform file I/O, or interact with a content provider, all from the background. Service与Activity类似,都是Android中四大组件之一,并且二者都 是从Context派生而来,最大的区别在于Service没有实际的界面,而是一 直在Android系统的后台运行,相当于是一个没有图形界面的Activity程序, 它不能自己直接运行,需要借助Activity或其他Context对象启动。 www. themegallery. com
配置Service 定义Service子类时必须实现on. Bind()方法,然后还需在 Android. Manifest. xml文件中进行配置,配置时可通过<intentfilter…/>元素指定它可被哪些Intent启动。 <service android: name=“. My. Service”> <intent-filter> <action android: name=“iet. jxufe. cn. android. My. Service”/> </intent-filter> </service> Action中的值一定要与程序中创建的Intent的Action的值一致, 程序就是根据Action的值来查找相应的Service从而启动它。 www. themegallery. com
绑定Service过程 Context的bind. Service()方法的完整方法签名为:bind. Service(Intent service, Service. Connection conn, int flags),该方法的三个参数含义如下: service:该参数表示与服务类相关联的Intent对象,用于指定所绑定的 Service; conn:该参数是一个Service. Connection对象,该对象用于监听访问者 与Service之间的连接。当访问者与Service间连接成功时,将回调该 Service. Connection对象的on. Service. Connected (Component. Name name, IBinder service)方法; flags:指定绑定时是否自动创建Service(如果Service还未创建)。 该参数可指定BIND_AUTO_CREATE(自动创建)。 www. themegallery. com
绑定Service u 当开发Service类时,必须提供一个on. Bind()方法,在绑定本地 Service的情况下,on. Bind()方法所返回的IBinder对象将会传给 Service. Connection对象里on. Service. Connected( Component. Name name, IBinder service)方法的service参数, 这样访问者就可以通过IBinder对象与Service进行通信。 u实际开发时通常会采用继承Binder(IBinder的实现类)的方式实 现自己的IBinder对象。 www. themegallery. com
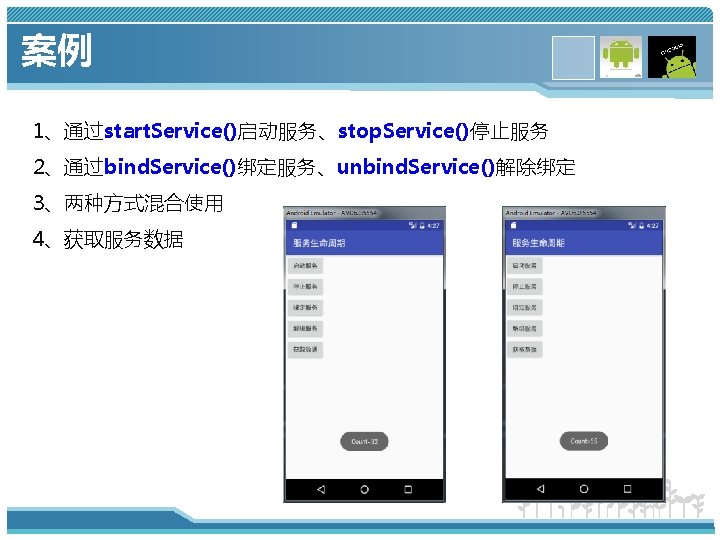
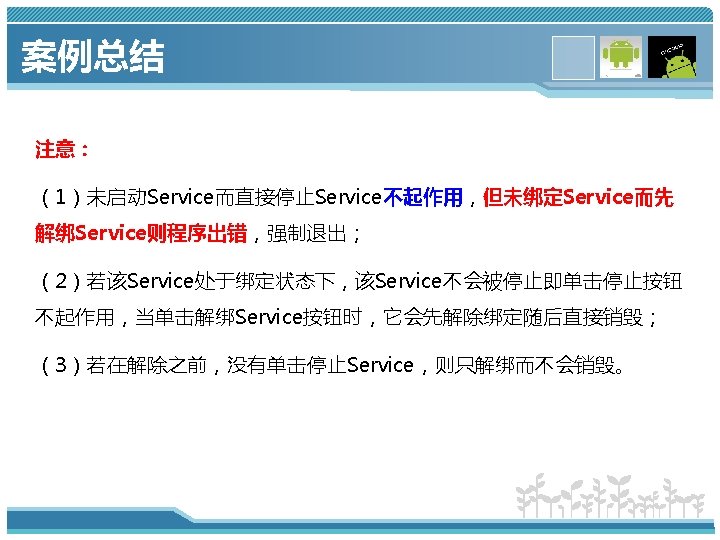
案例总结 1)先启动Service,然后绑定Service。测试步骤:【启动Service】→【 绑定Service】→【启动Service】→【停止Service】→【绑定Service】 →【解绑Service】。 总结:调用顺序如下:on. Create()→[on. Start. Command()1到N次] →on. Bind()→ on. Service. Connected()→on. Unbind()[→ on. Service. Connected()→on. Rebind()0到N次]→on. Destroy()。 www. themegallery. com
案例总结 2)先绑定Service,后启动Service。测试步骤:【绑定Service】→【启 动Service】→【绑定Service】→【解绑Service】→【启动Service】→ 【停止Service】。 总结:调用顺序如下:on. Create()→on. Bind()→on. Service. Connected() →[on. Start. Command() 1到N次]→on. Un. Bind[→on. Service. Connected() →on. Rebind()0到N次→on. Un. Bind]→on. Destroy()。 www. themegallery. com
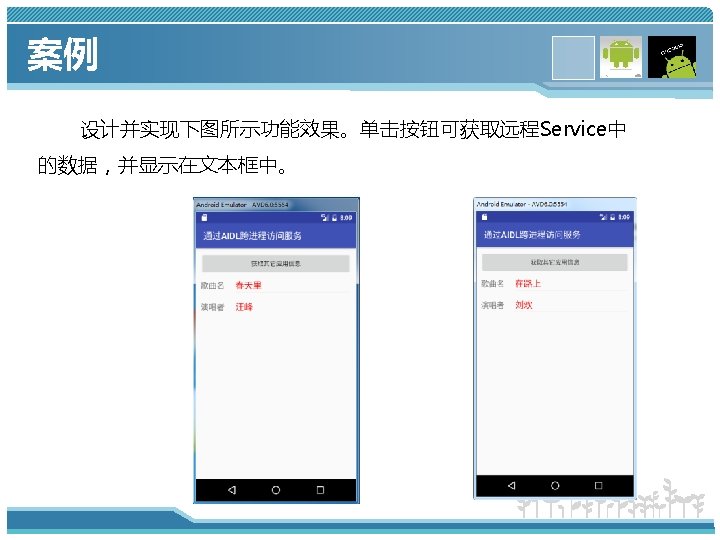
案例 假设A应用需要与B应用进行通信,调用B应用中的get. Name()、 get. Author()方法,B应用以Service方式向A应用提供服务。(我们可以把A 应用看成是客户端,B应用看成是服务端,分别命名为AIDLClient 、 AIDLServer)。整个过程需要以下几步: 1、在Server端编写AIDL文件 package cn. jxufe. iet. aidlserver; ; interface Song{ String get. Name(); String get. Author(); } www. themegallery. com
案例 2、在ADILServer应用中实现aidl文件生成的接口(本例是Song), 但并非直接实现接口,而是通过继承接口的Stub来实现(Stub抽象类内部 实现了aidl接口),并且实现接口中的方法。 public class Song. Binder extends Stub{ public String get. Name() throws Remote. Exception { return name; } 3、把AIDLService应用中 public String get. Author() throws aidl文件复制到客户端应用中,。 Remote. Exception { 接下来即可在AIDLClient应用中 return author; } } www. themegallery. com 实现与AIDLService应用通信。
www. themegallery. com