Two Person Positioning Goals of Two Person Positioning


")


- Slides: 36
Two Person Positioning
Goals of Two Person Positioning To put us in the best position to make the calls that allow us to keep the game safe and fair. To work as a TEAM to cover all areas of the field efficiently and consistently.
Role of the Officials SAFETY FAIRNESS FUN
Two Person Positioning Table Side Official Far Side Official • Should be the more experienced of the team • Will run the Coaches/Captains Meeting • Will discuss responsibilities with the Timer and Scorer • May be the less experienced of the team • Will participate in all pre-game discussions and meetings Once the game begins the officials have the same duties throughout the game, they will work together as a team to assure the game is administered safely and fairly. Two Person System Positioning Note: Officials may rotate sides after every 2 or 3 goals. If working with a very inexperienced official, rotating may be too challenging at first, so this is not a mandatory procedure. Discuss this with your partner.
Areas of Responsibilities Officials Lead to the Right, Trail to the Left Covers her whole sideline and end line Shared Area
To Start the Game The table side official will count all players to assure the correct number of players are on the field. Shared Area The official on the far side will administer the opening draw.
Boundary Responsibilities Official 1 Official 2
Boundaries The boundary is called when the player possessing the ball steps on or over the line, or when the ball touches the ground on or outside the line. A ball may be played in the air outside the plane of the line. A player may NOT play from out of bounds, including playing without the ball.
Boundaries Compare – Boundary Lines IN or out? (VB, FH, BB, Soccer)
Boundaries When a shot or deflected shot goes out of bounds, the player who is in bounds and closest to the BALL when it crosses the line is awarded the ball.
Restarting the Boundaries Play is restarted 2 -meters directly in from where the ball crossed boundary line. Other players directly involved in the play will maintain their relative position to the ball and sideline. The player restarting with the ball shall have 1 -meter of free space around them.
Boundaries When the Ball crosses the end line and: The GK is closest player to the ball when her team is awarded the ball and She is in her goal circle She is awarded possession and may remain in her Goal Circle to restart play. GK
Restarting Fouls near the Boundary Move the ball in 4 Meters from the boundary Administer Penalty (Offender, Others) Reposition yourself before Restarting
The Draw
The Draw A Draw is taken to start each half and restart after each goal. Draw Rules Three players from each team are allowed between the Restraining Lines including the two players taking the draw. Centers ( players taking the draw) shall “toe the line”
Draw Set Up With the crosse open to a teams Goalie, the right side of the stick will be the bottom of the draw. Players may stand on either side of the line Crosses will be held in the air, the entire stick above hip level The sticks shall be parallel above the center line Demo: stick set-up and player options at DRAW- see note
Help Hint: Proper Stick Set Up Have the players stand with their back to their goalie with their stick open (the pocket) to their goalie. Have each of the centers drop their sticks to their right hand side. Now hold the heads of the crosses together and have the players move to the side of their stick they want to draw from. Tip: for additional review-Draw video is on Central Hub
Draw Rules Players may not move, except for their heads, until the whistle The first motion of the draw must be UP The Ball must go above both players heads No other players shall cross into the center circle or over the restraining line before the whistle There may not be more than 6 players between the restraining lines until possession has been gained by one team
ox Draw Responsibilities ox ox Off 1 ox GK x ox xo o ox ox ox Off 2 ox GK
Critical Scoring Area Responsibilities. RL violations TRAIL LEAD
Responsibilities in the CSA Trail Lead On-ball fouls Shooting Space on your side of the arc Goal Circle activity Back boundary and side boundary Off-ball fouls on your side of arc Shooting Space on Trail half of arc Off-ball fouls (picks, 3 sec. , false starts, dangerous propel or follow through) Restraining Line Watch the Shooter After the Shot
LEAD Positioning The Lead’s purpose of movement is to see the ball and space between the ball carrier and her defenders Two approaches to proper positioning: Tangent Quadrants Use what works best for you 3 2 1 4
LEAD Tangent Positioning As the ball goes HIGH on the far side of the arc, the Official moves to a HIGH tangent
LEAD Tangent Positioning When the ball rolls the GC towards the official, she passes below the ball for the tangent
LEAD Quadrant Positioning 2 1 3 4
LEAD Quadrants 2 3 1 4
LEAD Quadrants 2 1 3 4
Transition • Stay ahead of and outside the ball • Position your body to keep play and players in your vision Trail to Lead • Maintain the “View” of the play action to CSA • Count players ahead of you • Stay up with play, don’t “get there when you get there” Lead to Trail • Anticipate where the play is going
Responsibilities in Transition Lead to Trail to Lead Handout: NEW TRAIL and what am I doing?
Transition Official 1 Offcial 2
Restart Guidelines LEAD restarts in the CSA Make eye contact with partner before restarts Know when to release partner Officials always restarts their side and back boundary Restart on your “third” of the field
Each Official should Restart Their side of the field Their CSA Restarts
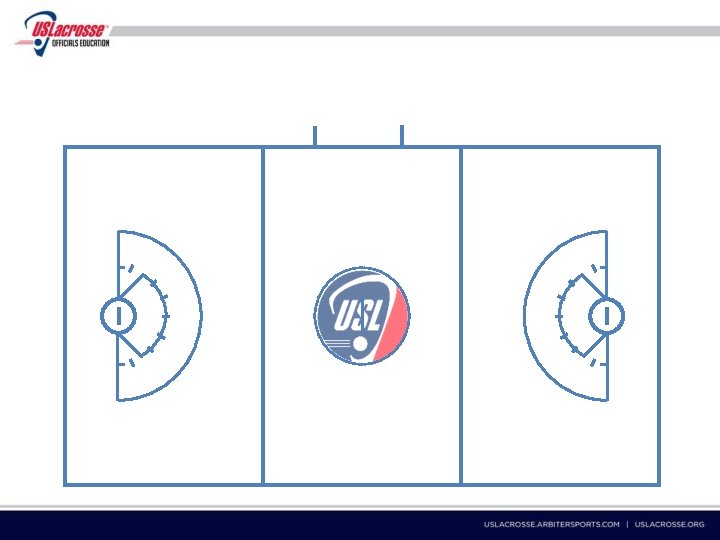
Thirds of the Field Shared Midfield Space
Trail Official can Restart in Midfield To allow LEAD to get “ahead” Restarts Off 1 X Off 2
Two Person Positioning