Microscopy I Light Microscope A Components 1 Light

")


 –measure")


 Focus")


 Procedure 1) Bacteria placed in drop of water on slide 2) Slide")
- Slides: 16
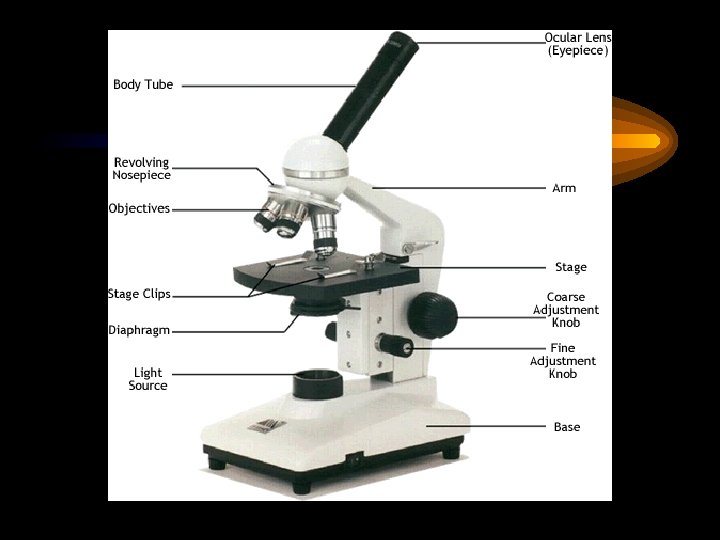
Microscopy I. Light Microscope A. Components 1. Light Source 2. Diaphragm: aperture; controls amount of light 3. Lens System a) Condenser: collects and directs light to slide b) Objectives: magnify image -Scanning 4 X -Low Power 10 X -High Power 40 X -Oil 100 X c) Ocular – Eye Piece: typically 10 X
Microscopy I. Light Microscope A. Components 4. Stage: holds slide 5. Focusing Knobs 1) Coarse Focus: only with Scanning or Low Power Objectives 2) Fine Focus
Microscopy I. Light Microscope B. Terminology 1. Magnification - how much larger the specimen appears a. Total Magnification = Ocular Mag X Objective Mag 2. Resolution - the ability to distinguish two near objects; Sharpness 3. Parfocalized – minor focusing adjustments needed when switching objective lens
Microscopy I. Light Microscope C. Oil Immersion Technique 1. Speed Of Light -In Vacuum = 300, 000 m/s -Slower through other mediums (Glass = 200, 000 m/s) -Refraction: bending of light as it passes from one medium to another 2. Index of Refraction (RI) –measure of the light bending ability of a medium RI = Speed of Light in a Vacuum Speed of Light in Medium -as light passes through mediums of differing RI, light is bent -as light passes through mediums of the same RI, light does not bend
Microscopy I. Light Microscope C. Oil Immersion Technique 2. Index of Refraction (RI) –measure of the light bending ability of a medium RI in Vacuum RI in Glass RI in Oil = 1. 5 = 1. 0 = 1. 5
Microscopy
Microscopy I. Light Microscope C. Oil Immersion Technique 3. Oil Immersion Microscopy: -Drop of Oil placed on slide; Oil Immersion Lens lowered into Oil a) RI of Immersion Oil equal to RI of Microscope Slide Glass -Light moves in straight line; no refraction, scattering, reflecting -More light captured by Objective = Increase Resolution and Brightness
Microscopy I. Light Microscope C. Oil Immersion Technique 4. Oil Immersion Technique 1) Focus on object with scanning objective; move to Low Power 2) Adjust focus under Low Power; move to High Power 3) Adjust FINE focus under High Power ("High and Dry") 4) Rotate the nosepiece in between the High Power and Oil Immersion lens. 5) Place 1 drop of immersion oil in center of slide. 6) Rotate Oil Immersion Lens into place 7) Using FINE ADJUSTMENT ONLY and viewing through ocular, adjust focus
Microscopy I. Light Microscope D. Measuring with the Microscope 1. Microscopic Field of View -the circle of light seen when viewing through a microscope Ques. If we can know the diameter of the Field of View, how can this help us to measure the size of objects viewed through the microscope? d - use the diameter as a Standard to measure or estimate the size of objects Low Power (10 X) Field of View
Microscopy I. Light Microscope D. Measuring with the Microscope 1. Microscopic Field of View Example: If the diameter of the Field of View is 1 mm, and the Paramecium you are viewing takes up ½ the diameter, how big is the Paramecium? . 5 mm or 500 um
Microscopy I. Light Microscope D. Measuring with the Microscope Ques. How can we determine the diameter of the Low Power(10 X) Field of View? -Place a transparent ruler on stage covering ½ of F of V. -Measure diameter edge of ruler Low Power (10 X) Field of View = 3. 5 mm or 3500 um
Microscopy I. Light Microscope D. Measuring with the Microscope Ques. How can we calculate the diameter of the High Power Field of View? Method One 1) High Power Diameter is always smaller than Low Power Diameter 2) The HP Diameter is smaller than the LP Diameter by the following factor: High Power Magnification Low Power Magnification 3) Divide Low Power Field of View Diameter by Factor
Microscopy I. Light Microscope D. Measuring with the Microscope Ques. How can we calculate the diameter of the High Power Field of View? Method Two Substitute into the following Formula; Solve for unknown High Power Mag X Low Power F o V = Low Power Mag. X High Power F o V Or High Low = Low High Keep Mag on one side and Field of View on the other
Microscopy I. Light Microscope E. Staining Techniques -Often required because cytoplasm generally lacks color 1) Simple Stain – use of a single stain a) Basic Dyes (Stain): -have a positive charge -cytoplasm has a negative charge -dye is attracted to cytoplasm
Microscopy b) Procedure 1) Bacteria placed in drop of water on slide 2) Slide allowed to air dry 3) Slide is "Heat Fixed" – passed through flame -kills microorganisms -bonds cells to slide 4) Basic Dye is added 5) Rinse with Distilled water 6) Blot Dry