CONTENT MANAGEMENT SYSTEM Presented by Mukesh A Pund

CONTENT MANAGEMENT SYSTEM Presented by: Mukesh A. Pund Principal Scientist CSIR-NISCAIR, New Delhi

JOOMLA INTRODUCTION & INSTALLATION ON WINDOWS
 for publishing web")
INTRODUCTION Joomla is a free and open-source content management system (CMS) for publishing web content. It is built on a model–view–controller web application framework that can be used independently of the CMS. Joomla is written in PHP, uses object-oriented programming (OOP) techniques (since version 1. 5) and software design patterns, stores data in a My. SQL, MS SQL (since version 2. 5), or Postgre. SQL (since version 3. 0) database, and includes features such as page caching, RSS feeds, printable versions of pages, news flashes, blogs, search, and support for language internationalization. As of June 2018, Joomla! has been downloaded over 94 million times. Over 8, 000 free and commercial extensions are available from the official Joomla! Extension Directory, and more available from other sources. It is estimated to be the second most used content management system on the Internet.

HISTORY Joomla is based on Mambo CMS which was developed by an Australian company in 2001 and initially released on August 17, 2005. The official version of Joomla 1. 0 was released on September 22, 2005. The latest version Joomla 3. 8. 10 was released on June 26, 2018. Version Release date 3. 0 September 27, 2012 3. 1 April 24, 2013 3. 2 November 6, 2013 3. 3 April 30, 2014 3. 4 February 24, 2015 3. 5 March 21, 2016 3. 6 July 12, 2016 3. 7 April 25, 2017 3. 8 September 19, 2017

FEATURES Joomla! is one of the world's most popular software packages used to build, organize, manage and publish content for websites, blogs, Intranets and mobile applications. With more than 3 percent of the Web running on Joomla! and a CMS market share of more than 9 percent, Joomla! powers the web presence of hundreds of thousands of small businesses, governments, non-profits and large organizations worldwide. Some features : v MULTILINGUAL : Joomla! is the most popular and widely supported open source multilingual CMS platform in the world, offering over 65 languages. Webmasters and content creators can create websites to be presented in multiple languages, without ever needing to step outside of the options available in the Joomla! core software.

v WELL SUPPORTED : There are thousands of professional Joomla! service providers throughout the world who can help build, maintain and market your Joomla! projects. v EASY UPDATES : Joomla! has a "One Click Version Update" feature to make this process super easy for users of any skill level. The built-in updater also has an automated checker which notifies you if anything needs updating; this includes notifications of the core software and Joomla! extension that utilise this feature. v INTEGRATED HELP SYSTEM : Joomla! has an in-app contextual help system to help every level of user to operate their Joomla. There is also a glossary explaining the terms in plain English, a version checker makes sure you're using the latest version, a system information tool helps you troubleshoot. v MEDIA MANAGER : The Media Manager is the tool for easily uploading, organizing and managing your media files and folders.

v BANNER MANAGEMENT: With the banner manager you have the possibility to easily add advertising and monetize your website. v CONTACT MANAGEMENT: The contacts component allows you to add several contacts, departments and categories, and extend the basic contact information with miscellaneous information and an image. v SEARCH BETTER, SEARCH SMARTER: With the built in search and smart search, your website visitors will be able to quickly and easily find the appropriate information on your site. And even more, thanks to the statistics you can analyze your visitors needs and streamline your content even better to serve them. v CONTENT MANAGEMENT: It allows managing the content using WYSIWYG editor to create or edit the content in a very simple way. v NESTED CATEGORIZATION: When you are managing content, organisation is a key requirement. Being able to create categories with nesting and no limits on depth is a great plus in helping manage large websites.

v FRONTEND EDITING: Editing content should be easy and fast. You are reading through your site's content and see a change you need to make. No need to login to the administrative section any more for simple edits of content and modules. Simply click and edit from the frontend. v RSS : It stands for Really Simple Syndication, which helps your site contents and RSS files to be automatically updated. v MENU MANAGER: It allows to create menus and menu items and can be managed subsequently. You can put menu in any style and in multiple places. v USER MANAGEMENT: It allows managing the user information such as permission to edit, access, publish, create or delete the user, change the password and languages. The main part of the user is Authentication. v TEMPLATE MANAGER: It manages the designs that are used on the website. The templates can be implemented without changing the content structure within a few seconds. v WEB LINK : The link resource is provided for user of the site and can be sorted into categories.

WHY JOOMLA ? ü Free ü Open Source ü Cross Platform ü Support (https: //www. joomla. org/) ü Long History ü Thousands of Extensions ü Secure ü Popularity ü Developer Friendly

ARCHITECTURE Joomla is a Model-View-Controller web application. The following diagram shows the architecture of Joomla.

The architecture of Joomla contains following layers: v DATABASE: Database is a collection of data and can be stored, manipulated and organized in a particular manner. The database stores the user information, content and many more required data of the site. It is used to store the administrative information to manage the Joomla site which ensures maximum flexibility and compatibility for extension. v JOOMLA FRAMEWORK: Framework is a collection of open source software, where the Joomla CMS is built. It is developed for more flexibility and breaks the framework into single modular packages which helps each package to develop more easily. v COMPONENTS: Components are considered as mini applications. It consists of two parts i. e. Administrator and Site. Whenever a page gets loaded, component is been called to render the body of main page. The Administrator part manages different aspects of the component and the site part helps in rendering the pages when request is made by site visitor. Components are main functional unit of Joomla.

v MODULES: Modules is an extension which is used to render the pages in Joomla and to display the new data from the component. It frequently looks like boxes such as login module. In Joomla administrator the modules are managed by the module. It displays the new content and images when module is linked to Joomla components. v PLUGIN: This is also a kind of Joomla extension, it is very flexible and powerful for extending the framework. It contains a bit of codes that is used to execute the particular event trigger. It is commonly used to format the output of a component or module when a page is built. The plugin function which are associated with event are executed in a sequence when a particular event occurs. v TEMPLATES: Template determines the look of the Joomla website. There are two types of templates used i. e. Front-end and Back-end. The Backend template is used to control the functions by the administrator whereas the Front-end template is a way to present the website to users. Templates are easy to build or customize your site. It provides maximum flexibility to style your site. v WEB BROWSER: It is a server where the user interacts. It delivers the web pages to the client. The HTTP (Hyper Text Transfer Protocol) is used to communicate between the client and the server.
:")
SYSTEM REQUIREMENTS § Database: My. SQL 5. 1 + § Web Hosting: WAMP (Windows): Download from (http: //www. wampserver. com/en/) LAMP (Linux) / Individual Software Packages like Apache, My. SQL, PHP XAMPP (Multi-platform) MAMP (Macintosh) Microsoft IIS § Operating System: Cross-platform § Browser Support: IE (Internet Explorer 7), Firefox, Google chrome § SSL (Secure Socket Layer): A valid security certificate is required for HTTPS § PHP Compatibility: PHP 5. 4+ or PHP 5. 3. 10+ § Domain Name: Should be according to the site created
 Standard Installation")
INSTALLATION Demo Installation Quick Installation (Cpanel) Standard Installation

DEMO INSTALLATION Joomla is installed on web server of official Joomla Demo Hosting Partner. 1. When you open the link https: //demo. joomla. org/, you will get to see a screen as below:

2. Provide the require details and then “Launch”

3. The user need to click on Activation Link received in mail for activation of account.

4. Click on “PROCEED TO CUSTOMER AREA ” to access login page.

5. The below screen shows the home page. 6. The site view will be accessed by clicking on “View Site” and Dashboard will be accessed by Clicking on “Admin”

Site View Admin panel
 Joomla is installed on free hosting web server (000 webhost) For")
QUICK INSTALLATION (Cpanel) Joomla is installed on free hosting web server (000 webhost) For Joomla package: Either Use the given package OR Download Joomla : Go to link http: //www. joomla. org/download. html 1. When you open the link https: //000 webhost. com/, you will get to see a screen as below and Sign Up

2. After Sign Up, the below screen shows up. You can also verify e-mail.

3. To edit already created website while Sign Up, Click on “Manage Website”. To add a new website, Click on “+”

4. Creating new website will ask for website name and password details. 5. Clicking on Create will show the below screen. Click on “UPLOAD NOW” to upload your own website

6. Click on “Upload Files” 7. Click on “Upload files now”

8. Click on the shown icon under public_html folder and Upload files of Joomla Package as shown; 9. Click on UPLOAD

10. Extract joomla package file uploaded under public_html folder : 11. Create new database on previous browser tab before installing Joomla on web server

12. Click on “New Database” 13. Provide details for creating database

14. Database created.

15. Click on provided website link and add the name of extracted folder after URL (here joomlawebsite 123. 000 webhostapp. com/Joomla) It has 3 tabs : Configuration, Database and Overview. Fill the required details.

Fill the required details in Database tab.

Fill the required details in Overview tab and Click on “Install”

Click on “Remote Installation Folder” For site View, Click on “Site” and for Admin Panel/Dashboard view, Click on “Administrator”

Admin Panel Site View

STANDARD INSTALLATION DOWNLOAD JOOMLA When you open the link http: //www. joomla. org/download. html, you will get to see a screen as below: DOWNLOAD WAMP SERVER Go to the link http: //www. wampserver. com/en/ to download latest version (32 bit or 64 bit) of WAMP server and install it.

STEPS FOR INSTALLATION OF JOOMLA IN WINDOWS To download the Joomla zip file from the official site, Click on “Download Joomla” option OR To update the files of your previous version, then click on “Upgrade Package” option. Create Store Database Joomla requires My. SQL database. So create a new empty database and provide username and password (for e. g. User as "root" and password as "root" or else you can set as per your convenience) for Joomla. After following the above step, you can continue with the installation process of Joomla. Set Up Wizard • Step (1): Create a folder in (C: //wamp/www) or /var/www/html(In case linux) • Step (2) : Copy and Extract the downloaded/given Joomla folder under the created directory • Step (3): Open your browser and navigate to your Joomla file path, then you will get the first screen of the Joomla installer as shown in the following screen. In our case the path is localhost/< Your_joomla_created_folder_name>
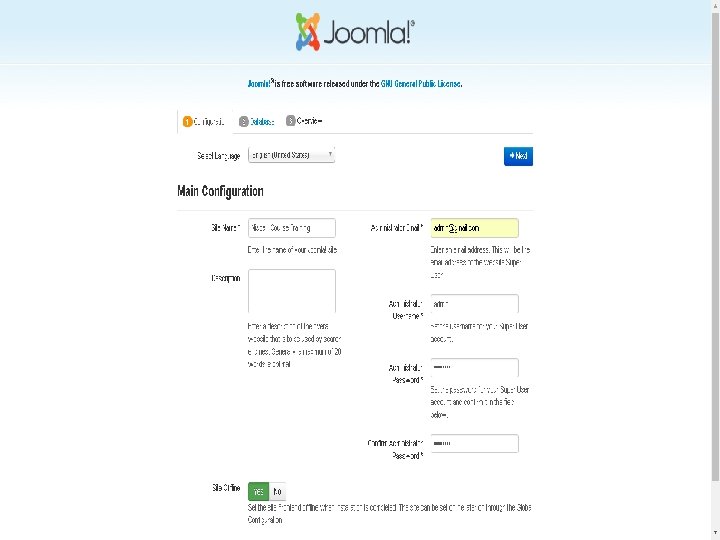

It contains the following fields: • Site Name: Enter the name of the site which you are going to create in Joomla. • Description: Add a small description about your site. • Admin Email: Enter your email address which helps to recover our password or any update. • Admin Username: Enter the username as per your choice while logging into Joomla. • Admin Password: Enter password to protect your site. • Site Offline: It specifies whether your site should be offline or online after completion of installation by clicking on Yes/No. After filling all the information, click on the Next button. Step (4): Here, you have to enter the information about the MYSQL database as seen in the screen below.
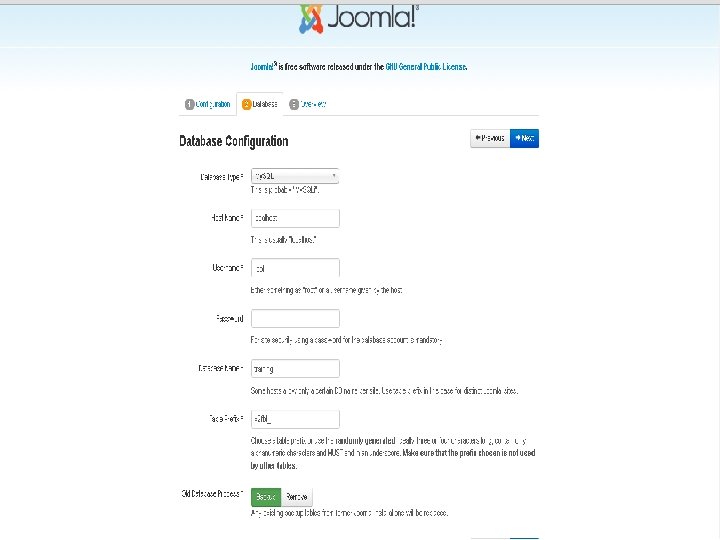

Database Type: Select your database type. By default it will be My. SQL. Host Name: Write the host name, by default it will be localhost. Username: Enter the user name of your My. SQL database. Password: Enter the password which you had set for My. SQL Database Name: Enter the database name which you have created in My. SQL database for Joomla. • Table Prefix: It is used to add prefix in the database tables which helps to run multiple sites on the same database. It takes the default value. • Old Database Process: It gives two options Backup or Remove. If you had already created a database then you can either remove it or select the backup option to create a backup of your whole database information. After filling all information, click on Next button. Step (5): In this step, you will be on last page of the installation process • • •
")
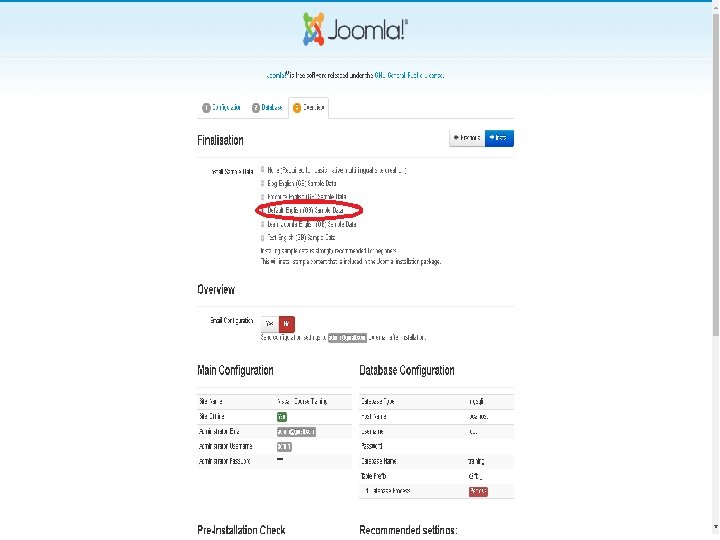
Here you can view all the information added to Joomla. Choose Default English (GB) Sample Data as an example to build your website and click on Install button. Step (6): Next, you can see that Joomla starts the installation process on your machine
: After a few minutes, after installation is successful and you will get")
Step (7): After a few minutes, after installation is successful and you will get a screen of the Joomla web installer as shown below. Next, click on the "Remove installation folder" button which will help you to protect your site, so that no other person can re-install your site.

Admin Panel After installing Joomla you are able to login to your Joomla Admin Panel as described below: Step (8): To access Joomla administrative panel, open the browser and type the URL as http: //localhost/<Your_joomla_folder>/administrator/index. php, then you will get the screen as shown below: Step (2): Enter the username and password which you had mentioned during installation as shown in the step 3 of Set Up Wizard section and click on the login button.

Site View After installing Joomla you are able to login to your Joomla Site View as described below: Step (9): To access Joomla site view, open the browser and type the URL as http: //localhost/<Your_joomla_folder_name>/, then you will get the screen as shown below:

Thank You
- Slides: 47