SNS PPU CRYOMODULE FDR Supply and Return End
- Slides: 31

SNS PPU CRYOMODULE FDR Supply and Return End Cans Gary Cheng June 10, 2019

Outline • Technical Requirements • Design Overview • Interface with Other Designs • Updates since PDR -Response to Recommendations & Comments Items • Engineering • SOW & Procurement Plan • Plans to Finish 2

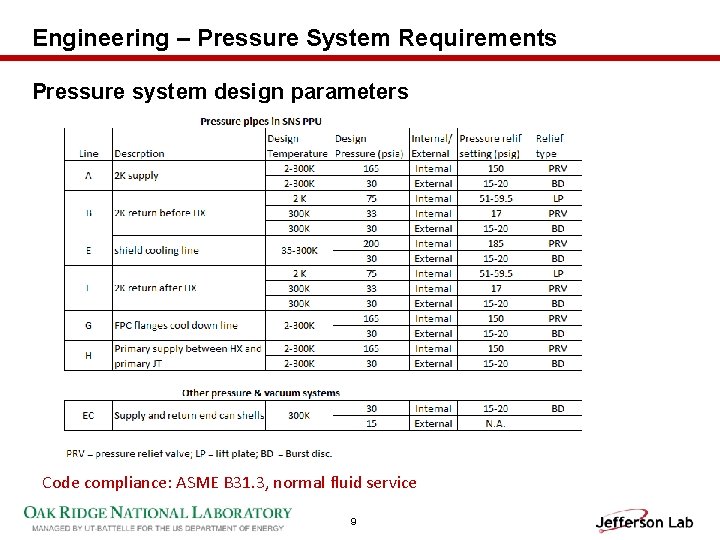
Technical Requirements • Design, fabrication and testing of the supply and return end cans must meet ASME BPVC and B 31. 3 rules. ASME U-stamp is required for both end cans. • Design pressures and temperatures are detailed in the Engineering section of this report. • End cans shall be designed to be able to maintain structural integrity during shipping, while connected to the rest of the cryomodule, from JLAB to ORNL. • End cans, especially the return end can, should have features to facilitate alignment of the interface female bayonets with respect to the male bayonets on the insertion U-tubes. 3

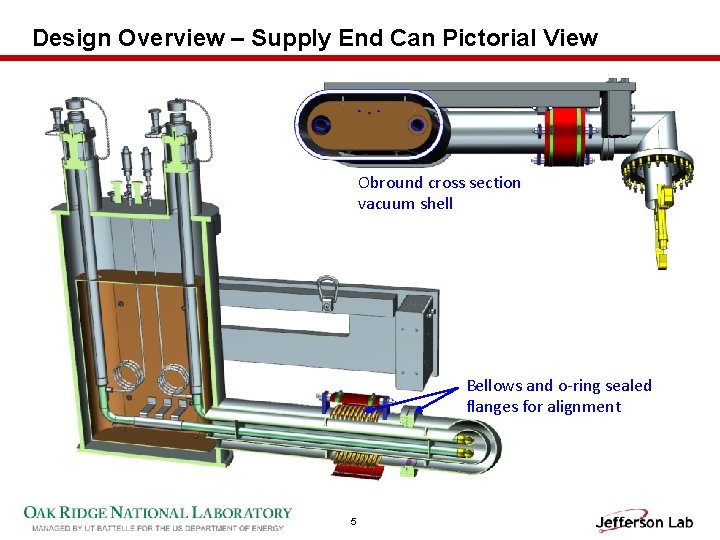
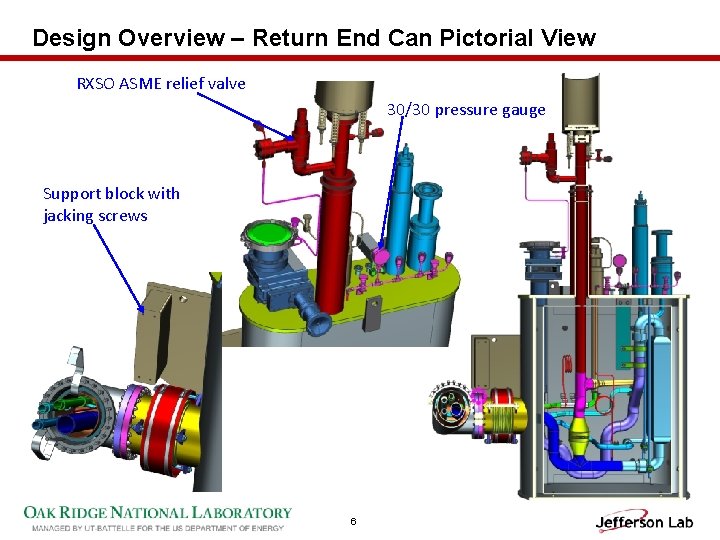
Design Overview • The end can design is based on that of the SNS HB Spare Cryomodule. • Both end cans adopt obround cross section vacuum shell. The shape and dimensions of the shell are kept consistent with SNS HB Spare Cryomodule End Cans. • On the bridging/interconnect tubes, bellows and companion flanges are added to permit alignment adjustments. • In the return end can, the heat exchanger position and thermal shield geometry are slightly adjusted to increase the clearance between the 50 K and 2 K objects. • Engineering work is conducted to verify that the cryogenic pipes and welds can withstand thermal and mechanical loads during cool down, pressurization and transportation. 4

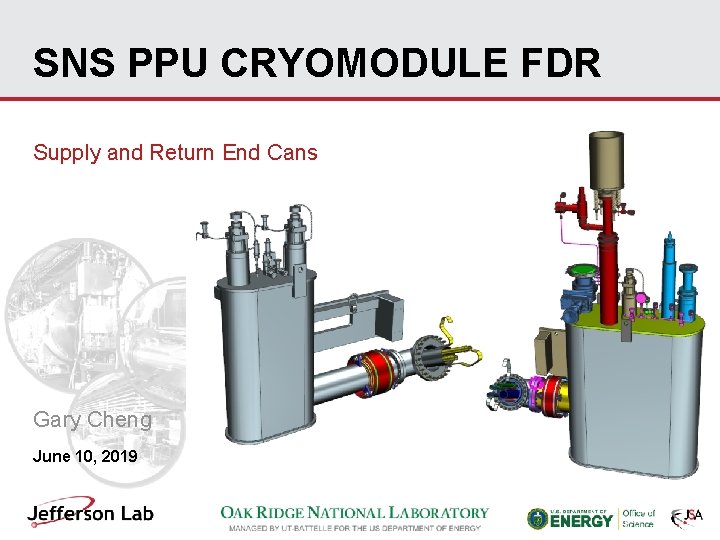
Design Overview – Supply End Can Pictorial View Obround cross section vacuum shell Bellows and o-ring sealed flanges for alignment 5

Design Overview – Return End Can Pictorial View RXSO ASME relief valve 30/30 pressure gauge Support block with jacking screws 6

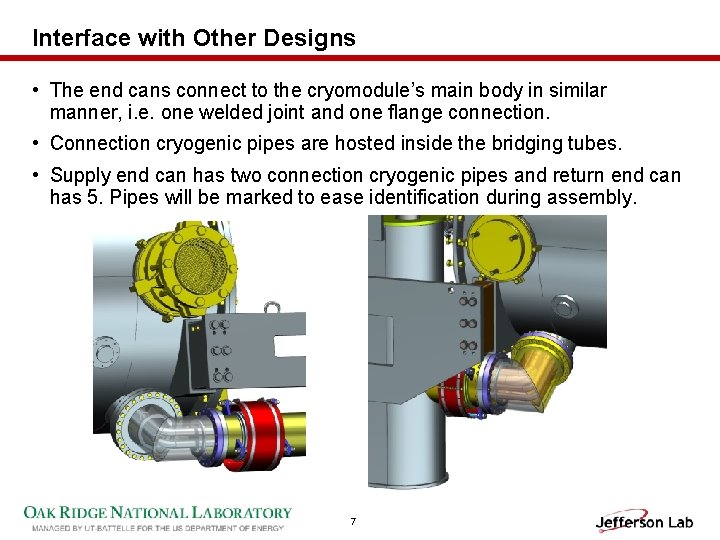
Interface with Other Designs • The end cans connect to the cryomodule’s main body in similar manner, i. e. one welded joint and one flange connection. • Connection cryogenic pipes are hosted inside the bridging tubes. • Supply end can has two connection cryogenic pipes and return end can has 5. Pipes will be marked to ease identification during assembly. 7

Updates Since PDR • Cryogenic pipe flexibility and shipping load analyses are carried out. More details will be given in the Engineering section. • According to the flexibility analysis, rigid connections between the bridging tube’s thermal shield and obround box’s thermal shield shall be avoided, especially for the REC. -Make sure there is a clearance between the tubular and box shields -Use braided copper wire instead of solid copper straps. • Planned changes in the end cans are now implemented. There a few changes that were not introduced during the PDR. A list of end can changes are attached as back up slides. • Drawing packages are prepared and being signed off. 8

Engineering – Pressure System Requirements Pressure system design parameters Code compliance: ASME B 31. 3, normal fluid service 9

Engineering – Shipping Loads for Design Shipping Loads: -Vertical: 4 g -Longitudinal(beam axis): 5 g -Transverse: 1. 5 g -Accelerations to be applied independently. Note: • There is no plan to do ASME BPVC design on the SEC and REC vacuum shell. The design was performed by ORNL and a couple of ASME shops have done their own BPVC analyses. New vendor to build SNS PPU end cans will carry out their own BPVC analysis. • The added alignment bellows were analyzed per EJMA rules and found to be safe. Bellows vendor has the freedom to alter some design parameters in their design. 10

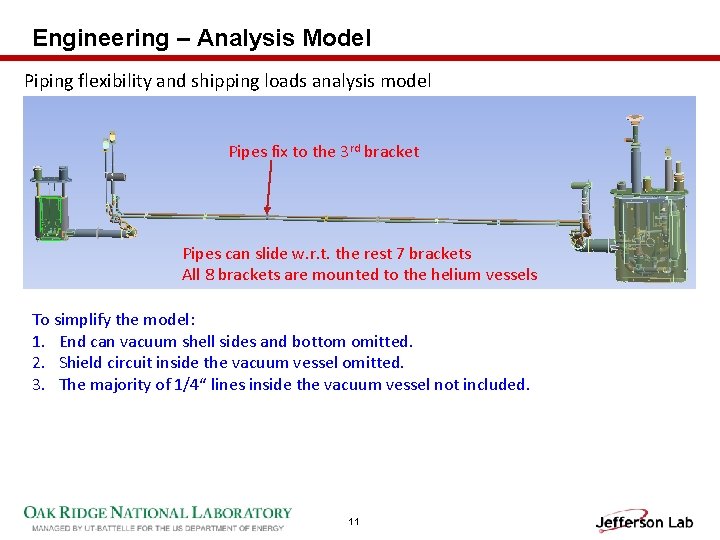
Engineering – Analysis Model Piping flexibility and shipping loads analysis model Pipes fix to the 3 rd bracket Pipes can slide w. r. t. the rest 7 brackets All 8 brackets are mounted to the helium vessels To simplify the model: 1. End can vacuum shell sides and bottom omitted. 2. Shield circuit inside the vacuum vessel omitted. 3. The majority of 1/4“ lines inside the vacuum vessel not included. 11

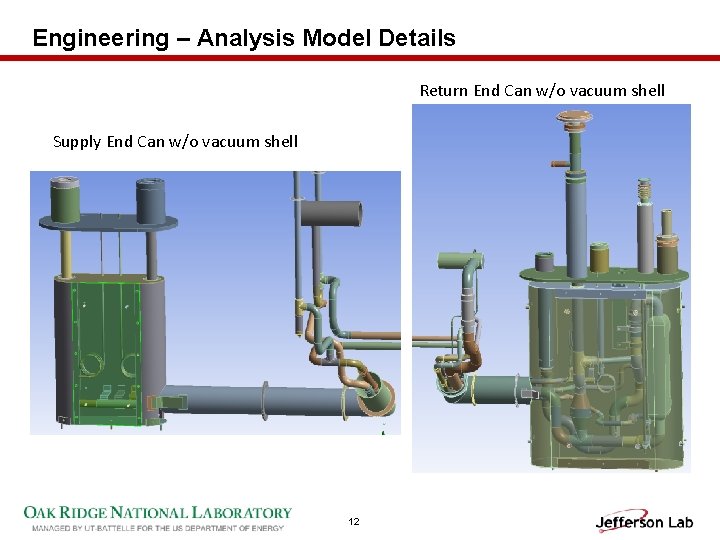
Engineering – Analysis Model Details Return End Can w/o vacuum shell Supply End Can w/o vacuum shell 12

Engineering – Flexibility and Shipping Analyses • Observing ASME B 31. 3 rules, SNS PPU piping flexibility analysis considers thermal contraction, i. e. the displacement load, and pressure, i. e. the sustained load, respectively. Gravity is always included. -Design pressures take from table shown on an earlier slide -A thermal model is run to determine the temperature profile used to generate thermal contractions. • Shipping analyses include the following cases: -Vertical upward 4 g, V +4 g -Vertical downward 4 g, V -4 g -Longitudinal upstream direction 5 g, L +5 g -Longitudinal downstream direction 5 g, L -5 g -Transverse front/aisle direction 1. 5 g, T +1. 5 g -Transverse back/wall direction 1. 5 g, T -1. 5 g 13

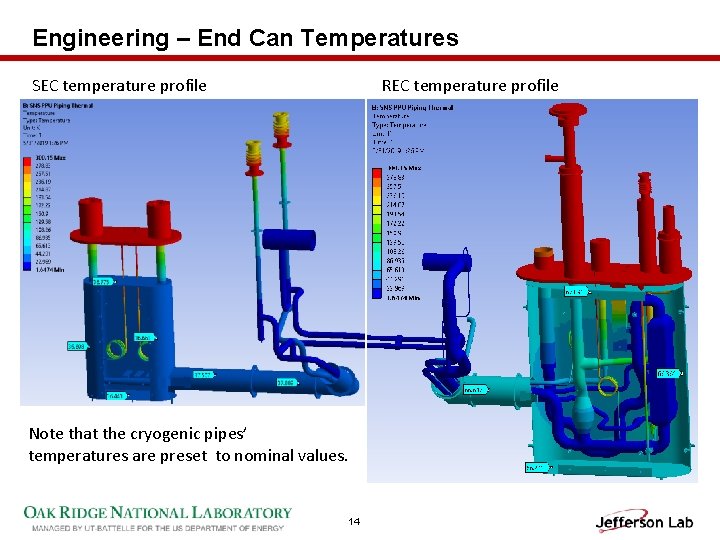
Engineering – End Can Temperatures SEC temperature profile REC temperature profile Note that the cryogenic pipes’ temperatures are preset to nominal values. 14

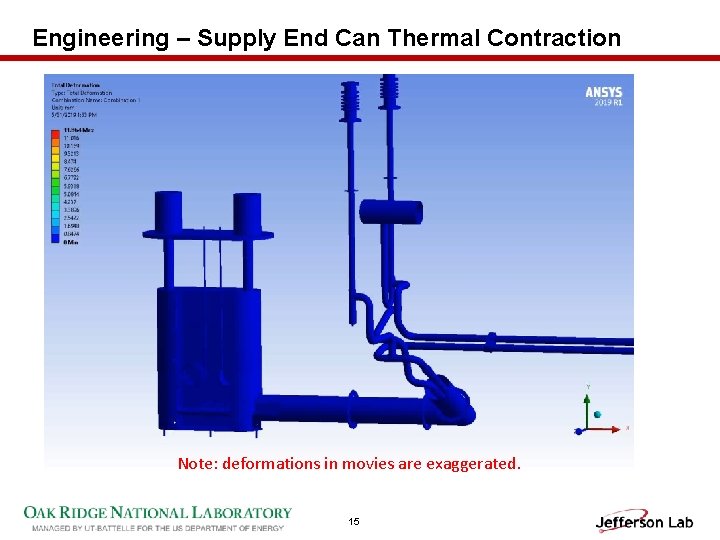
Engineering – Supply End Can Thermal Contraction Note: deformations in movies are exaggerated. 15

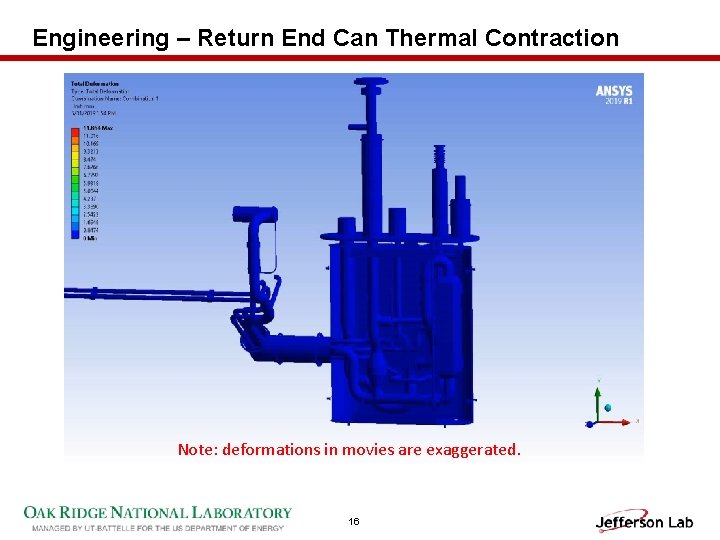
Engineering – Return End Can Thermal Contraction Note: deformations in movies are exaggerated. 16

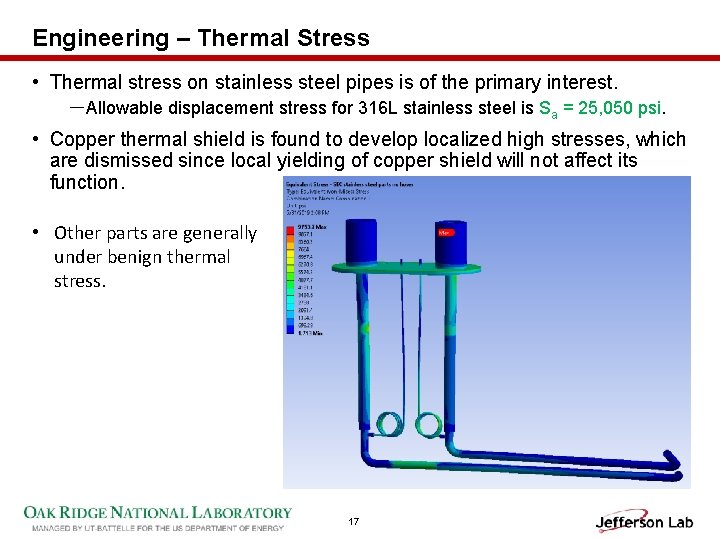
Engineering – Thermal Stress • Thermal stress on stainless steel pipes is of the primary interest. -Allowable displacement stress for 316 L stainless steel is Sa = 25, 050 psi. • Copper thermal shield is found to develop localized high stresses, which are dismissed since local yielding of copper shield will not affect its function. • Other parts are generally under benign thermal stress. 17

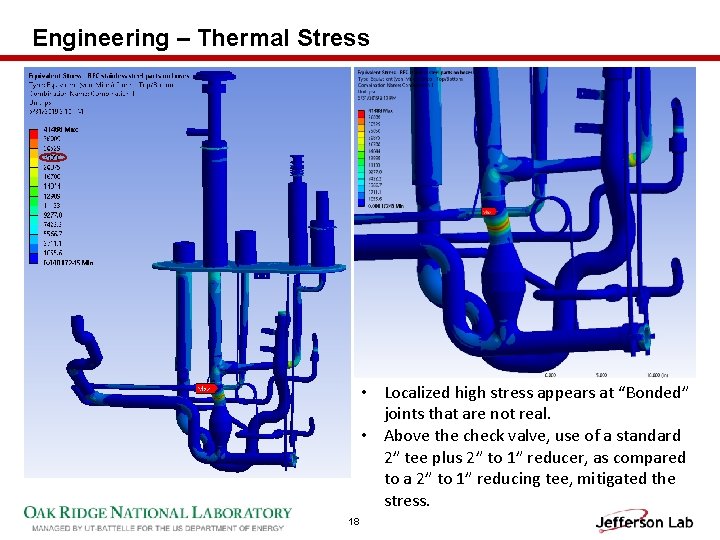
Engineering – Thermal Stress • Localized high stress appears at “Bonded” joints that are not real. • Above the check valve, use of a standard 2” tee plus 2” to 1” reducer, as compared to a 2” to 1” reducing tee, mitigated the stress. 18

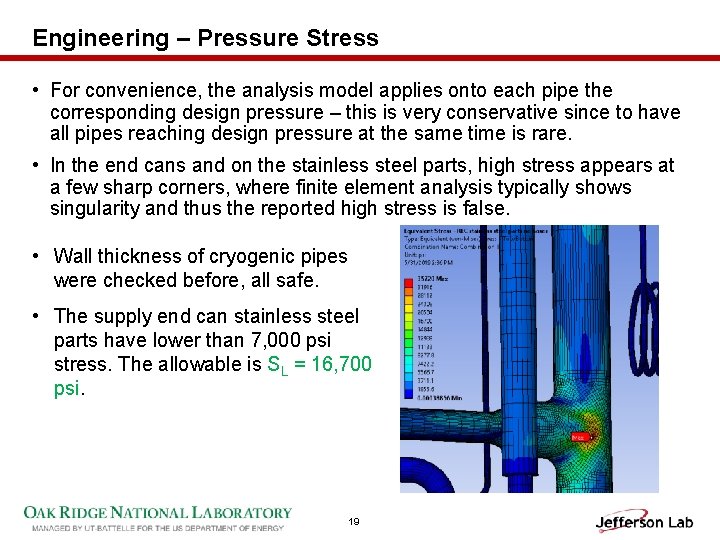
Engineering – Pressure Stress • For convenience, the analysis model applies onto each pipe the corresponding design pressure – this is very conservative since to have all pipes reaching design pressure at the same time is rare. • In the end cans and on the stainless steel parts, high stress appears at a few sharp corners, where finite element analysis typically shows singularity and thus the reported high stress is false. • Wall thickness of cryogenic pipes were checked before, all safe. • The supply end can stainless steel parts have lower than 7, 000 psi stress. The allowable is SL = 16, 700 psi. 19

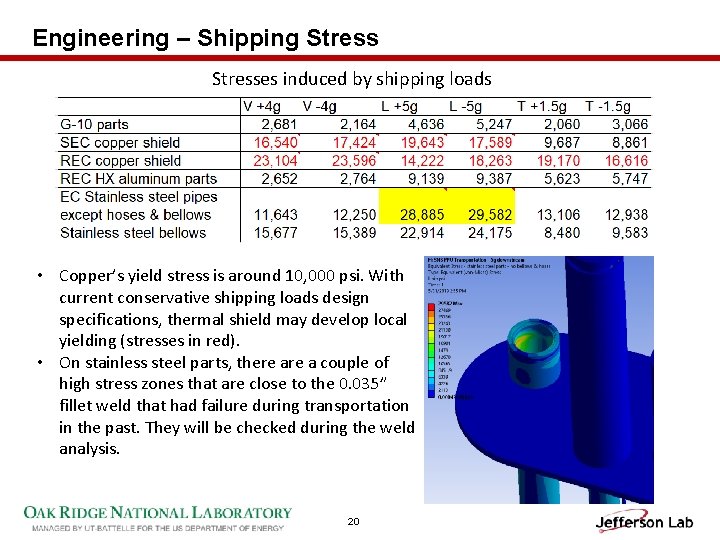
Engineering – Shipping Stresses induced by shipping loads • Copper’s yield stress is around 10, 000 psi. With current conservative shipping loads design specifications, thermal shield may develop local yielding (stresses in red). • On stainless steel parts, there a couple of high stress zones that are close to the 0. 035” fillet weld that had failure during transportation in the past. They will be checked during the weld analysis. 20

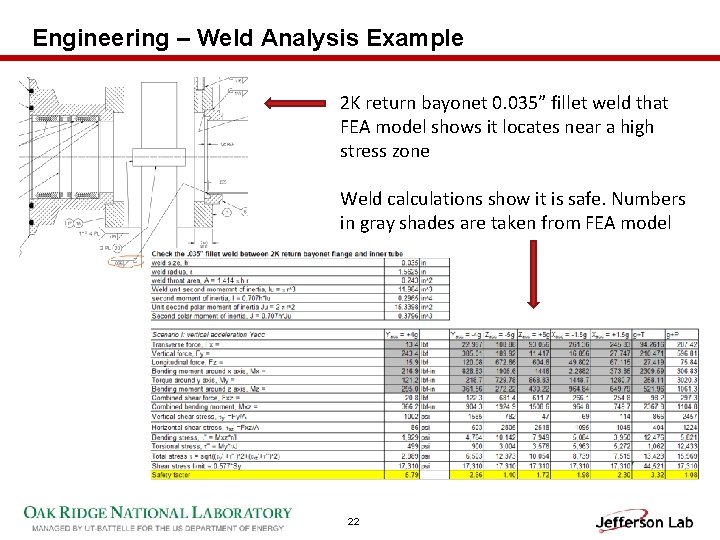
Engineering – Weld Strength Revisit • During the PDR, it was reported that the initial weld calculations, based on assumed loads, show that SEC welds are fine, however, the REC welds could not pass the failure criteria. • With the FEA model of the end cans completed, forces, torques and bending moments can be conveniently retrieved from the model and used for weld strength analysis. • Welds that are near the high stress zones are specifically selected for detailed weld analysis. • 3 critical welds on the SEC and 5 on the REC are checked. No issues found. • An example is given in the subsequent slide on the 0. 035” fillet weld between the 2 K return bayonet flange and inner tube. 21

Engineering – Weld Analysis Example 2 K return bayonet 0. 035” fillet weld that FEA model shows it locates near a high stress zone Weld calculations show it is safe. Numbers in gray shades are taken from FEA model 22

SOW and Procurement Plan • Return end can heat exchanger SOW is signed off. A procurement request (PR) has been submitted earlier. Bidding in progress. • A united SOW for the SEC and REC will be written based on ORNL SOWs for the SEC and REC as well as JLAB original SOWs for end cans. • Plan to select one vendor based on best value evaluation. • Will acquire ASME certified parallel plate reliefs from ORNL. • CERNOX diodes and RXSO ASME stamped pressure reliefs will be purchased by JLAB and supply to the vendor. • End can drawing packages, including the instrumentation wiring diagram, relevant JLab & ORNL specifications cited and the SOW will be ready to support SNS PPU End Can procurement schedule. 23

Plans to Finish • SEC and REC drawing status: -SEC: 18 new drawings created; 20 new drawings started; reuse drawings to be counted; none of the new drawings has gone through either Engineer or Designer check. -REC: 9 legacy drawings to reuse. 43 new drawings passed Engineer check. 17 drafted drawings haven't been checked yet. 15 new drawings to make, most of them are upper level assemblies within the return end can & the overall assembly for the return end can. A total of 80 ~ 90 drawings for REC. • Engineering analysis needs a final report. • Finalize the SOW. • Finalize and approve all drawings. 24

Questions & comments? Thank you! 25

Backups 26

Back up slides – List of SEC Changes 1. A bellows is added to the bridging 6” OD tube. A pair of flanges is added too. 2. The support mount/block inserts into a socket engraved on the vacuum vessel’s SEC mounting pad. 3. Pipes connecting to the female bayonets are of 3/4” NPS, no more necking down to 1/2“ NPS, no 3/4” to 1/2” reducer. 4. Added “pig tail” loops to the pressure tap lines to mitigate the risk of having thermoacoustic oscillation (TAO). 5. Weld unions added to the pressure tap lines to facilitate welding. 6. Lifting lugs added. A tapped hole on the support link is added so a 3 point lift can be carried out. 7. Cernox diodes holder added. 8. Tubular thermal shield inside the bridging tube is coped to allow more clearance to the run pipe. This shield has clearance with the boxshape shield to avoid interaction during cool down. 27

Back up slides – List of SEC changes (Cont’d) 9. The two thermal straps connecting the tubular and box thermal shields are re-shaped. They have dual functions, i. e. thermal and structural links. 10. The threaded tube G-10 standoffs in between the tubular thermal shield and vacuum jacket in the bridging tube are replaced with G-10 spiders for more robust structural support during shipping. 11. Washers added to all G-10 standoffs to spread the pressure/stress. 12. At the bottom of thermal shield, use 4 x G-10 standoffs. 13. Added 4 screws to the support link and block to resist weld shrinkage during final assembly. 28

Back up slides – List of REC changes 1. A bellows is added to the bridging 8” OD tube. 2. The support mount/block also inserts into a socket on the vacuum vessel REC mounting pad. 3. REC shell and thermal shield are made concentric to each other to increase clearance. Shell geometry intact. 4. HX moved upstream by 1/2". 5. Reroute plumbing due to the move of HX and for simplicity. 6. The top pieces of thermal shield are combined into one. 7. The female bayonets are switched to JLab traditional design. 8. Pipes connecting to the female bayonets are of 3/4” NPS, no more necking down to 1/2“ NPS, no 3/4” to 1/2” reducer. 9. Added “pig tail” loops to the pressure tap lines to mitigate the risk of having TAO. 10. Added a weld union to a pressure tap line to facilitate welding. 11. Five Cernox diodes holders are added 29

Back up slides – List of REC changes (Cont’d) 12. Lifting lugs added. A tapped hole on the support link is added so a 3 point lift can be carried out. 13. Added a structural support to the HX to resist beam axis shipping load. 14. The vertical long bent rod for HX support is replaced with two straight rods and an offset connector. The other rod is relocated for more clearance. 15. Switch the Circle Seal K 5120 B-10 MP-17 non-ASME PRV with a type RXSO 1 ¼ inlet, 1 ¼ outlet safety relief valve for the 17 PSID low pressure relief. It can be ASME certified. It has a Teflon seat. This PRV’s location is relocated 0. 5” in X direction (in/out of paper). 16. Pressure transducer manifold adopts the typical CEBAF design to have a 30/30 gauge and VCR connections that will need adapters to the Honeywell pressure transducers that SNS PPU will use. 17. Added 4 sets of G-10 standoffs to each of the two side thermal shields near the leading & trailing edges to resist shipping load. 30

Back up slides – List of REC changes (Cont’d) 18. Removed the aluminum weld protection shield. Resized tubular thermal shield to be larger to increase cryogenic pipe spacing. 19. Use spider supports between the bridging tube and its tubular thermal shield. Two of such supports have 0. 25” radial headroom. Consider adding springs for cushion shipping loads. 20. Use 4 x G-10 standoffs at the bottom of the box shape thermal shield. 21. Added a copper heat intercept ring to the pressure relief stack pipe. 22. Above the check valve, use a standard 2" tee plus 2" to 1" reducer to mitigate thermal and shipping stress. 23. The long rods lifting the HX are straight now with a connector plate. 24. Added 4 screws to the support link and block to resist weld shrinkage during final assembly. 31