Seismic Isolation Group SEI a LIGO HAMISI LLO


- Slides: 34

Seismic Isolation Group (SEI) a. LIGO HAM-ISI, LLO Unit 3, Testing Validation LIGO-G 1100507 -v 2 April 19 th, 2011 Céline Ramet, Michael Vargas, Adrien Le Roux, Vincent Lhuillier G 1100507 -V 2 1

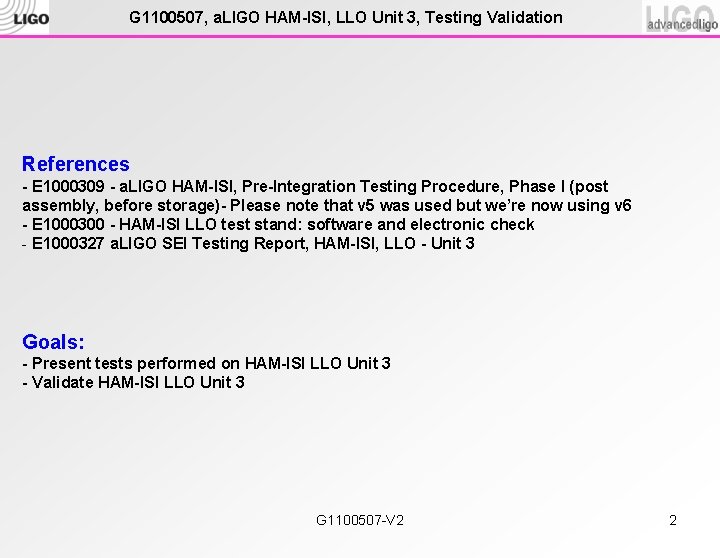
G 1100507, a. LIGO HAM-ISI, LLO Unit 3, Testing Validation References - E 1000309 - a. LIGO HAM-ISI, Pre-Integration Testing Procedure, Phase I (post assembly, before storage)- Please note that v 5 was used but we’re now using v 6 - E 1000300 - HAM-ISI LLO test stand: software and electronic check - E 1000327 a. LIGO SEI Testing Report, HAM-ISI, LLO - Unit 3 Goals: - Present tests performed on HAM-ISI LLO Unit 3 - Validate HAM-ISI LLO Unit 3 G 1100507 -V 2 2

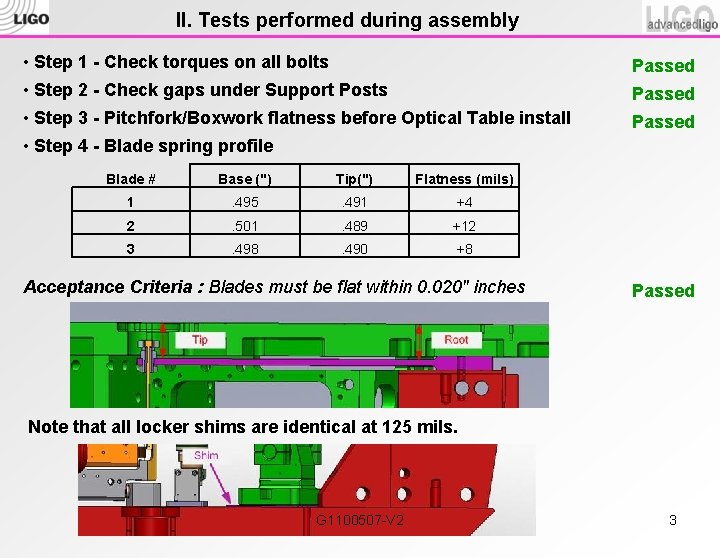
II. Tests performed during assembly • Step 1 - Check torques on all bolts Passed • Step 2 - Check gaps under Support Posts Passed • Step 3 - Pitchfork/Boxwork flatness before Optical Table install Passed • Step 4 - Blade spring profile Blade # Base (") Tip(") Flatness (mils) 1 . 495 . 491 +4 2 . 501 . 489 +12 3 . 498 . 490 +8 Acceptance Criteria : Blades must be flat within 0. 020" inches Passed Note that all locker shims are identical at 125 mils. G 1100507 -V 2 3

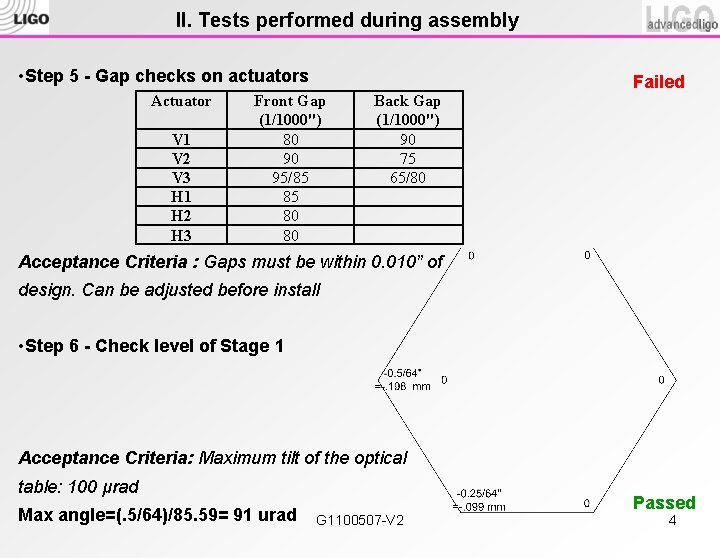
II. Tests performed during assembly • Step 5 - Gap checks on actuators Actuator V 1 V 2 V 3 H 1 H 2 H 3 Front Gap (1/1000") 80 90 95/85 85 80 80 Back Gap (1/1000") 90 75 65/80 Failed Acceptance Criteria : Gaps must be within 0. 010” of design. Can be adjusted before install • Step 6 - Check level of Stage 1 Acceptance Criteria: Maximum tilt of the optical table: 100 μrad Max angle=(. 5/64)/85. 59= 91 urad G 1100507 -V 2 Passed 4

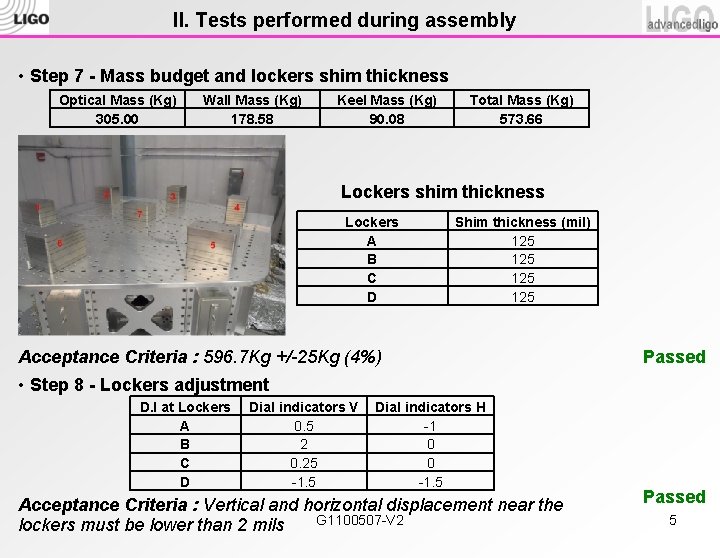
II. Tests performed during assembly • Step 7 - Mass budget and lockers shim thickness Optical Mass (Kg) 305. 00 Wall Mass (Kg) 178. 58 Keel Mass (Kg) 90. 08 Total Mass (Kg) 573. 66 Lockers shim thickness Lockers A B C D Shim thickness (mil) 125 125 Acceptance Criteria : 596. 7 Kg +/-25 Kg (4%) Passed • Step 8 - Lockers adjustment D. I at Lockers A B C D Dial indicators V 0. 5 2 0. 25 -1. 5 Dial indicators H -1 0 0 -1. 5 Acceptance Criteria : Vertical and horizontal displacement near the lockers must be lower than 2 mils G 1100507 -V 2 Passed 5

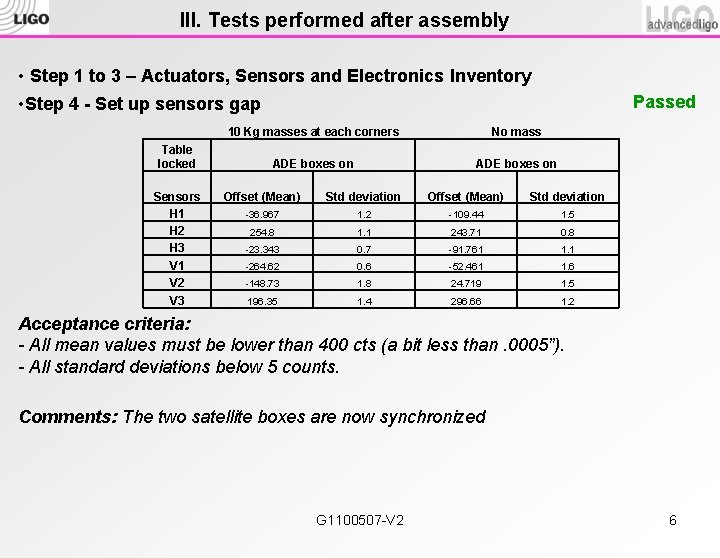
III. Tests performed after assembly • Step 1 to 3 – Actuators, Sensors and Electronics Inventory Passed • Step 4 - Set up sensors gap Table locked 10 Kg masses at each corners No mass ADE boxes on Sensors H 1 H 2 H 3 V 1 V 2 Offset (Mean) Std deviation -36. 967 1. 2 -109. 44 1. 5 254. 8 1. 1 243. 71 0. 8 -23. 343 0. 7 -91. 761 1. 1 -264. 62 0. 6 -52. 461 1. 6 -148. 73 1. 8 24. 719 1. 5 V 3 196. 35 1. 4 296. 66 1. 2 Acceptance criteria: - All mean values must be lower than 400 cts (a bit less than. 0005”). - All standard deviations below 5 counts. Comments: The two satellite boxes are now synchronized G 1100507 -V 2 6

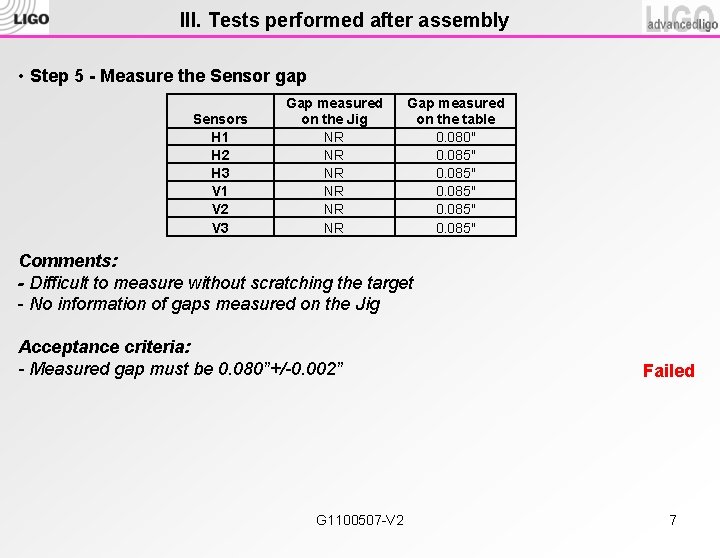
III. Tests performed after assembly • Step 5 - Measure the Sensor gap Sensors H 1 H 2 H 3 V 1 V 2 V 3 Gap measured on the Jig NR NR NR Gap measured on the table 0. 080" 0. 085" Comments: - Difficult to measure without scratching the target - No information of gaps measured on the Jig Acceptance criteria: - Measured gap must be 0. 080”+/-0. 002” G 1100507 -V 2 Failed 7

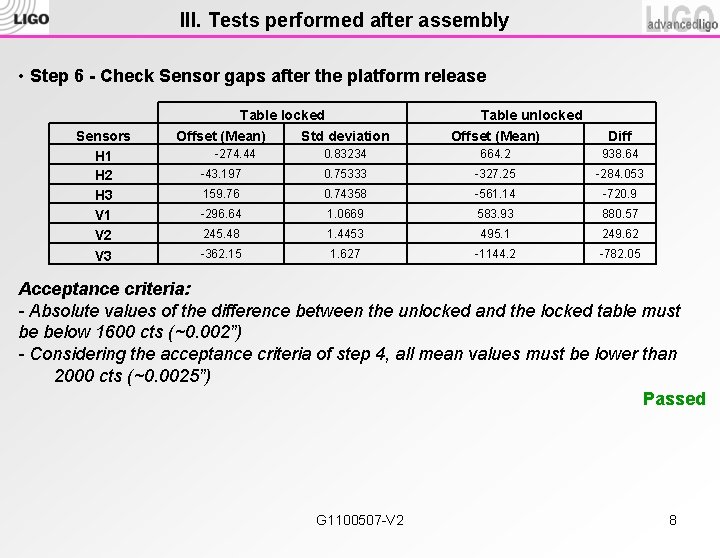
III. Tests performed after assembly • Step 6 - Check Sensor gaps after the platform release Sensors H 1 H 2 H 3 V 1 V 2 V 3 Table locked Offset (Mean) Std deviation -274. 44 Table unlocked Offset (Mean) Diff 0. 83234 664. 2 938. 64 -43. 197 0. 75333 -327. 25 -284. 053 159. 76 0. 74358 -561. 14 -720. 9 -296. 64 1. 0669 583. 93 880. 57 245. 48 1. 4453 495. 1 249. 62 -362. 15 1. 627 -1144. 2 -782. 05 Acceptance criteria: - Absolute values of the difference between the unlocked and the locked table must be below 1600 cts (~0. 002”) - Considering the acceptance criteria of step 4, all mean values must be lower than 2000 cts (~0. 0025”) Passed G 1100507 -V 2 8

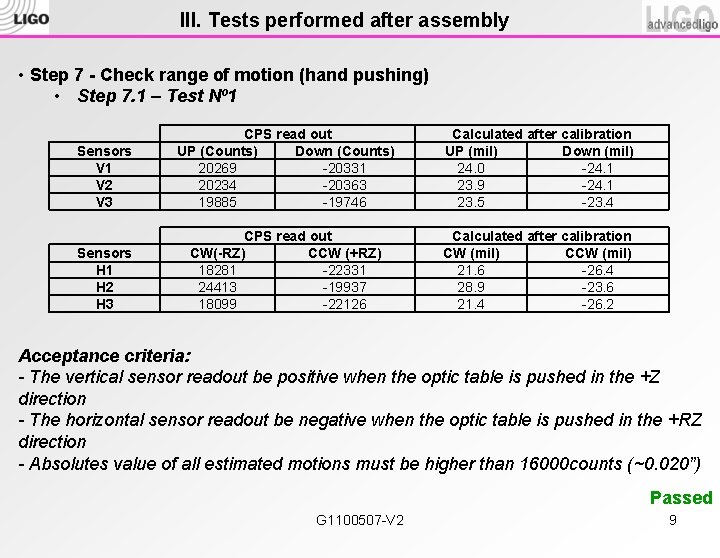
III. Tests performed after assembly • Step 7 - Check range of motion (hand pushing) • Step 7. 1 – Test Nº 1 Sensors V 1 V 2 V 3 CPS read out UP (Counts) Down (Counts) 20269 -20331 20234 -20363 19885 -19746 Calculated after calibration UP (mil) Down (mil) 24. 0 -24. 1 23. 9 -24. 1 23. 5 -23. 4 Sensors H 1 H 2 H 3 CPS read out CW(-RZ) CCW (+RZ) 18281 -22331 24413 -19937 18099 -22126 Calculated after calibration CW (mil) CCW (mil) 21. 6 -26. 4 28. 9 -23. 6 21. 4 -26. 2 Acceptance criteria: - The vertical sensor readout be positive when the optic table is pushed in the +Z direction - The horizontal sensor readout be negative when the optic table is pushed in the +RZ direction - Absolutes value of all estimated motions must be higher than 16000 counts (~0. 020”) Passed G 1100507 -V 2 9

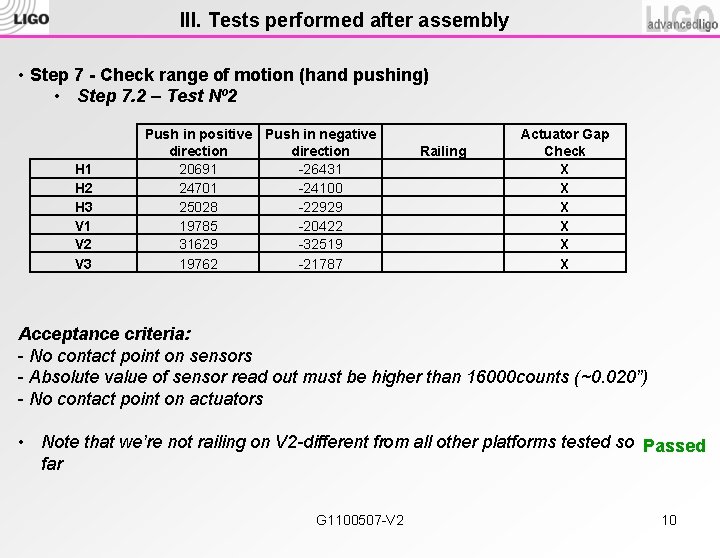
III. Tests performed after assembly • Step 7 - Check range of motion (hand pushing) • Step 7. 2 – Test Nº 2 H 1 H 2 H 3 V 1 V 2 V 3 Push in positive Push in negative direction 20691 -26431 24701 -24100 25028 -22929 19785 -20422 31629 -32519 19762 -21787 Railing Actuator Gap Check X X X Acceptance criteria: - No contact point on sensors - Absolute value of sensor read out must be higher than 16000 counts (~0. 020”) - No contact point on actuators • Note that we’re not railing on V 2 -different from all other platforms tested so Passed far G 1100507 -V 2 10

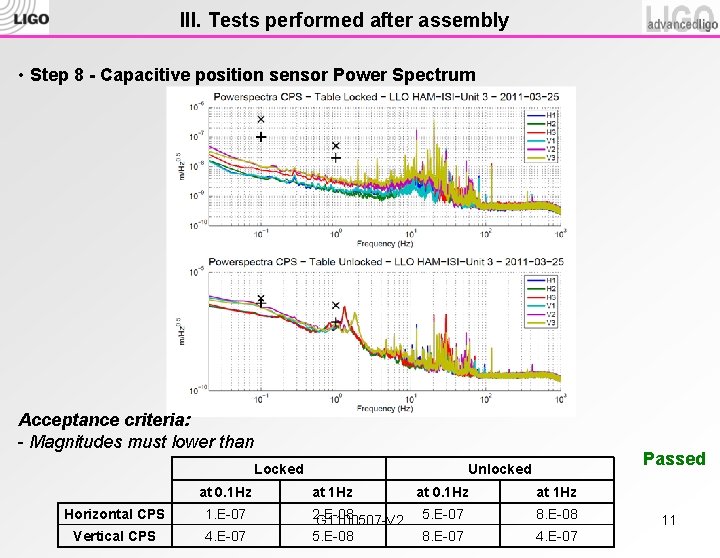
III. Tests performed after assembly • Step 8 - Capacitive position sensor Power Spectrum Acceptance criteria: - Magnitudes must lower than Locked at 0. 1 Hz Horizontal CPS 1. E-07 Vertical CPS 4. E-07 Passed Unlocked at 1 Hz 2. E-08 G 1100507 -V 2 5. E-08 at 0. 1 Hz at 1 Hz 5. E-07 8. E-08 8. E-07 4. E-07 11

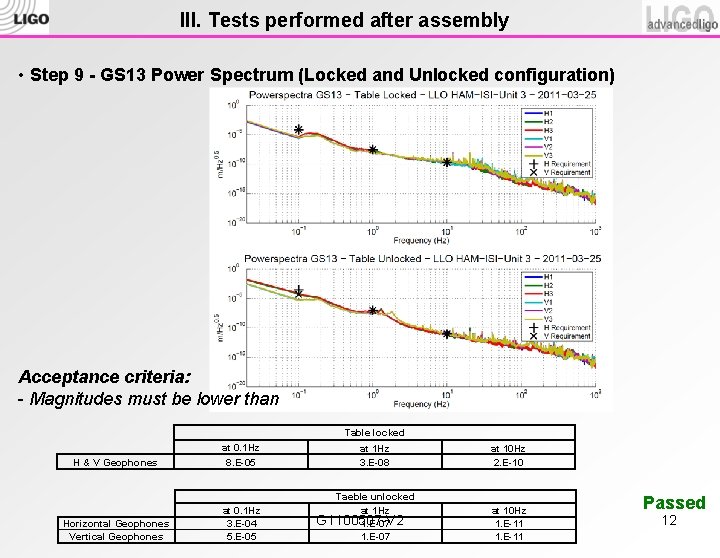
III. Tests performed after assembly • Step 9 - GS 13 Power Spectrum (Locked and Unlocked configuration) Acceptance criteria: - Magnitudes must be lower than Table locked at 0. 1 Hz H & V Geophones 8. E-05 Horizontal Geophones Vertical Geophones at 0. 1 Hz 3. E-04 5. E-05 at 1 Hz 3. E-08 Taeble unlocked at 1 Hz G 1100507 -V 2 1. E-07 at 10 Hz 2. E-10 at 10 Hz 1. E-11 Passed 12

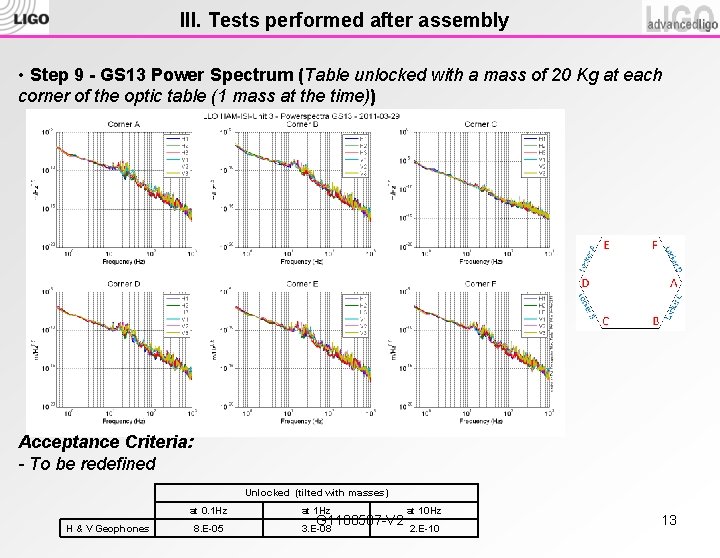
III. Tests performed after assembly • Step 9 - GS 13 Power Spectrum (Table unlocked with a mass of 20 Kg at each corner of the optic table (1 mass at the time)) Acceptance Criteria: - To be redefined Unlocked (tilted with masses) at 0. 1 Hz H & V Geophones 8. E-05 at 1 Hz G 1100507 -V 2 3. E-08 at 10 Hz 2. E-10 13

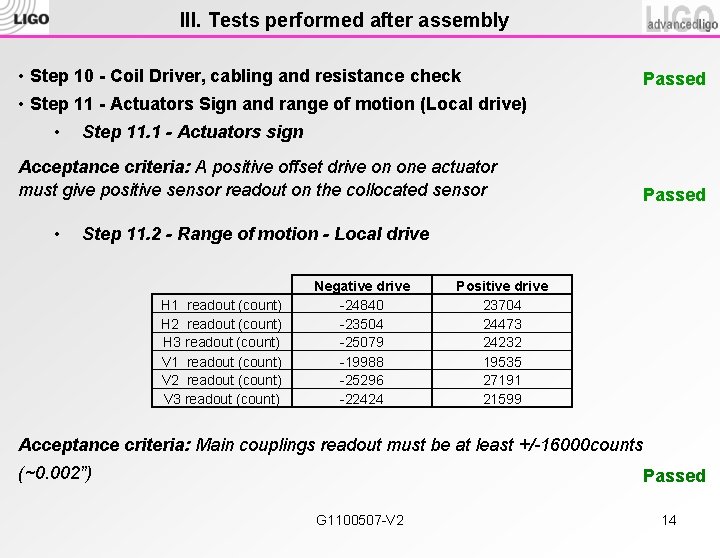
III. Tests performed after assembly • Step 10 - Coil Driver, cabling and resistance check Passed • Step 11 - Actuators Sign and range of motion (Local drive) • Step 11. 1 - Actuators sign Acceptance criteria: A positive offset drive on one actuator must give positive sensor readout on the collocated sensor • Passed Step 11. 2 - Range of motion - Local drive H 1 readout (count) H 2 readout (count) H 3 readout (count) V 1 readout (count) V 2 readout (count) V 3 readout (count) Negative drive -24840 -23504 -25079 -19988 -25296 -22424 Positive drive 23704 24473 24232 19535 27191 21599 Acceptance criteria: Main couplings readout must be at least +/-16000 counts (~0. 002”) Passed G 1100507 -V 2 14

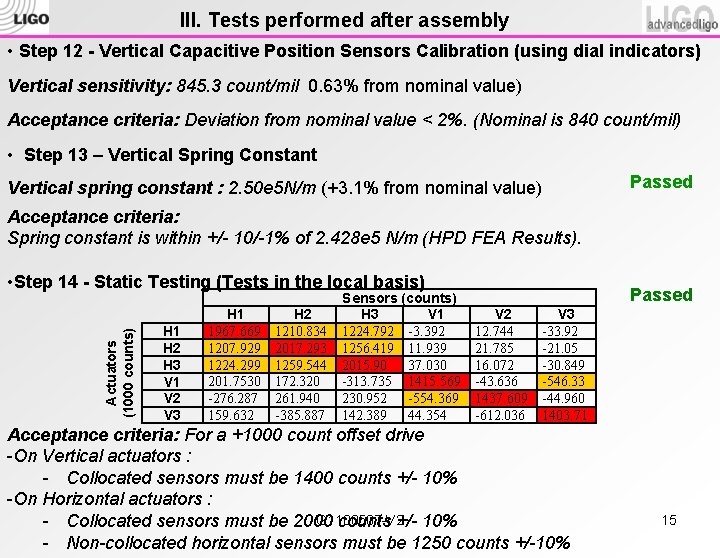
III. Tests performed after assembly • Step 12 - Vertical Capacitive Position Sensors Calibration (using dial indicators) Vertical sensitivity: 845. 3 count/mil 0. 63% from nominal value) Acceptance criteria: Deviation from nominal value < 2%. (Nominal is 840 count/mil) • Step 13 – Vertical Spring Constant Passed Vertical spring constant : 2. 50 e 5 N/m (+3. 1% from nominal value) Acceptance criteria: Spring constant is within +/- 10/-1% of 2. 428 e 5 N/m (HPD FEA Results). Actuators (1000 counts) • Step 14 - Static Testing (Tests in the local basis) H 1 H 2 H 3 V 1 V 2 V 3 H 1 1967. 669 1207. 929 1224. 299 201. 7530 -276. 287 159. 632 H 2 1210. 834 2017. 293 1259. 544 172. 320 261. 940 -385. 887 Sensors (counts) H 3 V 1 1224. 792 -3. 392 1256. 419 11. 939 2015. 90 37. 030 -313. 735 1415. 569 230. 952 -554. 369 142. 389 44. 354 Passed V 2 12. 744 21. 785 16. 072 -43. 636 1437. 609 -612. 036 V 3 -33. 92 -21. 05 -30. 849 -546. 33 -44. 960 1403. 71 Acceptance criteria: For a +1000 count offset drive -On Vertical actuators : - Collocated sensors must be 1400 counts +/- 10% -On Horizontal actuators : G 1100507 -V 2 - Collocated sensors must be 2000 counts +/- 10% - Non-collocated horizontal sensors must be 1250 counts +/-10% 15

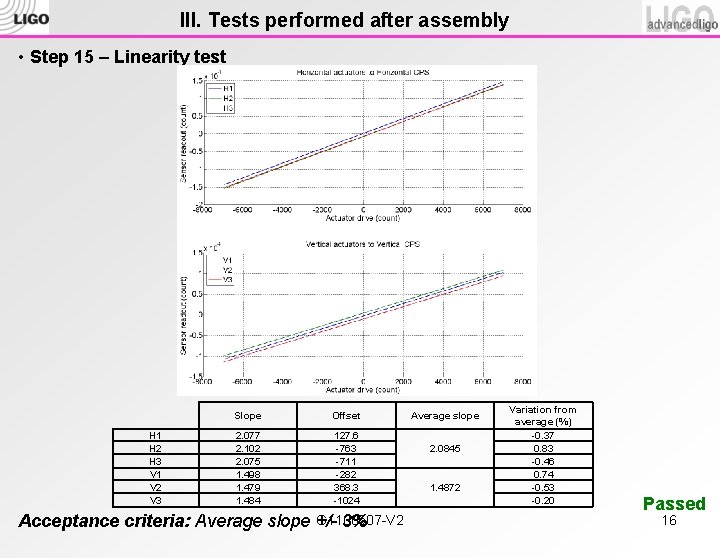
III. Tests performed after assembly • Step 15 – Linearity test H 1 H 2 H 3 V 1 V 2 V 3 Slope Offset 2. 077 2. 102 2. 075 1. 498 1. 479 1. 484 127. 6 -763 -711 -282 368. 3 -1024 G 1100507 -V 2 Acceptance criteria: Average slope +/3% Average slope 2. 0845 1. 4872 Variation from average (%) -0. 37 0. 83 -0. 46 0. 74 -0. 53 -0. 20 Passed 16

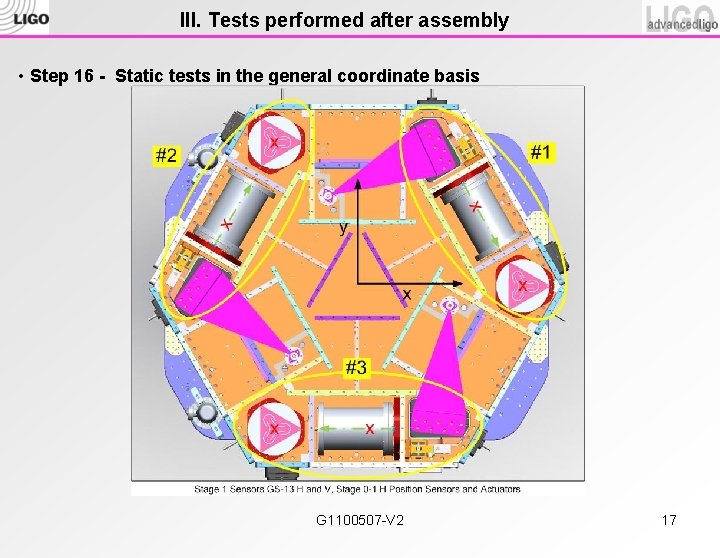
III. Tests performed after assembly • Step 16 - Static tests in the general coordinate basis G 1100507 -V 2 17

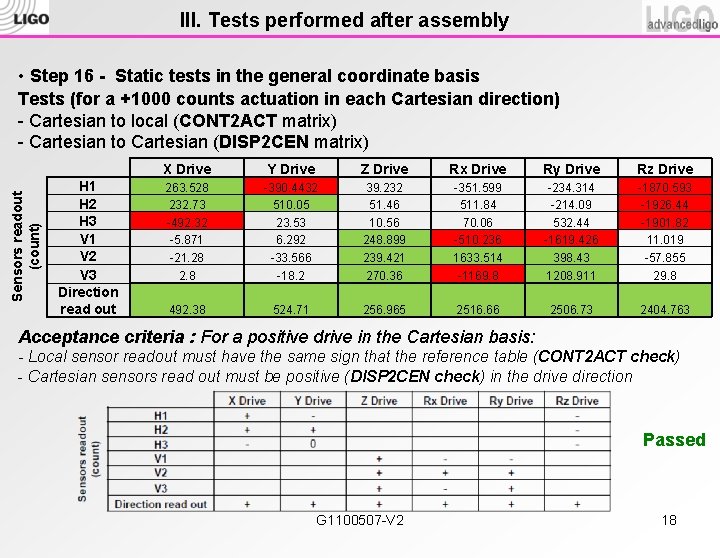
III. Tests performed after assembly Sensors readout (count) • Step 16 - Static tests in the general coordinate basis Tests (for a +1000 counts actuation in each Cartesian direction) - Cartesian to local (CONT 2 ACT matrix) - Cartesian to Cartesian (DISP 2 CEN matrix) H 1 H 2 H 3 V 1 V 2 V 3 Direction read out X Drive Y Drive Z Drive Rx Drive Ry Drive Rz Drive 263. 528 232. 73 -492. 32 -5. 871 -21. 28 -390. 4432 510. 05 23. 53 6. 292 -33. 566 39. 232 51. 46 10. 56 248. 899 239. 421 -351. 599 511. 84 70. 06 -510. 236 1633. 514 -234. 314 -214. 09 532. 44 -1619. 426 398. 43 -1870. 593 -1926. 44 -1901. 82 11. 019 -57. 855 2. 8 -18. 2 270. 36 -1169. 8 1208. 911 29. 8 492. 38 524. 71 256. 965 2516. 66 2506. 73 2404. 763 Acceptance criteria : For a positive drive in the Cartesian basis: - Local sensor readout must have the same sign that the reference table (CONT 2 ACT check) - Cartesian sensors read out must be positive (DISP 2 CEN check) in the drive direction Passed G 1100507 -V 2 18

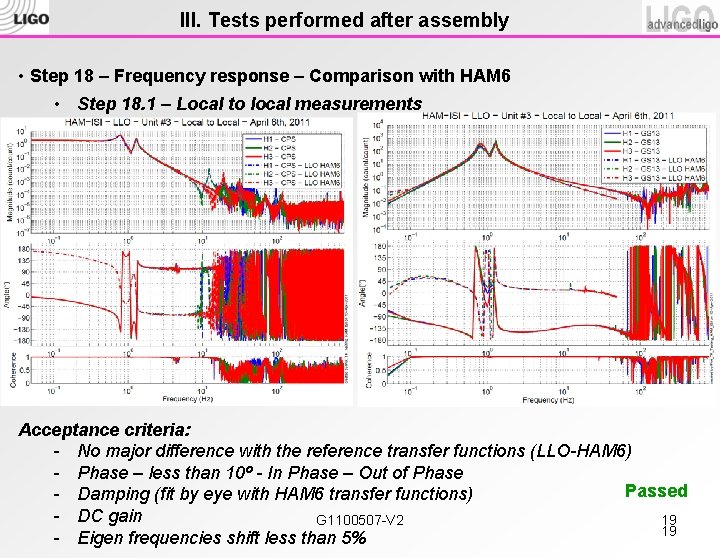
III. Tests performed after assembly • Step 18 – Frequency response – Comparison with HAM 6 • Step 18. 1 – Local to local measurements Horizontal sensors Acceptance criteria: - No major difference with the reference transfer functions (LLO-HAM 6) - Phase – less than 10º - In Phase – Out of Phase Passed - Damping (fit by eye with HAM 6 transfer functions) - DC gain G 1100507 -V 2 19 19 - Eigen frequencies shift less than 5%

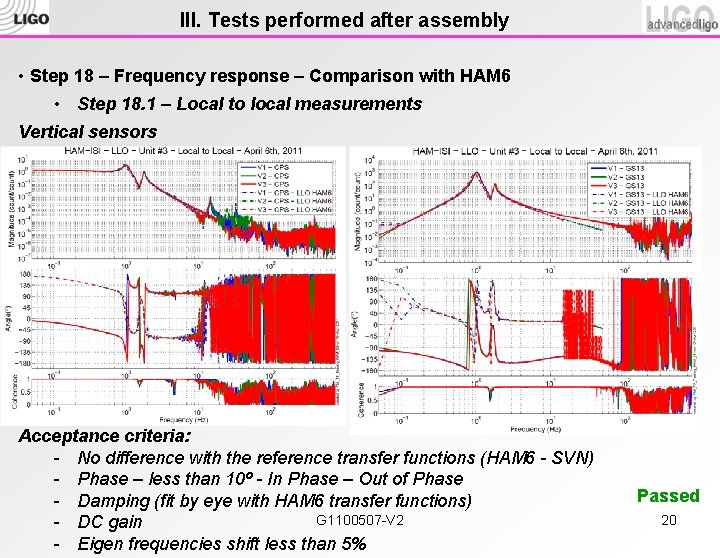
III. Tests performed after assembly • Step 18 – Frequency response – Comparison with HAM 6 • Step 18. 1 – Local to local measurements Vertical sensors Acceptance criteria: - No difference with the reference transfer functions (HAM 6 - SVN) - Phase – less than 10º - In Phase – Out of Phase - Damping (fit by eye with HAM 6 transfer functions) G 1100507 -V 2 - DC gain - Eigen frequencies shift less than 5% Passed 20

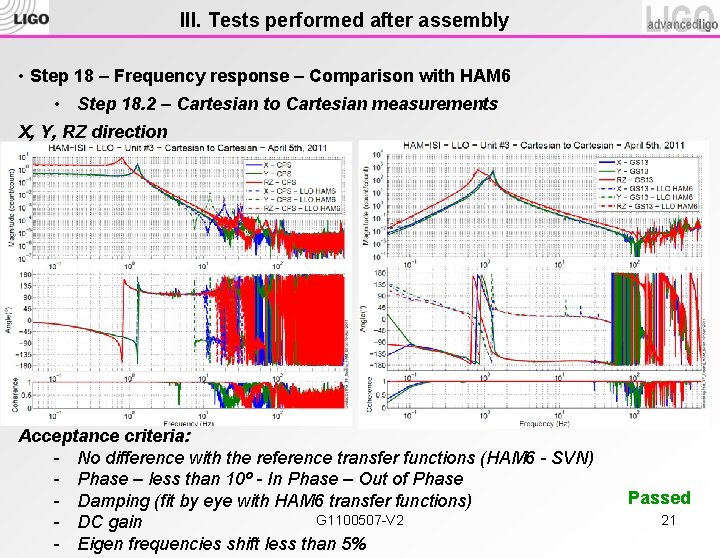
III. Tests performed after assembly • Step 18 – Frequency response – Comparison with HAM 6 • Step 18. 2 – Cartesian to Cartesian measurements X, Y, RZ direction Acceptance criteria: - No difference with the reference transfer functions (HAM 6 - SVN) - Phase – less than 10º - In Phase – Out of Phase - Damping (fit by eye with HAM 6 transfer functions) G 1100507 -V 2 - DC gain - Eigen frequencies shift less than 5% Passed 21

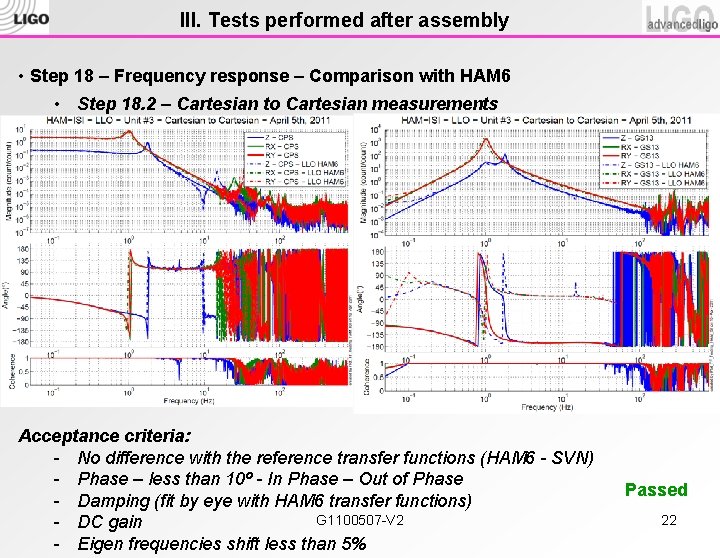
III. Tests performed after assembly • Step 18 – Frequency response – Comparison with HAM 6 • Step 18. 2 – Cartesian to Cartesian measurements Z, RX, RY direction Acceptance criteria: - No difference with the reference transfer functions (HAM 6 - SVN) - Phase – less than 10º - In Phase – Out of Phase - Damping (fit by eye with HAM 6 transfer functions) G 1100507 -V 2 - DC gain - Eigen frequencies shift less than 5% Passed 22

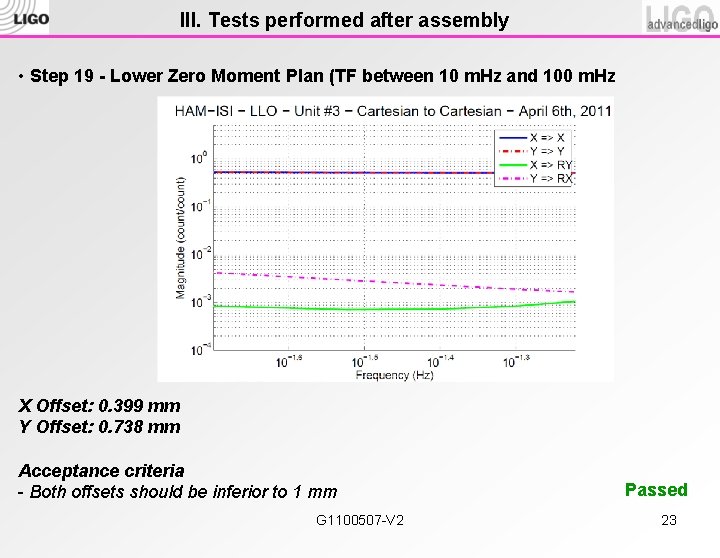
III. Tests performed after assembly • Step 19 - Lower Zero Moment Plan (TF between 10 m. Hz and 100 m. Hz X Offset: 0. 399 mm Y Offset: 0. 738 mm Acceptance criteria - Both offsets should be inferior to 1 mm G 1100507 -V 2 Passed 23

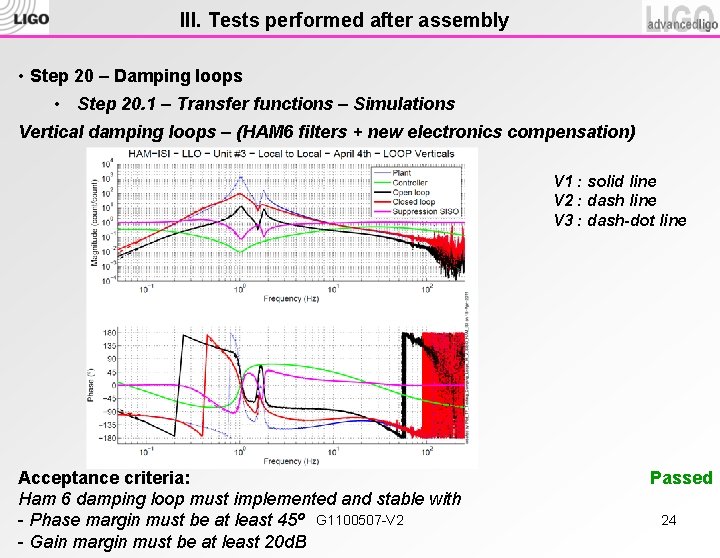
III. Tests performed after assembly • Step 20 – Damping loops • Step 20. 1 – Transfer functions – Simulations Vertical damping loops – (HAM 6 filters + new electronics compensation) V 1 : solid line V 2 : dash line V 3 : dash-dot line Acceptance criteria: Ham 6 damping loop must implemented and stable with - Phase margin must be at least 45º G 1100507 -V 2 - Gain margin must be at least 20 d. B Passed 24

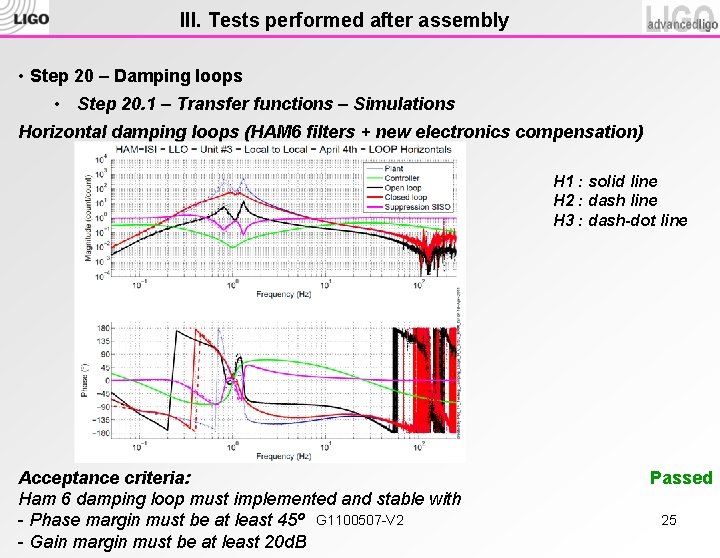
III. Tests performed after assembly • Step 20 – Damping loops • Step 20. 1 – Transfer functions – Simulations Horizontal damping loops (HAM 6 filters + new electronics compensation) H 1 : solid line H 2 : dash line H 3 : dash-dot line Acceptance criteria: Ham 6 damping loop must implemented and stable with - Phase margin must be at least 45º G 1100507 -V 2 - Gain margin must be at least 20 d. B Passed 25

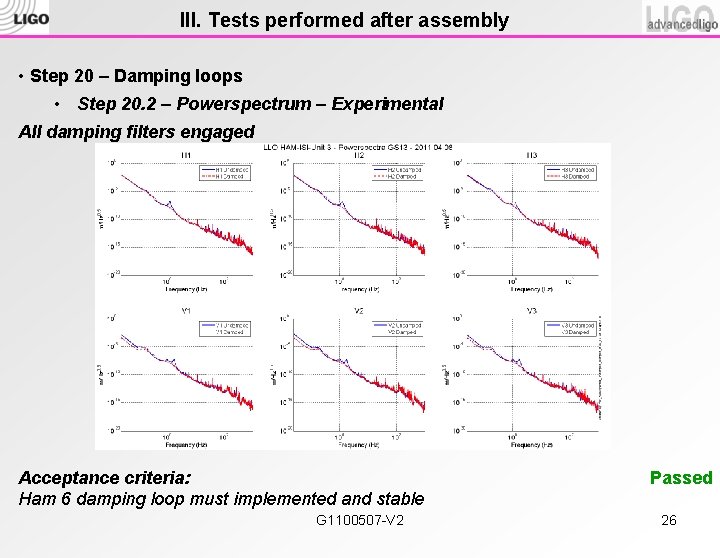
III. Tests performed after assembly • Step 20 – Damping loops • Step 20. 2 – Powerspectrum – Experimental All damping filters engaged Acceptance criteria: Ham 6 damping loop must implemented and stable G 1100507 -V 2 Passed 26

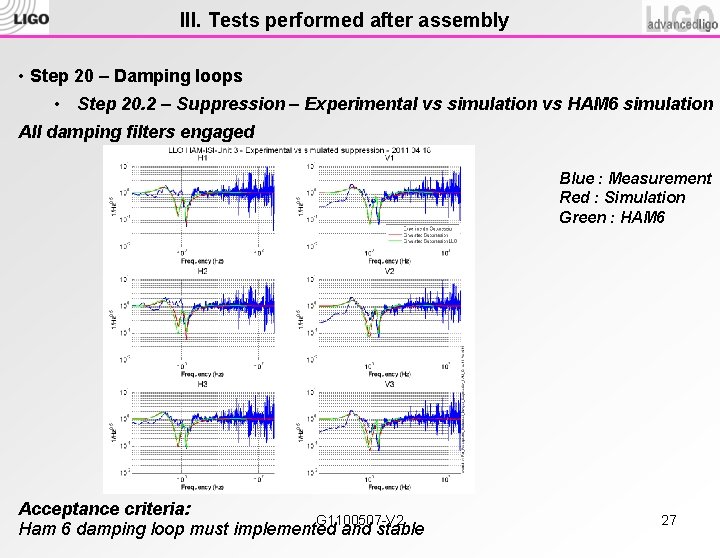
III. Tests performed after assembly • Step 20 – Damping loops • Step 20. 2 – Suppression – Experimental vs simulation vs HAM 6 simulation All damping filters engaged Blue : Measurement Red : Simulation Green : HAM 6 Acceptance criteria: G 1100507 -V 2 Ham 6 damping loop must implemented and stable 27

IV. Summary • Missing information • Some assembly measurements were done but not recorded at the time • Actuator gaps • Tests results • Passed without major difficulties • Failed tests • Actuator gaps (1 measurement slightly over) • Sensor gaps G 1100507 -V 2 28

Questions?

Back Up Slides

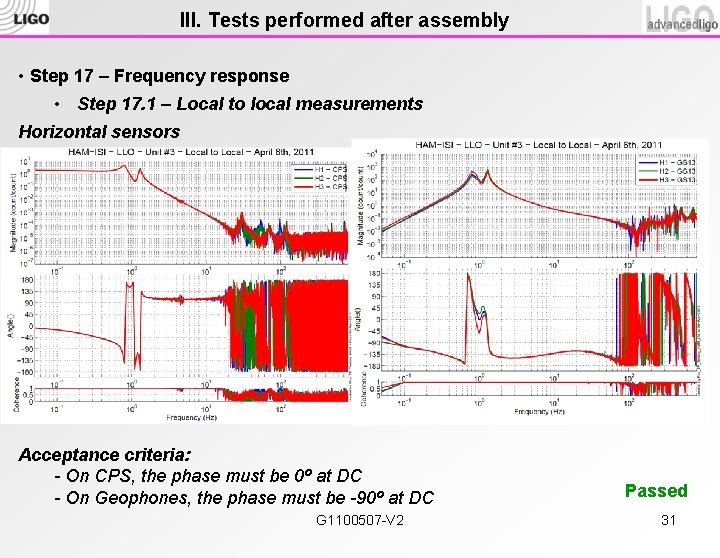
III. Tests performed after assembly • Step 17 – Frequency response • Step 17. 1 – Local to local measurements Horizontal sensors Acceptance criteria: - On CPS, the phase must be 0º at DC - On Geophones, the phase must be -90º at DC G 1100507 -V 2 Passed 31

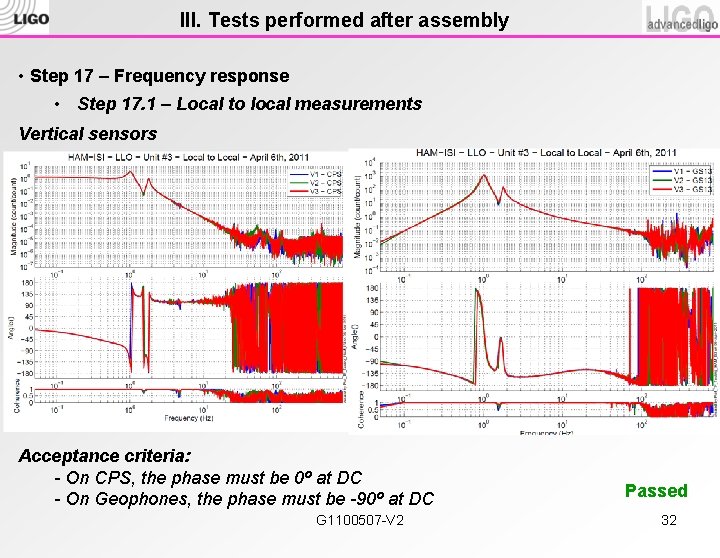
III. Tests performed after assembly • Step 17 – Frequency response • Step 17. 1 – Local to local measurements Vertical sensors Acceptance criteria: - On CPS, the phase must be 0º at DC - On Geophones, the phase must be -90º at DC G 1100507 -V 2 Passed 32

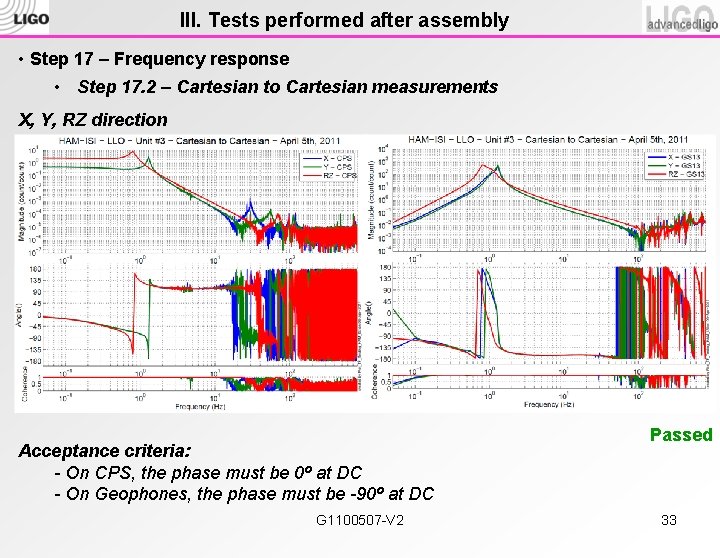
III. Tests performed after assembly • Step 17 – Frequency response • Step 17. 2 – Cartesian to Cartesian measurements X, Y, RZ direction Acceptance criteria: - On CPS, the phase must be 0º at DC - On Geophones, the phase must be -90º at DC G 1100507 -V 2 Passed 33

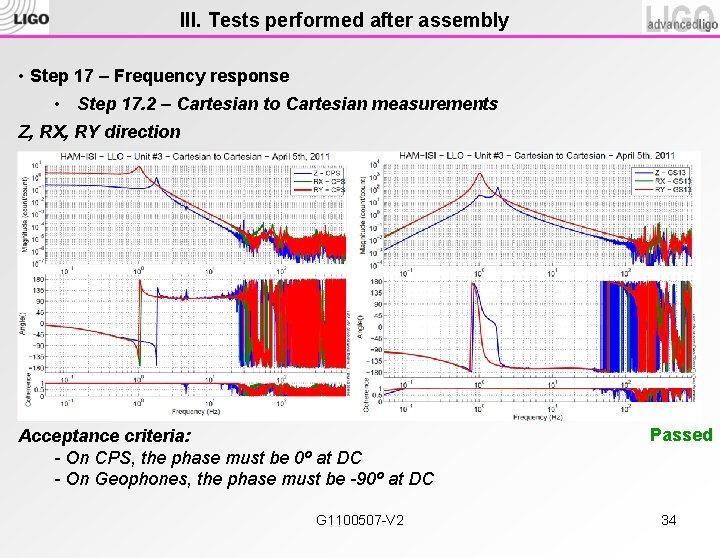
III. Tests performed after assembly • Step 17 – Frequency response • Step 17. 2 – Cartesian to Cartesian measurements Z, RX, RY direction Acceptance criteria: - On CPS, the phase must be 0º at DC - On Geophones, the phase must be -90º at DC G 1100507 -V 2 Passed 34