Inspection and Testing Peel Test Shown in the


![Setup Procedures and Suggested Schedules • • • [Step 1] Insert electrode of • Setup Procedures and Suggested Schedules • • • [Step 1] Insert electrode of •](https://slidetodoc.com/presentation_image_h/0a32e26c02eaeb78a89123abf8556387/image-13.jpg)

- Slides: 19

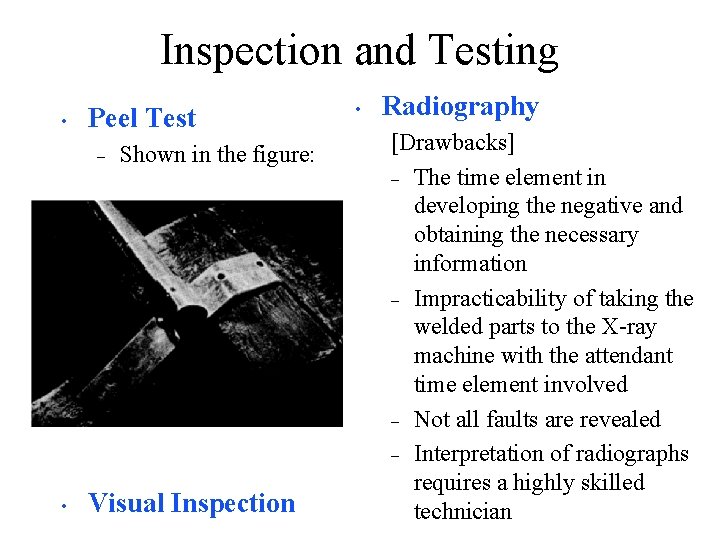
Inspection and Testing • Peel Test – • Shown in the figure: Visual Inspection • Radiography [Drawbacks] – The time element in developing the negative and obtaining the necessary information – Impracticability of taking the welded parts to the X-ray machine with the attendant time element involved – Not all faults are revealed – Interpretation of radiographs requires a highly skilled technician

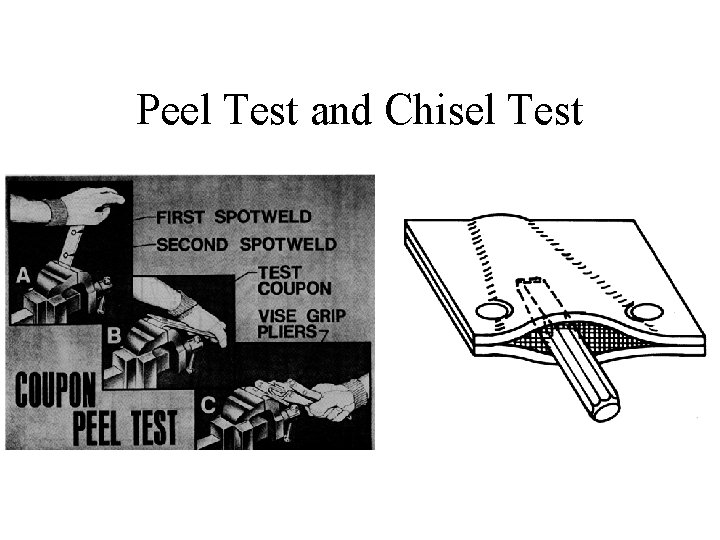
Peel Test and Chisel Test

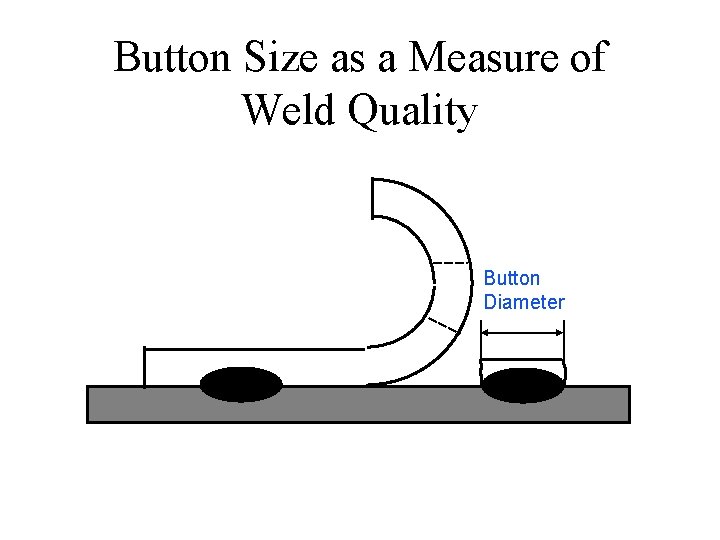
Button Size as a Measure of Weld Quality Button Diameter

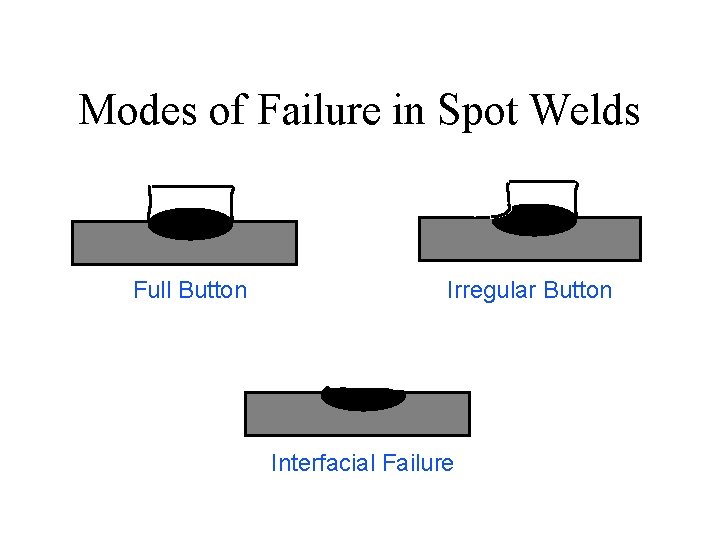
Modes of Failure in Spot Welds Full Button Irregular Button Interfacial Failure

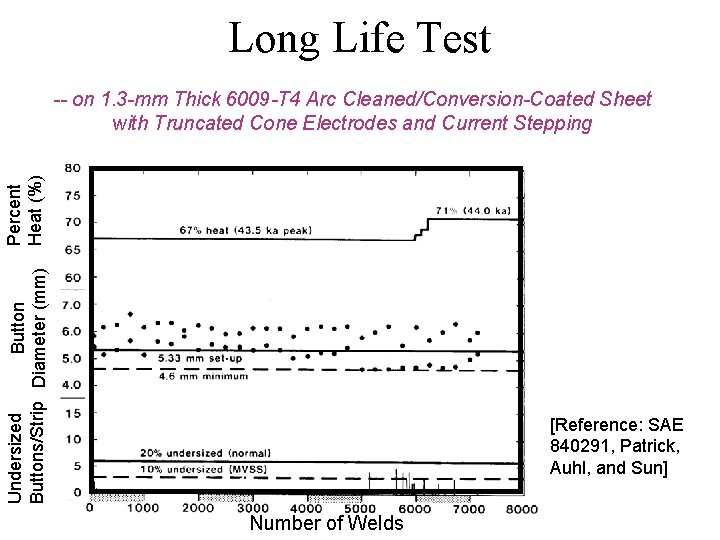
Long Life Test Undersized Buttons/Strip Diameter (mm) Percent Heat (%) -- on 1. 3 -mm Thick 6009 -T 4 Arc Cleaned/Conversion-Coated Sheet with Truncated Cone Electrodes and Current Stepping [Reference: SAE 840291, Patrick, Auhl, and Sun] Number of Welds

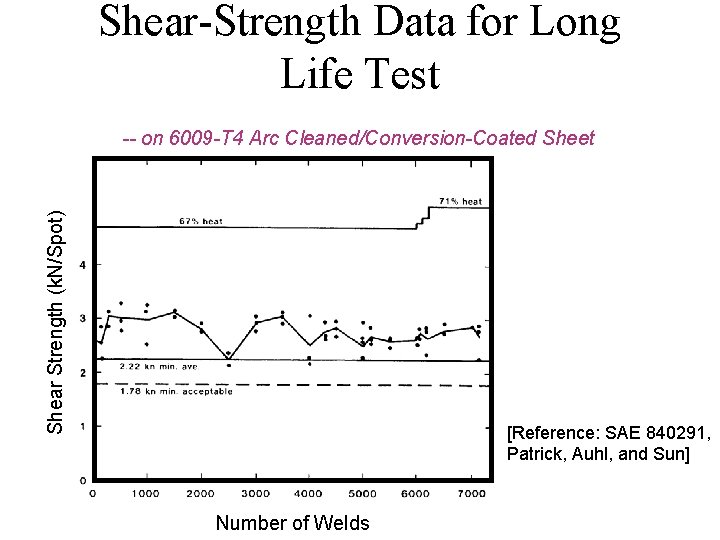
Shear-Strength Data for Long Life Test Shear Strength (k. N/Spot) -- on 6009 -T 4 Arc Cleaned/Conversion-Coated Sheet [Reference: SAE 840291, Patrick, Auhl, and Sun] Number of Welds

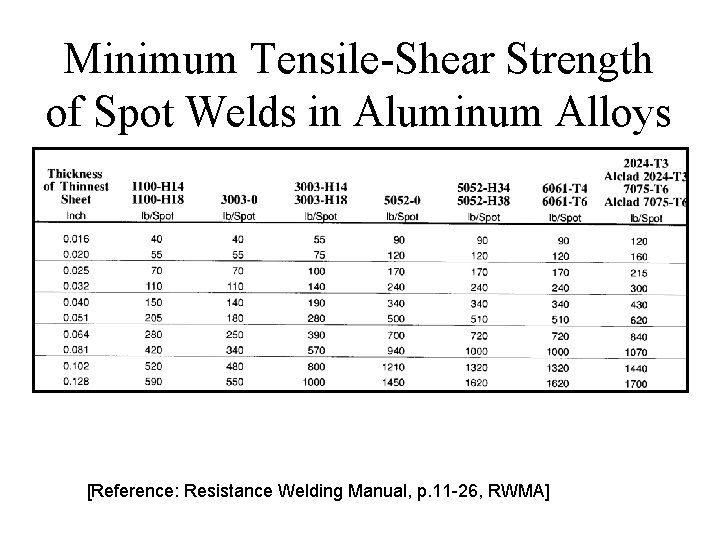
Minimum Tensile-Shear Strength of Spot Welds in Aluminum Alloys [Reference: Resistance Welding Manual, p. 11 -26, RWMA]

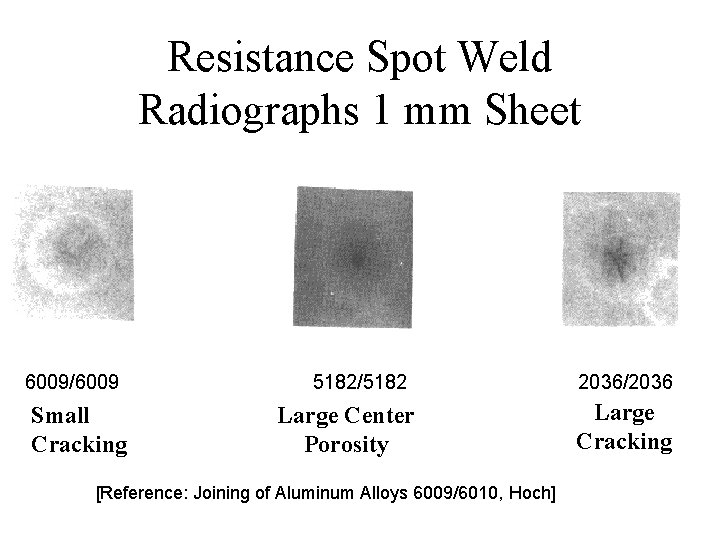
Resistance Spot Weld Radiographs 1 mm Sheet 6009/6009 Small Cracking 5182/5182 Large Center Porosity [Reference: Joining of Aluminum Alloys 6009/6010, Hoch] 2036/2036 Large Cracking

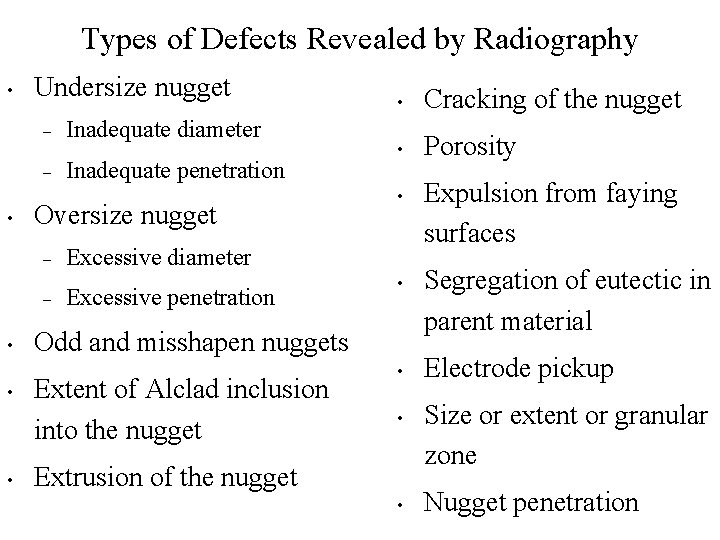
Types of Defects Revealed by Radiography • • Undersize nugget – Inadequate diameter – Inadequate penetration Oversize nugget – – • • Cracking of the nugget • Porosity • Excessive diameter Excessive penetration • Odd and misshapen nuggets Extent of Alclad inclusion into the nugget • • Extrusion of the nugget • Expulsion from faying surfaces Segregation of eutectic in parent material Electrode pickup Size or extent or granular zone Nugget penetration


![Setup Procedures and Suggested Schedules Step 1 Insert electrode of Setup Procedures and Suggested Schedules • • • [Step 1] Insert electrode of •](https://slidetodoc.com/presentation_image_h/0a32e26c02eaeb78a89123abf8556387/image-13.jpg)
Setup Procedures and Suggested Schedules • • • [Step 1] Insert electrode of • proper size and tip contour for the gauge combination. Align electrodes. [Step 2] Set pressure gage for suggested welding force, and check with an electrode force gauge. • [Step 3] Adjust the control to provide the approximate suggested weld and “postheat time”. [Step 4] The welding currents shown are approximate and intended to be a guide. The magnitude of the welding current is usually controlled by a heat dial or phase-shift control. [Step 5] Check the machine for consistency of operation by making and testing twenty single spot tension-shear specimens and five macroscopic examination specimens.

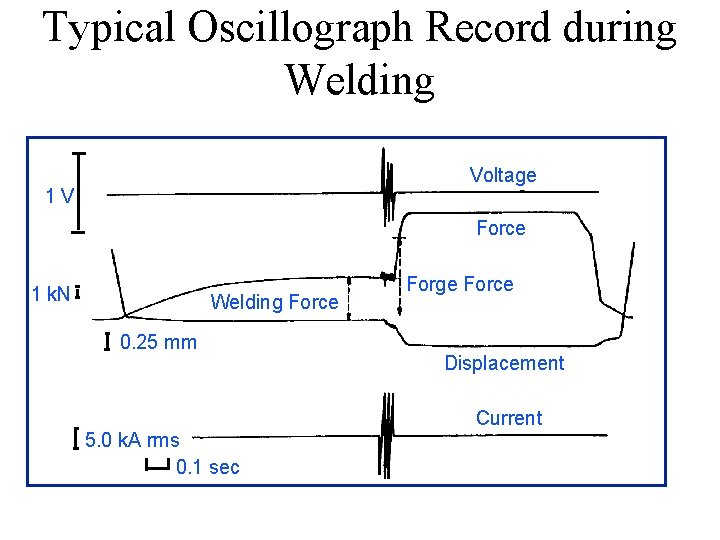
Typical Oscillograph Record during Welding Voltage 1 V Force 1 k. N Welding Force 0. 25 mm 5. 0 k. A rms 0. 1 sec Forge Force Displacement Current

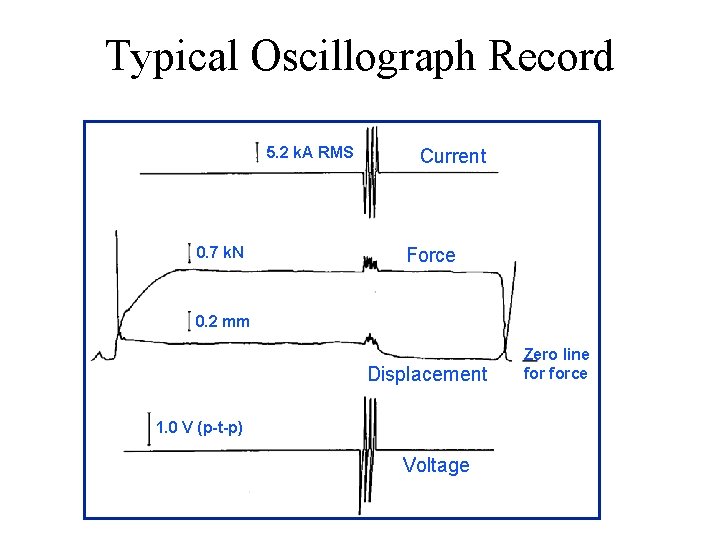
Typical Oscillograph Record 5. 2 k. A RMS 0. 7 k. N Current Force 0. 2 mm Displacement 1. 0 V (p-t-p) Voltage Zero line force

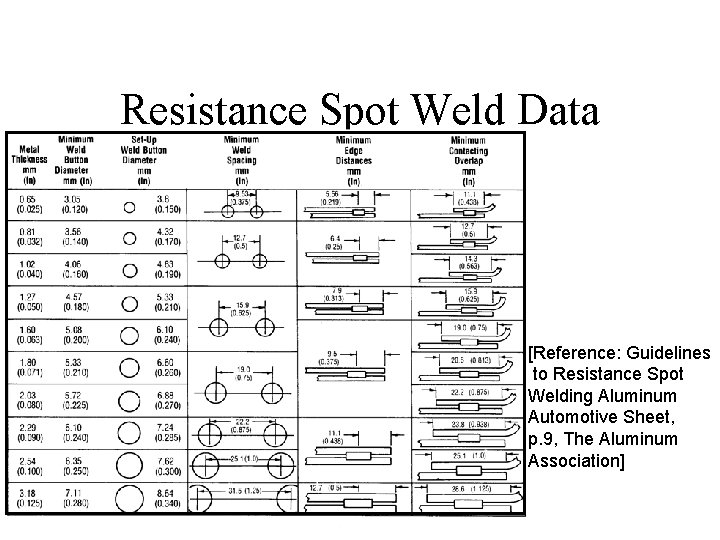
Resistance Spot Weld Data [Reference: Guidelines to Resistance Spot Welding Aluminum Automotive Sheet, p. 9, The Aluminum Association]


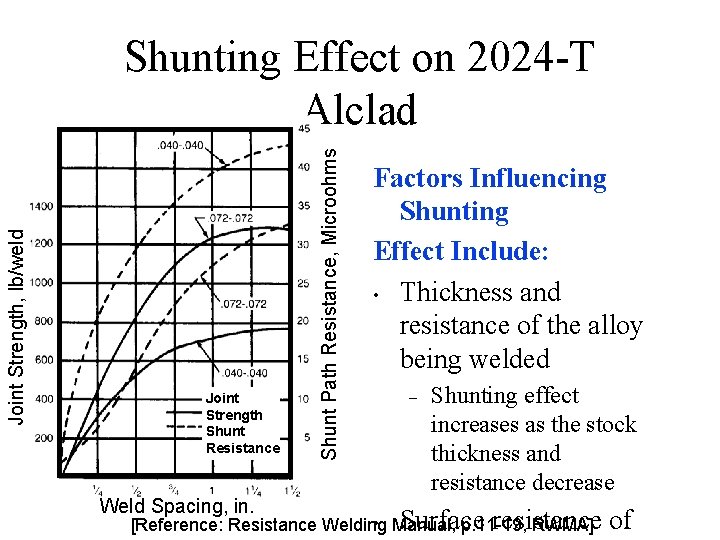
Joint Strength Shunt Resistance Weld Spacing, in. Shunt Path Resistance, Microohms Joint Strength, lb/weld Shunting Effect on 2024 -T Alclad Factors Influencing Shunting Effect Include: • Thickness and resistance of the alloy being welded – Shunting effect increases as the stock thickness and resistance decrease • Manual, Surface resistance [Reference: Resistance Welding p. 11 -19, RWMA] of

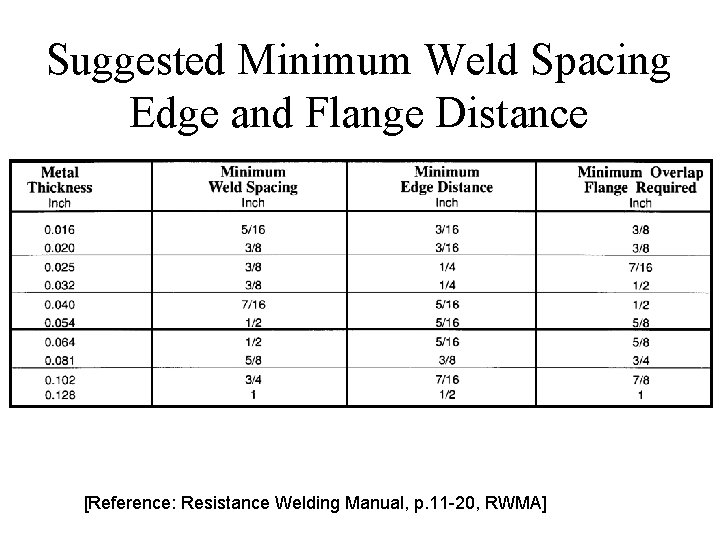
Suggested Minimum Weld Spacing Edge and Flange Distance [Reference: Resistance Welding Manual, p. 11 -20, RWMA]