Tomo Fix Small Surgical Guide TM Openwedge high


")

- Slides: 14
Tomo. Fix Small Surgical Guide TM Open-wedge high tibial osteotomy. 1
Product Overview Tomo. Fix™ Small은 AO/ASIF Knee Expert Group과 AO ASWG (Asian Surgeon Working Group)에 의해 Asian을 위해 새롭게 개발된 Medial High Tibial Osteotomy 용 Locking Plate입 니다. Plate와 Screw가 Locking이 되면서 Angular Stability를 만들어 뛰어난 Stability를 제공하므로, Open-wedge HTO에 강한 Fixation을 주므로 Post-OP 후 Early Mobilization이 가능한 장점이 있습니다. 2
Feature & Benefit Anatomical Design - Asian의 Tibia CT스캔을 바탕으로 새롭게 개발된 Implant 디자인에 의해 Plate와 Bone와 의 Fitting이 뛰어나, Soft Tissue의 침습을 최소화 한 디자인 입니다. Preservation of Blood Supply – Tomo. Fix™ Small은 Locking Mechanism을 적용하여, Plate와 Bone을 밀착시키지 않아도 됩니다. – LCP Spacer를 사용하여 Plate와 Bone사이 공간을 확보하여 Periosteneal의 Blood Supply 를 보존 할 수 있습니다. Angular Stability – Plate와 Locking Screw가 Angular Stability제공하여 체중 부하로 인한 Anatomical Rotation을 방지하고 Screw의 Loosening을 막아 줍니다. 3
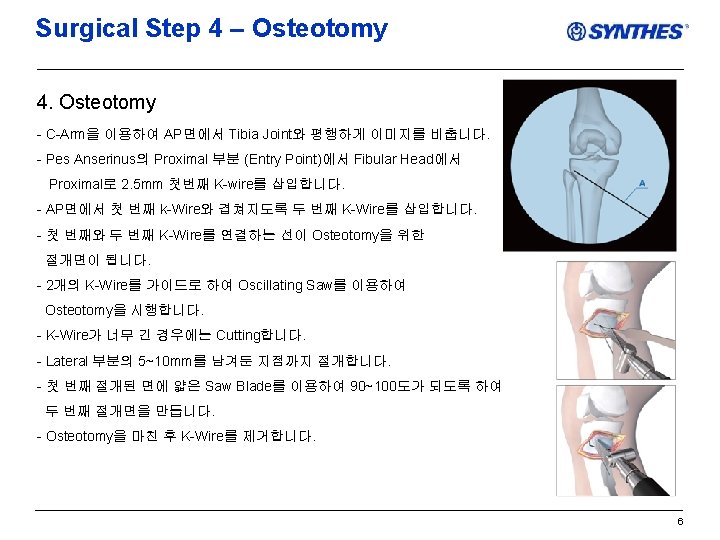
Surgical Step 4 – Osteotomy 7
Surgical Step 7 – Plate Fixation 7. Plate Fixation - Tom. Fix Small용 Guiding Block을 Plate에 끼운 후 Drill Guide를 Plate에 연결합니다. - Pes Anserinus의 압박을 피하기 위해 Hole D 또는 Hole 3, 4에 LCP Spacer를 삽입합니다. - Knee를 Full Extension하여 Pes Anserinus 위에 Plate을 슬라이딩하여 삽입합니다. - Hole A~D는 절개면보다 Proximal에 위치합니다. - Plate의 Proximal Hole의 Tibia Medial 부위의 중앙으로 오도록 위치합니다. - Plate의 Proximal 부위가 Tibia Anterior로 돌출 되지 않도록 주의 합니다. - Hole B에 2. 0 mm K-Wire를 삽입하여 관절면과 평행이 되는지 확인합니다. (K-Wire의 삽입 방향이 Screw의 삽입 방향이 됩니다. ) - Hole D의 Screw가 Proximal을 향하도록 Plate의 위치를 조절합니다. 11
Surgical Step 7 – Plate Fixation 7. Plate Fixation – Proximal Screw Fixation - Tomo. Fix Small의 Proximal 부분의 3개의 Hole에 5. 0 Locking Screw를 사용하여 고정합니다. - 5. 0 Locking Screw는 반드시Torque Limit을 사용하여 고정합니다. - 충분한 Stability를 얻기 위해 가능한 긴 Screw를 사용합니다. - Screw 삽입시 Plate가 Rotation이 되지 않도록 Proximal 부분을 단단히 고정합니다. 12
Surgical Step 7 – Plate Fixation 7. Plate Fixation – Lag Screw Fixation (Option) - Lateral Cortex에 Fracture가 있는 경우, Distal 부위 맨 윗부분에 있는 Combi Hole 중 DC Hole에 4. 5 Cortex Screw를 삽입하여 서서히 Compression을 시켜 줍니다. 13
Surgical Step 7 – Plate Fixation 7. Plate Fixation – Distal Screw Fixation - Distal 부분의 Screw를 삽입하기 해서 최소한의 피부를 절개합니다. - 5. 0 Locking Screw를 3 Distal의 4개 Hole에 삽입합니다. - Pes anserinus에 압박을 줄여 주기 위해 Temporary로 LCP Spacer를 삽입한 Hole과 Compression을 주기 위해 4. 5 Cortex Screw를 삽입한 Hole도 5. 0 Locking Screw로 교체하여 삽입합니다. - C-Arm을 통해 AP, ML 영상을 확인하여 Plate와 screw가 적절하게 위치되었는지 확인합니다. 14