Splinting and Use of Crutches Emergency Emotional Care


- Slides: 10
Splinting and Use of Crutches
Emergency Emotional Care • Emergency care relative to emotional reactions to trauma must be provided – Accept rights to personal feelings – Show empathy, not pity – Accept injured person’s limitations as real – Accept own limitations as provider of first aid – Be calm
• Emergency Splinting – Should always splint a suspected fracture before moving – Use proper immobilization to decrease risk of • Damage • Hemorrhage • Potential for death (if handled improperly) – Splint where athlete lies and avoid moving them – Splint one joint above and one below fracture
– Rapid form immobilizer • Styrofoam chips sealed in airtight sleeve • Moldable with Velcro straps to secure • Air can be removed to make splint rigid – Air splint • Clear plastic splint inflated with air around affected part • Can be used for splinting but requires practice • Do not use if it will alter fracture deformity • Provides moderate pressure and can be x-rayed through – Half-ring splint • Used for femoral fractures • Requires extensive practice • Open fractures must be dressed appropriately to avoid contamination
– Lower Limb Splinting • Foot and ankle require splinting of foot and knee • Knee, thigh, or hip require splinting of whole leg and one side of trunk – Upper Limb Splinting • Shoulder splinting is difficult – Use sling and swathe with upper limb bound to body • Upper arm and elbow – Splint with arm straight to lessen bone override • Lower arm and wrist – splint in position of forearm flexion and support with sling • Hand finger • splint with tongue depressors, roller gauze and/or aluminum splints
Moving and Transporting Athletes Injured • Must be executed with techniques that will not result in additional injury • No excuse for poor handling • Planning is necessary and practice is essential • Additional equipment may be required
Proper Fit and Use of Crutches or Canes • When lower extremity ambulation is contraindicated • Faulty mechanics or improper fitting can result in additional injury or falls • Fitting athlete – Athlete should stand with good posture, in flat soled shoes – Crutches should be placed • 6” from outer margin of shoe • 2” in front of shoe – Crutch base should fall 1” below anterior fold of axilla (2 - 3 fingers) – Hand brace should be positioned to place elbow at 30 degrees of flexion – Cane measurement should be taken from height of greater trochanter
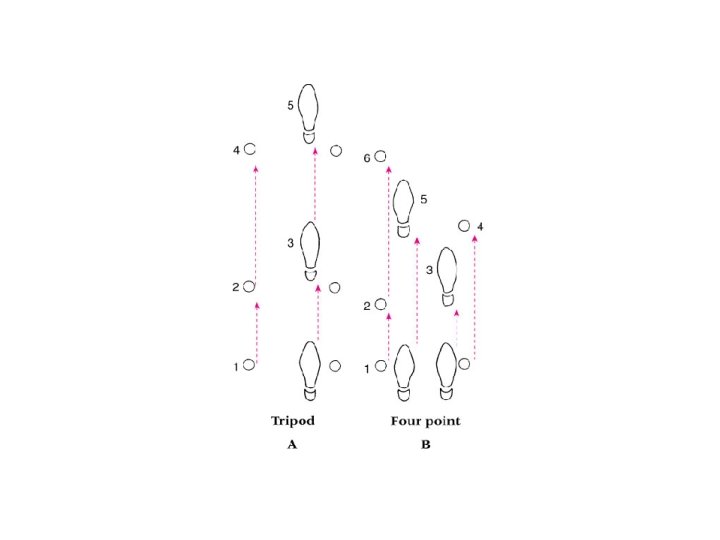
• Walking with Cane or Crutch – Corresponds to walking – Tripod method • Swing through without injured limb making contact with ground – Four- point crutch gait • Foot and crutch on same side move forward simultaneously with weight bearing
– Cane Tripod technique • Used on level surface • Modified with stair climbing – Unaffected support leg moves up one step (good goes up first) – Body weight is supported on crutch – Affected leg is pulled up to step • Reversed when descending stairs – Unaffected or good leg is used to lower – Affected leg and crutch (bad goes first) – Crutch walking follows a progression • • Non-weight bearing (NWB) Touch down weight bearing(TDWB) Partial (PWB) Full weight bearing (FWB) – When using cane or one crutch, support should be held on affected side