Splinting Workshop Principles of Proper Splinting Always use


 The U-splint or stirrup splint is used primarily for injuries to")


- Slides: 17
Splinting Workshop
Principles of Proper Splinting ● ● ● Always use cool, clean water. Do not oversaturate the plaster splint. Minimal water is required for fiberglass splints. Make the splint smooth when placing on the patient to avoid bumps and pressure points. Smooth and mold the splint without squeezing. Use the palms of the hands, not the fingers, to mold the splint to fit the contour of the body part. Place padded side against the skin. Extra cotton padding is optimal. Simply roll elastic bandages over an extremity without undue tension. Protect or pad edges. Leave fingertips exposed to check for circulation and sensation. Keep the patient still until the splint has dried and hardened. Post check includes function, arterial pulse, capillary refill, temperature of skin, and sensation (FACTS). Emphasize and demonstrate splint elevation to the patient. Tape over metal clips used to fasten the elastic bandage to keep it in place and avoid ingestion by a child.
Materials ● ● ● Stockinette Padding Pre-formed splint vs plaster rolls Over-wrap Water basin Towels
Materials Material Advantages Disadvantages Plaster ● ● Porous moldable inexpensive nonirritating ● ● ● heavy x-ray plaster trap sink dries in 24 h average durability not waterproof Fiberglass ● ● ● lightweight radiolucent no special prep very strong 3 -4 year shelf life sets in 4 -5 minutes ● ● nonporous not as conforming expensive synthetic padding irritating
Extra padding ● ● ● ● Olecranon Radial styloid Ulnar styloid Upper portion of the inner thigh Patella Fibular head Achilles tendon Medial and lateral malleoli
Long Arm The long arm posterior splint is used to immobilize injuries of the elbow and proximal forearm. It completely eliminates flexion and extension of the elbow, but it does not entirely prevent pronation and supination of the forearm. Therefore, it is not recommended for immobilization of complex or unstable distal forearm fractures unless used in conjunction with a long arm anterior splint. Alternatively, a double “sugar-tong” splint can be applied. Application of a long arm posterior splint. A, The posterior portion of the splint begins on the posterior aspect of the proximal humerus. It runs down the arm to the elbow and then continues along the ulnar aspect of the forearm and hand to the distal metacarpals. The elbow is flexed at a 90° angle, the forearm is in the neutral (thumb-up) position, and the wrist is in a neutral position or slightly extended (10°– 20°). B, Adding an anterior splint. The anterior splint mirrors the posterior splint by running down the anterior aspect of the arm to the antecubital fossa, where it continues along the radial aspect of the forearm and hand to the distal radius. The anterior splint is never used alone, but rather as an adjunct to the long arm posterior splint. It improves immobilization by increasing stability and preventing pronation and supination of the forearm. C, When measuring for a posterior splint, cut out a notch to allow for a smooth bend. Note that padding needs to be applied before splinting.
Double Sugar-Tong Like the long arm posterior splint, the double sugar-tong splint. is used to immobilize injuries of the elbow and forearm. However, because it prevents pronation and supination of the forearm, it is preferable for some fractures of the distal forearm and elbow. An alternative to the long arm posterior splint is a double sugar-tong splint. This splint immobilizes the elbow and prevents pronation and supination of the forearm. The splint consists of two separate pieces of 4 -inch plaster, a forearm splint, and an arm splint. The elbow is flexed at a 90° angle, the forearm is in the neutral (thumbup) position, and the wrist is in a neutral position or slightly extended (10°– 20°). The forearm portion of the splint is applied first. It runs from the metacarpal heads on the dorsum of the hand, along the dorsal surface of the forearm, and around the elbow. It continues along the volar surface of the forearm, stopping at the level of the metacarpophalangeal (MCP) joints. The arm portion of this splint begins on the anterior aspect of the proximal arm. It runs down the arm over the forearm splint, and around the elbow. It then continues up the posterior aspect of the arm, once again going over the forearm splint until it reaches the starting point. The fingers and thumb should remain free to avoid stiffness.
Volar A volar splint can be used for various injuries, including the following: ● ● ● Soft tissue injuries of the wrist and hand Fractures of the second, third, and fourth metacarpals Fractures of the second, third, and fourth phalanges Positioning for rheumatoid arthritis Certain wrist fractures, including a pisiform fracture
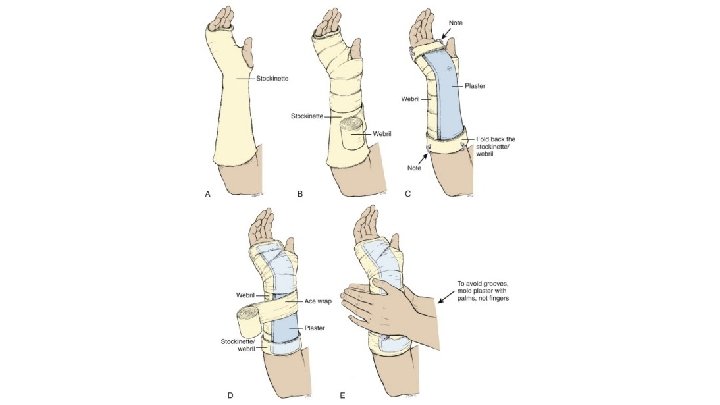
Thumb Spica The thumb spica splint is used to immobilize injuries to the scaphoid, lunate, and thumb and fractures of the first metacarpal. It is also used in the treatment of de Quervain tenosynovitis. Traditionally, a thumb spica splint or cast was thought to be a requirement to properly immobilize scaphoid fractures; however, there is no totally agreed-upon standard. Clay and coworkers stated that the optimal method of casting scaphoid fractures has not been definitively established. They were unable to prove a difference in patient comfort, recovery of function, or incidence of nonunion between a Colles cast and a traditional scaphoid cast that included the thumb. A and B, Application of a thumb spica splint. The splint extends from just distal to the interphalangeal joint of the thumb to the mid-forearm. The forearm is placed in the neutral position with the wrist extended 25° and the thumb in the wineglass position (see Fig. 50– 12). Inset, A small (1 - to 2 -cm) perpendicular cut is made 1 cm distal to the first MCP joint on each edge of the plaster to allow molding of the splint around the thumb without creating a buckle in the plaster. B, For skier's/gamekeeper thumb, a figure-of-eight thumb splint is ideal. C, Cut this length of material (should be ∼ 14” – 16”). Center the splint on the web space, crossing over the dorsal aspect of the thumb in a figure-of-eight fashion and overlapping the cut edges around the styloid process of the ulna. D, Wrap with a small elastic bandage, overlapping in a figure-of-eight formation. Mold and position after placement.
Ulnar Gutter The ulnar gutter splint is used to immobilize fractures and serious soft tissue injuries of the little and ring fingers and fractures of the neck, shaft, and base of the fourth and fifth metacarpals. Application of an ulnar gutter splint. The ulnar gutter splint incorporates both the little and the ring fingers. Webril or gauze should be placed between the digits to prevent maceration of the skin. The splint runs along the ulnar aspect of the forearm from just beyond the distal interphalangeal joint of the little finger to the midforearm. The forearm is in the neutral position with the wrist in slight extension (10°– 20°), the MCP joint in 50° of flexion, and the proximal and distal interphalangeal joints in slight flexion (10°– 15°). When immobilizing a metacarpal neck fracture, the MCP joint should be flexed to 90°.
Posterior Leg The posterior ankle splint is one of the most common splints applied in the ED. As noted in the introductory section, the entire concept of splinting an acutely sprained ankle has been questioned, with no firm evidence to support a better outcome of any type of splinting or casting versus functional management (early mobilization with an external support). Nonetheless, an acutely sprained ankle is painful, and if nothing else, splinting for a few days will alleviate pain. Proper application of a posterior ankle splint. This splint extends from the plantar surface of the great toe (or metatarsal heads) along the posterior surface of the foreleg to the level of the fibular head. The ankle should be at a 90° angle.
U-Splint (Stirrup Splint) The U-splint or stirrup splint is used primarily for injuries to the ankle. It functions like the posterior splint, and either of the two provides satisfactory ankle immobilization. In one study that compared these splints in normal volunteers, the U-splint allowed less plantar flexion and broke less often with plantar flexion than the posterior splint. Also, because it actually covers the malleoli, the U-splint may protect the medial and lateral ligamentous area from further injury better than the posterior splint. The U-splint (also called sugar-tong or stirrup splint) is also used primarily for injuries to the ankle. The splint passes under the plantar surface of the foot, extending up the medial and lateral sides of the foreleg to just below the level of the fibular head. The ankle should be at a 90° angle. For immobilization of the knee, the sides of the splint may be extended proximally to the groin, creating a long leg splint.
3 -Way Ankle Combination of stirrup and posterior ankle splint. Appropriate for distal tibial, or unstable ankle fractures.
Complications ● ● ● Compartment syndrome Pressure sores Heat injury Infection Dermatitis
Summary ● ● ● ● ● Lots of padding Extra padding Appropriate length Appropriate type Appropriate material Treat underlying skin Avoid compartment syndrome Good return instructions Good splint care instructions
Summary ● ● ● ● Long arm: elbow Fx Double Sugar-tong: forearm Fx Volar: strains / sprains Spica: distal radius, scaphoid, ligament Ulnar gutter: MC 4 th 5 th Fx Post Leg: strains / sprains, fibula, avulsion Fx U-Splint: Similar 3 -Way: tibial fracture, unstable ankle Fx