DEPARTMENT OF CIVIL ENGINEERING GEC AJMER MATERIAL TESTING

- Slides: 7

DEPARTMENT OF CIVIL ENGINEERING GEC, AJMER MATERIAL TESTING LAB EXPERIMENTS • • • 1. Tensile Strength Test – Mild Steel and HYSD bar 2. Compressive Strength Test – Mild Steel and Cast Iron 3. Compressive Strength Test – Cement Cubes and Concrete Cubes 4. Compressive Strength Test – Bricks 5. Compressive Strength Test – Wooden Blocks 6. Hardness Test – Rockwell Hardness and Brinell Hardness 7. Impact Test – Izod and Charpy 8. Modulus of Rupture of Wooden Beam 9. Fatigue Test 10. Spring Test 11. Torsion Test

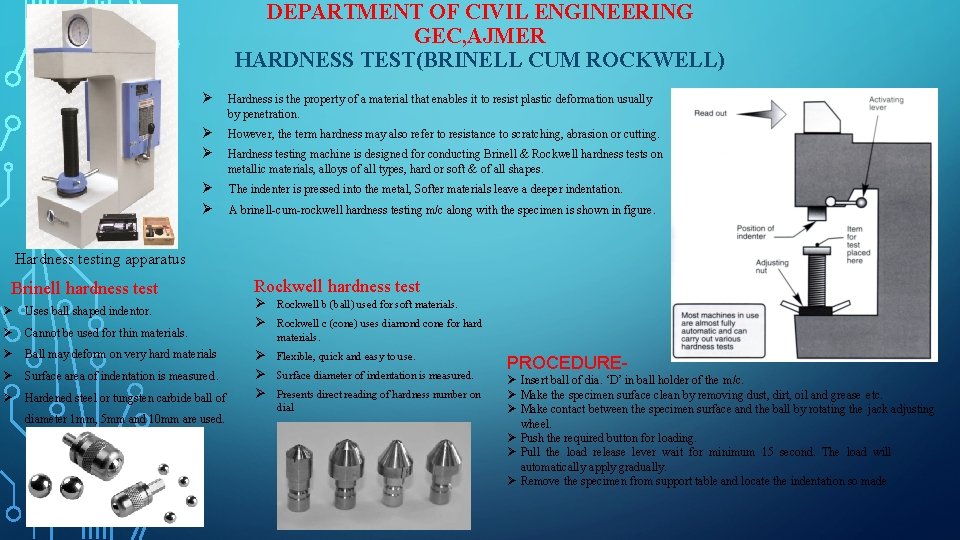
DEPARTMENT OF CIVIL ENGINEERING GEC, AJMER HARDNESS TEST(BRINELL CUM ROCKWELL) Ø Hardness is the property of a material that enables it to resist plastic deformation usually by penetration. Ø Ø However, the term hardness may also refer to resistance to scratching, abrasion or cutting. Hardness testing machine is designed for conducting Brinell & Rockwell hardness tests on metallic materials, alloys of all types, hard or soft & of all shapes. Ø The indenter is pressed into the metal, Softer materials leave a deeper indentation. Ø A brinell-cum-rockwell hardness testing m/c along with the specimen is shown in figure. Hardness testing apparatus Brinell hardness test Ø Uses ball shaped indentor. Ø Cannot be used for thin materials. Ø Ball may deform on very hard materials Ø Surface area of indentation is measured. Ø Hardened steel or tungsten carbide ball of diameter 1 mm, 5 mm and 10 mm are used. Rockwell hardness test Ø Ø Rockwell b (ball) used for soft materials. Ø Ø Ø Flexible, quick and easy to use. Rockwell c (cone) uses diamond cone for hard materials. Surface diameter of indentation is measured. Presents direct reading of hardness number on dial PROCEDUREØ Insert ball of dia. ‘D’ in ball holder of the m/c. Ø Make the specimen surface clean by removing dust, dirt, oil and grease etc. Ø Make contact between the specimen surface and the ball by rotating the jack adjusting wheel. Ø Push the required button for loading. Ø Pull the load release lever wait for minimum 15 second. The load will automatically apply gradually. Ø Remove the specimen from support table and locate the indentation so made

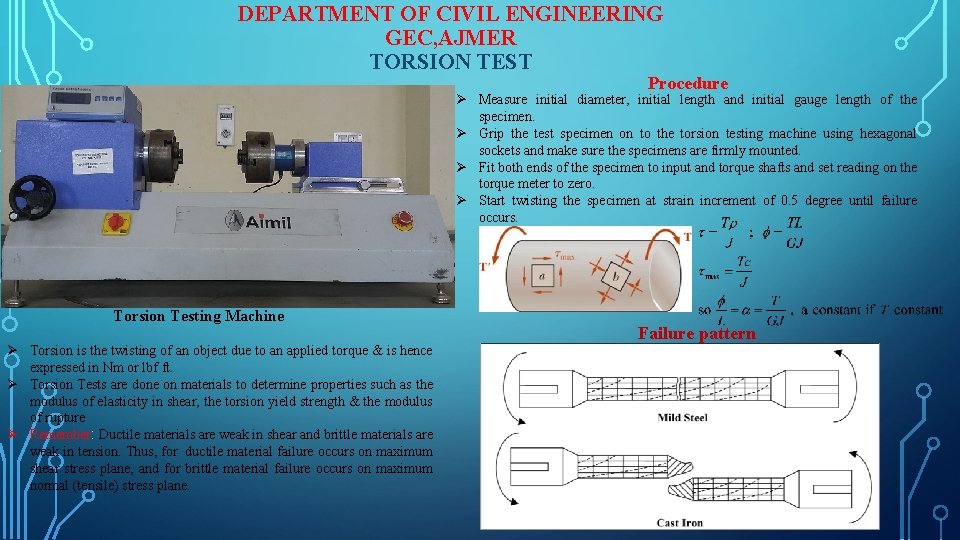
DEPARTMENT OF CIVIL ENGINEERING GEC, AJMER TORSION TEST Procedure Ø Measure initial diameter, initial length and initial gauge length of the specimen. Ø Grip the test specimen on to the torsion testing machine using hexagonal sockets and make sure the specimens are firmly mounted. Ø Fit both ends of the specimen to input and torque shafts and set reading on the torque meter to zero. Ø Start twisting the specimen at strain increment of 0. 5 degree until failure occurs. Torsion Testing Machine Ø Torsion is the twisting of an object due to an applied torque & is hence expressed in Nm or lbf ft. Ø Torsion Tests are done on materials to determine properties such as the modulus of elasticity in shear, the torsion yield strength & the modulus of rupture Ø Remember: Ductile materials are weak in shear and brittle materials are weak in tension. Thus, for ductile material failure occurs on maximum shear stress plane, and for brittle material failure occurs on maximum normal (tensile) stress plane. Failure pattern

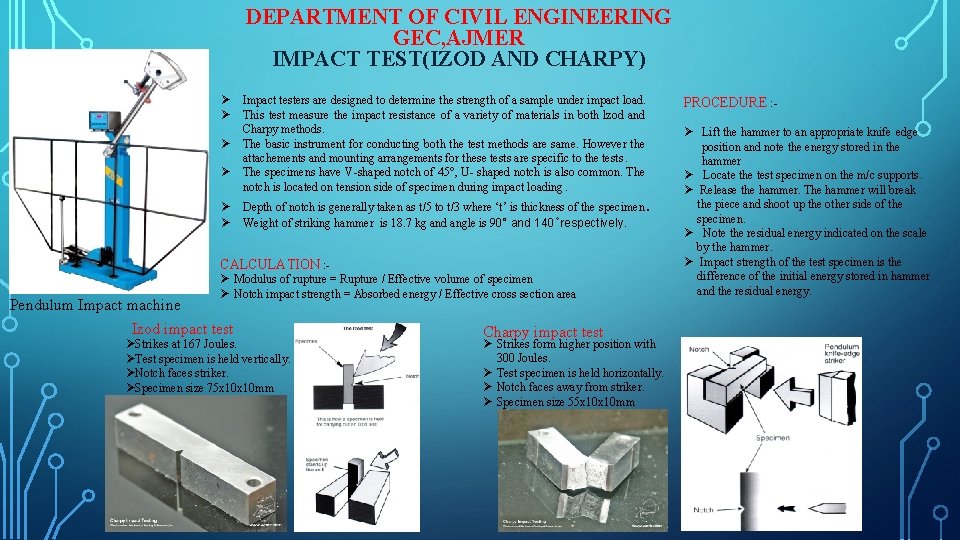
DEPARTMENT OF CIVIL ENGINEERING GEC, AJMER IMPACT TEST(IZOD AND CHARPY) Ø Ø Impact testers are designed to determine the strength of a sample under impact load. This test measure the impact resistance of a variety of materials in both lzod and Charpy methods. The basic instrument for conducting both the test methods are same. However the attachements and mounting arrangements for these tests are specific to the tests. The specimens have V-shaped notch of 45°, U- shaped notch is also common. The notch is located on tension side of specimen during impact loading. Ø Depth of notch is generally taken as t/5 to t/3 where ‘t’ is thickness of the specimen. Ø Weight of striking hammer is 18. 7 kg and angle is 90° and 140 respectively. CALCULATION : - Pendulum Impact machine Ø Modulus of rupture = Rupture / Effective volume of specimen Ø Notch impact strength = Absorbed energy / Effective cross section area Izod impact test ØStrikes at 167 Joules. ØTest specimen is held vertically. ØNotch faces striker. ØSpecimen size 75 x 10 mm Charpy impact test Ø Strikes form higher position with 300 Joules. Ø Test specimen is held horizontally. Ø Notch faces away from striker. Ø Specimen size 55 x 10 mm PROCEDURE : - Ø Lift the hammer to an appropriate knife edge position and note the energy stored in the hammer Ø Locate the test specimen on the m/c supports. Ø Release the hammer. The hammer will break the piece and shoot up the other side of the specimen. Ø Note the residual energy indicated on the scale by the hammer. Ø Impact strength of the test specimen is the difference of the initial energy stored in hammer and the residual energy.

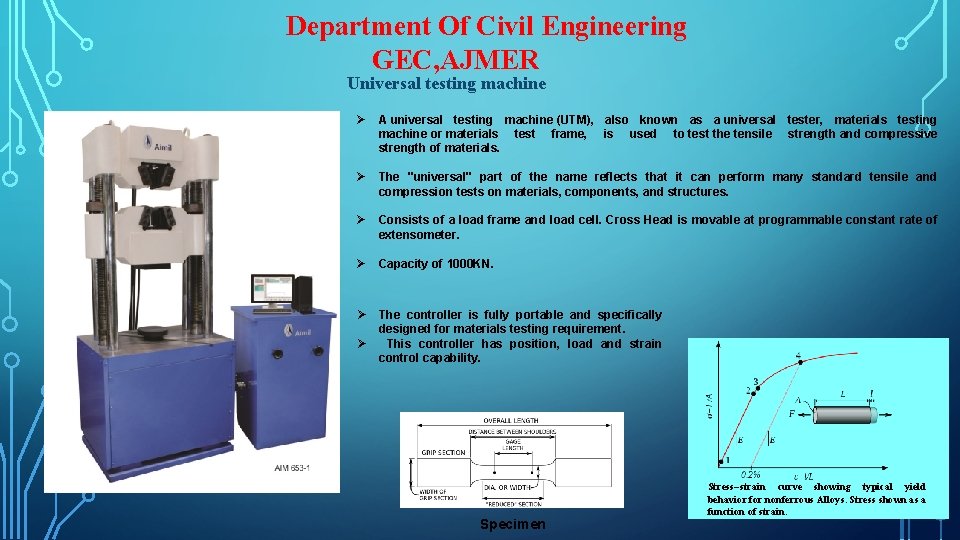
Department Of Civil Engineering GEC, AJMER Universal testing machine Ø A universal testing machine (UTM), also known as a universal tester, materials testing machine or materials test frame, is used to test the tensile strength and compressive strength of materials. Ø The "universal" part of the name reflects that it can perform many standard tensile and compression tests on materials, components, and structures. Ø Consists of a load frame and load cell. Cross Head is movable at programmable constant rate of extensometer. Ø Capacity of 1000 KN. Ø The controller is fully portable and specifically designed for materials testing requirement. This controller has position, load and strain control capability. Ø Specimen Stress–strain curve showing typical yield behavior for nonferrous Alloys. Stress shown as a function of strain.

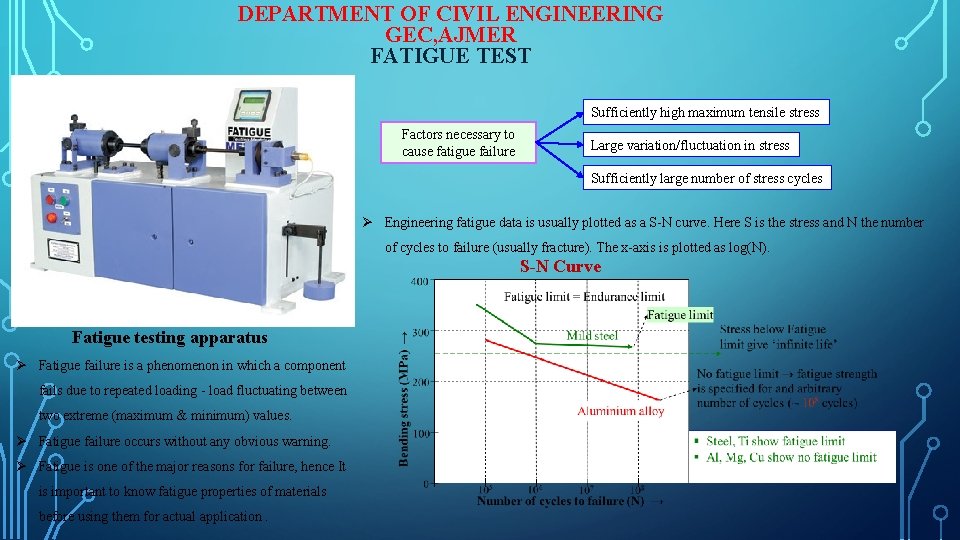
DEPARTMENT OF CIVIL ENGINEERING GEC, AJMER FATIGUE TEST Sufficiently high maximum tensile stress Factors necessary to cause fatigue failure Large variation/fluctuation in stress Sufficiently large number of stress cycles Ø Engineering fatigue data is usually plotted as a S-N curve. Here S is the stress and N the number of cycles to failure (usually fracture). The x-axis is plotted as log(N). S-N Curve Fatigue testing apparatus Ø Fatigue failure is a phenomenon in which a component fails due to repeated loading - load fluctuating between two extreme (maximum & minimum) values. Ø Fatigue failure occurs without any obvious warning. Ø Fatigue is one of the major reasons for failure, hence It is important to know fatigue properties of materials before using them for actual application.

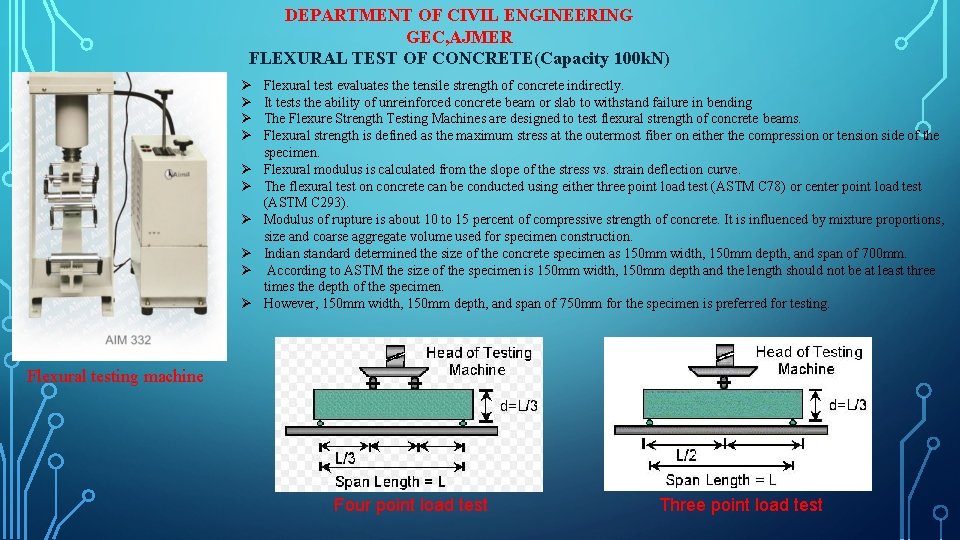
DEPARTMENT OF CIVIL ENGINEERING GEC, AJMER FLEXURAL TEST OF CONCRETE(Capacity 100 k. N) Ø Ø Ø Ø Ø Flexural test evaluates the tensile strength of concrete indirectly. It tests the ability of unreinforced concrete beam or slab to withstand failure in bending The Flexure Strength Testing Machines are designed to test flexural strength of concrete beams. Flexural strength is defined as the maximum stress at the outermost fiber on either the compression or tension side of the specimen. Flexural modulus is calculated from the slope of the stress vs. strain deflection curve. The flexural test on concrete can be conducted using either three point load test (ASTM C 78) or center point load test (ASTM C 293). Modulus of rupture is about 10 to 15 percent of compressive strength of concrete. It is influenced by mixture proportions, size and coarse aggregate volume used for specimen construction. Indian standard determined the size of the concrete specimen as 150 mm width, 150 mm depth, and span of 700 mm. According to ASTM the size of the specimen is 150 mm width, 150 mm depth and the length should not be at least three times the depth of the specimen. However, 150 mm width, 150 mm depth, and span of 750 mm for the specimen is preferred for testing. Flexural testing machine Four point load test Three point load test