Cut Cylinder Graphic Communication Cut Cylinder The views

- Slides: 16

Cut Cylinder Graphic Communication

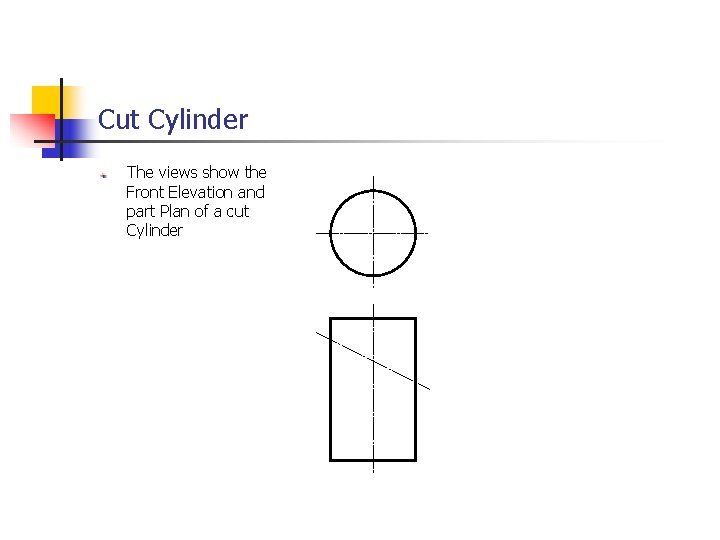
Cut Cylinder The views show the Front Elevation and part Plan of a cut Cylinder

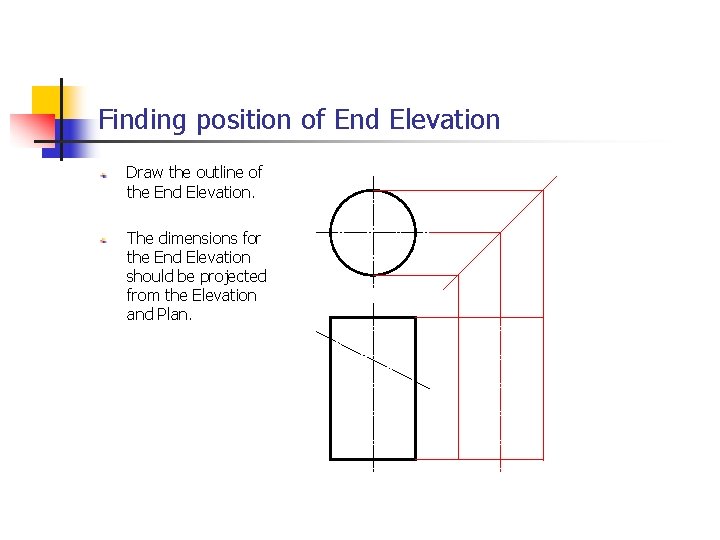
Finding position of End Elevation Draw the outline of the End Elevation. The dimensions for the End Elevation should be projected from the Elevation and Plan.

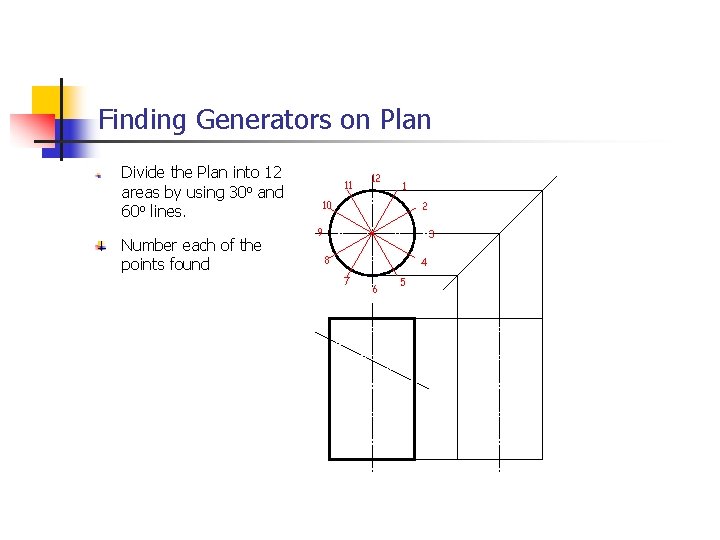
Finding Generators on Plan Divide the Plan into 12 areas by using 30 o and 60 o lines. Number each of the points found 11 12 1 10 2 9 3 8 4 7 6 5

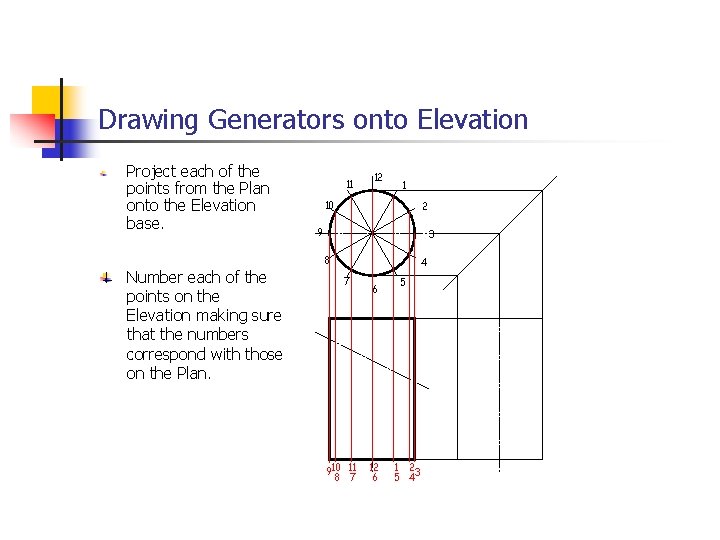
Drawing Generators onto Elevation Project each of the points from the Plan onto the Elevation base. Number each of the points on the Elevation making sure that the numbers correspond with those on the Plan. 11 12 1 10 2 9 3 8 4 7 910 11 8 7 6 12 6 5 1 2 5 43

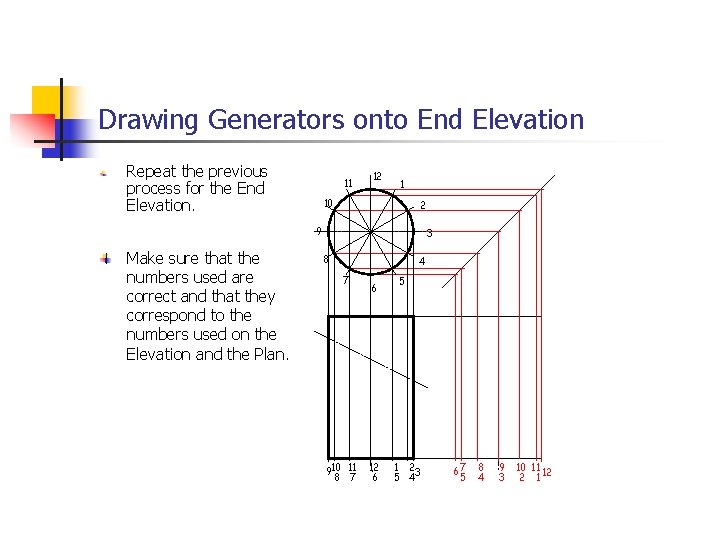
Drawing Generators onto End Elevation Repeat the previous process for the End Elevation. 11 12 1 10 2 9 Make sure that the numbers used are correct and that they correspond to the numbers used on the Elevation and the Plan. 3 8 4 7 910 11 8 7 6 12 6 5 1 2 5 43 67 5 8 4 9 3 10 11 2 1 12

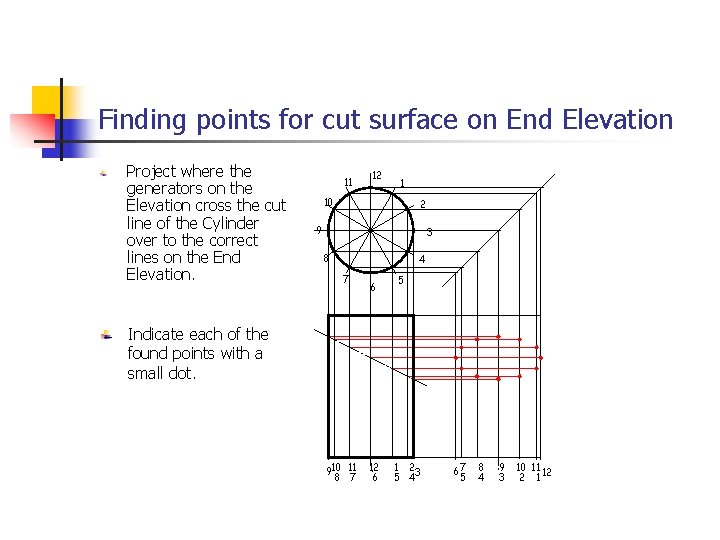
Finding points for cut surface on End Elevation Project where the generators on the Elevation cross the cut line of the Cylinder over to the correct lines on the End Elevation. 11 12 1 10 2 9 3 8 4 7 6 5 Indicate each of the found points with a small dot. 910 11 8 7 12 6 1 2 5 43 67 5 8 4 9 3 10 11 2 1 12

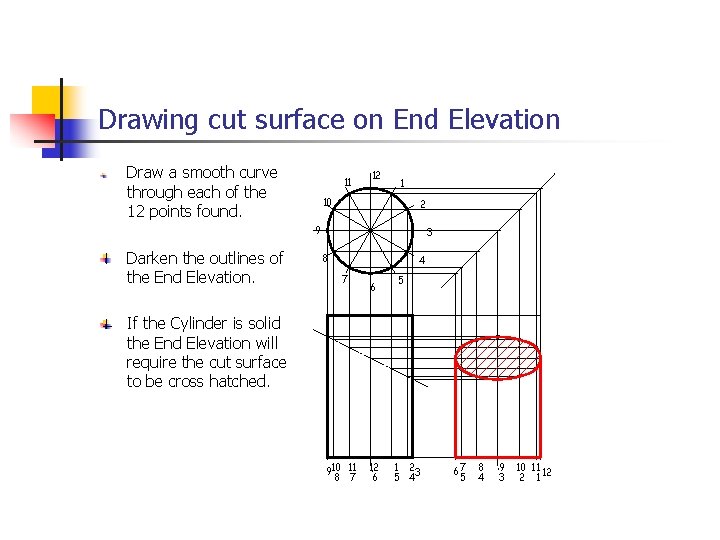
Drawing cut surface on End Elevation Draw a smooth curve through each of the 12 points found. 11 12 1 10 2 9 Darken the outlines of the End Elevation. 3 8 4 7 6 5 If the Cylinder is solid the End Elevation will require the cut surface to be cross hatched. 910 11 8 7 12 6 1 2 5 43 67 5 8 4 9 3 10 11 2 1 12

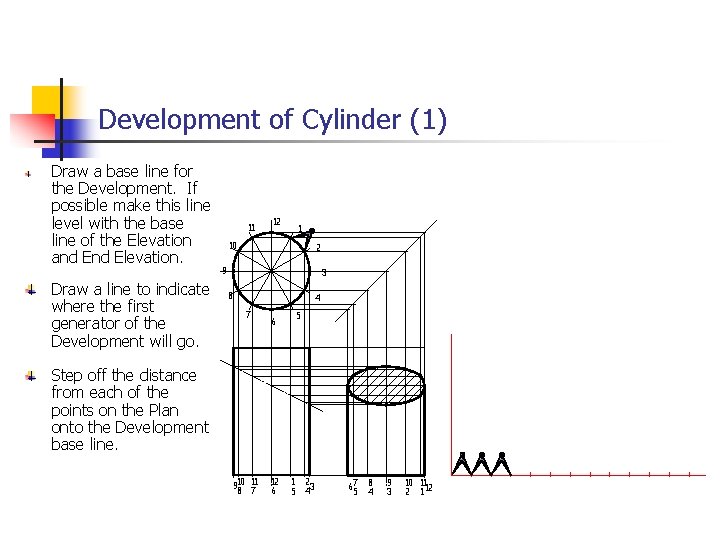
Development of Cylinder (1) Draw a base line for the Development. If possible make this line level with the base line of the Elevation and Elevation. Draw a line to indicate where the first generator of the Development will go. 11 12 1 10 2 9 3 8 4 7 6 5 Step off the distance from each of the points on the Plan onto the Development base line. 910 11 8 7 12 6 1 2 5 43 67 8 5 4 9 3 10 11 2 1 12

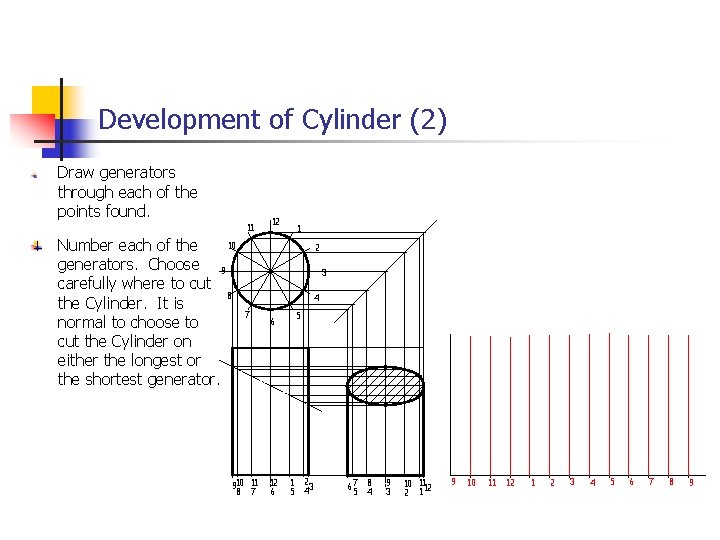
Development of Cylinder (2) Draw generators through each of the points found. 11 10 Number each of the generators. Choose 9 carefully where to cut 8 the Cylinder. It is normal to choose to cut the Cylinder on either the longest or the shortest generator. 12 1 2 3 4 7 910 11 8 7 6 12 6 5 1 2 5 43 67 8 5 4 9 3 10 11 2 1 12 9 10 11 12 1 2 3 4 5 6 7 8 9

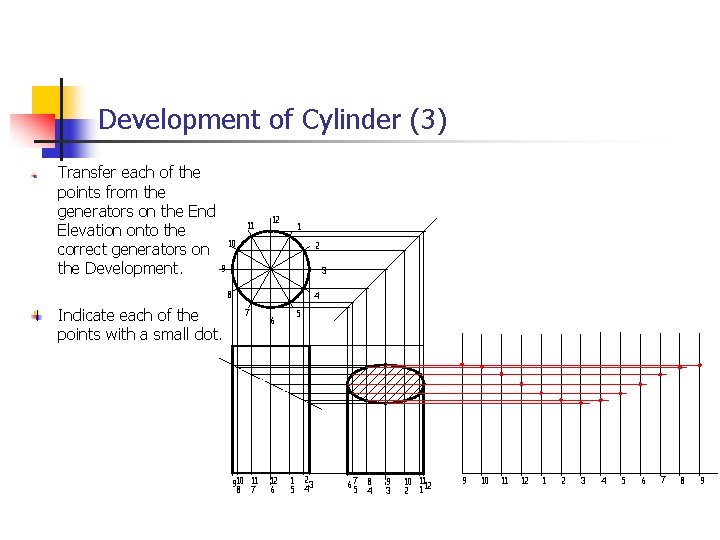
Development of Cylinder (3) Transfer each of the points from the generators on the End Elevation onto the correct generators on the Development. 11 12 1 10 2 9 3 8 Indicate each of the points with a small dot. 4 7 910 11 8 7 6 12 6 5 1 2 5 43 67 8 5 4 9 3 10 11 2 1 12 9 10 11 12 1 2 3 4 5 6 7 8 9

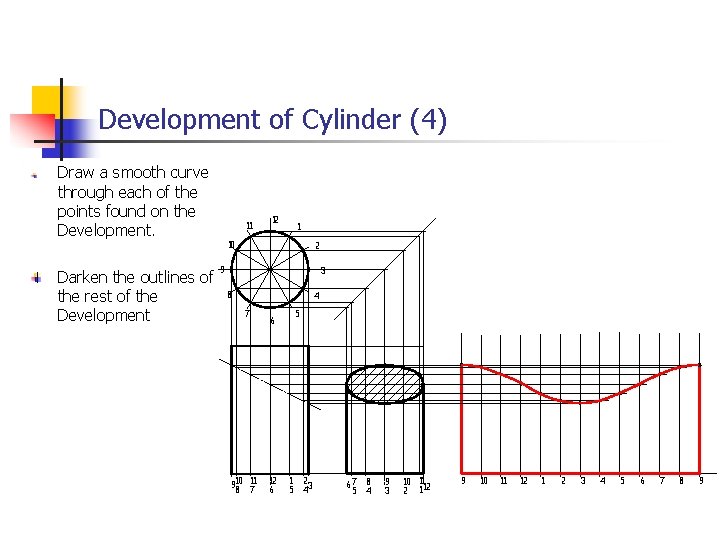
Development of Cylinder (4) Draw a smooth curve through each of the points found on the Development. Darken the outlines of the rest of the Development 11 12 1 10 2 9 3 8 4 7 910 11 8 7 6 12 6 5 1 2 5 43 67 8 5 4 9 3 10 11 2 1 12 9 10 11 12 1 2 3 4 5 6 7 8 9

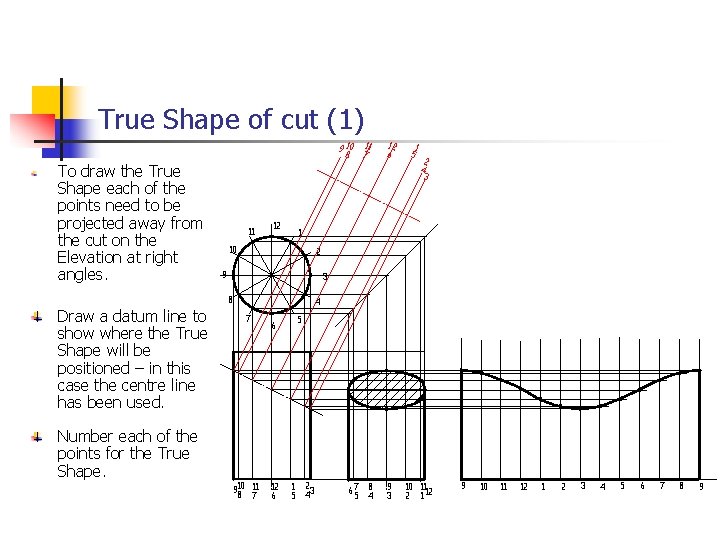
True Shape of cut (1) 9 10 11 8 7 To draw the True Shape each of the points need to be projected away from the cut on the Elevation at right angles. Draw a datum line to show where the True Shape will be positioned – in this case the centre line has been used. Number each of the points for the True Shape. 11 12 12 6 1 5 2 4 3 1 10 2 9 3 8 4 7 910 11 8 7 6 12 6 5 1 23 5 4 67 8 5 4 9 3 10 11 2 1 12 9 10 11 12 1 2 3 4 5 6 7 8 9

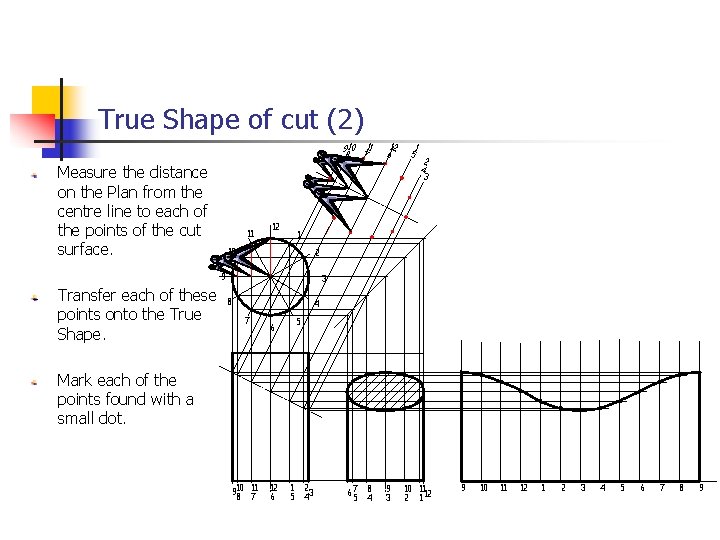
True Shape of cut (2) 910 11 8 7 Measure the distance on the Plan from the centre line to each of the points of the cut surface. 11 12 1 5 2 4 3 1 10 2 9 Transfer each of these points onto the True Shape. 12 6 3 8 4 7 6 5 Mark each of the points found with a small dot. 910 11 8 7 12 6 1 23 5 4 67 8 5 4 9 3 10 11 2 1 12 9 10 11 12 1 2 3 4 5 6 7 8 9

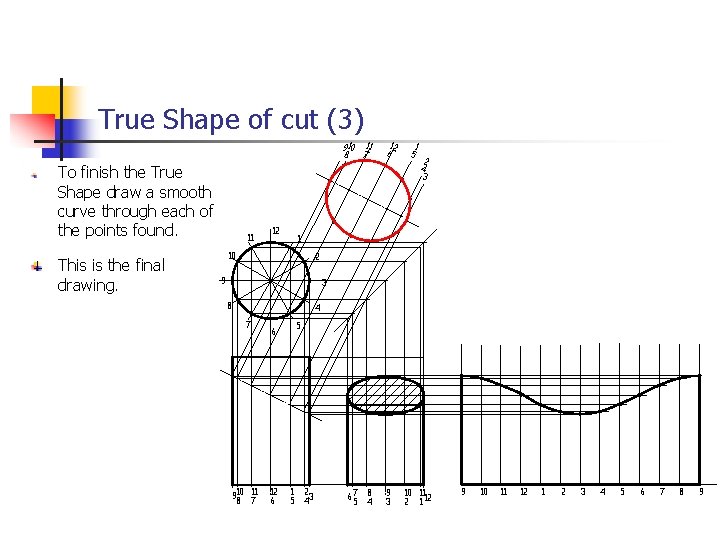
True Shape of cut (3) 910 11 8 7 To finish the True Shape draw a smooth curve through each of the points found. This is the final drawing. 11 12 12 6 1 5 2 4 3 1 10 2 9 3 8 4 7 910 11 8 7 6 12 6 5 1 23 5 4 67 8 5 4 9 3 10 11 2 1 12 9 10 11 12 1 2 3 4 5 6 7 8 9

End of show