ORTHOGRAPHIC PROJECTIONS OF POINTS LINES PLANES AND SOLIDS
- Slides: 16

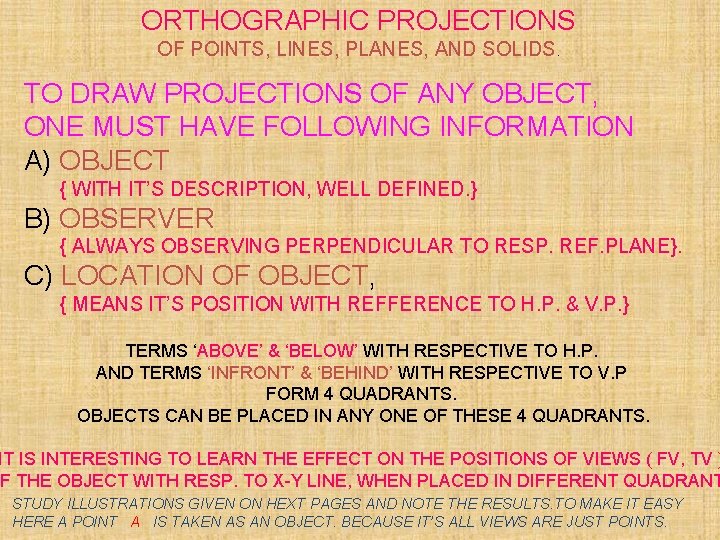
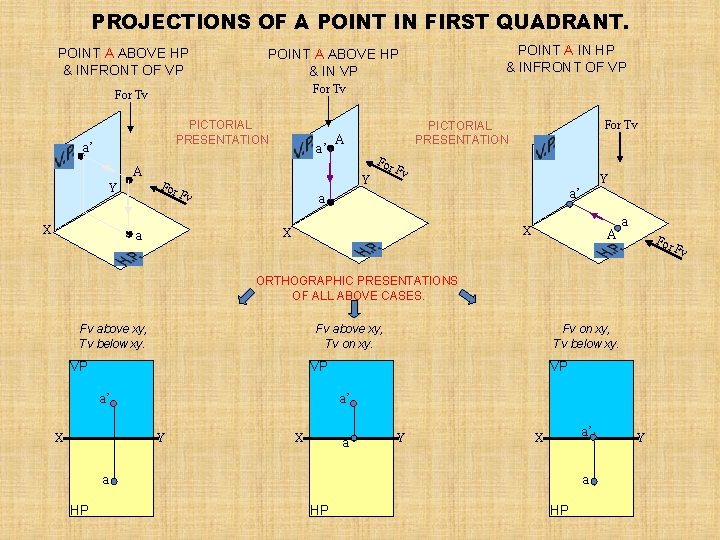
ORTHOGRAPHIC PROJECTIONS OF POINTS, LINES, PLANES, AND SOLIDS. TO DRAW PROJECTIONS OF ANY OBJECT, ONE MUST HAVE FOLLOWING INFORMATION A) OBJECT { WITH IT’S DESCRIPTION, WELL DEFINED. } B) OBSERVER { ALWAYS OBSERVING PERPENDICULAR TO RESP. REF. PLANE}. C) LOCATION OF OBJECT, { MEANS IT’S POSITION WITH REFFERENCE TO H. P. & V. P. } TERMS ‘ABOVE’ & ‘BELOW’ WITH RESPECTIVE TO H. P. AND TERMS ‘INFRONT’ & ‘BEHIND’ WITH RESPECTIVE TO V. P FORM 4 QUADRANTS. OBJECTS CAN BE PLACED IN ANY ONE OF THESE 4 QUADRANTS. IT IS INTERESTING TO LEARN THE EFFECT ON THE POSITIONS OF VIEWS ( FV, TV ) F THE OBJECT WITH RESP. TO X-Y LINE, WHEN PLACED IN DIFFERENT QUADRANT STUDY ILLUSTRATIONS GIVEN ON HEXT PAGES AND NOTE THE RESULTS. TO MAKE IT EASY HERE A POINT A IS TAKEN AS AN OBJECT. BECAUSE IT’S ALL VIEWS ARE JUST POINTS.

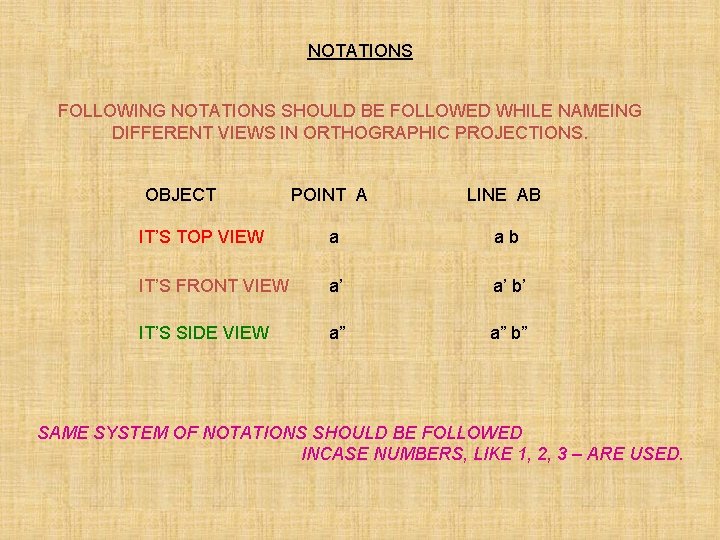
NOTATIONS FOLLOWING NOTATIONS SHOULD BE FOLLOWED WHILE NAMEING DIFFERENT VIEWS IN ORTHOGRAPHIC PROJECTIONS. OBJECT POINT A LINE AB IT’S TOP VIEW a ab IT’S FRONT VIEW a’ a’ b’ IT’S SIDE VIEW a” a” b” SAME SYSTEM OF NOTATIONS SHOULD BE FOLLOWED INCASE NUMBERS, LIKE 1, 2, 3 – ARE USED.

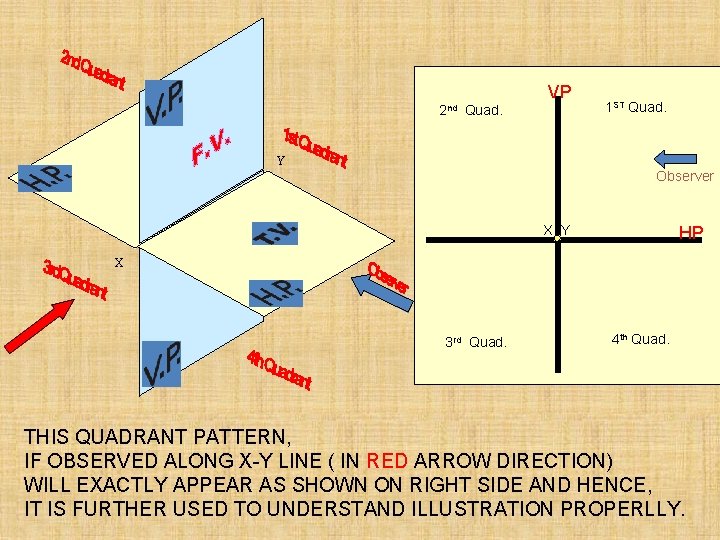
VP 2 nd Quad. 1 ST Quad. Y Observer HP X Y X 3 rd Quad. 4 th Quad. THIS QUADRANT PATTERN, IF OBSERVED ALONG X-Y LINE ( IN RED ARROW DIRECTION) WILL EXACTLY APPEAR AS SHOWN ON RIGHT SIDE AND HENCE, IT IS FURTHER USED TO UNDERSTAND ILLUSTRATION PROPERLLY.

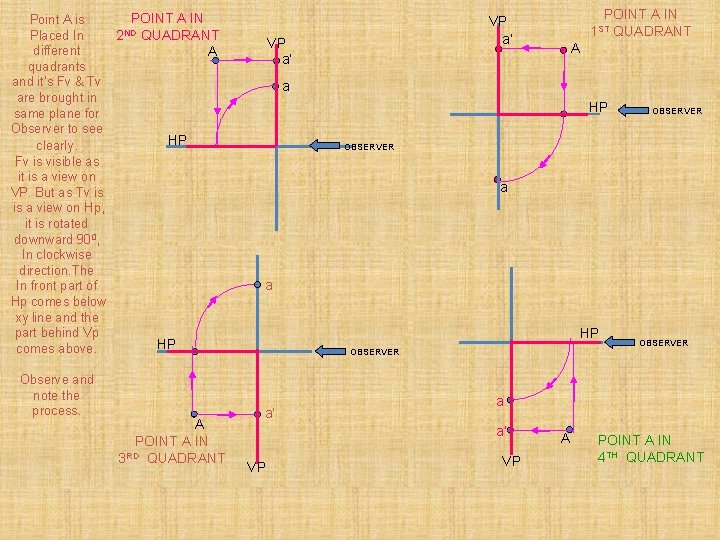
POINT A IN Point A is ND Placed In 2 QUADRANT different A quadrants and it’s Fv & Tv are brought in same plane for Observer to see HP clearly. Fv is visible as it is a view on VP. But as Tv is is a view on Hp, it is rotated downward 900, In clockwise direction. The In front part of Hp comes below xy line and the part behind Vp HP comes above. Observe and note the process. A POINT A IN RD 3 QUADRANT POINT A IN 1 ST QUADRANT VP a’ A a HP OBSERVER a’ a a’ VP OBSERVER VP A POINT A IN 4 TH QUADRANT

PROJECTIONS OF A POINT IN FIRST QUADRANT. POINT A ABOVE HP & INFRONT OF VP For Tv PICTORIAL PRESENTATION a’ A Y X POINT A IN HP & INFRONT OF VP POINT A ABOVE HP & IN VP a’ A For Y For F v Fv Y a’ a X X a For Tv PICTORIAL PRESENTATION A a For ORTHOGRAPHIC PRESENTATIONS OF ALL ABOVE CASES. Fv above xy, Tv below xy. Fv above xy, Tv on xy. VP Fv on xy, Tv below xy. VP a’ X VP a’ Y X a Y a’ X a a HP HP HP Y Fv

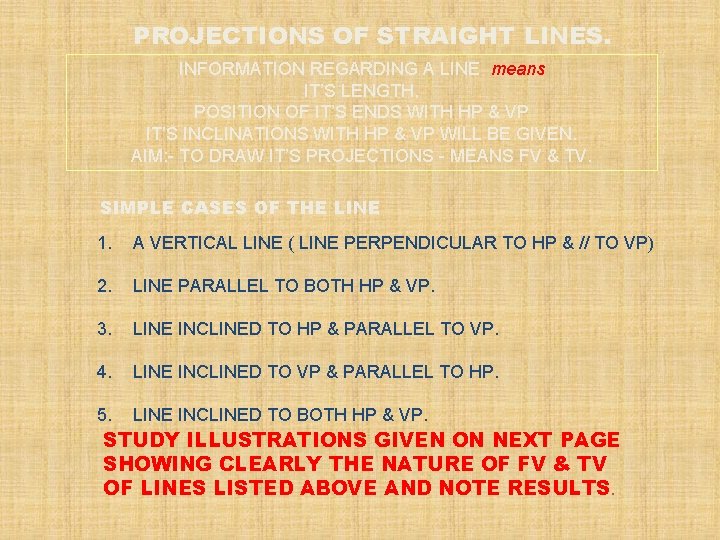
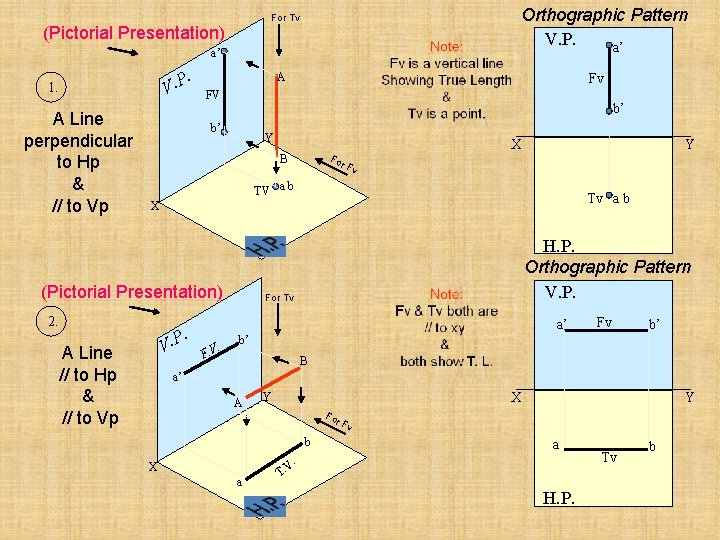
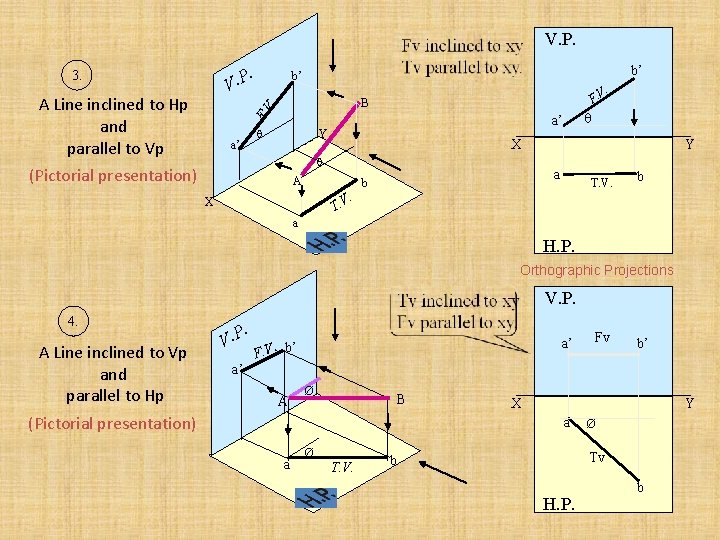
PROJECTIONS OF STRAIGHT LINES. INFORMATION REGARDING A LINE means IT’S LENGTH, POSITION OF IT’S ENDS WITH HP & VP IT’S INCLINATIONS WITH HP & VP WILL BE GIVEN. AIM: - TO DRAW IT’S PROJECTIONS - MEANS FV & TV. SIMPLE CASES OF THE LINE 1. A VERTICAL LINE ( LINE PERPENDICULAR TO HP & // TO VP) 2. LINE PARALLEL TO BOTH HP & VP. 3. LINE INCLINED TO HP & PARALLEL TO VP. 4. LINE INCLINED TO VP & PARALLEL TO HP. 5. LINE INCLINED TO BOTH HP & VP. STUDY ILLUSTRATIONS GIVEN ON NEXT PAGE SHOWING CLEARLY THE NATURE OF FV & TV OF LINES LISTED ABOVE AND NOTE RESULTS.

Orthographic Pattern V. P. a’ For Tv (Pictorial Presentation) a’ . V. P 1. A Line perpendicular to Hp & // to Vp A Fv FV b’ b’ Y X Fo B Y r. F v TV a b Tv a b X (Pictorial Presentation) 2. . P. V A Line // to Hp & // to Vp H. P. Orthographic Pattern V. P. For Tv a’. F. V Fv b’ b’ B a’ A X Y Fo Y r. F b X a T. v a V. H. P. Tv b

V. P. . V. P 3. . F. V B F. V. A Line inclined to Hp and parallel to Vp b’ b’ a’ Y X (Pictorial presentation) a’ A . Y a b T. V X a H. P. Orthographic Projections V. P. 4. A Line inclined to Vp and parallel to Hp . V. P a’ a’ . b’ F. V A Ø B (Pictorial presentation) Ø T. V. b’ X Y a a Fv Ø Tv b H. P. b

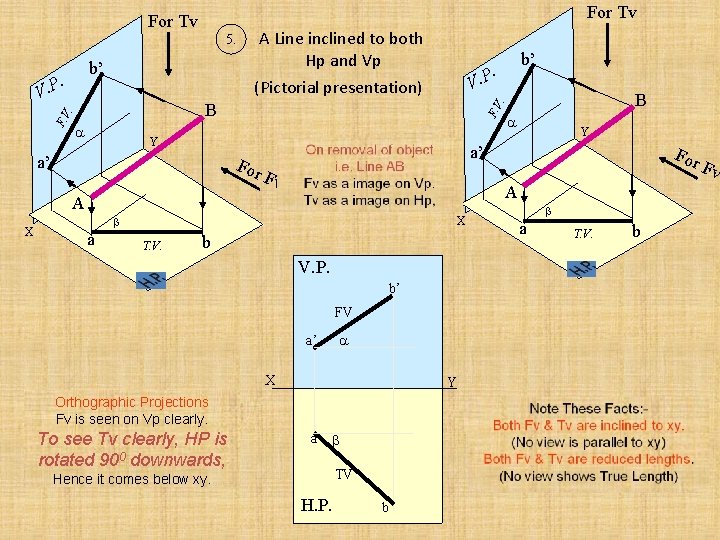
For Tv A Line inclined to both Hp and Vp 5. b’ Y a’ For Fv X T. V. b V. P. b’ FV a’ X Y Orthographic Projections Fv is seen on Vp clearly. To see Tv clearly, HP is rotated 900 downwards, Y For A a a’ A X B . F. V V (Pictorial presentation) F. V . V. P b’ . P. a TV Hence it comes below xy. H. P. b a T. V. b Fv

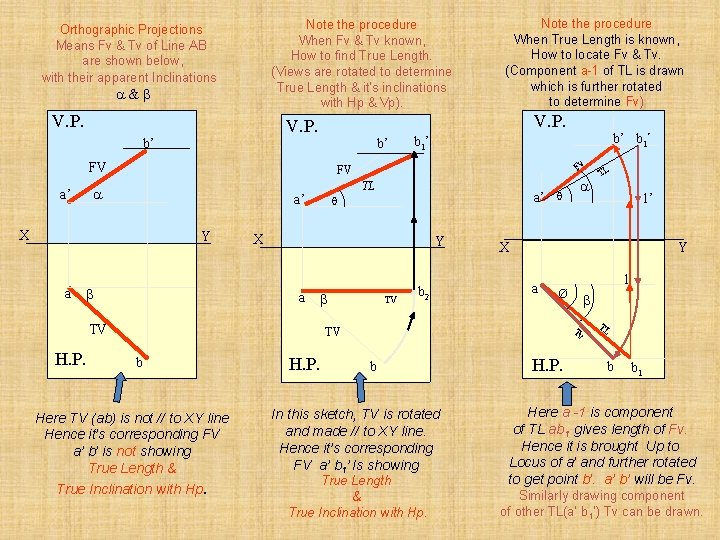
Note the procedure When Fv & Tv known, How to find True Length. (Views are rotated to determine True Length & it’s inclinations with Hp & Vp). Orthographic Projections Means Fv & Tv of Line AB are shown below, with their apparent Inclinations & V. P. b’ b’ FV X Y a a’ X Y a TV H. P. Fv TL a’ TV b 2 Here TV (ab) is not // to XY line Hence it’s corresponding FV a’ b’ is not showing True Length & True Inclination with Hp. H. P. In this sketch, TV is rotated and made // to XY line. Hence it’s corresponding FV a’ b 1’ Is showing True Length & True Inclination with Hp. 1’ Y a 1 Ø Tv b TL X TV b b’ b 1’ FV a’ Note the procedure When True Length is known, How to locate Fv & Tv. (Component a-1 of TL is drawn which is further rotated to determine Fv) H. P. TL b b 1 Here a -1 is component of TL ab 1 gives length of Fv. Hence it is brought Up to Locus of a’ and further rotated to get point b’. a’ b’ will be Fv. Similarly drawing component of other TL(a’ b 1‘) Tv can be drawn.

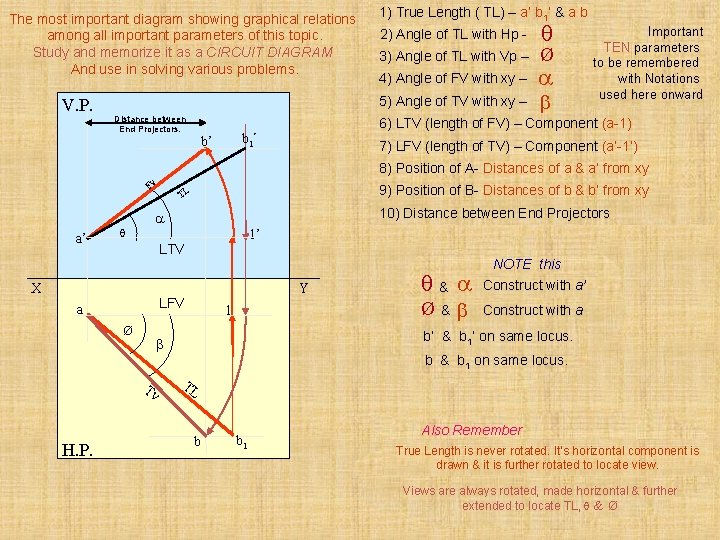
The most important diagram showing graphical relations among all important parameters of this topic. Study and memorize it as a CIRCUIT DIAGRAM And use in solving various problems. V. P. 1) True Length ( TL) – a’ b 1’ & a b 2) Angle of TL with Hp 3) Angle of TL with Vp – 4) Angle of FV with xy – 5) Angle of TV with xy – Distance between End Projectors. Ø Important TEN parameters to be remembered with Notations used here onward 6) LTV (length of FV) – Component (a-1) b 1’ b’ 7) LFV (length of TV) – Component (a’-1’) 8) Position of A- Distances of a & a’ from xy Fv a’ 9) Position of B- Distances of b & b’ from xy TL 10) Distance between End Projectors 1’ LTV X Y LFV a Ø 1 NOTE this & Construct with a’ Ø& Construct with a b’ & b 1’ on same locus. b & b 1 on same locus. Tv H. P. TL b b 1 Also Remember True Length is never rotated. It’s horizontal component is drawn & it is further rotated to locate view. Views are always rotated, made horizontal & further extended to locate TL, & Ø

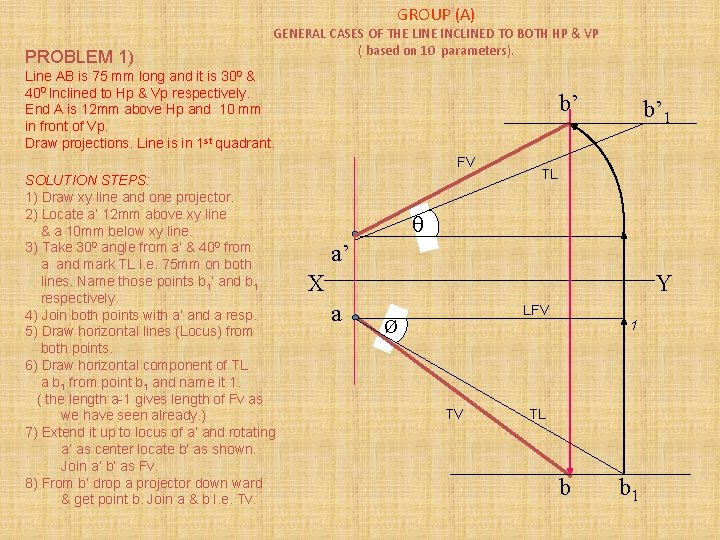
GROUP (A) PROBLEM 1) GENERAL CASES OF THE LINE INCLINED TO BOTH HP & VP ( based on 10 parameters). Line AB is 75 mm long and it is 300 & 400 Inclined to Hp & Vp respectively. End A is 12 mm above Hp and 10 mm in front of Vp. Draw projections. Line is in 1 st quadrant. b’ FV SOLUTION STEPS: 1) Draw xy line and one projector. 2) Locate a’ 12 mm above xy line & a 10 mm below xy line. 3) Take 300 angle from a’ & 400 from a and mark TL I. e. 75 mm on both lines. Name those points b 1’ and b 1 respectively. 4) Join both points with a’ and a resp. 5) Draw horizontal lines (Locus) from both points. 6) Draw horizontal component of TL a b 1 from point b 1 and name it 1. ( the length a-1 gives length of Fv as we have seen already. ) 7) Extend it up to locus of a’ and rotating a’ as center locate b’ as shown. Join a’ b’ as Fv. 8) From b’ drop a projector down ward & get point b. Join a & b I. e. Tv. b’ 1 TL a’ X Y a LFV Ø TV 1 TL b b 1

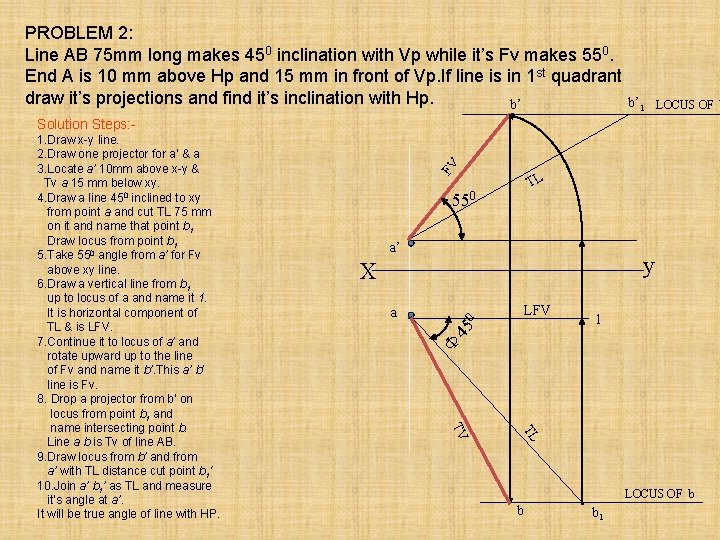
PROBLEM 2: Line AB 75 mm long makes 450 inclination with Vp while it’s Fv makes 550. End A is 10 mm above Hp and 15 mm in front of Vp. If line is in 1 st quadrant draw it’s projections and find it’s inclination with Hp. b’ b’ 1 LOCUS OF TL 550 a’ y X 45 0 LFV 1 a TL TV 1. Draw x-y line. 2. Draw one projector for a’ & a 3. Locate a’ 10 mm above x-y & Tv a 15 mm below xy. 4. Draw a line 450 inclined to xy from point a and cut TL 75 mm on it and name that point b 1 Draw locus from point b 1 5. Take 550 angle from a’ for Fv above xy line. 6. Draw a vertical line from b 1 up to locus of a and name it 1. It is horizontal component of TL & is LFV. 7. Continue it to locus of a’ and rotate upward up to the line of Fv and name it b’. This a’ b’ line is Fv. 8. Drop a projector from b’ on locus from point b 1 and name intersecting point b. Line a b is Tv of line AB. 9. Draw locus from b’ and from a’ with TL distance cut point b 1‘ 10. Join a’ b 1’ as TL and measure it’s angle at a’. It will be true angle of line with HP. FV Solution Steps: - LOCUS OF b b b 1

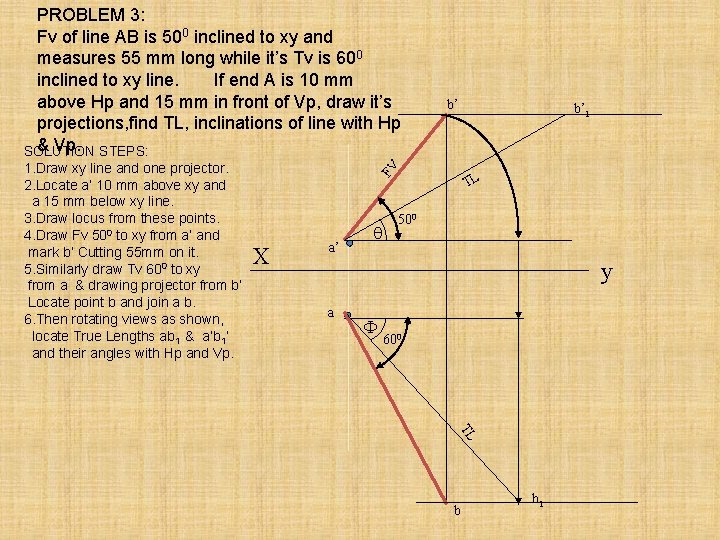
1. Draw xy line and one projector. 2. Locate a’ 10 mm above xy and a 15 mm below xy line. 3. Draw locus from these points. 4. Draw Fv 500 to xy from a’ and mark b’ Cutting 55 mm on it. 5. Similarly draw Tv 600 to xy from a & drawing projector from b’ Locate point b and join a b. 6. Then rotating views as shown, locate True Lengths ab 1 & a’b 1’ and their angles with Hp and Vp. b’ FV PROBLEM 3: Fv of line AB is 500 inclined to xy and measures 55 mm long while it’s Tv is 600 inclined to xy line. If end A is 10 mm above Hp and 15 mm in front of Vp, draw it’s projections, find TL, inclinations of line with Hp & Vp. STEPS: SOLUTION X a’ b’ 1 TL 500 y a 600 TL b b 1

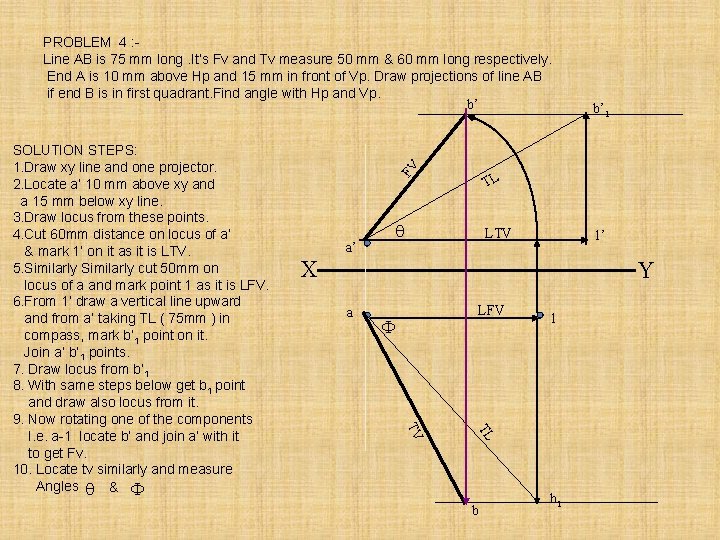
a’ TL LTV b’ 1 1’ X Y a LFV 1 TL TV SOLUTION STEPS: 1. Draw xy line and one projector. 2. Locate a’ 10 mm above xy and a 15 mm below xy line. 3. Draw locus from these points. 4. Cut 60 mm distance on locus of a’ & mark 1’ on it as it is LTV. 5. Similarly cut 50 mm on locus of a and mark point 1 as it is LFV. 6. From 1’ draw a vertical line upward and from a’ taking TL ( 75 mm ) in compass, mark b’ 1 point on it. Join a’ b’ 1 points. 7. Draw locus from b’ 1 8. With same steps below get b 1 point and draw also locus from it. 9. Now rotating one of the components I. e. a-1 locate b’ and join a’ with it to get Fv. 10. Locate tv similarly and measure Angles & FV PROBLEM 4 : Line AB is 75 mm long. It’s Fv and Tv measure 50 mm & 60 mm long respectively. End A is 10 mm above Hp and 15 mm in front of Vp. Draw projections of line AB if end B is in first quadrant. Find angle with Hp and Vp. b’ b b 1

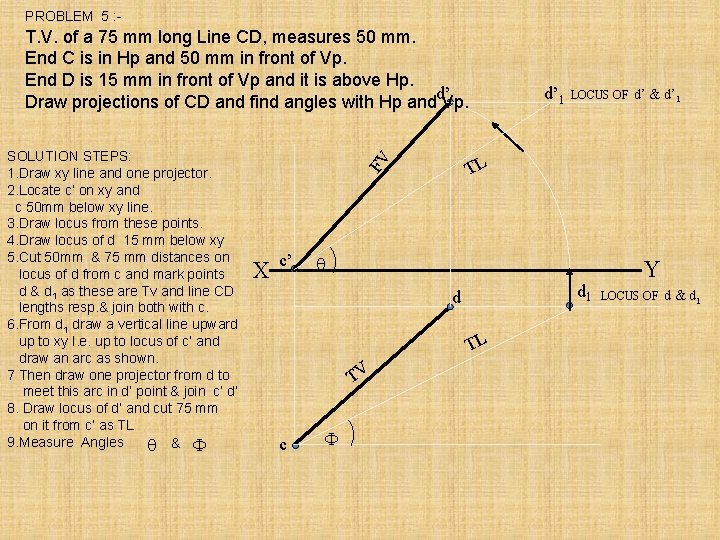
PROBLEM 5 : - T. V. of a 75 mm long Line CD, measures 50 mm. End C is in Hp and 50 mm in front of Vp. End D is 15 mm in front of Vp and it is above Hp. Draw projections of CD and find angles with Hp andd’Vp. X c’ d 1 d TL TV c LOCUS OF d’ & d’ 1 TL FV SOLUTION STEPS: 1. Draw xy line and one projector. 2. Locate c’ on xy and c 50 mm below xy line. 3. Draw locus from these points. 4. Draw locus of d 15 mm below xy 5. Cut 50 mm & 75 mm distances on locus of d from c and mark points d & d 1 as these are Tv and line CD lengths resp. & join both with c. 6. From d 1 draw a vertical line upward up to xy I. e. up to locus of c’ and draw an arc as shown. 7 Then draw one projector from d to meet this arc in d’ point & join c’ d’ 8. Draw locus of d’ and cut 75 mm on it from c’ as TL 9. Measure Angles & d’ 1 Y LOCUS OF d & d 1