XML 1 2 3 4 matchparent wrapcontent 1


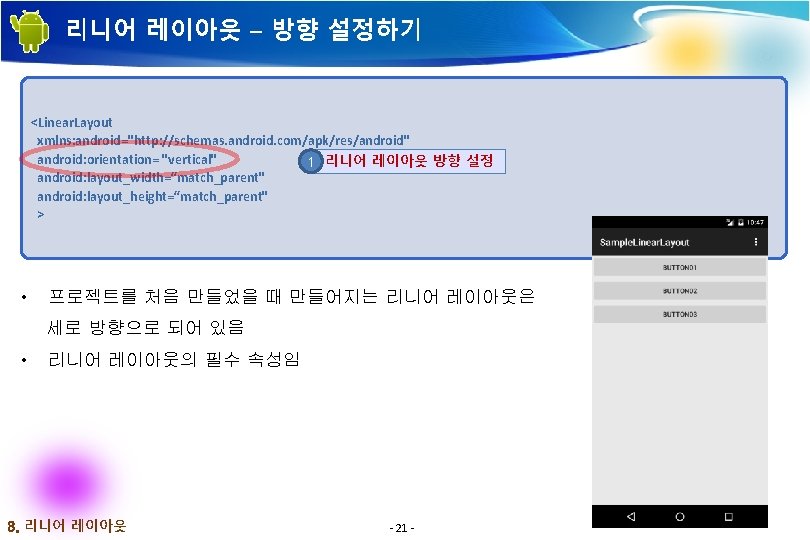


 <Linear. Layout xmlns: android=\"http: //schemas. android. com/apk/res/android\" android:")

 <Text. View android: id=\"@+id/button 01\" android: layout_width=\"wrap_content\" android:")


 <Button android: text=\"하단버튼\" android: text. Color=\"#ff 000000\" android: text.")


 <Scroll. View android: id=\"@+id/scroll. View\" android: layout_width=\"wrap_content\" 3 스크롤뷰 android:")
 find. View. By. Id(R.")


 { if")


 <Radio. Group android: id=\"@+id/radio. Group 01\" android:")
 <Radio. Button android: id=\"@+id/radio 02\" android: layout_width=\"wrap_content\"")
 <Text. View android: layout_width=\"wrap_content\" android: layout_height=\"wrap_content\" android:")


![참고 문헌 [ References] • 기본 서적 2015, 정재곤, “Do it! 안드로이드 앱 프로그래밍(개정](https://slidetodoc.com/presentation_image/2755cb02217d375bb8bc23b536b4b678/image-65.jpg "참고 문헌 [ References] • 기본 서적 2015, 정재곤, “Do it! 안드로이드 앱 프로그래밍(개정")
- Slides: 65
XML 레이아웃으로 구성하기 1 2 3 4 [match_parent와 wrap_content 값 을 폭과 넓이에 적용한 예] 1. 뷰와 뷰그룹 <Button android: layout_width="wrap_content" android: layout_height="wrap_content" android: text=“Button" /> 1 <Button android: layout_width=“match_parent" android: layout_height="wrap_content" android: text=“Button“ /> 2 <Button android: layout_width="wrap_content" android: layout_height=“match_parent" android: text=“Button" /> 3 <Button android: layout_width=“match_parent" android: layout_height=“match_parent" android: text=“Button" /> 4 - 12 -
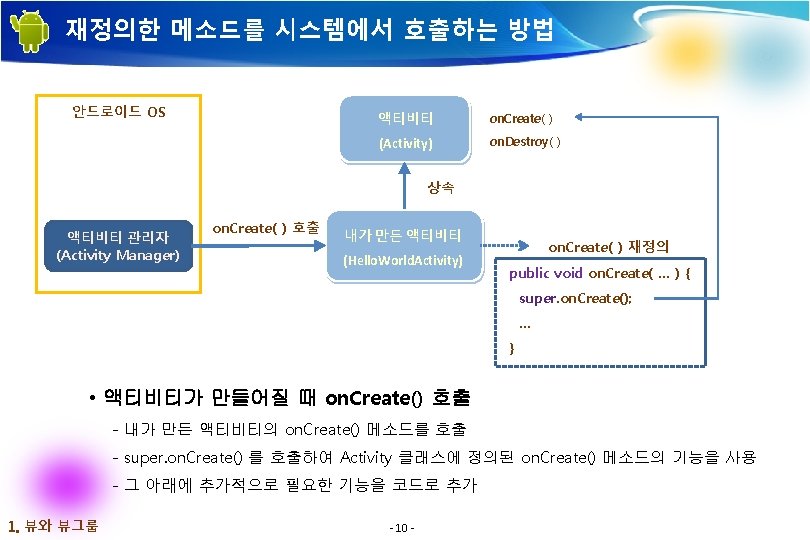
뷰의 ID 속성 <Button android: id="@+id/button" android: layout_width=“match_parent" android: layout_height=“match_parent" android: text="Layout" /> [버튼의 id 추가] public class Main. Activity extends Action. Bar. Activity { public void on. Create(Bundle saved. Instance. State) { super. on. Create(saved. Instance. State); set. Content. View(R. layout. main); Button button = (Button) find. View. By. Id(R. id. button ); } } • 인플레이션(Inflation) - XML 레이아웃에 정의된 정보를 메모리 상에서 객체로 만드는 객체화 과정 - 애플리케이션이 시작될 때 이 과정을 거쳐 메모리 상에 만들어진 객체들을 참조하기 위해 ID를 지정함 • id 속성은 자바 코드 상에서 R. id. [ID]와 같은 형태로 참조함("@+id/. . . “) [버튼의 id 참조] 1. 뷰와 뷰그룹 - 14 -
리니어 레이아웃 – 자바 코드에서 구성하기 • 자바 코드에서 직접 레이아웃 객체를 만들고 파라미터 설정하는 방법 Linear. Layout main. Layout = new Linear. Layout(this); main. Layout. set. Orientation(Linear. Layout. VERTICAL); 레이아웃 객체 생성 1 Linear. Layout. Params params = new Linear. Layout. Params( Linear. Layout. Params. MATCH_PARENT, Linear. Layout. Params. WRAP_CONTENT); 2 파라미터 설정 Button button 1 = new Button(this); button 1. set. Text("Button 1"); 3 버튼 객체 생성하여 추가 button 1. set. Layout. Params(params); main. Layout. add. View(button 1); 4 set. Content. View(main. Layout); 3. 리니어 레이아웃 - 23 - 화면 설정
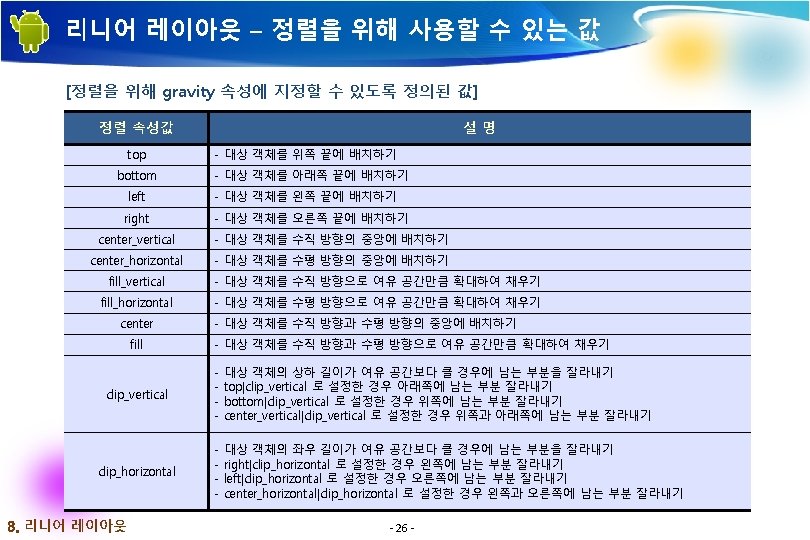
리니어 레이아웃 – 정렬 설정하기 (계속) <Linear. Layout xmlns: android="http: //schemas. android. com/apk/res/android" android: orientation= "vertical" android: layout_width=“match_parent" 1 리니어 레이아웃 방향 설정 android: layout_height=“match_parent" > <Button android: id="@+id/button 1" android: layout_width="wrap_content" android: layout_height="wrap_content" android: layout_gravity= "left" 2 첫 번째 버튼 정렬 android: text="left" /> Continued. . 3. 리니어 레이아웃 - 25 -
리니어 레이아웃 – 글자 아랫줄 정렬 <Linear. Layout xmlns: android="http: //schemas. android. com/apk/res/android" android: orientation="horizontal" android: layout_width="match_parent" android: layout_height=“match_parent" android: baseline. Aligned= "true" 1 글자의 아랫줄 맞추기 > Continued. . 3. 리니어 레이아웃 - 27 -
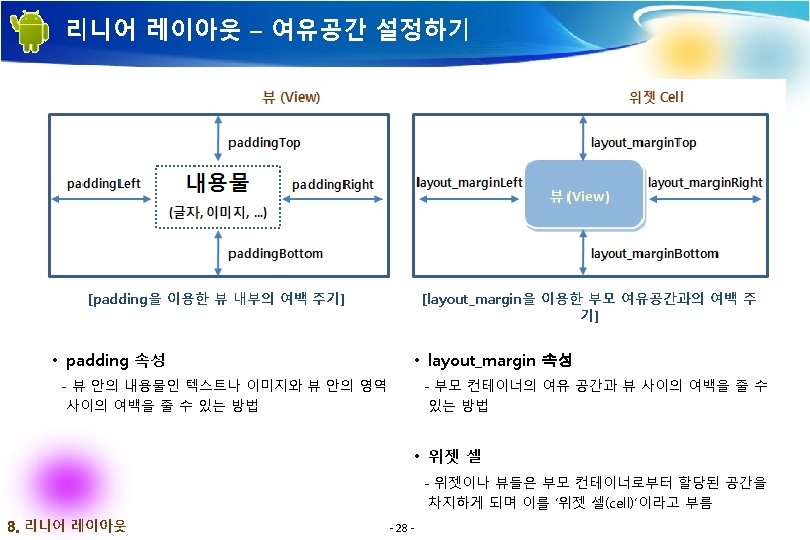
리니어 레이아웃 – 여유공간 설정하기 (계속) <Text. View android: id="@+id/button 01" android: layout_width="wrap_content" android: layout_height="wrap_content" android: background="#ffffff 00" android: text="텍스트" android: text. Color="#ffff 0000" android: text. Size="24 dp" android: padding= "20 dp" 위젯 내부 여백 설정 /> Continued. . 3. 리니어 레이아웃 - 29 -
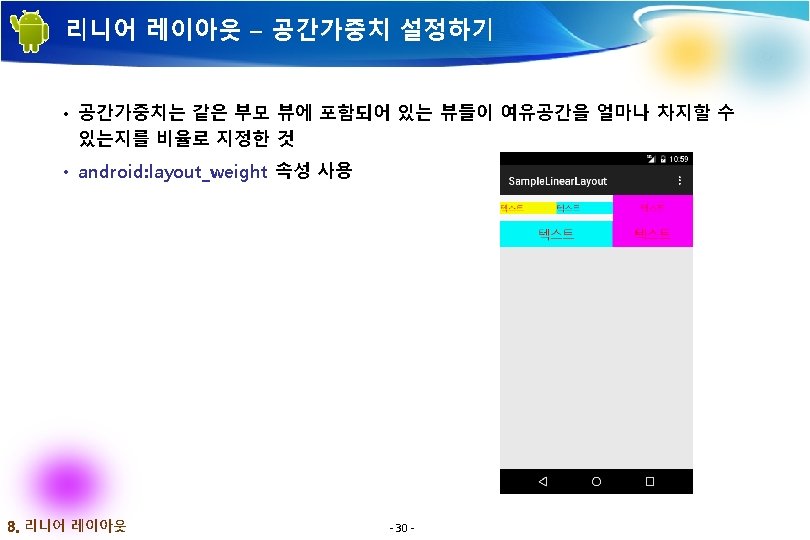
리니어 레이아웃 – 공간가중치 설정하기 <Text. View android: id="@+id/button 01" android: layout_width="wrap_content" android: layout_height="wrap_content" android: background="#ffffff 00" android: text="텍스트" android: text. Color="#ffff 0000" android: text. Size="16 dp" android: layout_weight= "1" 공간 가중치 설정 /> Continued. . 3. 리니어 레이아웃 - 31 -
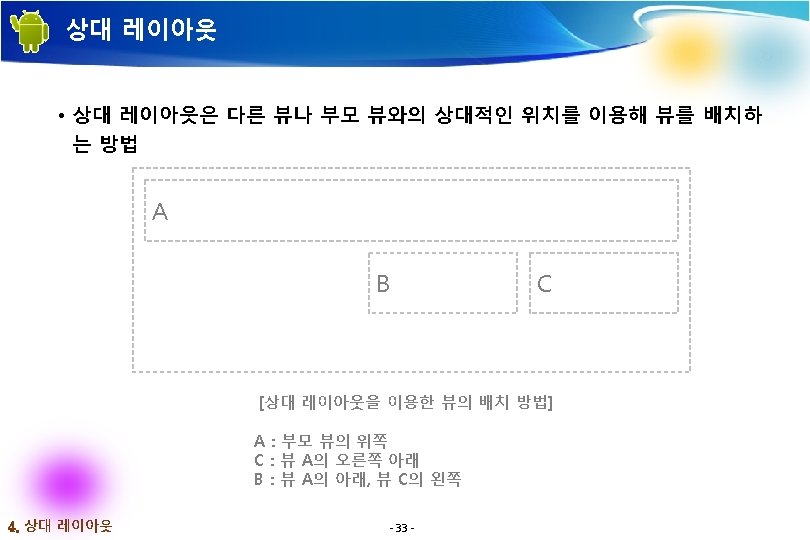
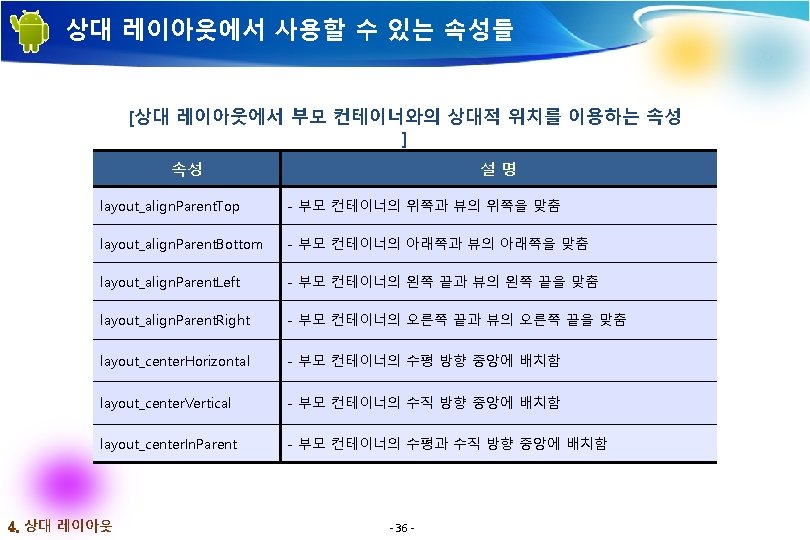
상대 레이아웃의 속성 사용 <Relative. Layout xmlns: android="http: //schemas. android. com/apk/res/android" android: layout_width=“match_parent" android: layout_height=“match_parent" > <Button android: text="전체버튼" android: text. Color="#ff 000000" android: text. Size="24 sp" android: background="#ff 00 ffff" android: layout_width=“match_parent" android: layout_height=“match_parent" android: layout_center. In. Parent= "true" 1 한 가운데 배치 /> Continued. . 4. 상대 레이아웃 - 34 -
상대 레이아웃의 속성 사용 (계속) <Button android: text="하단버튼" android: text. Color="#ff 000000" android: text. Size="24 sp" android: layout_width=“match_parent" android: layout_height="wrap_content" 2 android: layout_align. Parent. Bottom= "true" /> </Relative. Layout> 4. 상대 레이아웃 - 35 - 아래쪽 배치
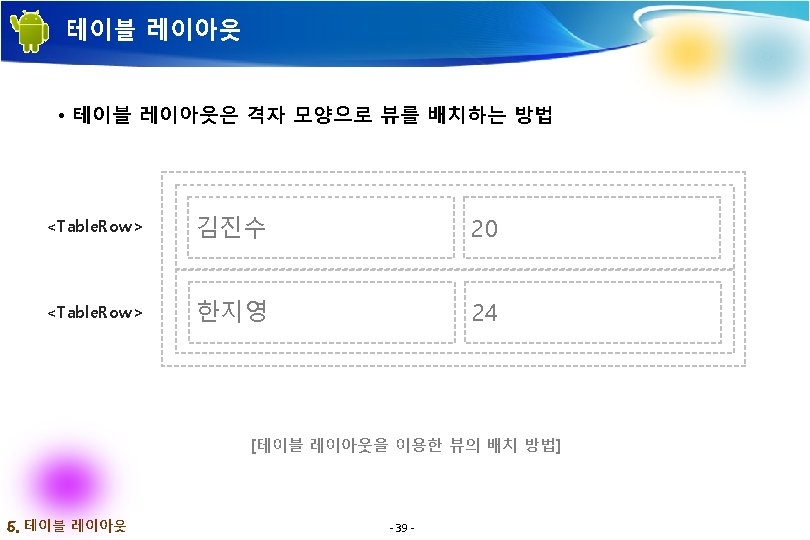
테이블 레이아웃 <Table. Layout xmlns: android="http: //schemas. android. com/apk/res/android" android: layout_width=“match_parent" android: layout_height="wrap_content" android: stretch. Columns= "1" 1 폭에 맞추어 열을 자동 확장 > <Table. Row> <Text. View android: text="Name : " android: text. Size="24 dp" android: padding="10 dp" /> <Text. View 2 테이블의 첫 번째 행 android: text="박찬기" android: text. Size="24 dp" android: gravity="left" android: padding="10 dp" /> </Table. Row> 5. 테이블 레이아웃 - 40 -
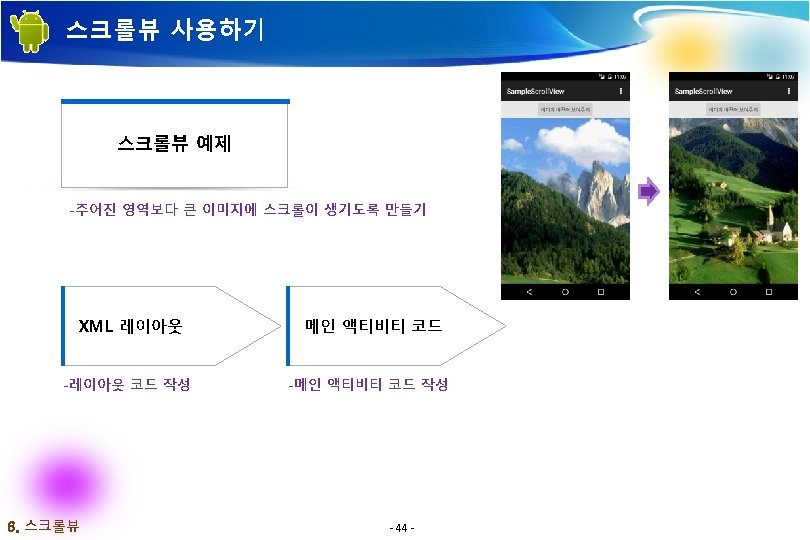
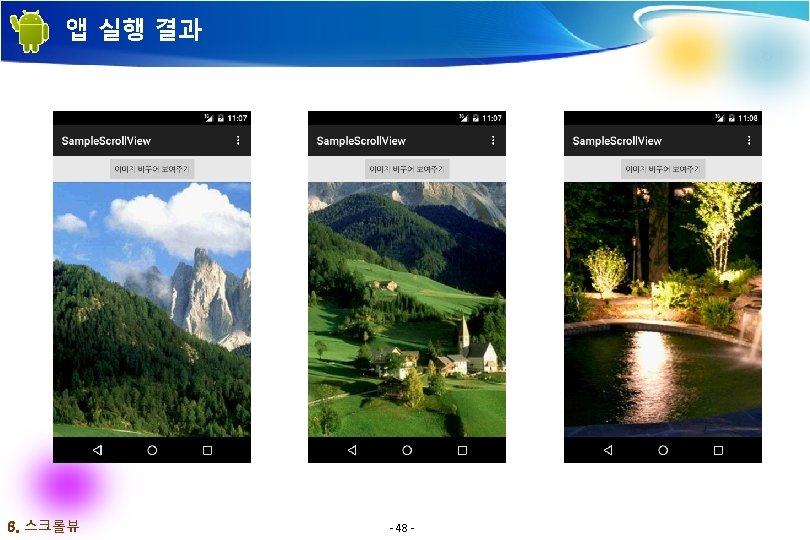
스크롤뷰 사용하기 • 사용 예 – 텍스트뷰를 스크롤뷰로 감싸주는 경우 <Scroll. View android: layout_width=“match_parent" android: layout_height=“match_parent" > <Text. View android: id="@+id/text. View" android: layout_width=“match_parent" android: layout_height=“match_parent" /> </Scroll. View> 6. 스크롤뷰 - 43 -
스크롤뷰의 XML 레이아웃 <Linear. Layout xmlns: android="http: //schemas. android. com/apk/res/android" android: orientation="vertical" android: layout_width=“match_parent" android: layout_height=“match_parent" > <Button android: id="@+id/button" android: layout_width="wrap_content" android: layout_height="wrap_content" android: layout_gravity="center" 1 버튼 2 가로방향 스크롤뷰 android: text=“이미지 바꾸어 보여주기" /> <Horizontal. Scroll. View android: id="@+id/hor. Scroll. View 1" android: layout_width="wrap_content" android: layout_height="wrap_content" > Continued. . 6. 스크롤뷰 - 45 -
스크롤뷰의 XML 레이아웃 (계속) <Scroll. View android: id="@+id/scroll. View" android: layout_width="wrap_content" 3 스크롤뷰 android: layout_height="wrap_content" > <Image. View android: id="@+id/image. View" android: layout_width="wrap_content" 4 이미지뷰 android: layout_height="wrap_content" /> </Scroll. View> </Horizontal. Scroll. View> </Linear. Layout> 6. 스크롤뷰 - 46 -
스크롤뷰의 메인 액티비티 코드 … scroll. View = (Scroll. View) find. View. By. Id(R. id. scroll. View); 1 객체 참조 image. View = (Image. View) find. View. By. Id(R. id. image. View); … scroll. View. set. Horizontal. Scroll. Bar. Enabled(true); 2 기능 설정 Resources res = get. Resources(); Bitmap. Drawable bitmap = (Bitmap. Drawable) res. get. Drawable(R. drawable. system_architecture); int bitmap. Width = bitmap. get. Intrinsic. Width(); 3 이미지 참조 int bitmap. Height = bitmap. get. Intrinsic. Height(); image. View. set. Image. Drawable(bitmap); image. View. get. Layout. Params(). width = bitmap. Width; 4 크기 설정 image. View. get. Layout. Params(). height = bitmap. Height; … Continued. . 6. 스크롤뷰 - 47 -
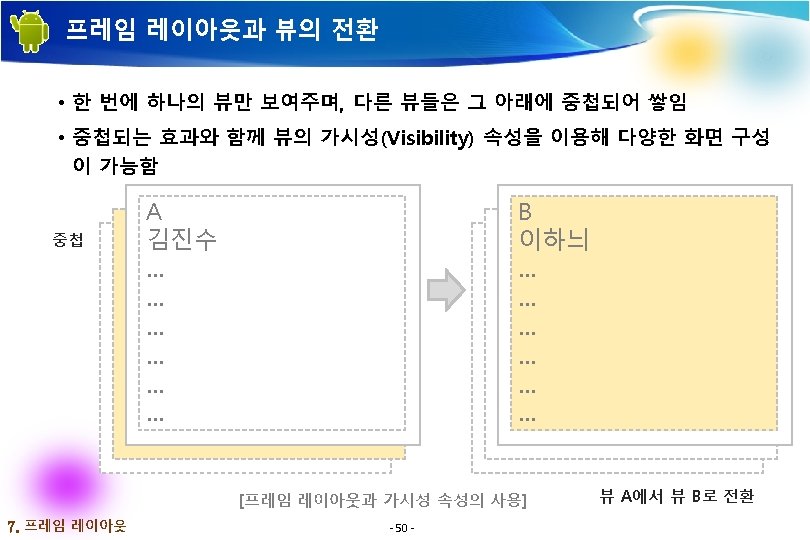
가시성 속성 사용하기 • 사용 예 – XML 레이아웃 • 사용 예 – 소스 코드 layout 1. set. Visibility(View. GONE); <Linear. Layout android: id=“@+id/layout 1" layout 1. set. Visibility(View. VISIBLE); android: layout_width=“match_parent" layout 1. set. Visibility(View. INVISIBLE); android: layout_height=“match_parent" android: orientation=“vertical“ android: visibility=“gone“ > <Text. View android: layout_width=“match_parent" android: layout_height=“match_parent" /> </Scroll. View> 7. 프레임 레이아웃 - 51 -
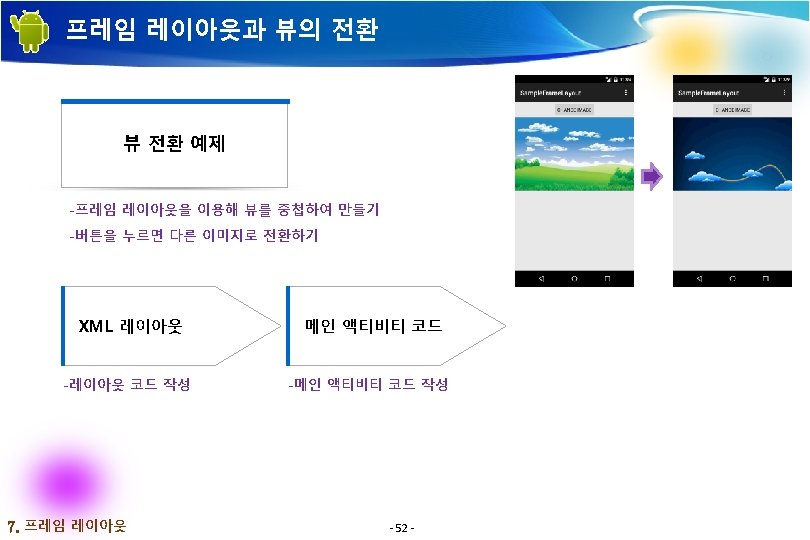
프레임 레이아웃과 뷰의 전환 – XML 레이아웃 <Linear. Layout xmlns: android="http: //schemas. android. com/apk/res/android" android: orientation="vertical" android: layout_width=“match_parent" android: layout_height=“match_parent" > <Button android: id="@+id/button 1" android: layout_width="wrap_content" android: layout_height="wrap_content" 1 전환 버튼 android: layout_gravity="center" android: text="Change Image" /> <Frame. Layout android: layout_width=“match_parent" android: layout_height=“match_parent" 2 화면 채우기 > Continued. . 7. 프레임 레이아웃 - 53 -
프레임 레이아웃과 뷰의 전환 – XML 레이아웃 <Image. View android: id="@+id/image. View 1" android: layout_width="wrap_content" android: layout_height="wrap_content" android: src="@drawable/dream 01" android: visibility= "invisible" 3 이미지 뷰 설정 /> <Image. View android: id="@+id/image. View 2" android: layout_width="wrap_content" android: layout_height="wrap_content" android: src="@drawable/dream 02" android: visibility= "visible" /> 4 이미지 뷰 설정 </Frame. Layout> </Linear. Layout> 7. 프레임 레이아웃 - 54 -
프레임 레이아웃과 뷰의 전환 – 메인 액티비티 코드 private void change. Image() { if (image. Index == 0) { image. View 1. set. Visibility(View. VISIBLE); image. View 2. set. Visibility(View. INVISIBLE); 1 이미지 뷰 설정 image. Index = 1; } else if (image. Index == 1) { image. View 1. set. Visibility(View. INVISIBLE); image. View 2. set. Visibility(View. VISIBLE); 2 이미지 뷰 설정 image. Index = 0; } } } 7. 프레임 레이아웃 - 55 -
기본 위젯 – 텍스트뷰의 속성 사용 <Linear. Layout xmlns: android="http: //schemas. android. com/apk/res/android" android: orientation="vertical" android: layout_width=“match_parent" android: layout_height=“match_parent" > <Text. View android: id="@+id/Text. View 01" android: layout_width="wrap_content" android: layout_height="wrap_content" android: background= "#ff 000055" 1 배경색 설정 android: padding="3 px" android: text="여기에 사용자 이름을 입력하세요. " android: text. Size= "22 sp" 2 android: text. Style= "bold" 3 스타일 설정 android: text. Color= "#88 ff 8888" android: single. Line= "true" android: gravity="center" /> 크기 설정 4 5 색상 설정 한 줄 설정 </Linear. Layout> 8. 기본 위젯들 - 58 -
기본 위젯 – 버튼의 속성 사용 <Linear. Layout xmlns: android="http: //schemas. android. com/apk/res/android" android: orientation="vertical" android: layout_width=“match_parent" android: layout_height=“match_parent" > <Button android: id="@+id/btn. Exit" android: layout_width="wrap_content" android: layout_height="wrap_content" android: text=" 선택 " 1 기본 버튼 android: text. Size="24 dp" android: text. Style="bold" android: gravity="center" /> Continued. . 8. 기본 위젯들 - 59 -
기본 위젯 – 버튼의 속성 사용 (계속) <Radio. Group android: id="@+id/radio. Group 01" android: layout_width="wrap_content" android: layout_height="wrap_content" 2 라디오 그룹 android: orientation="horizontal" android: padding. Left="5 dp" android: padding. Right="5 dp" > <Radio. Button android: id="@+id/radio 01" android: layout_width="wrap_content" android: layout_height="wrap_content" android: layout_weight="1" android: text="남성" 3 첫 번째 버튼 android: text. Color="#ffaaff 10" android: text. Style="bold" android: text. Size="24 dp" /> 8. 기본 위젯들 Continued. . - 60 -
기본 위젯 – 버튼의 속성 사용 (계속) <Radio. Button android: id="@+id/radio 02" android: layout_width="wrap_content" android: layout_height="wrap_content" android: layout_weight="1" 4 두 번째 버튼 android: text="여성" android: text. Color="#ffaaff 10" android: text. Style="bold" android: text. Size="24 dp" /> </Radio. Group> <Linear. Layout android: layout_width=“match_parent" android: layout_height="wrap_content" android: gravity="center_vertical|center_horizontal" android: padding. Top="10 dp" > Continued. . 8. 기본 위젯들 - 61 -
기본 위젯 – 버튼의 속성 사용 (계속) <Text. View android: layout_width="wrap_content" android: layout_height="wrap_content" android: text="하루종일" android: text. Size="24 dp" android: padding. Right="10 dp" android: text. Color="#ffaaff 10" /> <Check. Box android: id="@+id/all. Day" android: layout_width="wrap_content" 5 android: layout_height="wrap_content" /> </Linear. Layout> 8. 기본 위젯들 - 62 - 체크 박스
기본 위젯 – 입력상자의 속성 사용 <Linear. Layout xmlns: android="http: //schemas. android. com/apk/res/android" android: orientation="vertical" android: layout_width=“match_parent" android: layout_height=“match_parent" > <Edit. Text android: id="@+id/edit. Text 1" android: layout_width=“match_parent" android: layout_height="wrap_content" android: text. Size="18 sp" android: auto. Text= "true" 1 설정 android: capitalize= "words" 2 변경 3 표시 android: hint= "이름을 입력하세요. " > </Edit. Text> </Linear. Layout> 8. 기본 위젯들 - 63 -
기본 위젯 – 이미지뷰의 속성 사용 <Image. Button android: id="@+id/Image. Button 01" android: background="@drawable/ok_btn" android: layout_width=“ 24 dp" 1 이미지 버튼 android: layout_height=“ 24 dp" … /> <Image. View android: id="@+id/Image. View 01" android: background="@drawable/person" 2 android: layout_width=“ 32 dp" android: layout_height=“ 32 dp" … /> 8. 기본 위젯들 - 64 - 이미지 뷰
참고 문헌 [ References] • 기본 서적 2015, 정재곤, “Do it! 안드로이드 앱 프로그래밍(개정 2판)”, 이지스퍼블리싱(주) • Android Website http: //www. android. com/ • Google Developer’s Conference http: //code. google. com/events/io/ • Android SDK Documentation References - 65 -