WSPATR Submission Process 2019 Website Details www itaware

WSP-ATR Submission Process 2019

Website Details www. itaware. co. za “Step 1” Step 1 – Click “LOGIN” Step 2 – Click “WSP / ATR System” “Step 2”

SDF Registration Process 1 “REGISTER” STEP 1 STEP 2 STEP 1: - Click “ Register” STEP 2: - Complete all the Fields STEP 3: - Click Register User STEP 4: - Click Finish STEP 3 STEP 4

SDF Login Process 2 “LOGIN” Step 1 Step 2 Step 3 STEP 1: - Click “ Register” STEP 2: - User Name – Should be the South African Identification Document Number or The Passport Number STEP 3: - Password – Enter Password STEP 4: - Click “Login” Step 4

Forgot Password / Change Password STEP 1: - Click “ Forgot Password” STEP 2: - An e-mail with the reset password has sent to the user e-mail Address STEP 2 STEP 3: - Enter the Temporary Password received via e-mail STEP 4: - Click Login Password from email STEP 1 STEP 3 Enter new Password Repeat new Password STEP 4

2019 WSP-ATR AND PIVOTAL SUBMISSIONS PROCESS Click on “Supporting Documents” and download relevant policies, guides and templates. Kindly refrain from printing documents.

SDF Details
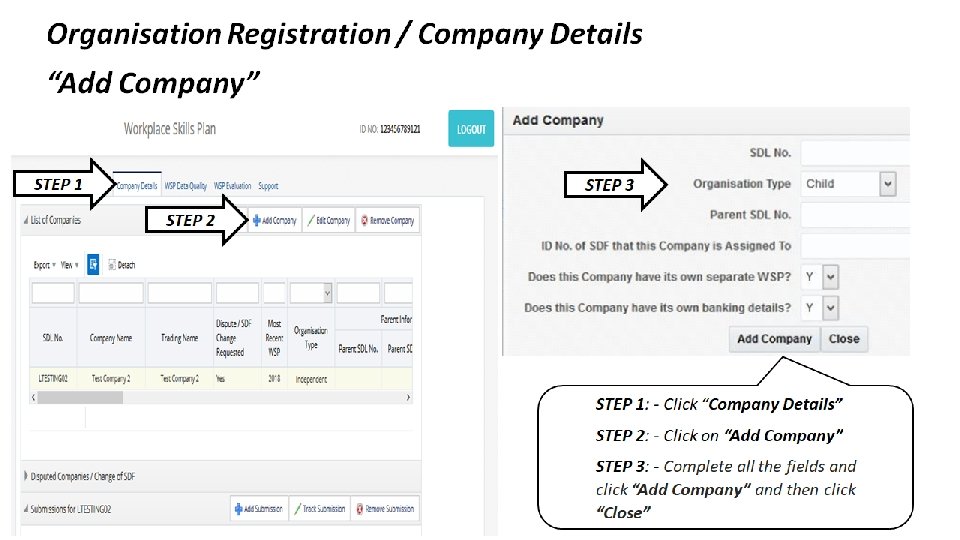

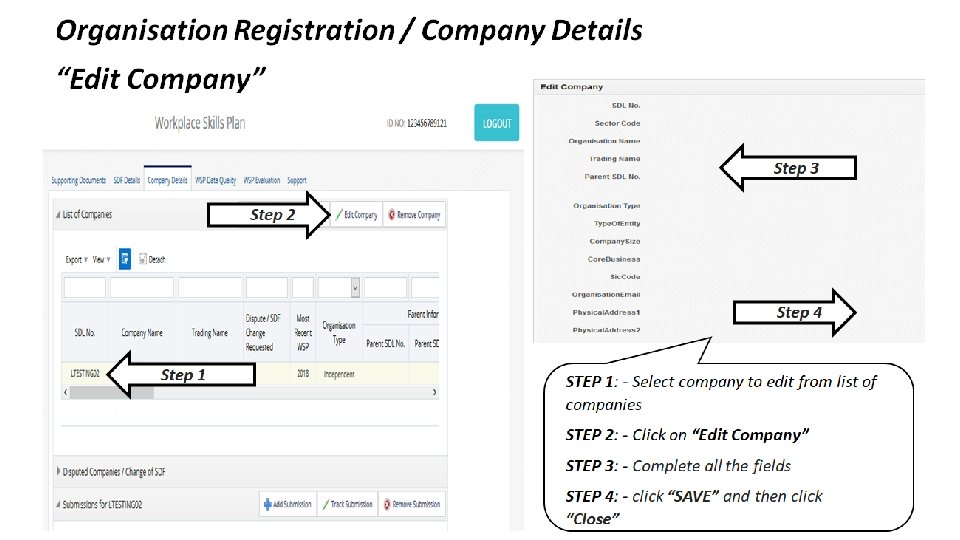
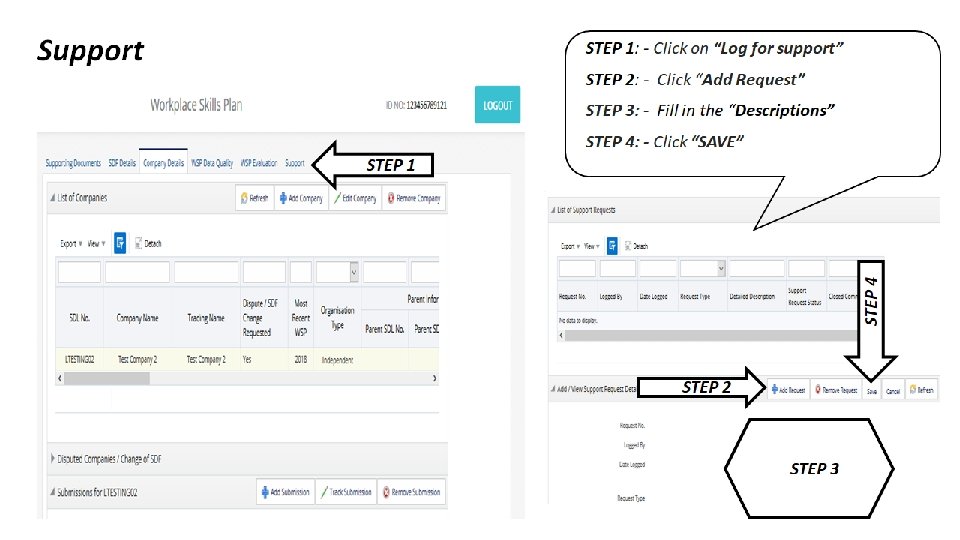
Organisation Registration / Company Details “Change of Responsible SDF” STEP 1 STEP 3 STEP 2 STEP 1: - Click “ Add Levy Number” STEP 2: - Click “ Add Company” STEP 3: - If the Company is already registered by another SDF a popup with the option to resolve such a conflicting registration will appear, Click “YES” STEP 4: An Information Tab will populate by indicating what to be done. Read and click “OK” STEP 5: - A change request (document available under Support Documents) has to be signed by the company officials and upload it under Disputed Companies/Change SDF. STEP 5

Organisation Registration “Add Submission Cycle for 2019” Step 5 Step 3 Step 1 Step 4 Step 2 STEP 1: - Select company STEP 2: - Click on “Add Submission” STEP 3: - Check the SDL No and Organisation Type are correct and then click “Add Submission” STEP 4: - 2018 should appear under Financial year STEP 5: - Click “Refresh” if new year does not appear

STEP 1: - Select company for Verification Document STEP 2: - Make sure to select “ 2019” STEP 3: - Click to download your “Verification Document” STEP 4: - Get your Verification Document Signed and upload on to the system Step 1 STEP 5: - After you upload the document a confirmation email will be received by saying that the submission status has been updated “Verification Document” Step 2 Step 3 Step 5 Step 4

St ep 3 Source Data Upload Step 1 Step 4 Step 5 STEP 1: - Select company STEP 2: - Click here to Upload the “SOURCE DATA TEMPLATE (EXCEL SPREAD SHEET)” Step 2 STEP 3: - Browse the Source data file STEP 4: - Click Process Upload File STEP 5: - Click Generate WSP

Step 3 WSP Report Step 1 Step 4 Step 2 Step 5 STEP 1: - Select Company STEP 2: - Click here to download “WSP Report” STEP 3: - Click “Download Button” Step 6 STEP 4: - Click to “Save File” STEP 5: - Get your WSP Document Signed STEP 6: - Make sure you comply with all the Check Descriptions then click Proceed to submission Upload. After you upload the document a confirmation email will be received by saying that the submission status has been updated “WSP REPORT”

Online Error Check on WSP SECTION 1 The Missing Information, Duplicates and OFO Mapping Errors (to be fixed Offline) section summarises all the errors that need to be corrected in the Excel source data and then re-upload. SECTION 2 This section contains a summary of OFO specialisations per OFO code that are wrong or does not match the list of Alternative Titles and Specialisations for a specific OFO Code. These errors could be corrected online SECTION 3 The last section contains details of errors that could be corrected on the system after the final source data upload. Errors are listed per sheet and could be corrected by selecting the appropriate value from the dropdown list for each field on the respective sheets Click in WSP Data Quality Please note If there are blank values in the source data the online error facility will not activate the online error fixing utility. The system cannot fix blank values. The source data then must be amended and reuploaded
 STEP 1:")
Submission Completed (How to make sure that you have completed the process) STEP 1: - Upload of Signed Verification - Click View Button to make sure that you have uploaded the correct document - Dash Board should indicate Signed Verification Document Uploaded is "YES” STEP 2: - Upload of Signed WSP Report - Click View Button to make sure that you have uploaded the correct document - Dash Board should indicate Signed WSP Uploaded is "YES”

SOURCE DATA TEMPLATE
")
Worksheet 1 - Biodata Worksheet 2 - Training Worksheet 3 - HARD-TO-FILL VACANCY (HTFV)

Worksheet 4 – Generic or “Top-up” Skills Survey Worksheet 7 – Finance and Training Comparison

OFO MAPPING

STEP 1: - Capture the Job Title STEP 2: - Choose the right Occupation STEP 3: - Click Select Occupation Mapping done
- Slides: 22