Workshop Technology 11 Cutting tools and cutting materials








- Slides: 65

Workshop Technology -11

Cutting tools and cutting materials

INTRODUCTION Cutting material are shaped with the help of cutting tools into useable form through various process. The work piece of most different shapes and sizes and of different material are worked.

CUTTING TOOLS The tools which are used for the purpose of cutting the metal in the desired shape and size are called cutting tools.

Single point cutting tools When the cutting tool terminates into single point it is termed as a single point tool. These tools are used on lathes, Shapers, Planers and for boring works.

Classification of cutting tools Single point cutting tools Multi point cutting tools

Multi point cutting tools These tools are used as milling cutter, Drills, Broaches and for grinding works. Types : 1) Linear motion tools 2)Rotary motion tools 3) linear and rotary tools

Types of single point cutting tools A cutting tool is used either for cutting apart or for removing chips. Various types of single point cutting tools having a wedge like action find a wide application on lathe machine, shaper, planner and slotter etc.

Tools for Lathe Machine 1) Turning tool 2) Facing tool 3) Chamfering tool 4) External Threading tool 5) Internal threading tool 6)Boring tool

Tools for Planer 1) Straight and bent roughing tool. 2) Straight, Roundness and goose neck tools.

Tools for shaper and slotter 1) Roughing for CI, Brass or Bronze 2) Finishing tools for CI brass 3) Cutting tool for Steel and tough metal 4) Cutting tool for aluminium and other soft material

Single point cutting tool geometry Cutting tool geometry concern with basic tool angles i. e. angles ground on tool to make it efficient in cutting. A single point cutting tool has only one cutting edge and is widely used in routine workshop.

Parts of single point cutting tools 1) Shank 2) Face 3) Flank 4) Heel 5) Base 6) Nose 7) Point

Principal angles of a single point cutting tool The different angles provided on a single point cutting tool have a great significance role to play in successful and efficient machining of different metals.

Parts of principal angle 1) Rake Angle : Rake angle may be positive, Negative or Zero. 2) Side Rake Angle 3) Back Rake or Top Rake angle 4) Lip Angle 5) Clearance Angle

Parts of principal angle 6) Front Clearance Angle 7) Side Clearance Angle 8) Relief Angle or End Relief Angle 9) Cutting Angle 10) Nose Radius 11) Side cutting edge 12) End cutting edge angle

TOOL SIGNATURE The term TOOL SIGNATURE is used to denote a standardised system of specifying the principal tool angle of a single point cutting tool. Signature of a tool always stated in the following order: 1) Back rake angle 2) Side rake angle 3) End relief angle

4) Side relief angle 5) End cutting edge angle 6) Side cutting edge angle 7) Nose radius

EFFECT OF TOOL SIGNATURE It allow chips to flow in a convenient direction. It reduces the cutting field required to shear the metal and consequently help to increase the tool life and reduces the power consumed. It improve the surface finish.

Heat produced during cutting Considerable heat during machining process is generated at the cutting edge of the tool due to friction between tool and work and the plastic shearing of the metal in the form of chips, When the tool is machining metal on a machine tool.

Evolution of heat at three zones Zone A is the shear zone. Zone B is the Friction zone. Zone C is the work tool contact zone.

Effect of heat produced during cutting 1) The heat produced reduce the tool life. 2) The heat causes the chip material to weld to the tool face due to friction between the chip and tool. 3) The heat reduces the surface finish.

Prevention of heat produced during cutting 1) Reduce Friction. 2) Reduce Temperature. 3) Reduce Pressure. 4) Preventing Metal to Metal contact.

Cutting Speed Cutting speed of cutting tool is defined as the speed at which the cutting edge passes over the material and it is expressed in meter per minute.

Effect of cutting speed and FEED 1) Cutting speed has maximum influence on tool life. 2) Tool life decreases as the cutting speed increases. FEED : The feed of a cutting tool is defined as the distance the tool advances into or along the workpiece each time the tool point passes a certain position in its travel over the surface.

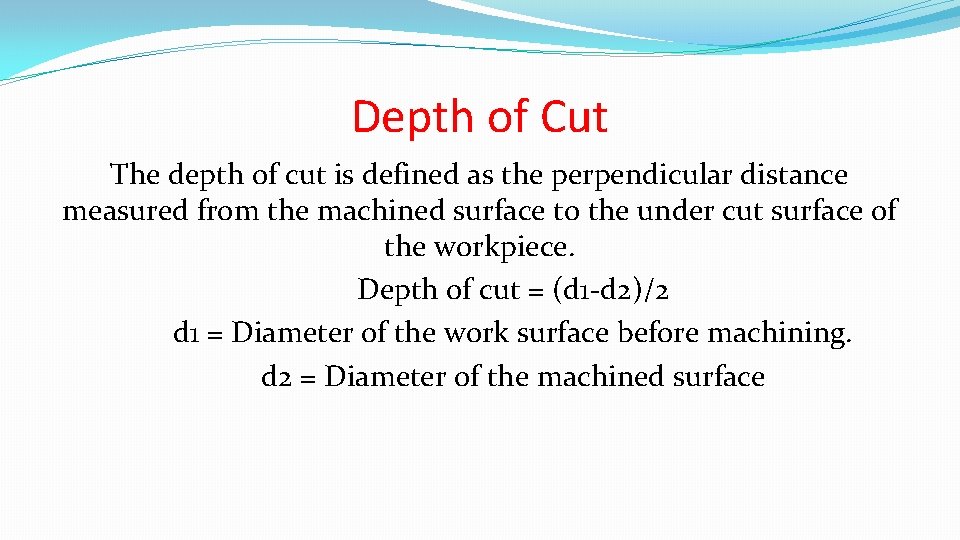
Depth of Cut The depth of cut is defined as the perpendicular distance measured from the machined surface to the under cut surface of the workpiece. Depth of cut = (d 1 -d 2)/2 d 1 = Diameter of the work surface before machining. d 2 = Diameter of the machined surface

Effects Kind of material being cut Shape and dimension of cutting elements Type of finish desired Type of coolant used

CUTTING TOOL MATERIALSA With a great variety of machine and machining operation in use, there is no single tool material, which fulfil all the factors encountered during machining process. The relative importance of each item shifts with the nature of product machined i. e. high or low precision cost, the volume of production, the type of machining operation intermittent or continuous.

PROPERTIES 1) 2) 3) 4) 5) It should be harder than the material of workpiece. It should have ability to retain its harness at high temperature called hardness. It should have the ability to resist shock called toughness. It should have high resistance against wear to have longer too life. It should be able to fabricated and shaped easily.

Various cutting tool Material High speed steel Tungsten carbide Cobalt steel Cemented carbides Stellite Cemented oxide or ceramics Diamond

CHAPTER - 2 LATHE

INTRODUCTION The history of invention of lathe dates back to eighteenth century. The first useful form of lathe with essential features, was made by Henry Maudslay, a britisher in the year 1797.

PRICIPAL OF TURNING Turning in a lathe is to remove excess material from the workpiece to produce a cone shaped or a cylindrical surface. The work is held between centres during turning operation.

VARIOUS TYPES OF LATHE 1) 2) 3) 4) 5) 6) 7) Speed lathe Engine lathe or centre lathe Bench lathe Tool room lathe Capstan and turret lathe Special purpose lathe Automatic lathe

Classification of various lathe 1) Speed lathe : a) Wood working c) Polishing 2) Engine lathe : a) Belt drive c) gear head lathe 3) Special purpose lathe : a) wheel lathe c) T-lathe b) Centering c) spinning b) individual drive b) gap bed lathe d) Missile lathe

LATHE SPECIFICATION MAXIMUM LENGTH BETWEEN CENTRES SWING IN GAP HEIGHT OF CENTRE SWING OVER CARRIAGE SWING OVER BED

DESCRIPTION AND FUNCTION OF PARTS OF LATHE BED HEAD STOCK TAIL STOCK CARRIAGE FEED MECHANISM SCREW OR THREAD CUTTING MECHANISM

BED The bed of lathe acts as the base on which the different fixed and operating parts of the lathe are mounted. This facilitates the correct relative location of the fixed parts and at the same time provides ways for a well guided and controlled movement of the operating part.

HEAD STOCK Head stock is that part of lathe which serves as a housing for the driving arrangements. It is permanently fasted to the left hand end of the lathe.

TAIL STOCK It is located on the inner ways at the right hand end of the bed. It serves the following two main purpose. 1) It supports the other end of work during machining between centres. 2) It hold a tool for performing operations such as drilling, reaming and tapping etc.

Carriage The lathe carriage serves the purpose of supporting, guiding and feeding the tool against the job during the lathe operations. 1) Saddle 2) Cross slide 3) Compound rest 4) Tool post 5) Apron

Feed mechanism and Thread Cutting Mechanism Feed Mechanism : The movement of tool relative to the work is termed as feed. A lathe tool may have three types of feed named as longitudinal, cross and angular. Thread cutting mechanism : The rotation of lead screw is used to transverse the tool along the work to produce screw thread.

Work holding devices Holding between centres Chucks Collets Face plate Mandrels Rests : a) steady Rest b) Follower rest

Lathe Tools a) Shank f) Face b) Flank g) Heel c) Nose h) Rake d) Back Rake i) Side Rake e) Side relief j) End relief k) End cutting edge angle l)Side cutting edge angle

Lathe operation To perform different machining operations on lathe, the workpiece is supported and driven by any of the following method : 1) Workpiece is held between centres and driven by carriers and Cath plates. 2) Workpiece is held on a mandrel which is supported between centres and driven by carriers and catch plates. 3) Workpiece is held and driven by chuck or a face plate or an angle plate.

Plain and step turning Both these operations are simple operations and can be done by holding the job in many different ways. The common methods of holding the work are: 1) Between centres 2) On a face plate 3) In a chuck 4) On a mandrel

Faacing This operation enables the production of a flat surface through machining at the end of job. In this operation the tool is fed at right angles to the axis of job. Since no longitudinal feed is needed, the carriage is clamped to the bed so that it remains stationary during the operation.

Parting Off This is also named as cutting off. This operation is employed for cutting away a desired length from the bar stock which is usually need in separating the finished article from it stock.

Taper Turning A taper is defined as a uniform increase or decrease in diameter of a piece of work measured along its length. In a lath, taper turning means to produce a conical surface by a gradual reduction in diameter from a cylindrical workpiece.

Eccentric Turning If a cylindrical workpiece has two separate axis of rotation, one being out of centre to the other, the workpiece is termed as eccentric and turning of different surface of the workpiece is known as eccentric turning.

DRILLING It is an operation of producing a cylindrical hole in a workpiece by the rotating cutting edge of a cutter known as the drill. Drilling on a lathe is performed by any one of the following methods. 1) The workpiece is held and revolved in a chuck or face plate and the drill is held in tail stock drill holder. 2) The drill is held and driven by a drill chuck attached to the head stock spindle and the work is held against a pad supported by the tail stock spindle.

Reaming It is the operation which follow the operation of drilling and boring for the holes in which very high grade of surface finish and dimensional accuracy is needed. The tool used is called the reamer which has multiple cutting edges.

BORING It is the operation of enlarging and truing a hole produced by drilling, punching, casting or forging. Boring is termed as internal turning. The operation of boring involve enlarging of holes through machining.

THREADING In threading the thread cutting tools should be very carefully set exactly at the height of centres and normal to the axis of the work. If incorrectly set, the thread angle will not be correct and the flanks formed will not be proper.

KNURLING The purpose of knurling is to provide an effective gripping surface on a workpiece to prevent it from slipping when operated by hand. Outside surface of measuring instrument, tools and gauges are usually provided with rolled depression on them in order to provide a better grip in a comparison to a smooth surface.

FORM TURNING Many times it is required to produce parts on a lathe which have neither cylindrical nor tapered surface. Such parts are said to have formed surfaces. For formed surfaces special tools are used which are known as form tool.

SPINNING Spinning which is the process of forming a thin sheet of metal by revolving the workpiece at high speed and pressing it against a former attached to the head stock spindle.

CUTTING PARAMETERS In metal working workpiece of different shapes and dimensions and different materials are worked. The different working process are grouped into cutting and non-cutting. 1. Speed 2. Feed 3. Depth of cut 4. Machining time

LATHE ACCESSORIES The device which help to improve the efficiency of performing a usual lathe operation is called a lathe accessories. Their selection is governed by the type of job to be made. 1. Lathe centres 2. Lathe carriers 3. Chucks 4. Face plate

LATHE ACCESSORIES 5. Angle plate 6. Mandrel 7. Steady rate 8. Follow rest 9. Taper turning attachment 10. Tool post grinder 11. Milling attachment 12. Quick change device for tools

CENTRE OR LATHE ACCESORIES 1. 2. 3. 4. 5. 6. 7. Ordinary centre Half centre Ball centre Pipe centre Frictionless centre Inserted bit type centre Tipped centre

LATHE CARRIERS These are used in conjunction with the driving plate. There are two type of DOG commonly used and named as straight tail and bent tail. The work to be held is inserted in the ‘V’ shaped hole of the DOG and then firmly secured in position by means of set screw.

CHUCKS 1. 2. 3. 4. 5. 6. 7. Four jaw independent chucks Three jaw universal chucks Air or hydraulic operated chucks Magnetic chuck Collect chuck Combination chuck Drill chuck

FACE PLATE It is a circular cast iron disc having a threaded hole at its centre so that it can be screwed to the thread nose of the spindle. It consists of a number of holes and slots by means of which the work can be secured to it.

ANGLE PLATE It is a cast iron disc having a threaded hole at its centre so that it can be screwed to the thread nose of the spindle.