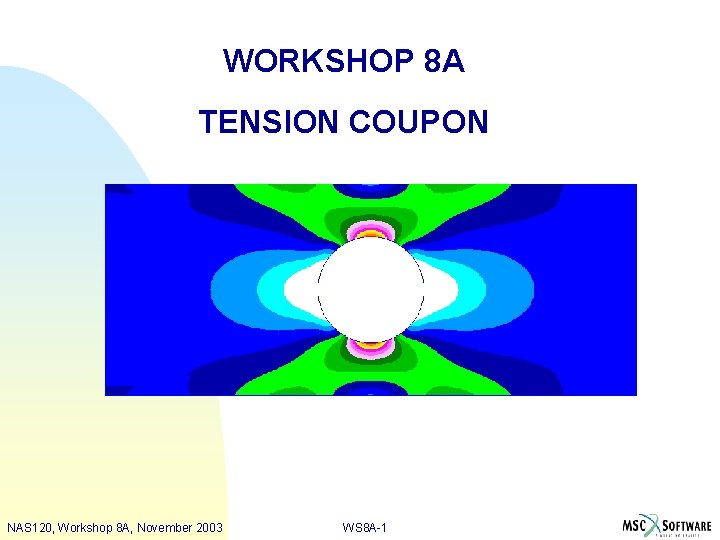
WORKSHOP 8 A TENSION COUPON NAS 120 Workshop
- Slides: 40

WORKSHOP 8 A TENSION COUPON NAS 120, Workshop 8 A, November 2003 WS 8 A-1

NAS 120, Workshop 8 A, November 2003 WS 8 A-2

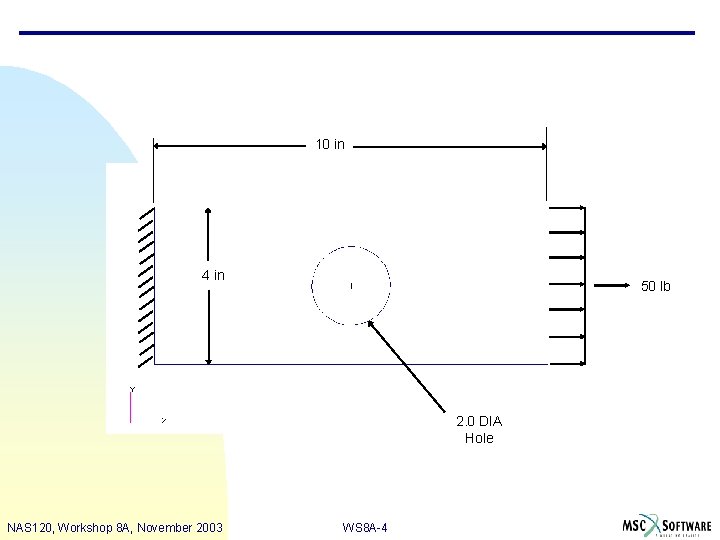
n Problem Description u A tension coupon is constructed from aluminum with E = 10 x 106 psi and n = 0. 3 u The coupon thickness is 0. 125 in u An edge load of 50 lb is applied to the tension coupon NAS 120, Workshop 8 A, November 2003 WS 8 A-3

10 in 4 in 50 lb 2. 0 DIA Hole NAS 120, Workshop 8 A, November 2003 WS 8 A-4

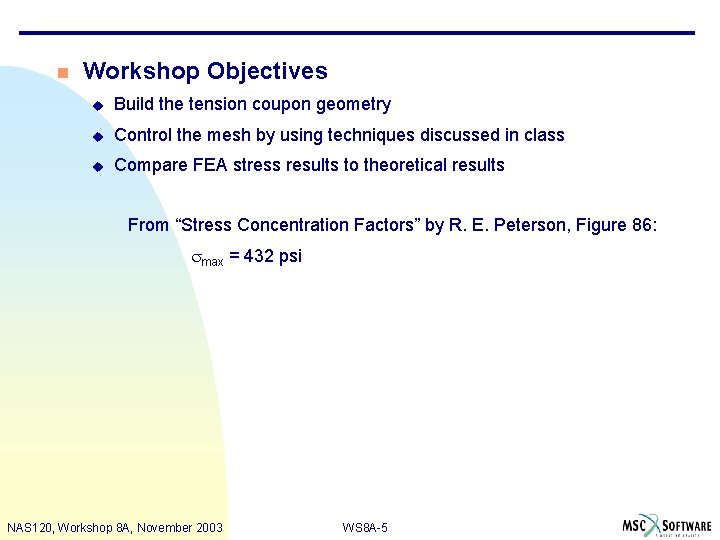
n Workshop Objectives u Build the tension coupon geometry u Control the mesh by using techniques discussed in class u Compare FEA stress results to theoretical results From “Stress Concentration Factors” by R. E. Peterson, Figure 86: smax = 432 psi NAS 120, Workshop 8 A, November 2003 WS 8 A-5

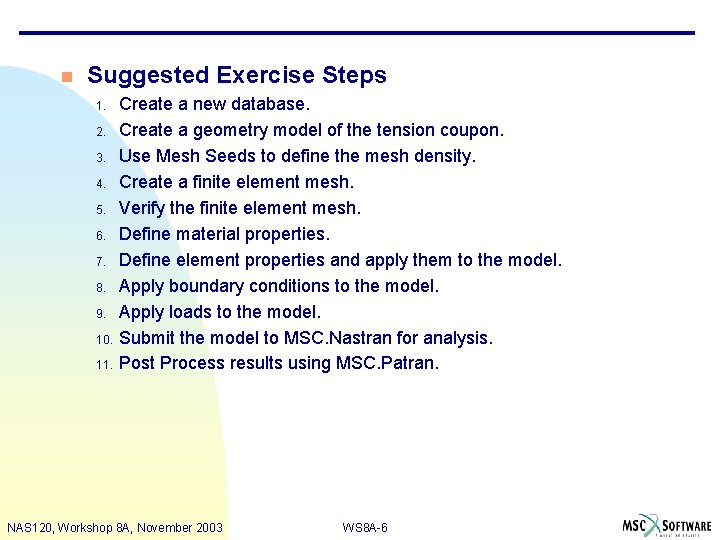
n Suggested Exercise Steps 1. 2. 3. 4. 5. 6. 7. 8. 9. 10. 11. Create a new database. Create a geometry model of the tension coupon. Use Mesh Seeds to define the mesh density. Create a finite element mesh. Verify the finite element mesh. Define material properties. Define element properties and apply them to the model. Apply boundary conditions to the model. Apply loads to the model. Submit the model to MSC. Nastran for analysis. Post Process results using MSC. Patran. NAS 120, Workshop 8 A, November 2003 WS 8 A-6

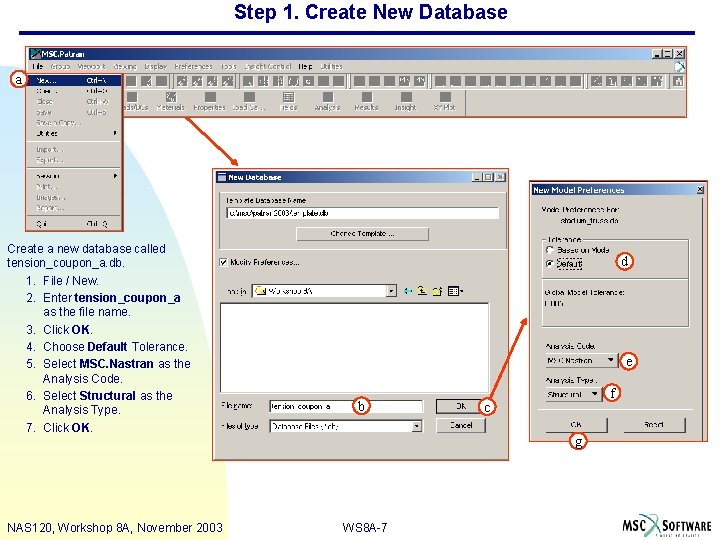
Step 1. Create New Database a a Create a new database called tension_coupon_a. db. 1. File / New. 2. Enter tension_coupon_a as the file name. 3. Click OK. 4. Choose Default Tolerance. 5. Select MSC. Nastran as the Analysis Code. 6. Select Structural as the Analysis Type. 7. Click OK. NAS 120, Workshop 8 A, November 2003 d e b f c g WS 8 A-7

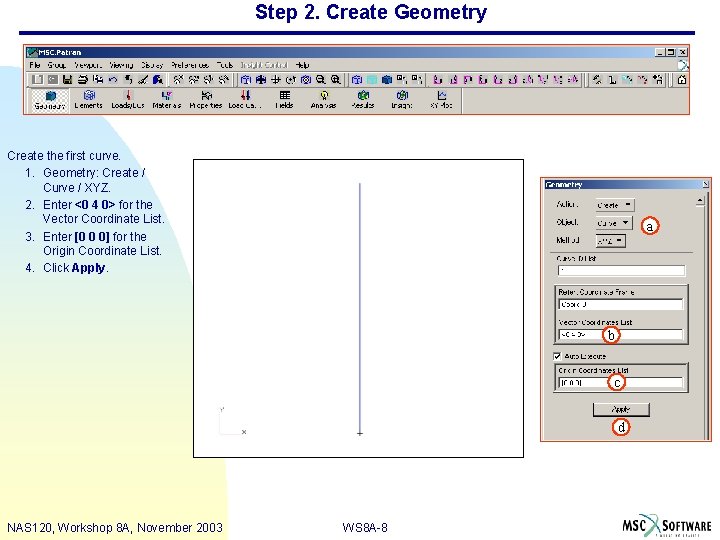
Step 2. Create Geometry Create the first curve. 1. Geometry: Create / Curve / XYZ. 2. Enter <0 4 0> for the Vector Coordinate List. 3. Enter [0 0 0] for the Origin Coordinate List. 4. Click Apply. a b c d NAS 120, Workshop 8 A, November 2003 WS 8 A-8

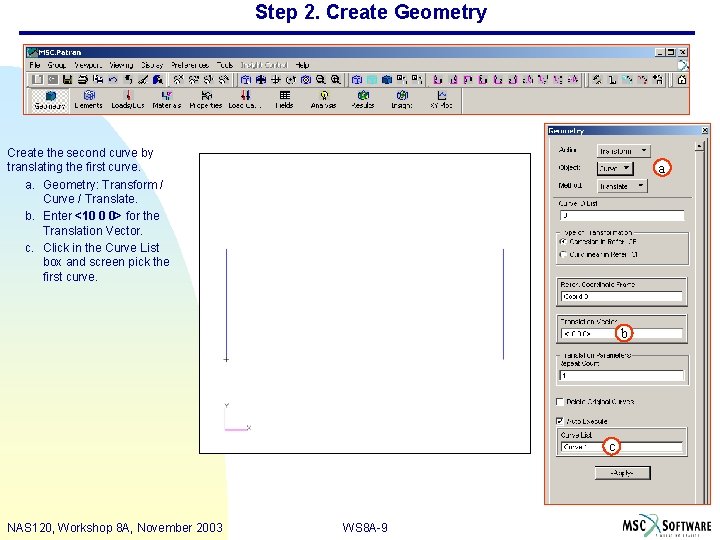
Step 2. Create Geometry Create the second curve by translating the first curve. a. Geometry: Transform / Curve / Translate. b. Enter <10 0 0> for the Translation Vector. c. Click in the Curve List box and screen pick the first curve. a b c NAS 120, Workshop 8 A, November 2003 WS 8 A-9

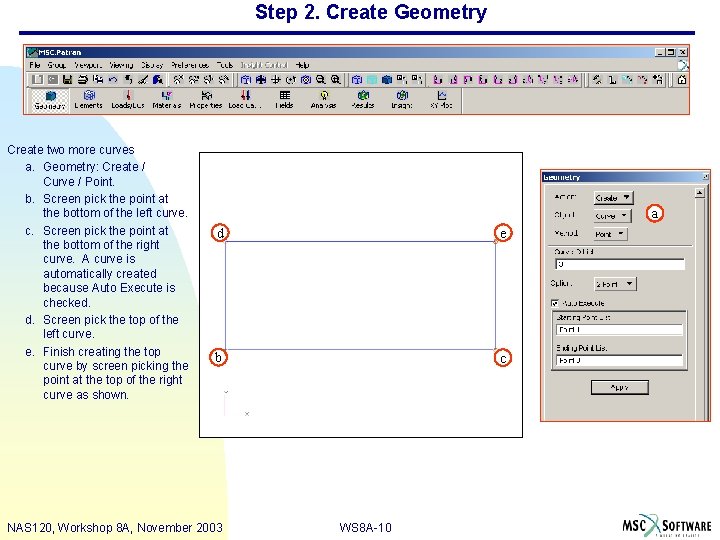
Step 2. Create Geometry Create two more curves a. Geometry: Create / Curve / Point. b. Screen pick the point at the bottom of the left curve. c. Screen pick the point at the bottom of the right curve. A curve is automatically created because Auto Execute is checked. d. Screen pick the top of the left curve. e. Finish creating the top curve by screen picking the point at the top of the right curve as shown. a d e b c NAS 120, Workshop 8 A, November 2003 WS 8 A-10

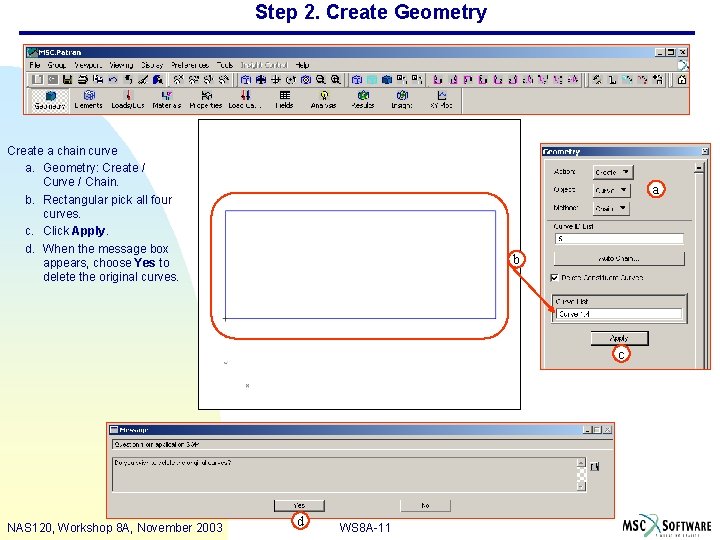
Step 2. Create Geometry Create a chain curve a. Geometry: Create / Curve / Chain. b. Rectangular pick all four curves. c. Click Apply. d. When the message box appears, choose Yes to delete the original curves. a b c NAS 120, Workshop 8 A, November 2003 d WS 8 A-11

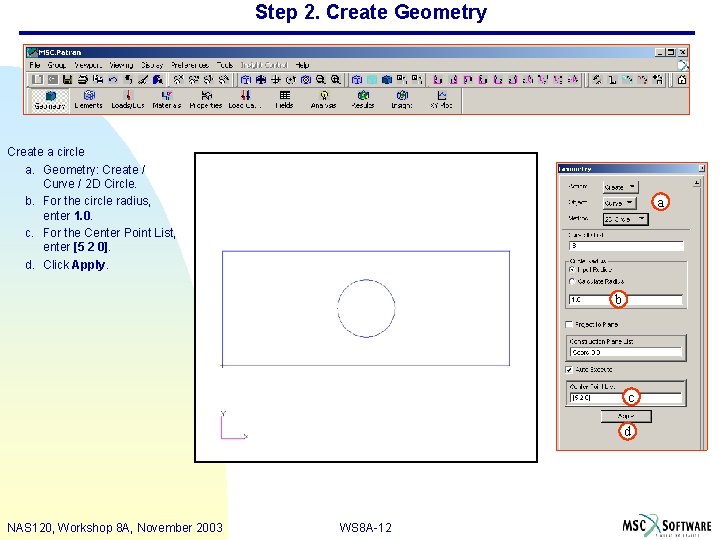
Step 2. Create Geometry Create a circle a. Geometry: Create / Curve / 2 D Circle. b. For the circle radius, enter 1. 0. c. For the Center Point List, enter [5 2 0]. d. Click Apply. a b c d NAS 120, Workshop 8 A, November 2003 WS 8 A-12

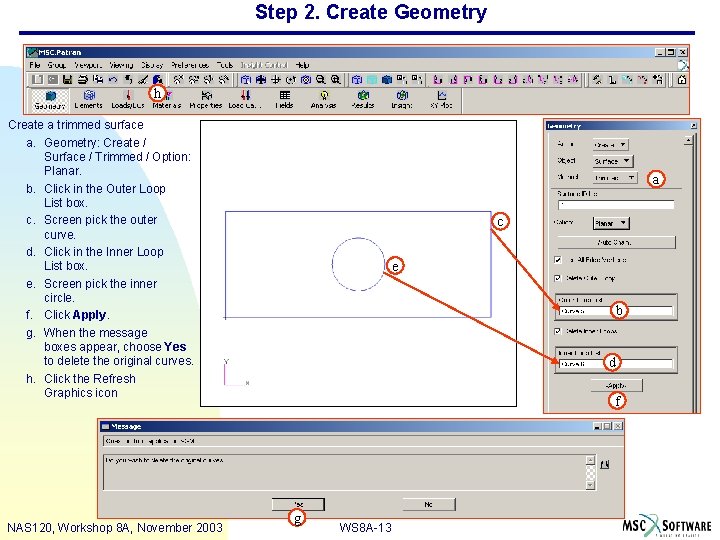
Step 2. Create Geometry h Create a trimmed surface a. Geometry: Create / Surface / Trimmed / Option: Planar. b. Click in the Outer Loop List box. c. Screen pick the outer curve. d. Click in the Inner Loop List box. e. Screen pick the inner circle. f. Click Apply. g. When the message boxes appear, choose Yes to delete the original curves. h. Click the Refresh Graphics icon NAS 120, Workshop 8 A, November 2003 a c e b d f g WS 8 A-13

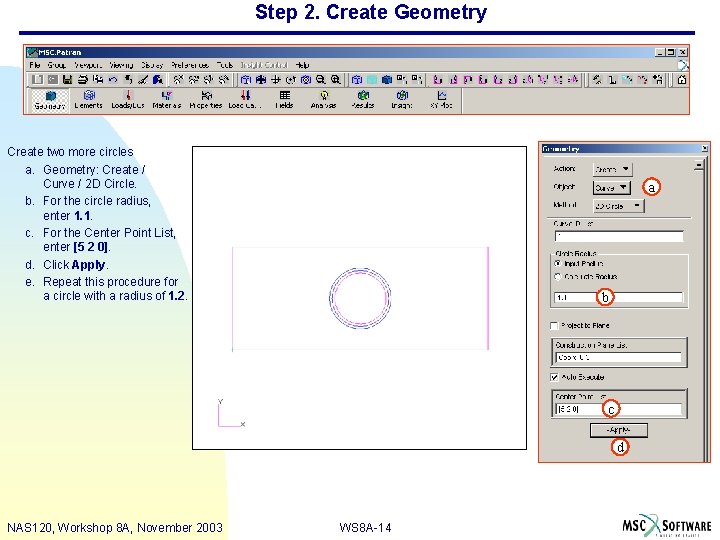
Step 2. Create Geometry Create two more circles a. Geometry: Create / Curve / 2 D Circle. b. For the circle radius, enter 1. 1. c. For the Center Point List, enter [5 2 0]. d. Click Apply. e. Repeat this procedure for a circle with a radius of 1. 2. a b c d NAS 120, Workshop 8 A, November 2003 WS 8 A-14

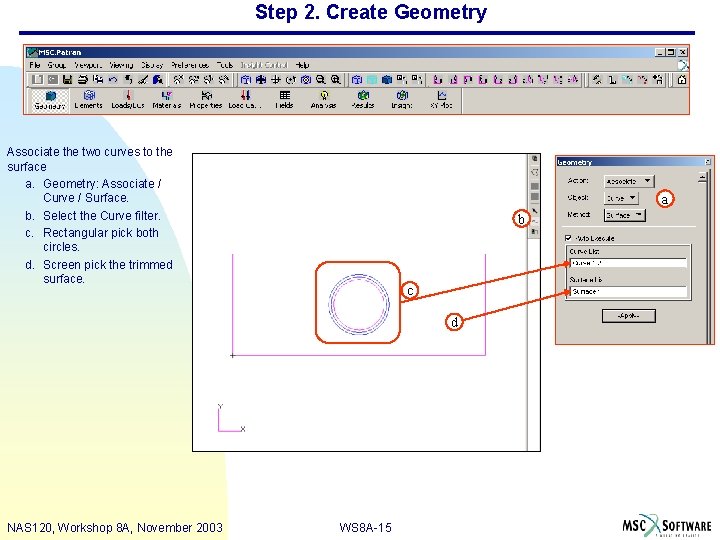
Step 2. Create Geometry Associate the two curves to the surface a. Geometry: Associate / Curve / Surface. b. Select the Curve filter. c. Rectangular pick both circles. d. Screen pick the trimmed surface. a b c d NAS 120, Workshop 8 A, November 2003 WS 8 A-15

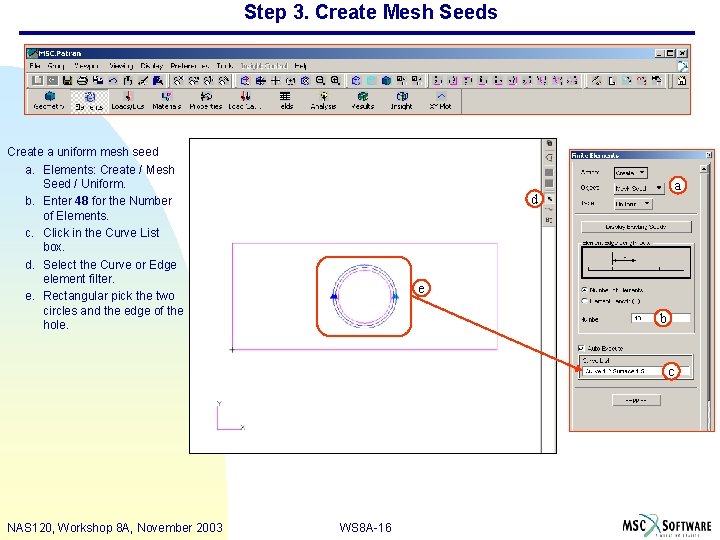
Step 3. Create Mesh Seeds Create a uniform mesh seed a. Elements: Create / Mesh Seed / Uniform. b. Enter 48 for the Number of Elements. c. Click in the Curve List box. d. Select the Curve or Edge element filter. e. Rectangular pick the two circles and the edge of the hole. a d e b c NAS 120, Workshop 8 A, November 2003 WS 8 A-16

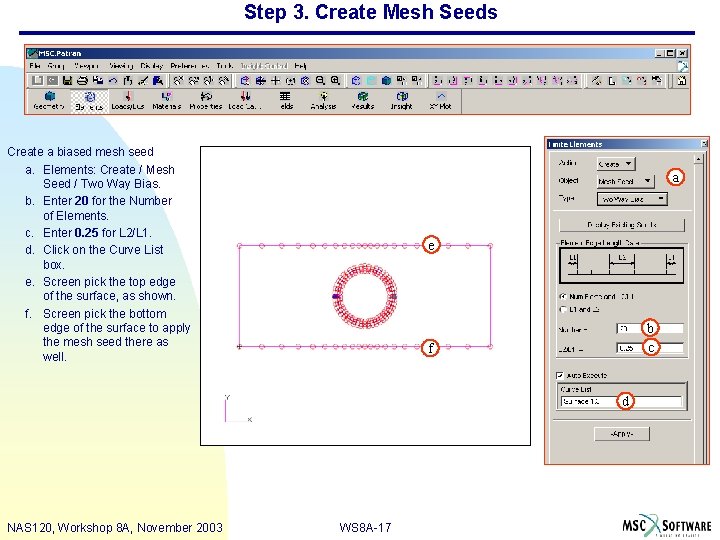
Step 3. Create Mesh Seeds Create a biased mesh seed a. Elements: Create / Mesh Seed / Two Way Bias. b. Enter 20 for the Number of Elements. c. Enter 0. 25 for L 2/L 1. d. Click on the Curve List box. e. Screen pick the top edge of the surface, as shown. f. Screen pick the bottom edge of the surface to apply the mesh seed there as well. a e b c f d NAS 120, Workshop 8 A, November 2003 WS 8 A-17

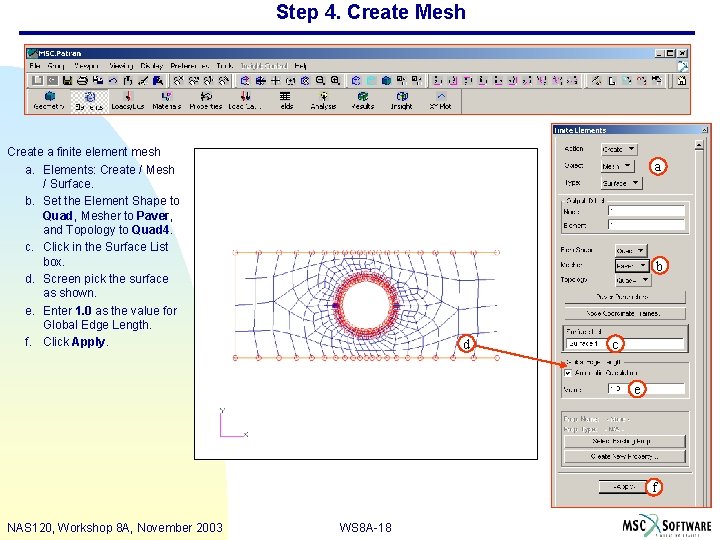
Step 4. Create Mesh Create a finite element mesh a. Elements: Create / Mesh / Surface. b. Set the Element Shape to Quad, Mesher to Paver, and Topology to Quad 4. c. Click in the Surface List box. d. Screen pick the surface as shown. e. Enter 1. 0 as the value for Global Edge Length. f. Click Apply. a b d c e f NAS 120, Workshop 8 A, November 2003 WS 8 A-18

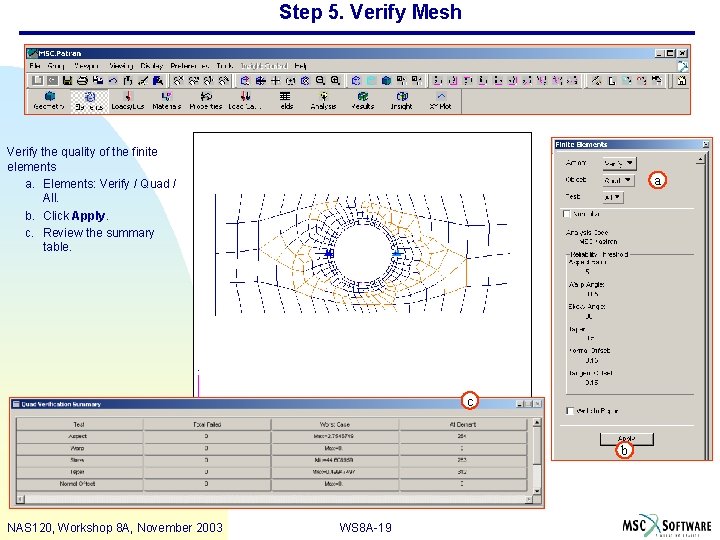
Step 5. Verify Mesh Verify the quality of the finite elements a. Elements: Verify / Quad / All. b. Click Apply. c. Review the summary table. a c b NAS 120, Workshop 8 A, November 2003 WS 8 A-19

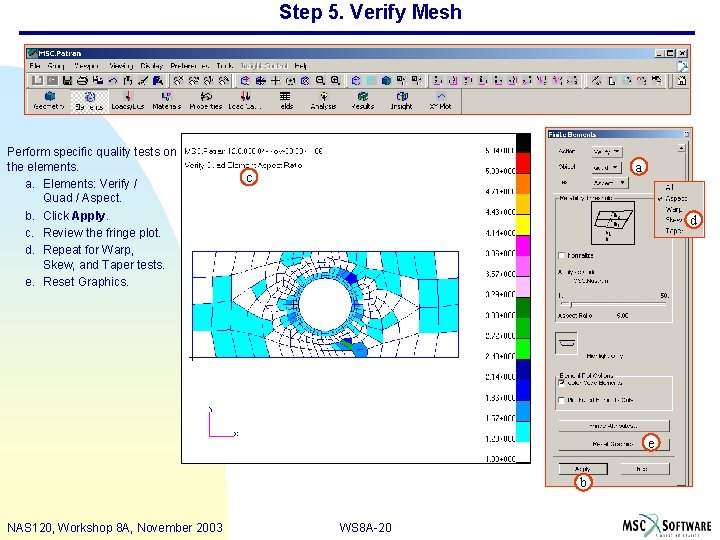
Step 5. Verify Mesh Perform specific quality tests on the elements. a. Elements: Verify / Quad / Aspect. b. Click Apply. c. Review the fringe plot. d. Repeat for Warp, Skew, and Taper tests. e. Reset Graphics. a c d e b NAS 120, Workshop 8 A, November 2003 WS 8 A-20

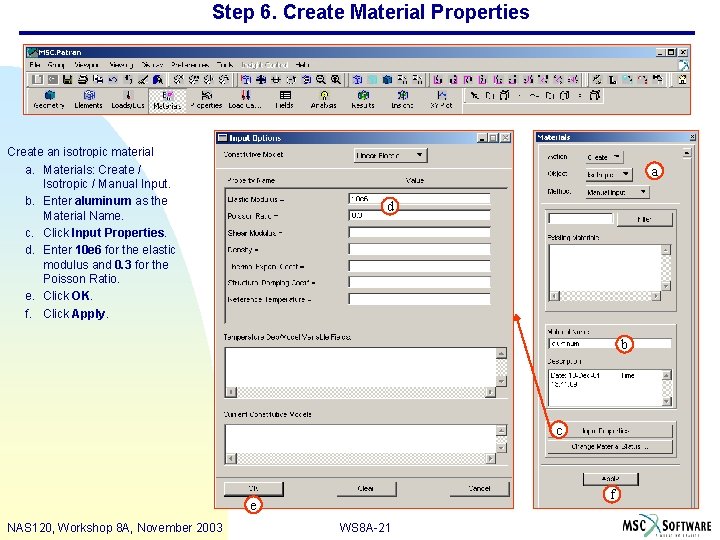
Step 6. Create Material Properties Create an isotropic material a. Materials: Create / Isotropic / Manual Input. b. Enter aluminum as the Material Name. c. Click Input Properties. d. Enter 10 e 6 for the elastic modulus and 0. 3 for the Poisson Ratio. e. Click OK. f. Click Apply. a d b c f e NAS 120, Workshop 8 A, November 2003 WS 8 A-21

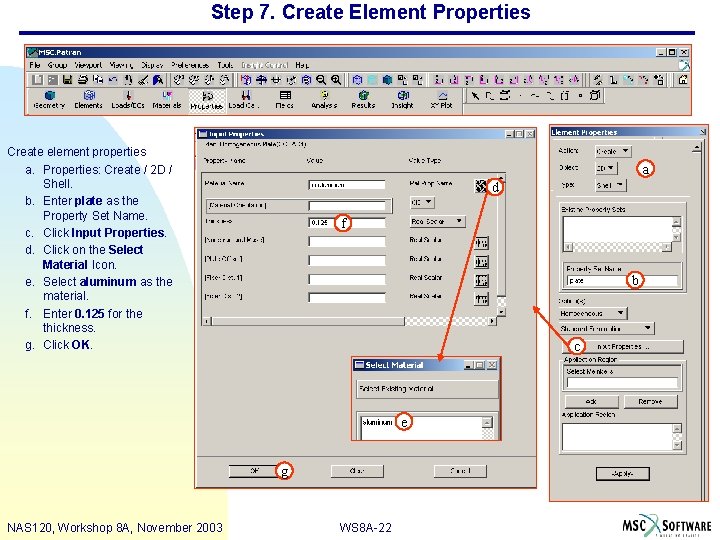
Step 7. Create Element Properties Create element properties a. Properties: Create / 2 D / Shell. b. Enter plate as the Property Set Name. c. Click Input Properties. d. Click on the Select Material Icon. e. Select aluminum as the material. f. Enter 0. 125 for the thickness. g. Click OK. a d f b c e g NAS 120, Workshop 8 A, November 2003 WS 8 A-22

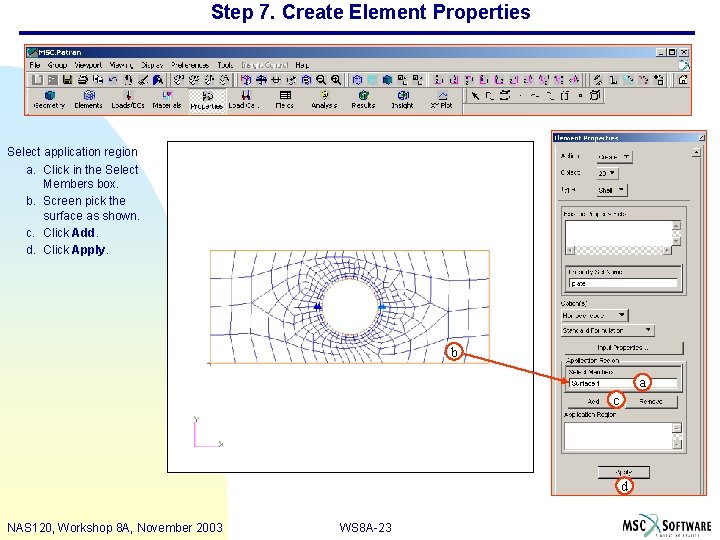
Step 7. Create Element Properties Select application region a. Click in the Select Members box. b. Screen pick the surface as shown. c. Click Add. d. Click Apply. b a c d NAS 120, Workshop 8 A, November 2003 WS 8 A-23

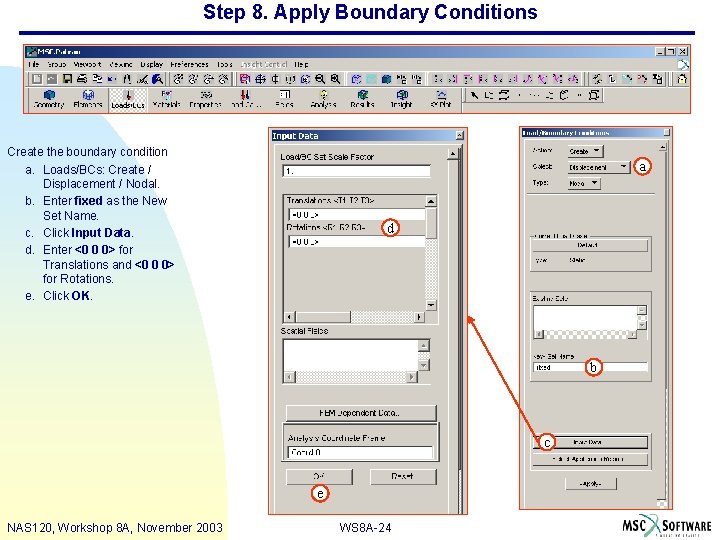
Step 8. Apply Boundary Conditions Create the boundary condition a. Loads/BCs: Create / Displacement / Nodal. b. Enter fixed as the New Set Name. c. Click Input Data. d. Enter <0 0 0> for Translations and <0 0 0> for Rotations. e. Click OK. a d b c e NAS 120, Workshop 8 A, November 2003 WS 8 A-24

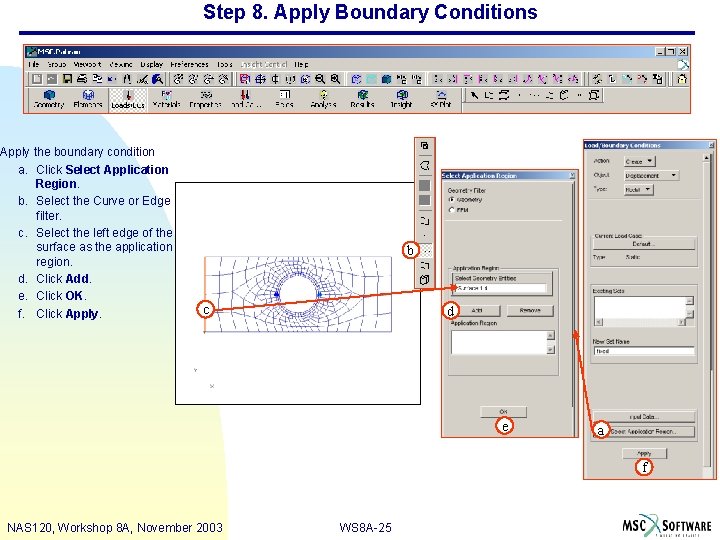
Step 8. Apply Boundary Conditions Apply the boundary condition a. Click Select Application Region. b. Select the Curve or Edge filter. c. Select the left edge of the surface as the application region. d. Click Add. e. Click OK. f. Click Apply. b c d e a f NAS 120, Workshop 8 A, November 2003 WS 8 A-25

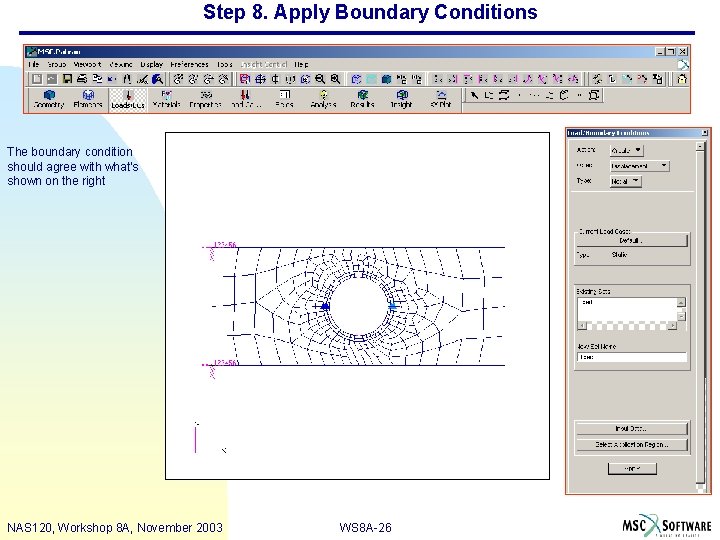
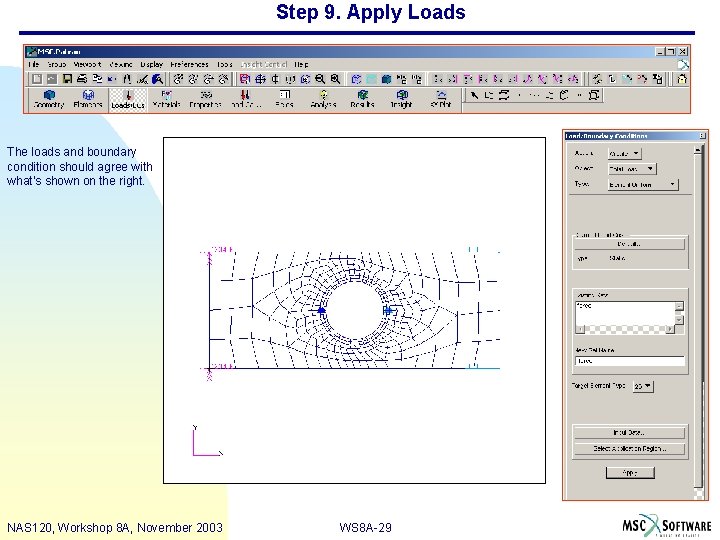
Step 8. Apply Boundary Conditions The boundary condition should agree with what’s shown on the right NAS 120, Workshop 8 A, November 2003 WS 8 A-26

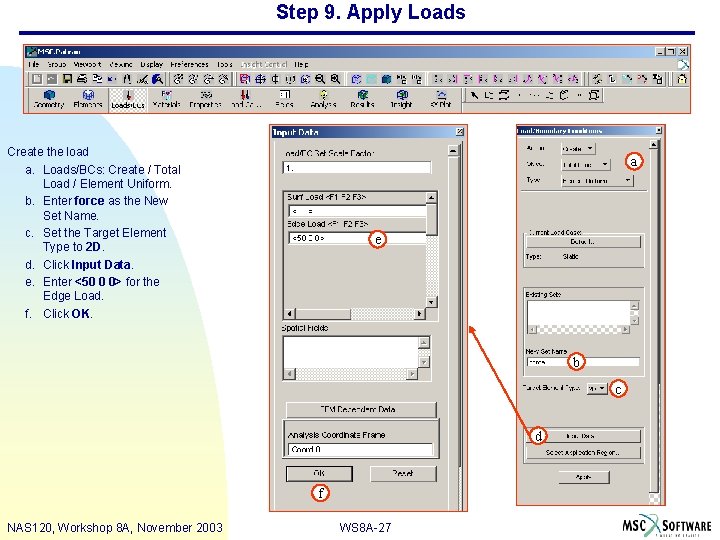
Step 9. Apply Loads Create the load a. Loads/BCs: Create / Total Load / Element Uniform. b. Enter force as the New Set Name. c. Set the Target Element Type to 2 D. d. Click Input Data. e. Enter <50 0 0> for the Edge Load. f. Click OK. a e b c d f NAS 120, Workshop 8 A, November 2003 WS 8 A-27

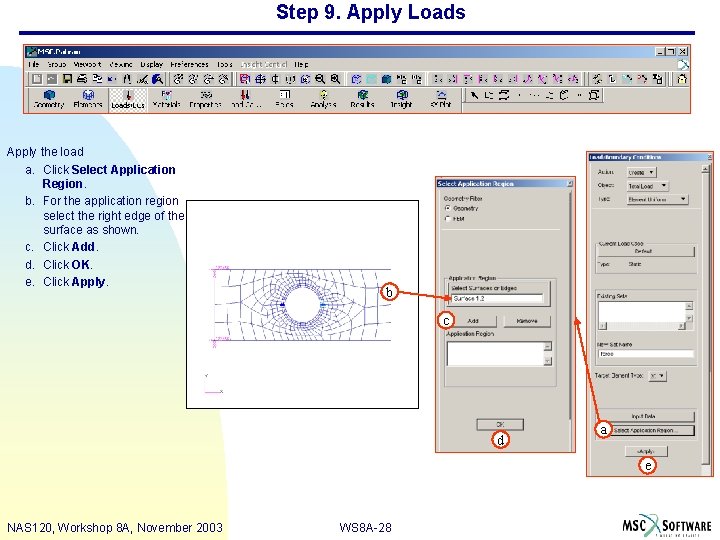
Step 9. Apply Loads Apply the load a. Click Select Application Region. b. For the application region select the right edge of the surface as shown. c. Click Add. d. Click OK. e. Click Apply. b c d a e NAS 120, Workshop 8 A, November 2003 WS 8 A-28

Step 9. Apply Loads The loads and boundary condition should agree with what’s shown on the right. NAS 120, Workshop 8 A, November 2003 WS 8 A-29

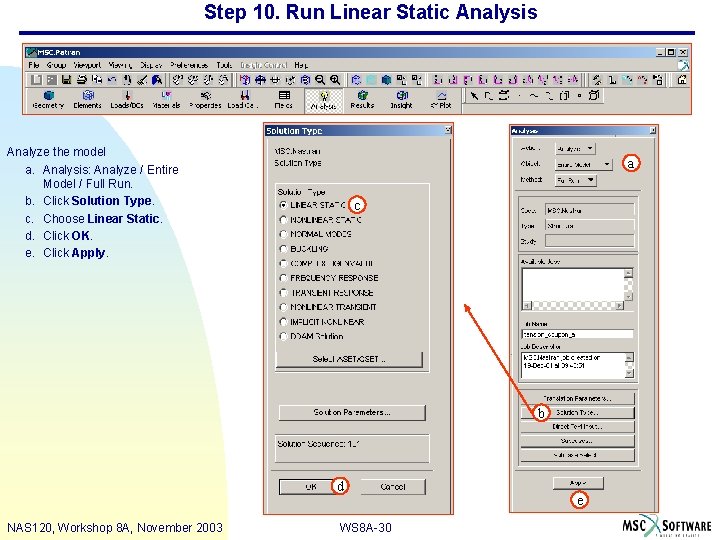
Step 10. Run Linear Static Analysis Analyze the model a. Analysis: Analyze / Entire Model / Full Run. b. Click Solution Type. c. Choose Linear Static. d. Click OK. e. Click Apply. a c b d NAS 120, Workshop 8 A, November 2003 WS 8 A-30 e

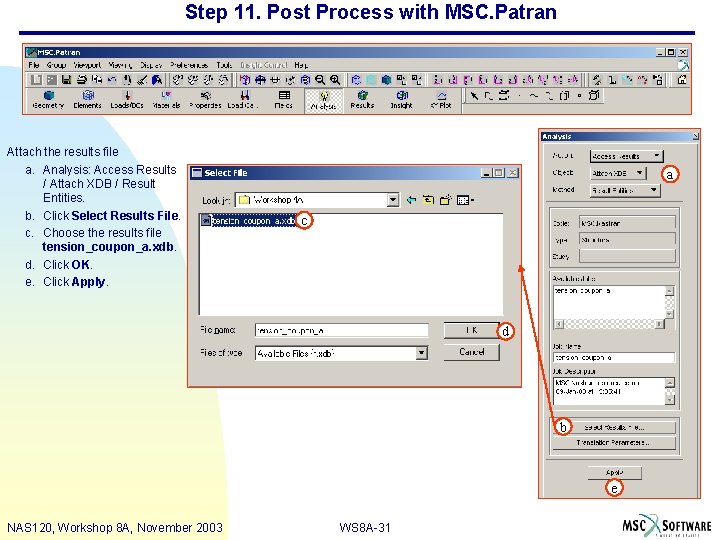
Step 11. Post Process with MSC. Patran Attach the results file a. Analysis: Access Results / Attach XDB / Result Entities. b. Click Select Results File. c. Choose the results file tension_coupon_a. xdb. d. Click OK. e. Click Apply. a c d b e NAS 120, Workshop 8 A, November 2003 WS 8 A-31

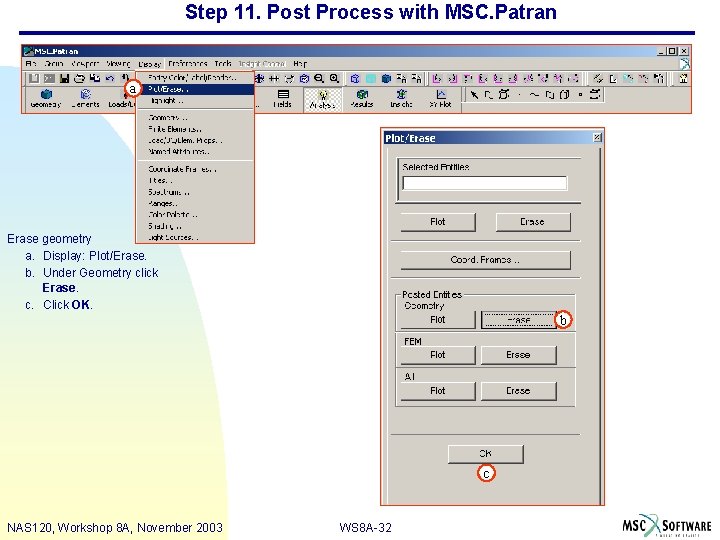
Step 11. Post Process with MSC. Patran a Erase geometry a. Display: Plot/Erase. b. Under Geometry click Erase. c. Click OK. b c NAS 120, Workshop 8 A, November 2003 WS 8 A-32

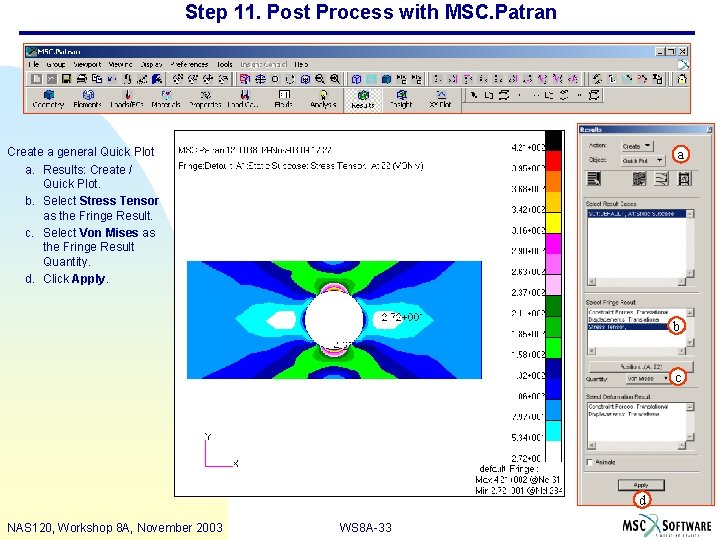
Step 11. Post Process with MSC. Patran Create a general Quick Plot a. Results: Create / Quick Plot. b. Select Stress Tensor as the Fringe Result. c. Select Von Mises as the Fringe Result Quantity. d. Click Apply. a b c d NAS 120, Workshop 8 A, November 2003 WS 8 A-33

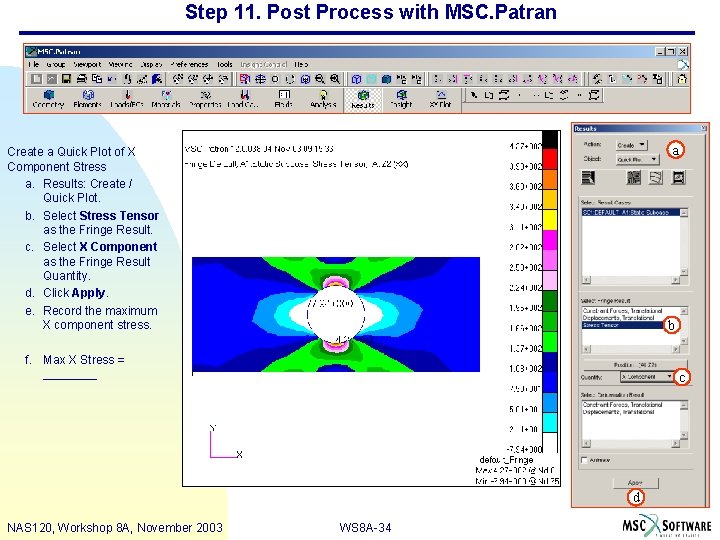
Step 11. Post Process with MSC. Patran a Create a Quick Plot of X Component Stress a. Results: Create / Quick Plot. b. Select Stress Tensor as the Fringe Result. c. Select X Component as the Fringe Result Quantity. d. Click Apply. e. Record the maximum X component stress. b f. Max X Stress = ____ c d NAS 120, Workshop 8 A, November 2003 WS 8 A-34

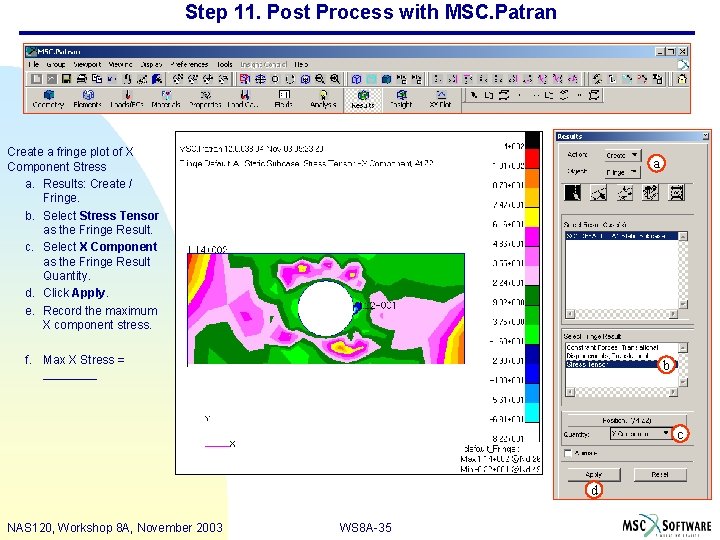
Step 11. Post Process with MSC. Patran Create a fringe plot of X Component Stress a. Results: Create / Fringe. b. Select Stress Tensor as the Fringe Result. c. Select X Component as the Fringe Result Quantity. d. Click Apply. e. Record the maximum X component stress. a f. Max X Stress = ____ b c d NAS 120, Workshop 8 A, November 2003 WS 8 A-35

Step 11. Post Process with MSC. Patran n By default, MSC. Nastran presents element stress results in the element coordinate system. n For the Fringe Plot option, MSC. Patran takes the MSC. Nastran results and plot them as is. n For the Quick Plot option, MSC. Patran automatically transforms the stress results into the basic coordinate system first before plotting them. NAS 120, Workshop 8 A, November 2003 WS 8 A-36

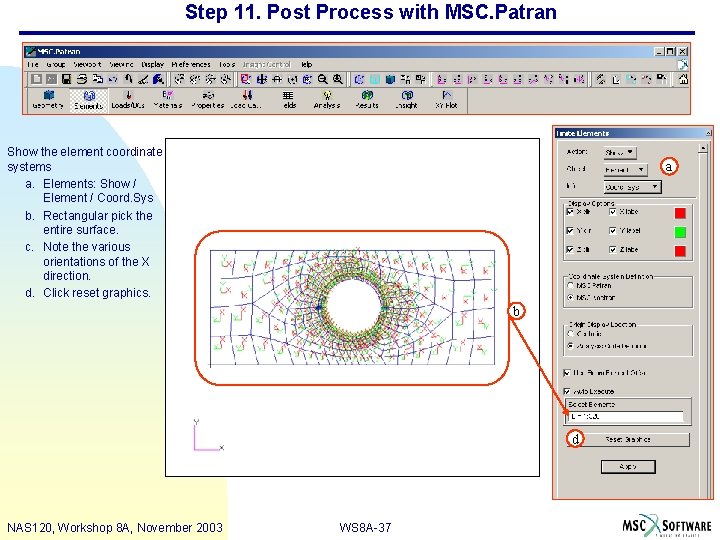
Step 11. Post Process with MSC. Patran Show the element coordinate systems a. Elements: Show / Element / Coord. Sys b. Rectangular pick the entire surface. c. Note the various orientations of the X direction. d. Click reset graphics. a b d NAS 120, Workshop 8 A, November 2003 WS 8 A-37

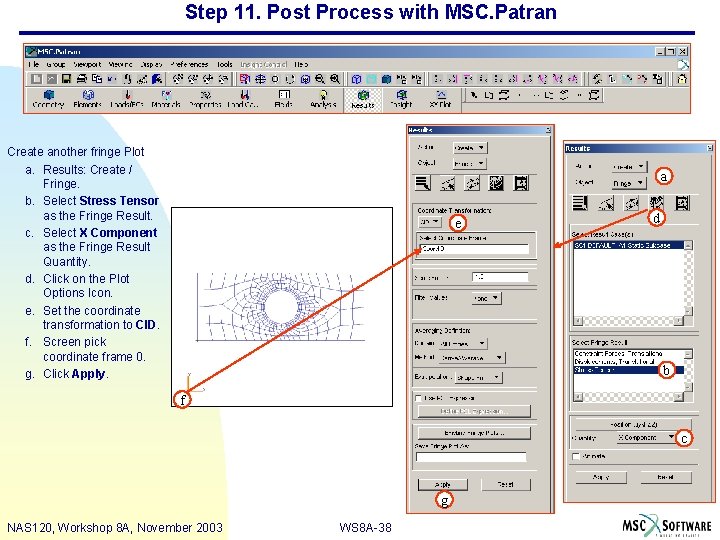
Step 11. Post Process with MSC. Patran Create another fringe Plot a. Results: Create / Fringe. b. Select Stress Tensor as the Fringe Result. c. Select X Component as the Fringe Result Quantity. d. Click on the Plot Options Icon. e. Set the coordinate transformation to CID. f. Screen pick coordinate frame 0. g. Click Apply. a e d b f c g NAS 120, Workshop 8 A, November 2003 WS 8 A-38

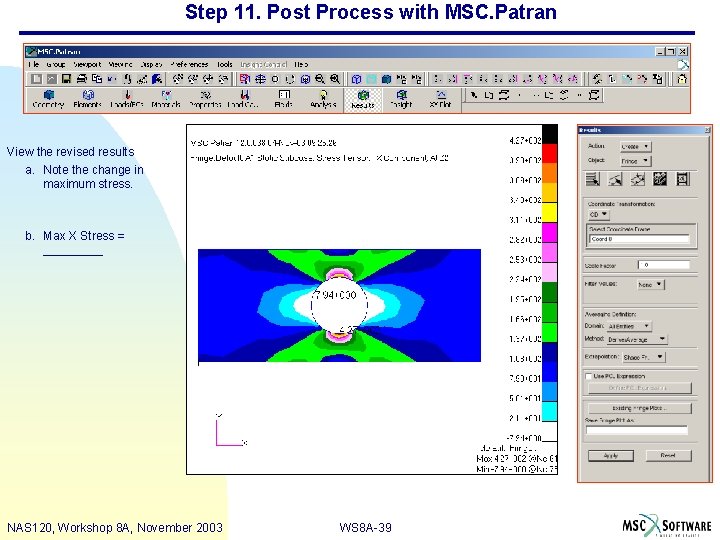
Step 11. Post Process with MSC. Patran View the revised results a. Note the change in maximum stress. b. Max X Stress = _____ NAS 120, Workshop 8 A, November 2003 WS 8 A-39

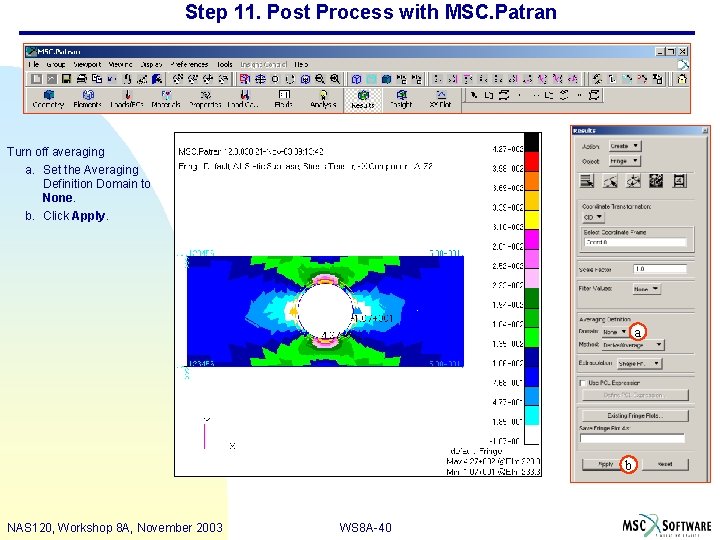
Step 11. Post Process with MSC. Patran Turn off averaging a. Set the Averaging Definition Domain to None. b. Click Apply. a b NAS 120, Workshop 8 A, November 2003 WS 8 A-40