Workshop 4 1 Static Mixer Geometry and Mesh
- Slides: 37

Workshop 4. 1 Static Mixer: Geometry and Mesh April 5, 2007 © 2007 ANSYS, Inc. All rights reserved. ANSYS, Inc. Proprietary Inventory #002407 4 -1

Workshop 4. 1: Static Mixer Training Manual This workshop will take you through the process of creating a geometry in Design. Modeler and using Automatic meshing method to create a simple mesh for that geometry in Meshing. • The basic steps involved in creating a CFD mesh are: • – 1. Create the Geometry (Design. Modeler). – 2. Define Named Selections for some 2 D regions (Design. Modeler). – 3. Create surface and volume mesh (Meshing). Design. Modeler • This workshop is intended to give you a feel for the geometry and mesh creation process from start to finish. The methods used and the steps you follow will be discussed and explained in later lectures. April 5, 2007 © 2007 ANSYS, Inc. All rights reserved. ANSYS, Inc. Proprietary Inventory #002407 4 -2

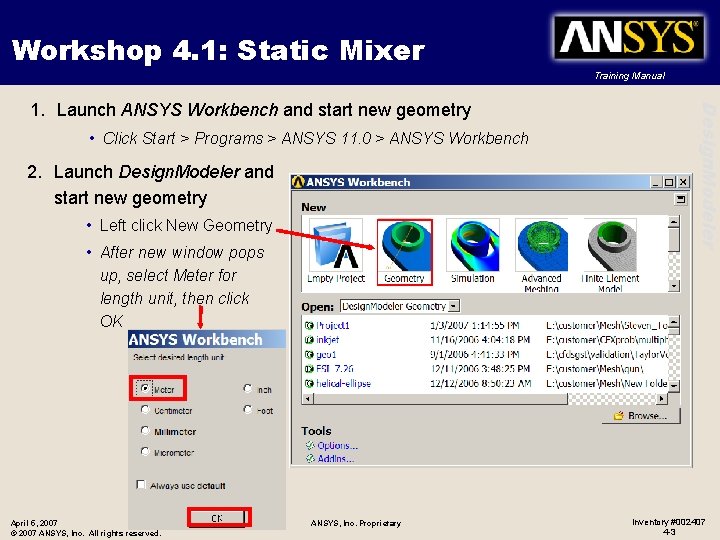
Workshop 4. 1: Static Mixer Training Manual • Click Start > Programs > ANSYS 11. 0 > ANSYS Workbench 2. Launch Design. Modeler and start new geometry • Left click New Geometry • After new window pops up, select Meter for length unit, then click OK April 5, 2007 © 2007 ANSYS, Inc. All rights reserved. ANSYS, Inc. Proprietary Design. Modeler 1. Launch ANSYS Workbench and start new geometry Inventory #002407 4 -3

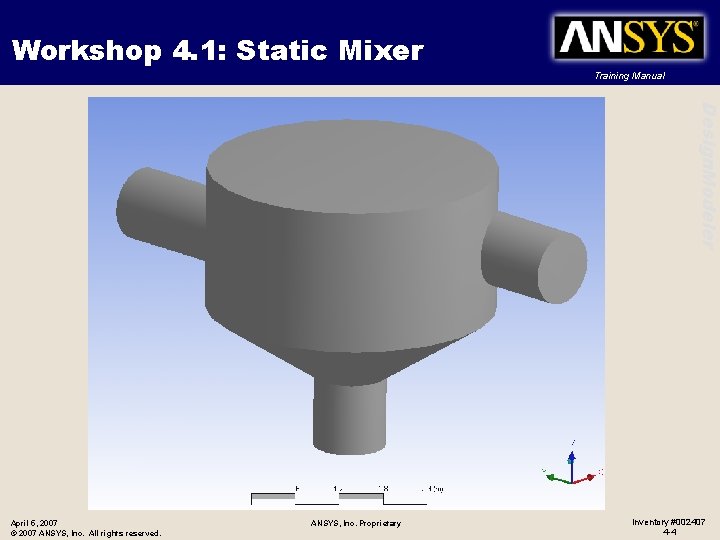
Workshop 4. 1: Static Mixer Training Manual Design. Modeler April 5, 2007 © 2007 ANSYS, Inc. All rights reserved. ANSYS, Inc. Proprietary Inventory #002407 4 -4

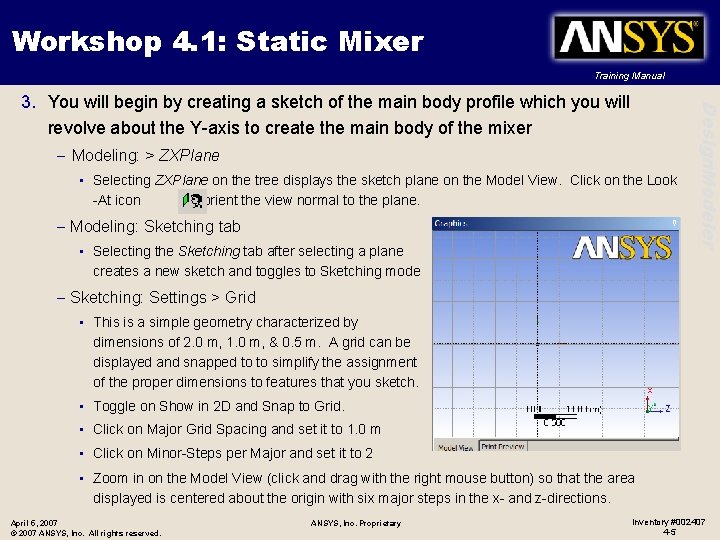
Workshop 4. 1: Static Mixer Training Manual – Modeling: > ZXPlane • Selecting ZXPlane on the tree displays the sketch plane on the Model View. Click on the Look -At icon to orient the view normal to the plane. – Modeling: Sketching tab • Selecting the Sketching tab after selecting a plane creates a new sketch and toggles to Sketching mode Design. Modeler 3. You will begin by creating a sketch of the main body profile which you will revolve about the Y-axis to create the main body of the mixer – Sketching: Settings > Grid • This is a simple geometry characterized by dimensions of 2. 0 m, 1. 0 m, & 0. 5 m. A grid can be displayed and snapped to to simplify the assignment of the proper dimensions to features that you sketch. • Toggle on Show in 2 D and Snap to Grid. • Click on Major Grid Spacing and set it to 1. 0 m • Click on Minor-Steps per Major and set it to 2 • Zoom in on the Model View (click and drag with the right mouse button) so that the area displayed is centered about the origin with six major steps in the x- and z-directions. April 5, 2007 © 2007 ANSYS, Inc. All rights reserved. ANSYS, Inc. Proprietary Inventory #002407 4 -5

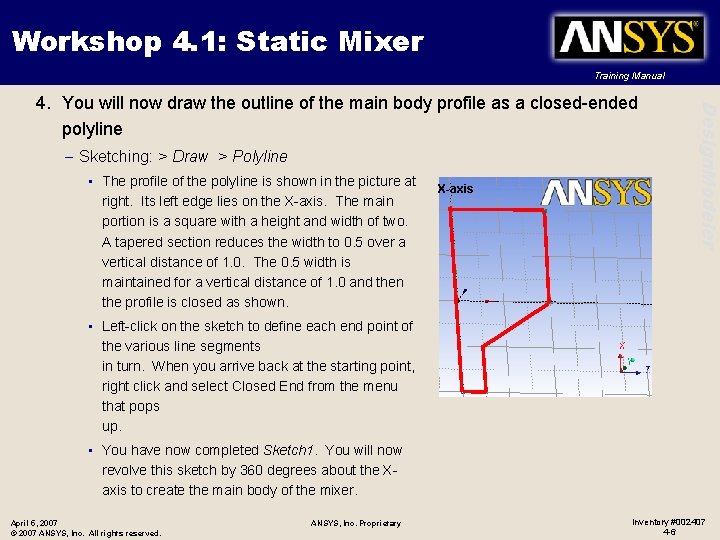
Workshop 4. 1: Static Mixer Training Manual – Sketching: > Draw > Polyline • The profile of the polyline is shown in the picture at right. Its left edge lies on the X-axis. The main portion is a square with a height and width of two. A tapered section reduces the width to 0. 5 over a vertical distance of 1. 0. The 0. 5 width is maintained for a vertical distance of 1. 0 and then the profile is closed as shown. X-axis Design. Modeler 4. You will now draw the outline of the main body profile as a closed-ended polyline • Left-click on the sketch to define each end point of the various line segments in turn. When you arrive back at the starting point, right click and select Closed End from the menu that pops up. • You have now completed Sketch 1. You will now revolve this sketch by 360 degrees about the Xaxis to create the main body of the mixer. April 5, 2007 © 2007 ANSYS, Inc. All rights reserved. ANSYS, Inc. Proprietary Inventory #002407 4 -6

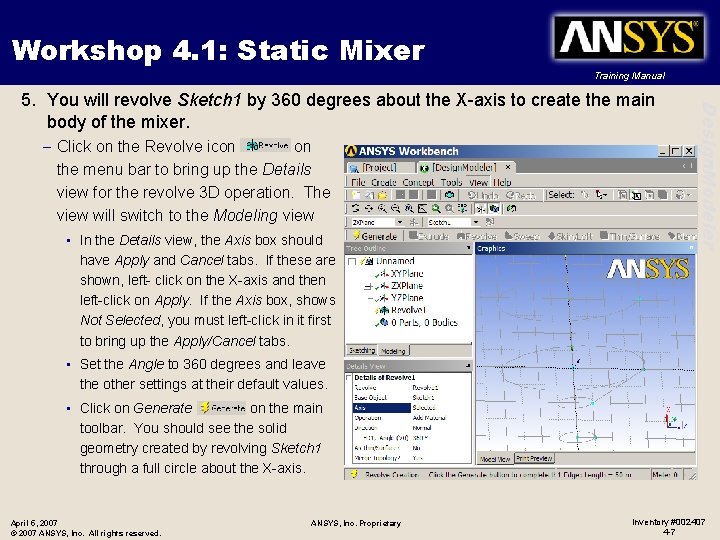
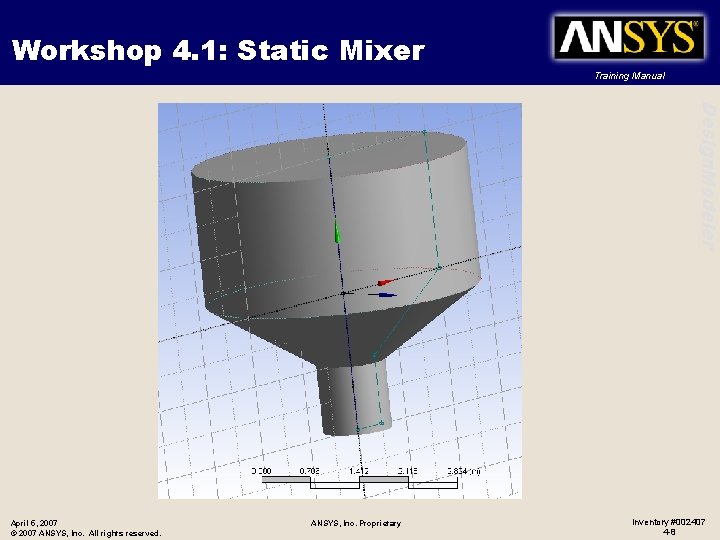
Workshop 4. 1: Static Mixer Training Manual – Click on the Revolve icon on the menu bar to bring up the Details view for the revolve 3 D operation. The view will switch to the Modeling view • In the Details view, the Axis box should have Apply and Cancel tabs. If these are shown, left- click on the X-axis and then left-click on Apply. If the Axis box, shows Not Selected, you must left-click in it first to bring up the Apply/Cancel tabs. Design. Modeler 5. You will revolve Sketch 1 by 360 degrees about the X-axis to create the main body of the mixer. • Set the Angle to 360 degrees and leave the other settings at their default values. • Click on Generate on the main toolbar. You should see the solid geometry created by revolving Sketch 1 through a full circle about the X-axis. April 5, 2007 © 2007 ANSYS, Inc. All rights reserved. ANSYS, Inc. Proprietary Inventory #002407 4 -7

Workshop 4. 1: Static Mixer Training Manual Design. Modeler April 5, 2007 © 2007 ANSYS, Inc. All rights reserved. ANSYS, Inc. Proprietary Inventory #002407 4 -8

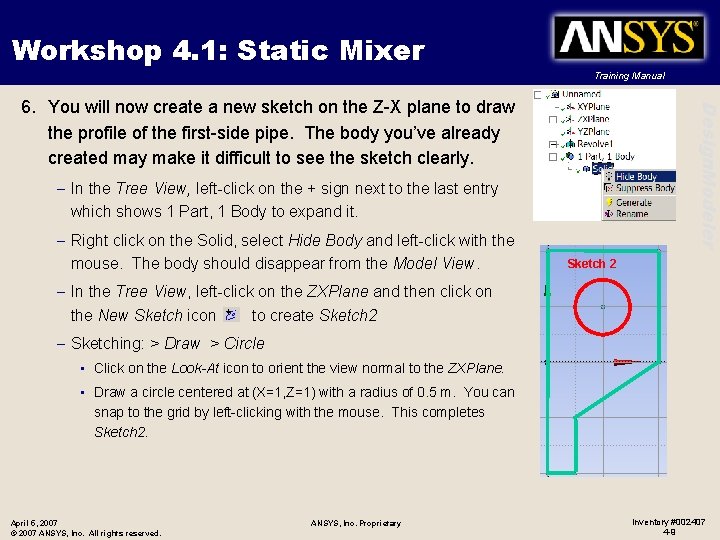
Workshop 4. 1: Static Mixer Training Manual Design. Modeler 6. You will now create a new sketch on the Z-X plane to draw the profile of the first-side pipe. The body you’ve already created may make it difficult to see the sketch clearly. – In the Tree View, left-click on the + sign next to the last entry which shows 1 Part, 1 Body to expand it. – Right click on the Solid, select Hide Body and left-click with the mouse. The body should disappear from the Model View. Sketch 2 – In the Tree View, left-click on the ZXPlane and then click on the New Sketch icon to create Sketch 2 – Sketching: > Draw > Circle • Click on the Look-At icon to orient the view normal to the ZXPlane. • Draw a circle centered at (X=1, Z=1) with a radius of 0. 5 m. You can snap to the grid by left-clicking with the mouse. This completes Sketch 2. April 5, 2007 © 2007 ANSYS, Inc. All rights reserved. ANSYS, Inc. Proprietary Inventory #002407 4 -9

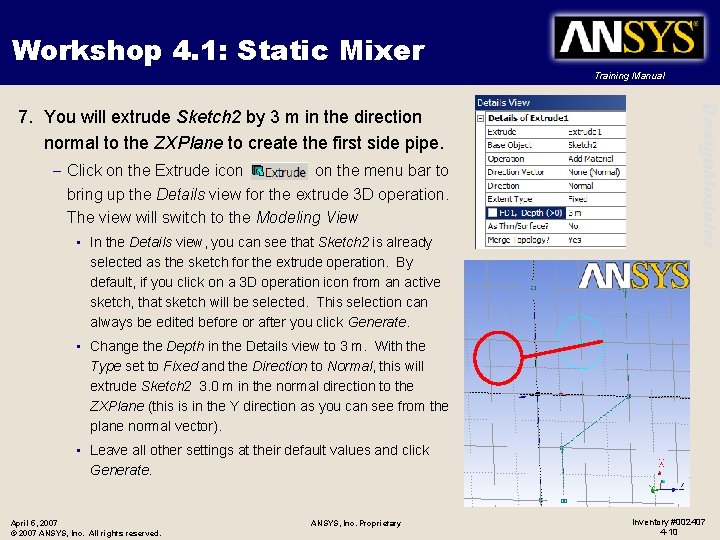
Workshop 4. 1: Static Mixer Training Manual – Click on the Extrude icon on the menu bar to bring up the Details view for the extrude 3 D operation. The view will switch to the Modeling View • In the Details view, you can see that Sketch 2 is already selected as the sketch for the extrude operation. By default, if you click on a 3 D operation icon from an active sketch, that sketch will be selected. This selection can always be edited before or after you click Generate. Design. Modeler 7. You will extrude Sketch 2 by 3 m in the direction normal to the ZXPlane to create the first side pipe. • Change the Depth in the Details view to 3 m. With the Type set to Fixed and the Direction to Normal, this will extrude Sketch 2 3. 0 m in the normal direction to the ZXPlane (this is in the Y direction as you can see from the plane normal vector). • Leave all other settings at their default values and click Generate. April 5, 2007 © 2007 ANSYS, Inc. All rights reserved. ANSYS, Inc. Proprietary Inventory #002407 4 -10

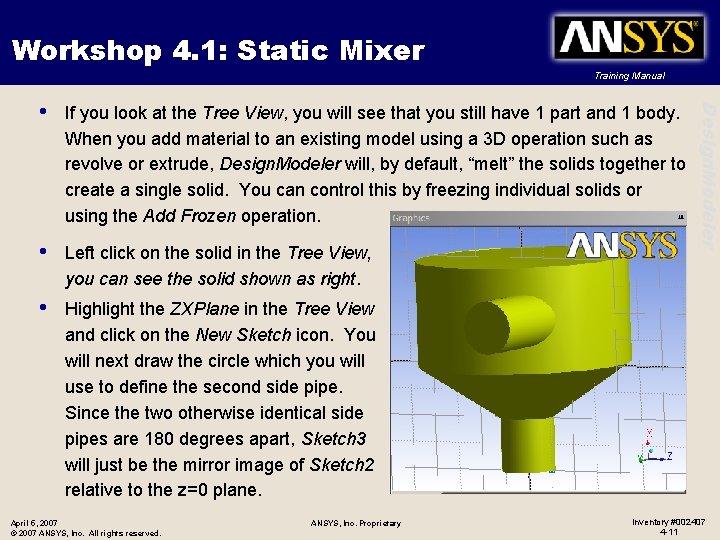
Workshop 4. 1: Static Mixer Training Manual If you look at the Tree View, you will see that you still have 1 part and 1 body. When you add material to an existing model using a 3 D operation such as revolve or extrude, Design. Modeler will, by default, “melt” the solids together to create a single solid. You can control this by freezing individual solids or using the Add Frozen operation. • Left click on the solid in the Tree View, you can see the solid shown as right. • Highlight the ZXPlane in the Tree View and click on the New Sketch icon. You will next draw the circle which you will use to define the second side pipe. Since the two otherwise identical side pipes are 180 degrees apart, Sketch 3 will just be the mirror image of Sketch 2 relative to the z=0 plane. April 5, 2007 © 2007 ANSYS, Inc. All rights reserved. ANSYS, Inc. Proprietary Design. Modeler • Inventory #002407 4 -11

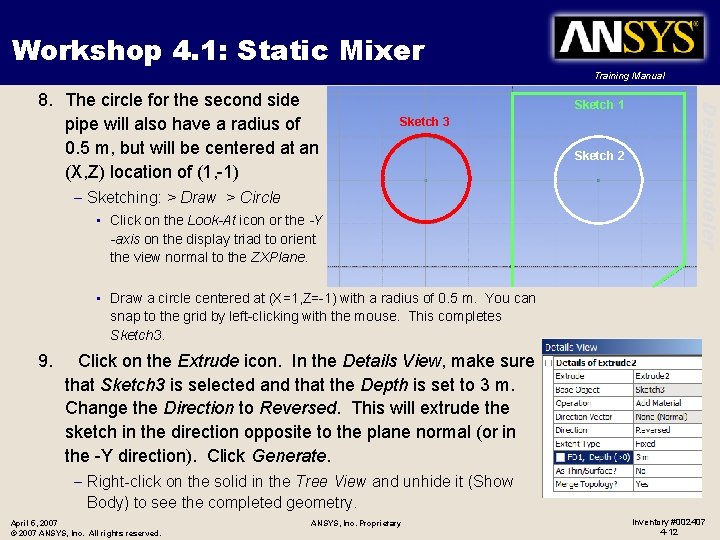
Workshop 4. 1: Static Mixer Training Manual Sketch 1 Sketch 3 – Sketching: > Draw > Circle • Click on the Look-At icon or the -Y -axis on the display triad to orient the view normal to the ZXPlane. Sketch 2 Design. Modeler 8. The circle for the second side pipe will also have a radius of 0. 5 m, but will be centered at an (X, Z) location of (1, -1) • Draw a circle centered at (X=1, Z=-1) with a radius of 0. 5 m. You can snap to the grid by left-clicking with the mouse. This completes Sketch 3. 9. Click on the Extrude icon. In the Details View, make sure that Sketch 3 is selected and that the Depth is set to 3 m. Change the Direction to Reversed. This will extrude the sketch in the direction opposite to the plane normal (or in the -Y direction). Click Generate. – Right-click on the solid in the Tree View and unhide it (Show Body) to see the completed geometry. April 5, 2007 © 2007 ANSYS, Inc. All rights reserved. ANSYS, Inc. Proprietary Inventory #002407 4 -12

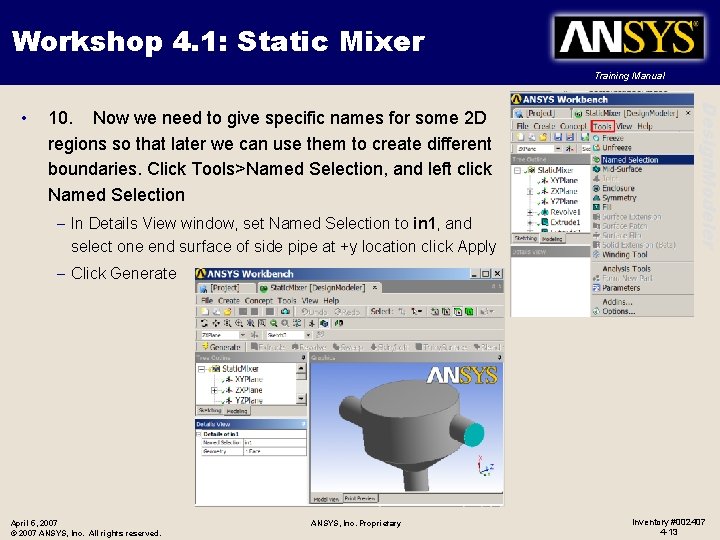
Workshop 4. 1: Static Mixer Training Manual 10. Now we need to give specific names for some 2 D regions so that later we can use them to create different boundaries. Click Tools>Named Selection, and left click Named Selection – In Details View window, set Named Selection to in 1, and select one end surface of side pipe at +y location click Apply Design. Modeler • – Click Generate April 5, 2007 © 2007 ANSYS, Inc. All rights reserved. ANSYS, Inc. Proprietary Inventory #002407 4 -13

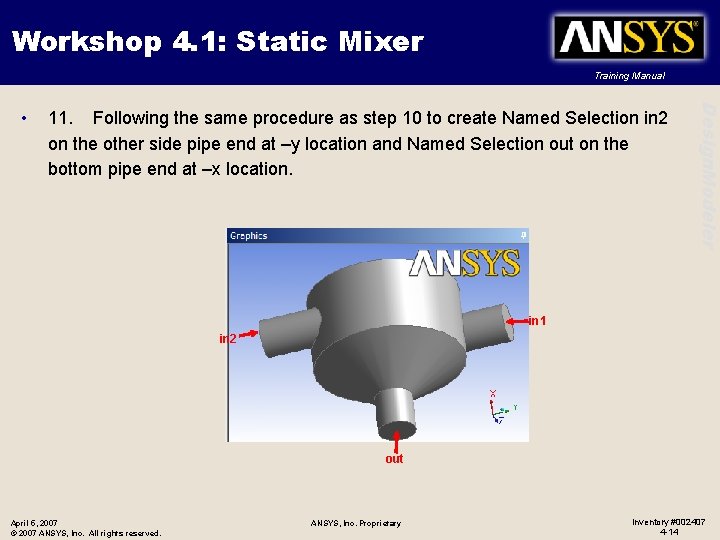
Workshop 4. 1: Static Mixer Training Manual 11. Following the same procedure as step 10 to create Named Selection in 2 on the other side pipe end at –y location and Named Selection out on the bottom pipe end at –x location. Design. Modeler • in 1 in 2 out April 5, 2007 © 2007 ANSYS, Inc. All rights reserved. ANSYS, Inc. Proprietary Inventory #002407 4 -14

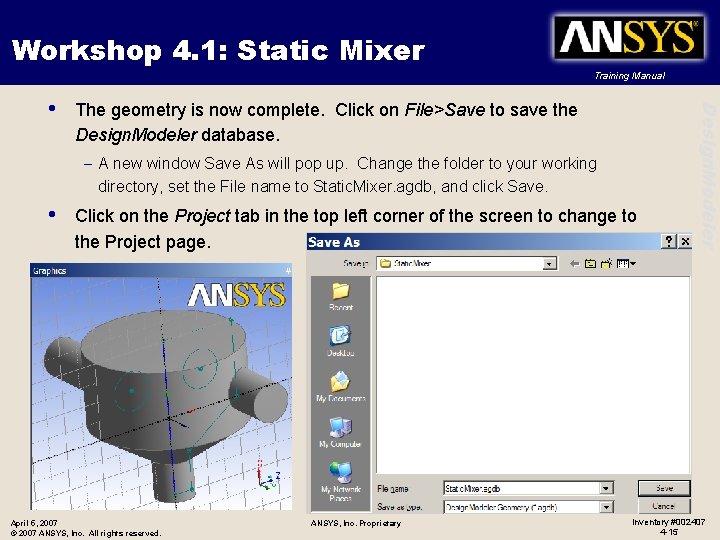
Workshop 4. 1: Static Mixer Training Manual The geometry is now complete. Click on File>Save to save the Design. Modeler database. – A new window Save As will pop up. Change the folder to your working directory, set the File name to Static. Mixer. agdb, and click Save. • Click on the Project tab in the top left corner of the screen to change to the Project page. April 5, 2007 © 2007 ANSYS, Inc. All rights reserved. ANSYS, Inc. Proprietary Design. Modeler • Inventory #002407 4 -15

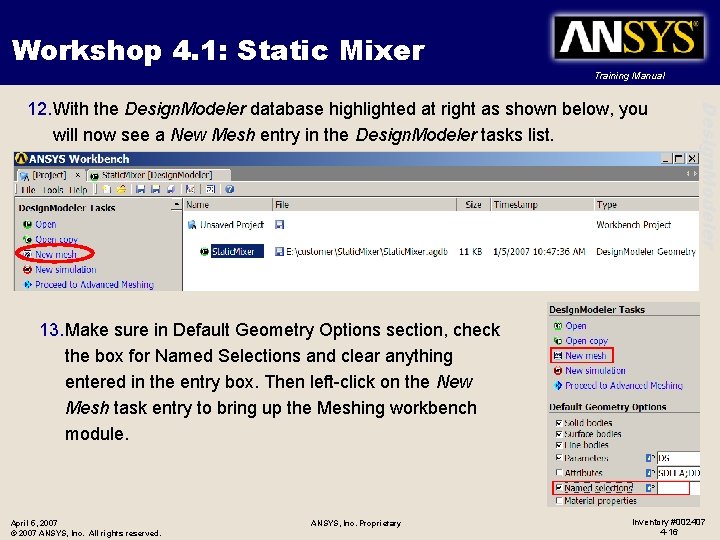
Workshop 4. 1: Static Mixer Training Manual Design. Modeler 12. With the Design. Modeler database highlighted at right as shown below, you will now see a New Mesh entry in the Design. Modeler tasks list. 13. Make sure in Default Geometry Options section, check the box for Named Selections and clear anything entered in the entry box. Then left-click on the New Mesh task entry to bring up the Meshing workbench module. April 5, 2007 © 2007 ANSYS, Inc. All rights reserved. ANSYS, Inc. Proprietary Inventory #002407 4 -16

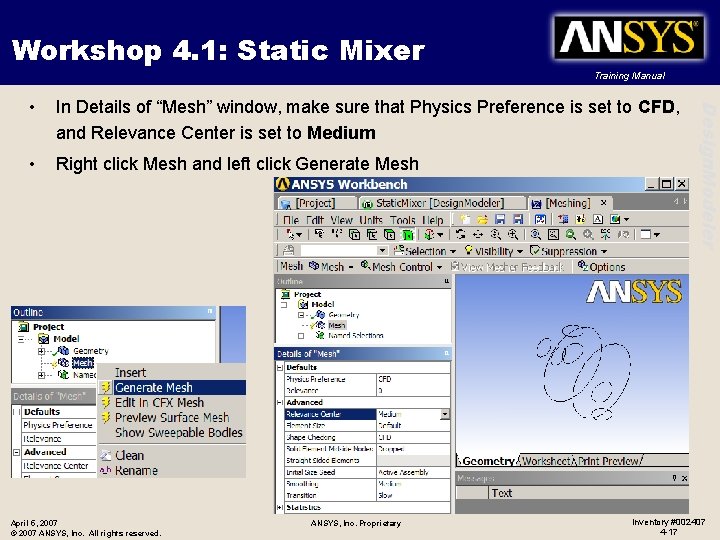
Workshop 4. 1: Static Mixer Training Manual In Details of “Mesh” window, make sure that Physics Preference is set to CFD, and Relevance Center is set to Medium • Right click Mesh and left click Generate Mesh April 5, 2007 © 2007 ANSYS, Inc. All rights reserved. ANSYS, Inc. Proprietary Design. Modeler • Inventory #002407 4 -17

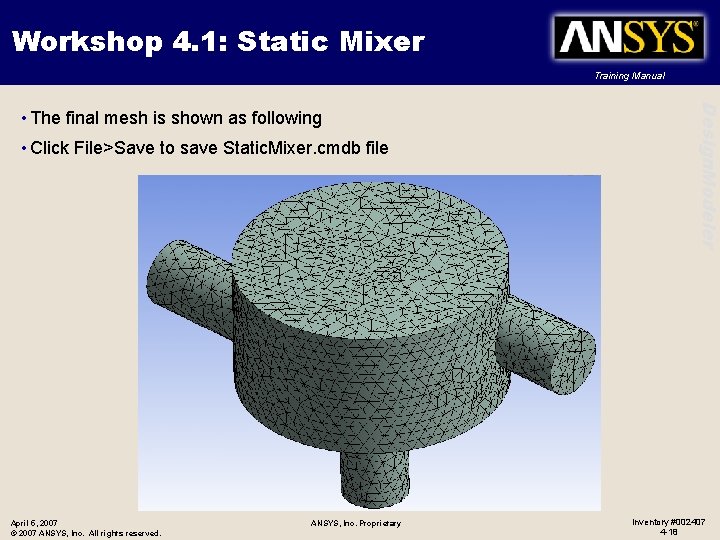
Workshop 4. 1: Static Mixer Training Manual • Click File>Save to save Static. Mixer. cmdb file April 5, 2007 © 2007 ANSYS, Inc. All rights reserved. ANSYS, Inc. Proprietary Design. Modeler • The final mesh is shown as following Inventory #002407 4 -18

Workshop B. 2 Static Mixer: Basic Settings, Mesh Controls and Inflation ANSYS, Inc. Proprietary © 2009 ANSYS, Inc. All rights reserved. B-19 April 28, 2009 Inventory #002645

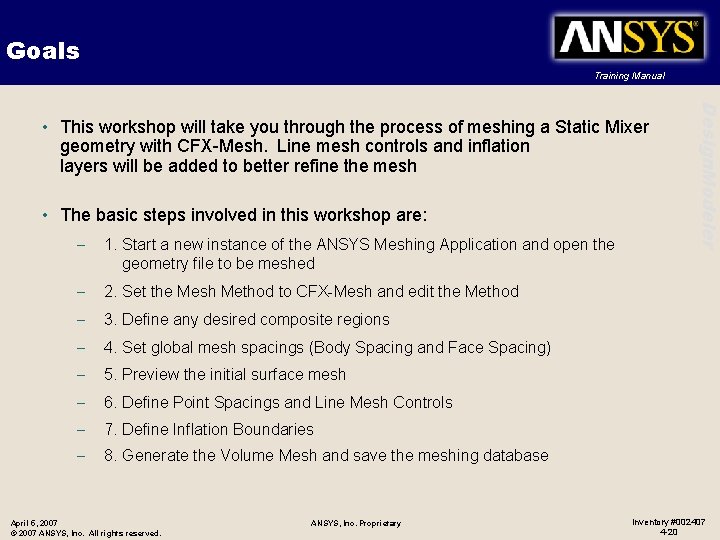
Goals Training Manual • The basic steps involved in this workshop are: – 1. Start a new instance of the ANSYS Meshing Application and open the geometry file to be meshed – 2. Set the Mesh Method to CFX-Mesh and edit the Method – 3. Define any desired composite regions – 4. Set global mesh spacings (Body Spacing and Face Spacing) – 5. Preview the initial surface mesh – 6. Define Point Spacings and Line Mesh Controls – 7. Define Inflation Boundaries – 8. Generate the Volume Mesh and save the meshing database April 5, 2007 © 2007 ANSYS, Inc. All rights reserved. ANSYS, Inc. Proprietary Design. Modeler • This workshop will take you through the process of meshing a Static Mixer geometry with CFX-Mesh. Line mesh controls and inflation layers will be added to better refine the mesh Inventory #002407 4 -20

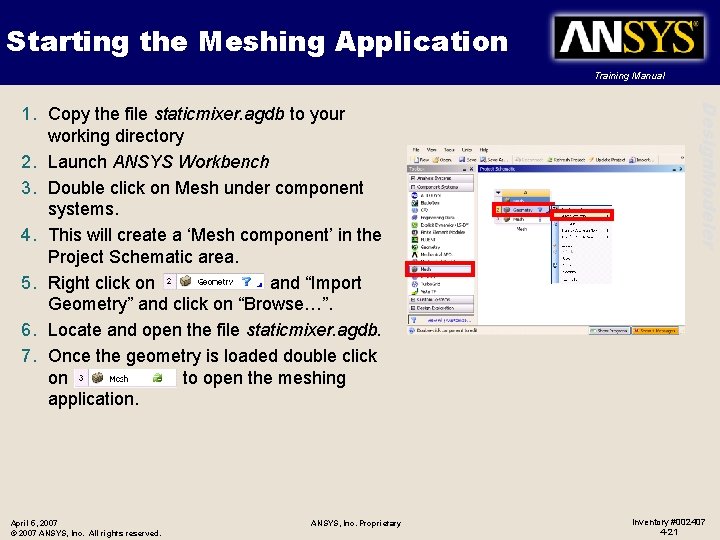
Starting the Meshing Application Training Manual April 5, 2007 © 2007 ANSYS, Inc. All rights reserved. ANSYS, Inc. Proprietary Design. Modeler 1. Copy the file staticmixer. agdb to your working directory 2. Launch ANSYS Workbench 3. Double click on Mesh under component systems. 4. This will create a ‘Mesh component’ in the Project Schematic area. 5. Right click on and “Import Geometry” and click on “Browse…”. 6. Locate and open the file staticmixer. agdb. 7. Once the geometry is loaded double click on to open the meshing application. Inventory #002407 4 -21

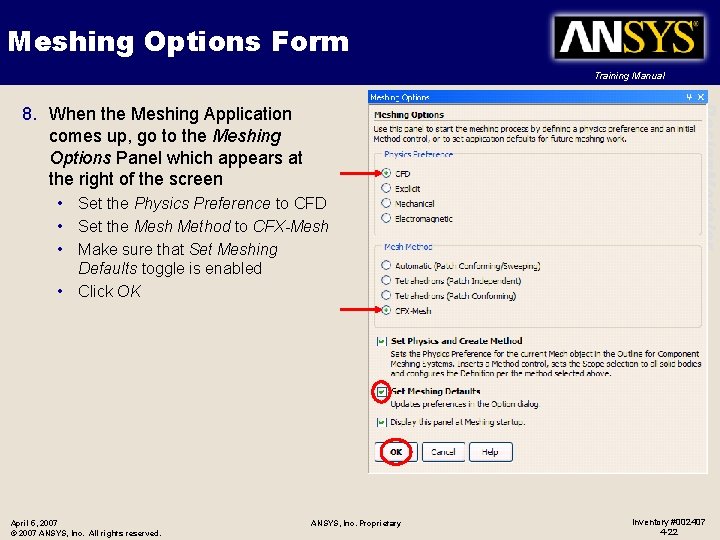
Meshing Options Form Training Manual • Set the Physics Preference to CFD • Set the Mesh Method to CFX-Mesh • Make sure that Set Meshing Defaults toggle is enabled • Click OK April 5, 2007 © 2007 ANSYS, Inc. All rights reserved. ANSYS, Inc. Proprietary Design. Modeler 8. When the Meshing Application comes up, go to the Meshing Options Panel which appears at the right of the screen Inventory #002407 4 -22

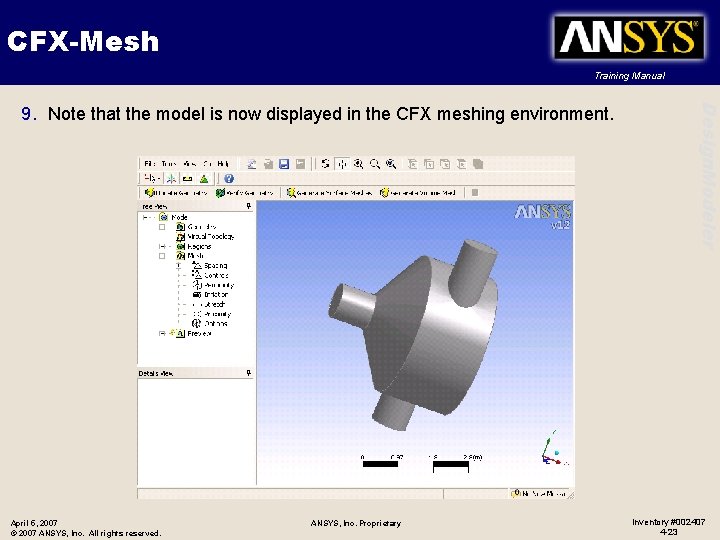
CFX-Mesh Training Manual April 5, 2007 © 2007 ANSYS, Inc. All rights reserved. ANSYS, Inc. Proprietary Design. Modeler 9. Note that the model is now displayed in the CFX meshing environment. Inventory #002407 4 -23

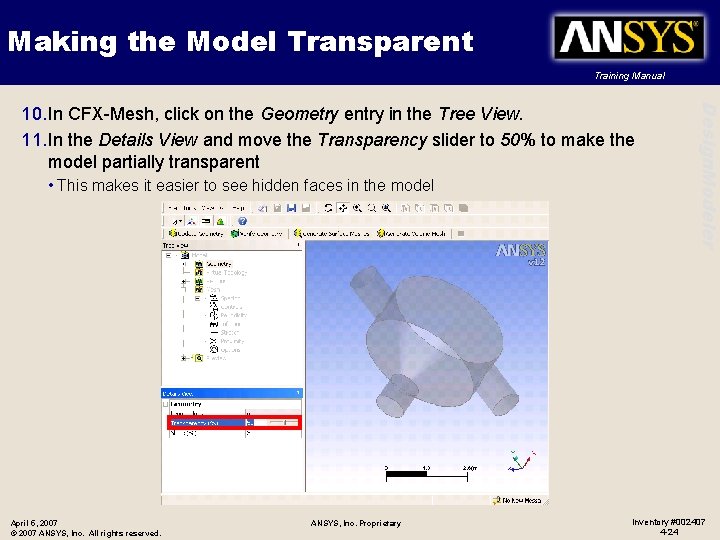
Making the Model Transparent Training Manual • This makes it easier to see hidden faces in the model April 5, 2007 © 2007 ANSYS, Inc. All rights reserved. ANSYS, Inc. Proprietary Design. Modeler 10. In CFX-Mesh, click on the Geometry entry in the Tree View. 11. In the Details View and move the Transparency slider to 50% to make the model partially transparent Inventory #002407 4 -24

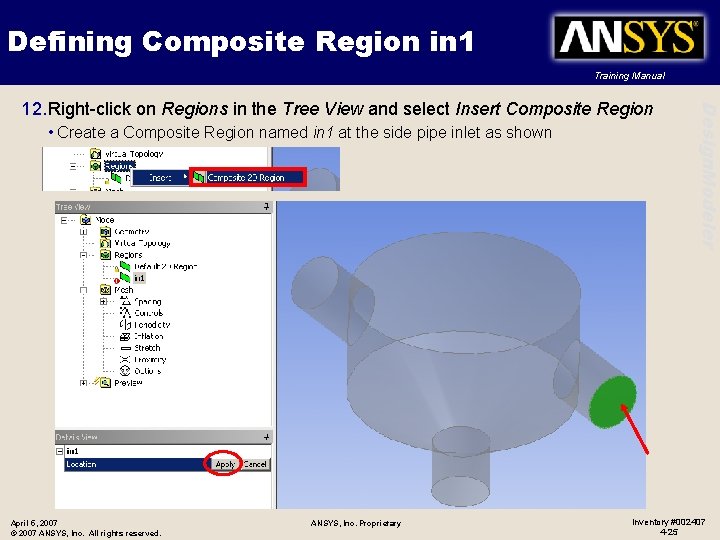
Defining Composite Region in 1 Training Manual • Create a Composite Region named in 1 at the side pipe inlet as shown April 5, 2007 © 2007 ANSYS, Inc. All rights reserved. ANSYS, Inc. Proprietary Design. Modeler 12. Right-click on Regions in the Tree View and select Insert Composite Region Inventory #002407 4 -25

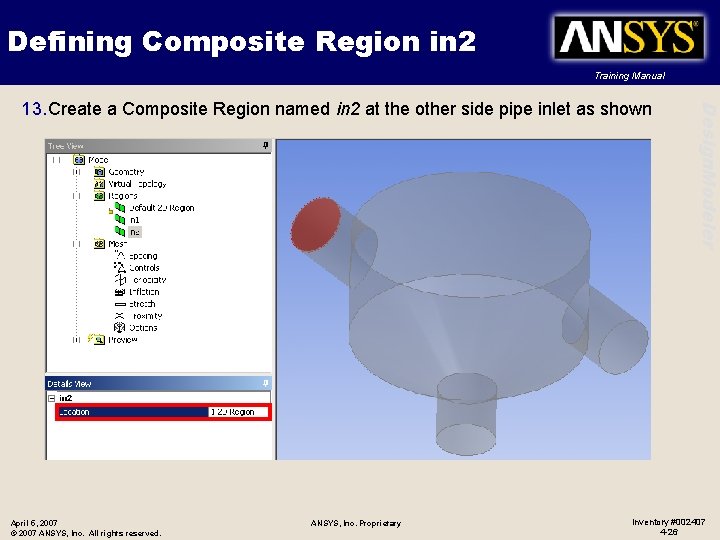
Defining Composite Region in 2 Training Manual April 5, 2007 © 2007 ANSYS, Inc. All rights reserved. ANSYS, Inc. Proprietary Design. Modeler 13. Create a Composite Region named in 2 at the other side pipe inlet as shown Inventory #002407 4 -26

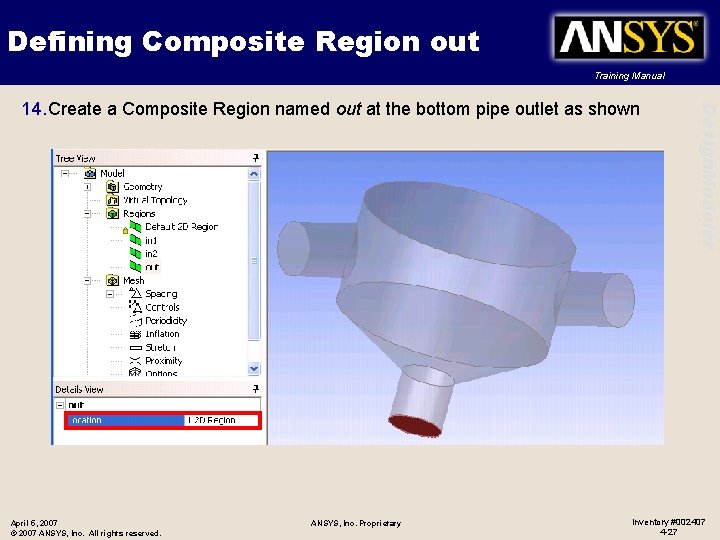
Defining Composite Region out Training Manual April 5, 2007 © 2007 ANSYS, Inc. All rights reserved. ANSYS, Inc. Proprietary Design. Modeler 14. Create a Composite Region named out at the bottom pipe outlet as shown Inventory #002407 4 -27

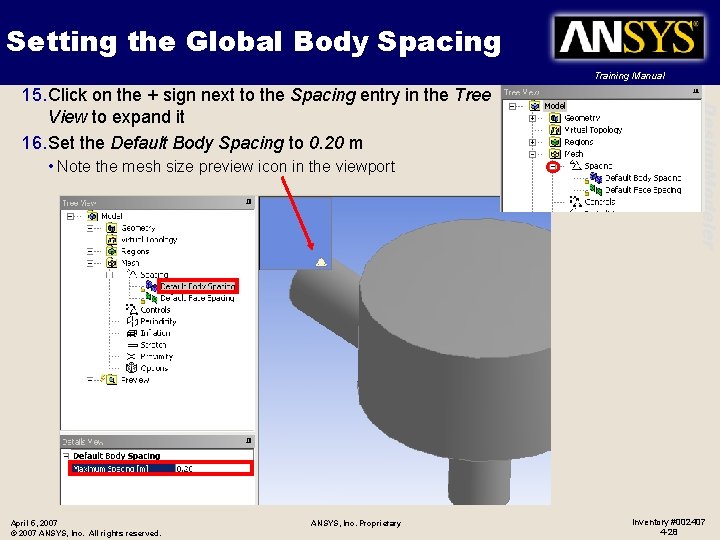
Setting the Global Body Spacing Training Manual • Note the mesh size preview icon in the viewport April 5, 2007 © 2007 ANSYS, Inc. All rights reserved. ANSYS, Inc. Proprietary Design. Modeler 15. Click on the + sign next to the Spacing entry in the Tree View to expand it 16. Set the Default Body Spacing to 0. 20 m Inventory #002407 4 -28

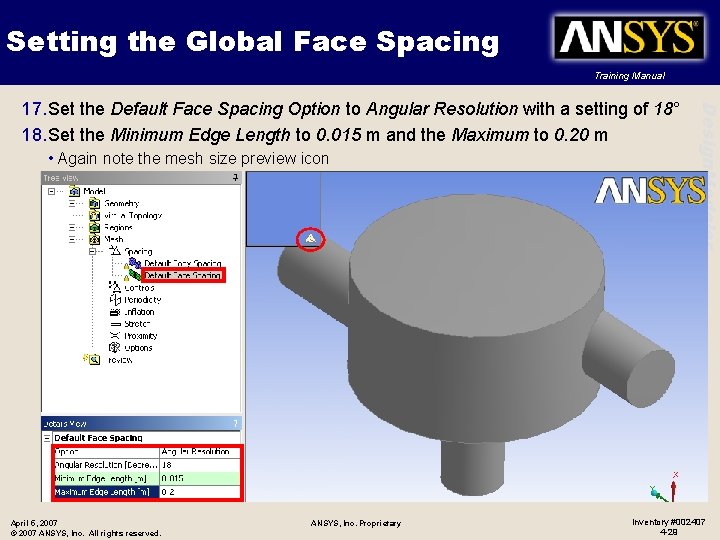
Setting the Global Face Spacing Training Manual • Again note the mesh size preview icon April 5, 2007 © 2007 ANSYS, Inc. All rights reserved. ANSYS, Inc. Proprietary Design. Modeler 17. Set the Default Face Spacing Option to Angular Resolution with a setting of 18° 18. Set the Minimum Edge Length to 0. 015 m and the Maximum to 0. 20 m Inventory #002407 4 -29

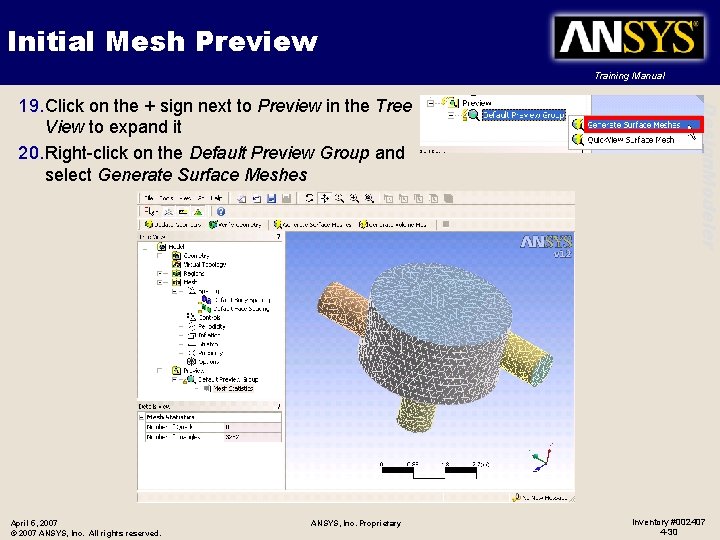
Initial Mesh Preview Training Manual April 5, 2007 © 2007 ANSYS, Inc. All rights reserved. ANSYS, Inc. Proprietary Design. Modeler 19. Click on the + sign next to Preview in the Tree View to expand it 20. Right-click on the Default Preview Group and select Generate Surface Meshes Inventory #002407 4 -30

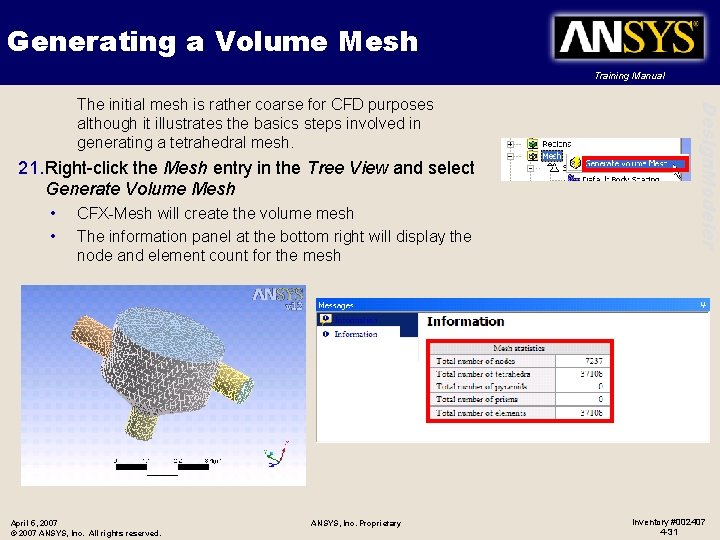
Generating a Volume Mesh Training Manual 21. Right-click the Mesh entry in the Tree View and select Generate Volume Mesh • • CFX-Mesh will create the volume mesh The information panel at the bottom right will display the node and element count for the mesh April 5, 2007 © 2007 ANSYS, Inc. All rights reserved. ANSYS, Inc. Proprietary Design. Modeler The initial mesh is rather coarse for CFD purposes although it illustrates the basics steps involved in generating a tetrahedral mesh. Inventory #002407 4 -31

Mesh Refinement Training Manual • Although a better quality mesh for CFD purposes could be generated by defining finer global mesh spacings, the global mesh spacings will be left as they are Design. Modeler • The first part of this tutorial resulted in a rather coarse mesh with no resolution of the boundary layer near walls • Instead, a mesh control will be defined to refine the mesh in the area of the two pipe inlets. Also, an inflation layer will be added to the all walls in the geometry to better resolve the boundary layer April 5, 2007 © 2007 ANSYS, Inc. All rights reserved. ANSYS, Inc. Proprietary Inventory #002407 4 -32

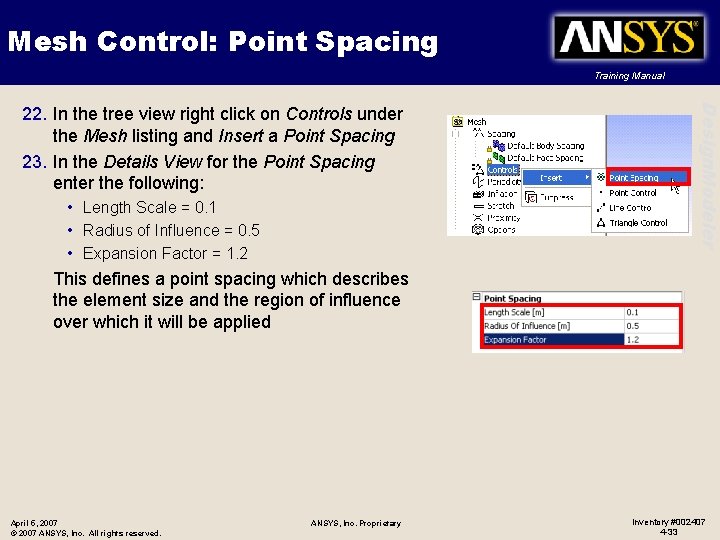
Mesh Control: Point Spacing Training Manual • Length Scale = 0. 1 • Radius of Influence = 0. 5 • Expansion Factor = 1. 2 Design. Modeler 22. In the tree view right click on Controls under the Mesh listing and Insert a Point Spacing 23. In the Details View for the Point Spacing enter the following: This defines a point spacing which describes the element size and the region of influence over which it will be applied April 5, 2007 © 2007 ANSYS, Inc. All rights reserved. ANSYS, Inc. Proprietary Inventory #002407 4 -33

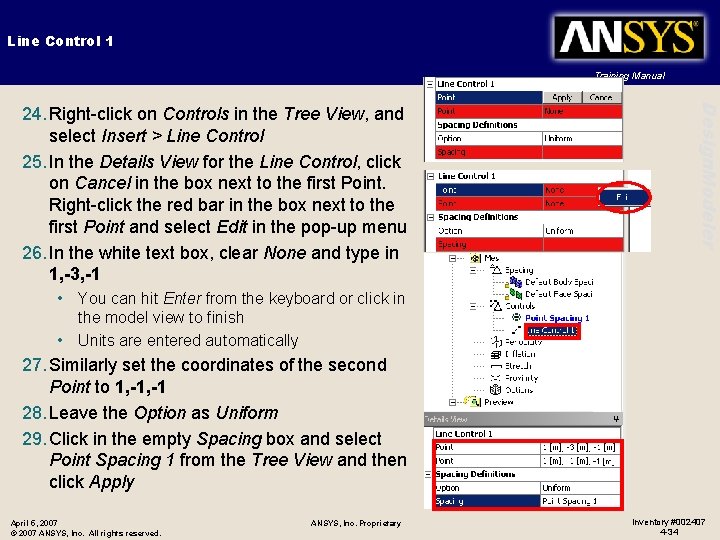
Line Control 1 Training Manual Design. Modeler 24. Right-click on Controls in the Tree View, and select Insert > Line Control 25. In the Details View for the Line Control, click on Cancel in the box next to the first Point. Right-click the red bar in the box next to the first Point and select Edit in the pop-up menu 26. In the white text box, clear None and type in 1, -3, -1 • You can hit Enter from the keyboard or click in the model view to finish • Units are entered automatically 27. Similarly set the coordinates of the second Point to 1, -1 28. Leave the Option as Uniform 29. Click in the empty Spacing box and select Point Spacing 1 from the Tree View and then click Apply April 5, 2007 © 2007 ANSYS, Inc. All rights reserved. ANSYS, Inc. Proprietary Inventory #002407 4 -34

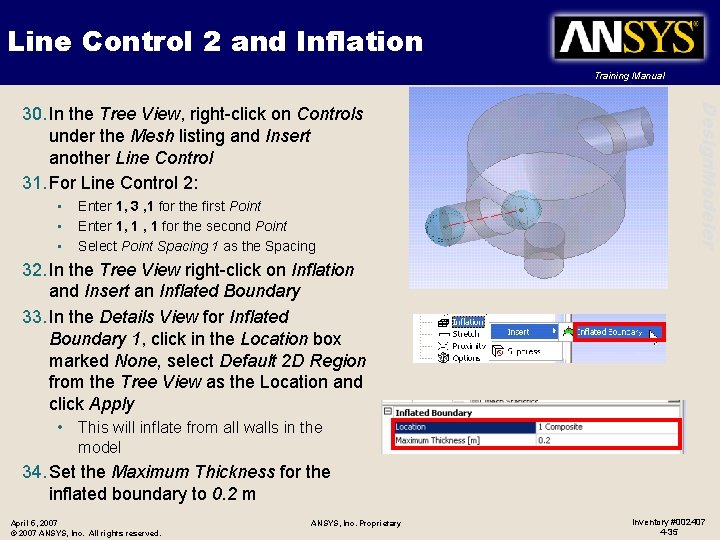
Line Control 2 and Inflation Training Manual • • • Enter 1, 3 , 1 for the first Point Enter 1, 1 for the second Point Select Point Spacing 1 as the Spacing Design. Modeler 30. In the Tree View, right-click on Controls under the Mesh listing and Insert another Line Control 31. For Line Control 2: 32. In the Tree View right-click on Inflation and Insert an Inflated Boundary 33. In the Details View for Inflated Boundary 1, click in the Location box marked None, select Default 2 D Region from the Tree View as the Location and click Apply • This will inflate from all walls in the model 34. Set the Maximum Thickness for the inflated boundary to 0. 2 m April 5, 2007 © 2007 ANSYS, Inc. All rights reserved. ANSYS, Inc. Proprietary Inventory #002407 4 -35

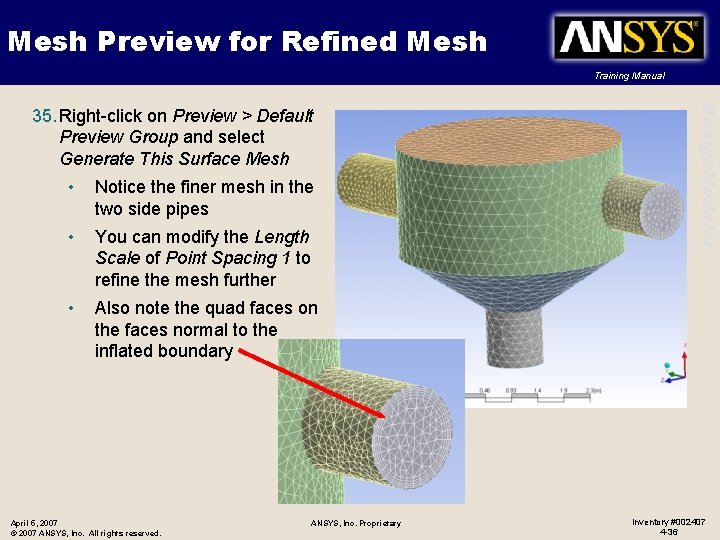
Mesh Preview for Refined Mesh Training Manual • Notice the finer mesh in the two side pipes • You can modify the Length Scale of Point Spacing 1 to refine the mesh further • Also note the quad faces on the faces normal to the inflated boundary April 5, 2007 © 2007 ANSYS, Inc. All rights reserved. ANSYS, Inc. Proprietary Design. Modeler 35. Right-click on Preview > Default Preview Group and select Generate This Surface Mesh Inventory #002407 4 -36

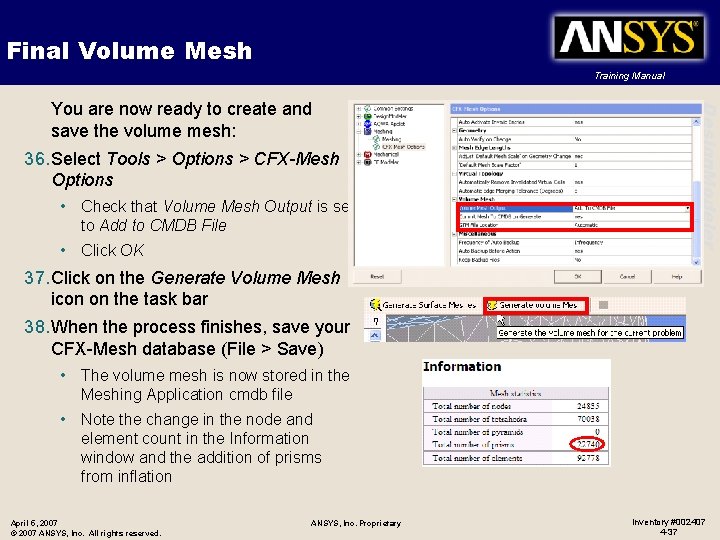
Final Volume Mesh Training Manual 36. Select Tools > Options > CFX-Mesh Options • Check that Volume Mesh Output is set to Add to CMDB File • Click OK Design. Modeler You are now ready to create and save the volume mesh: 37. Click on the Generate Volume Mesh icon on the task bar 38. When the process finishes, save your CFX-Mesh database (File > Save) • The volume mesh is now stored in the Meshing Application cmdb file • Note the change in the node and element count in the Information window and the addition of prisms from inflation April 5, 2007 © 2007 ANSYS, Inc. All rights reserved. ANSYS, Inc. Proprietary Inventory #002407 4 -37