Wilderness Survival 1 Do the following a Explain


, build and light three fires.")


- Slides: 70
Wilderness Survival
1. Do the following: a. Explain to your counselor the hazards you are most likely to encounter while participating in wilderness survival activities, and what you should do to anticipate, help prevent, mitigate, or lessen these hazards. You can train for a trip in the outdoors just like any other athletic event. Start slowly, gradually increasing the duration and intensity of your workouts, to build your physical fitness and stamina. Staying in good shape helps keep you ready for the physical demands of a trek. Any trip you plan should match the skill level and fitness of the members of your group. Before you leave, get topographic maps and current trail maps for the area. Take equipment—including a first-aid kit—and clothing that is appropriate for the weather and is in good condition. 1 of 2
Communication is key to a safe outdoor adventure, and staying in touch with home base is the first step. Complete a trip plan and share the details of your trek with someone back home. A copy of your trip plan should be left back home with one or more persons who are responsible, reliable, and available. If you don’t return as scheduled, those back home can alert searchand-rescue personnel and give them a good idea where to start looking for you. Make sure everyone in your group understands the rules and procedures for safe trekking. When participants know the reasons behind the rules, they are much more likely to follow them. 2 of 2 The very fact that you are putting together a survival kit to carry into the backcountry will improve your chances by providing you with a few items that will make your life easier. Perhaps even more important is that you are thinking about dealing with possible emergencies long before they can develop.
1, b. Show that you know first aid for and how to prevent injuries or illnesses likely to occur in backcountry settings, including hypothermia, heat reactions, frostbite, dehydration, blisters, insect stings, tick bites, and snakebites. 1 of 2
2 of 2
2. From memory list the seven priorities for survival in a backcountry or wilderness location. Explain the importance of each one with your counselor. 1. 2. 3. 4. 5. 6. 7. STOP Provide first aid Seek shelter Build a fire Signal for help Drink water Don’t worry about food
S. T. O. P. : Stop, Think, Observe, & Plan Stop and relax. Observe your surroundings, equipment, the weather and natural resources. Determine what you need to do to survive and help others find you. See if you, or anyone with you, are in need of first aid. If there is a need, provide first aid immediately. This is the second priority for survival. 1 of 7
Provide First Aid FIRST AID If an accident occurs in the wilderness it will be your responsibility to deal with the situation. The specific sequence of actions when dealing with this situation is: 1. Remain calm, providing your patient with quiet, efficient first aid treatment. 2. Keep the patient warm and lying down. Do not move this injured person until you have discovered the extent of the injuries. 3. Start mouth-to-mouth artificial respiration immediately if the injured person is not breathing. 4. Stop any bleeding. 5. Give your patient reassurance. Watch carefully for signs of shock. 6. Check for cuts, fractures, breaks and injuries to the head, neck or spine. 7. Do not allow people to crowd the injured person. 8. Do not remove clothing unless it is imperative. 9. Decide if your patient can be moved to a proper medical facility. If this is not possible, prepare a suitable living area in which shelter, heat and food are provided. 2 of 7
Shelter The third priority for survival is to find or construct shelter. Natural cover such as caves or under a rock overhang or the bottom branches of a strong tree are quick solutions. Check for signs of snakes or other animals. In the absence of natural shelter, use small branches to build a frame. Cover it with ponchos, garbage bags or emergency blankets. 3 of 7
Build a Fire A fire can be used for comfort, sterilization, purifying water, protection, cooking and signaling. Don't build a fire in your shelter unless it's well ventilated. If you can find a location that is near your shelter, build a wall about 2 feet high out of rocks. Arrange the rocks in the shape of a "C" with the opening pointed towards your shelter. This will direct the heat in your direction. You can also warm rocks in the fire and bury them under your shelter for heat. If the wind is an issue, dig a shallow pit for your wood. Clear a four-foot area surrounding the fire. A small fire is more controllable. Large, smoky fires are more visible. Add green or wet leaves to increase the smoke. 4 of 7
Signal Use smoke or signal mirrors to signal for help. Whistle instead of yelling. It carries further and requires less energy. Three is the universal distress signal. If you're near a clearing, arrange three fires or piles of rocks in a field. You can also scratch a message into the dirt or sand. 5 of 7
Hydration Due to cold, hot, exertion, stress and waste removal, your body loses vital fluids. Collect rainwater in a plastic sheet or in a can before it hits the ground or a cloth to collect dew. Cactus pulp can be sucked in small amounts. Water from lakes, rivers and creeks can be boiled for 30 minutes or more to remove contaminants. However, it is better to drink water that hasn't been purified than to dehydrate. Do not drink sea water or urine, eat snow or suck plants that are not edible. 6 of 7
Food According to the BSA manual, the capture and preparation of an animal requires too much energy. Being hungry is not very pleasant, but on the list of survival priorities, it is not very high, either. Some plants may cause intestinal stress or even poisoning. Unless you are absolutely sure of the identity of a plant and know it is safe to eat, it’s best to leave vegetation alone. The same is true of most wildlife. An average person on an average day burns around 2500 calories. A backpacker carrying 50 pounds for 6 hours over level terrain may burn 4000 to 5000 calories. Add elevation gain and a few more hours and the count raises to 6000 to 8000 calories. Be Prepared : always bring food (trail mix) when hiking, backpacking even if your only going for an hour, You never know if you might get lost. 7 of 7
3. Describe ways to avoid panic and maintain a high level of morale when lost, and explain why this is important. Over many years and many miles backpackers and hikers have become familiar with preparing for emergencies before they happen. In any backpackers or hikers mind it is first and foremost "The What If. " Your first key to preventing accidents and emergencies is to be prepared for anything. Being prepared happens before you hit the trail and not after your in the wilderness. Always keep in mind that you should expect the unexpected. Try to relax and have a meal if at all possible. Waiting is always hard under stressful circumstances, but try to keep your stress level down. Remember help is on the way and of course you have already sent your distress signal at this time. You should have filed a wilderness permit and let others know where you are and when your scheduled return is to be. If your late at all then you can be assured that people will be looking for you and rescue is on the way. If the waiting gets to much for you work on attracting attention to the area your in. Your best bet in attracting attention is to build a smoky fire. Best way to avoid panic is to set your mind on some definite plan such as singing a complicated song that you know, or calculating math problems in your head. Moral booster is planning what you will have for supper when you arrive back home, or what you will do on summer vacation. I always carry a pack of cards in my backpack. 1 of 2
When things go wrong, the skills of wilderness survival can help make everything right again. Thinking through the challenges that face us and coming up with good solutions are vital to taking care of ourselves in the outdoors, especially when we must get out of difficulties. Wilderness survival means knowing how to stay alive and well until the emergency is over. It means working with nature rather than against it. It means always having a positive attitude— the one essential that can’t be carried in a pack or a pocket. Mastering wilderness survival takes practice. During trips to the outdoors that are not emergencies, you can learn to light a fire without matches, build a shelter without a tent, signal for help, and practice first aid. Earning the Wilderness Survival merit badge will get you started in the right direction, but there is always more to learn. 2 of 2
4. Describe the steps you would take to survive in the following conditions: a. Cold and snowy b. Wet (forest) c. Hot and dry (desert) d. Windy (mountains or plains) e. Water (ocean, lake, or river) 1 of 6
Cold and Snow Cold weather brings with it the very real danger of hypothermia. The temperature does not need to be all that low for hypothermia to be a concern. A cool, rainy day, especially if the wind is blowing, can be especially worrisome. Do all you can to keep yourself warm and dry. Watch those around you for signs that they are becoming chilled. Take steps to find shelter and, if possible, to light a fire. Snow can also make survival more difficult by burying firewood and the native materials that could be used for making or improving shelters. It is easy to lose gear in the snow. If snow gets into your clothing, it will melt and can chill you. On the other hand, snow can be an effective resource for building a shelter. It may be as simple as a depression dug into a snowbank so that you can get out of the wind. With more time and energy, you might dig a snow cave or construct a snow trench to create a shelter that will insulate you from the cold. Be sure to drink plenty of fluids even though you might not feel thirsty. Melt snow over a stove or campfire. If the day is sunny, try laying out a dark-colored plastic trash bag or ground cloth, spreading some snow on it, and letting the sunlight melt it. Shape the snow underneath the plastic to form a depression that captures the water and allows you to dip a cook pot or water bottle into it. 2 of 6
Wet Forests While forests can offer an abundance of materials for making shelters and building campfires, they can also be challenging, especially if the weather is wet. The shade of a forest floor can feel chilly, and dampness can make it seem even colder. As in other settings, do what you must to keep yourself and others dry and warm, and be on guard against hypothermia. Dense forests can make signaling to rescuers difficult. You might need to move a short distance to a meadow, stream bank, or other open area visible from an aircraft. Consider your options carefully, though, before changing locations. Mark your route clearly in case you need to find your way back. 3 of 6
Hot and Dry Deserts While the greatest challenge of desert survival might be staying cool during the day, nights are sometimes cold enough in arid regions for you to need clothing, shelter, and perhaps a fire to keep warm. Rest in a high, shady spot during the day, then complete necessary activities in the cool of the evening or early morning. Wear sun protection if you have it, including long sleeves and a hat. A hat or some type of head cover will help beat the heat, too. 4 of 6
Wind can make other challenges more difficult to overcome. In hot weather, a wind might help keep you cooler, but it can also sap away moisture and cause you to need to drink water more often. In cold weather, wind can blow warm air away from your body and cause the temperature to seem colder than what is indicated on a thermometer. A steady wind can be exhausting as it hammers away at your energy and morale. Protect yourself from the wind by wearing a windproof outer layer—a jacket, rain gear, or even a tarp or tent rain fly. Seek shelter on the calm side of a boulder or large tree. If the weather is chilly or cold, watch for any signs of hypothermia. 5 of 6
Oceans, Lakes, and Rivers Emergencies on water often begin when a watercraft capsizes or when someone falls from shore or from a boat. If that is the case, the first concern is to protect those in the water from drowning. They will need to get to dry land, get back into their watercraft, or stay afloat until help arrives. If you are in cold water very near the shore, get everyone out of the water as soon as possible to help avoid hypothermia. If you capsize far from shore, try to get as much of your body out of the water as possible by climbing on the capsized craft. If that is not possible, conserve energy and body heat by floating with your personal flotation device and clothing on, your head positioned so that you can breathe, and your legs drawn up close to your trunk. Huddle together with others if you are not alone. A capsized canoe, boat, or other watercraft, even if damaged, might stay afloat. It is also more visible than a person alone in the water. Canoes and small boats can sometimes be righted, but don’t waste much energy in the effort. You can climb into a swamped boat and it should still keep you on the surface. If that isn’t possible, hang onto the side of the boat and use it to help you rest and keep your head above water. When a survival situation involves a life raft, look for storage compartments containing an emergency kit that might contain first-aid supplies, water, signaling devices, and emergency Heat escape lessening posture (HELP) food. Follow the instructions included with the kit. 6 of 6
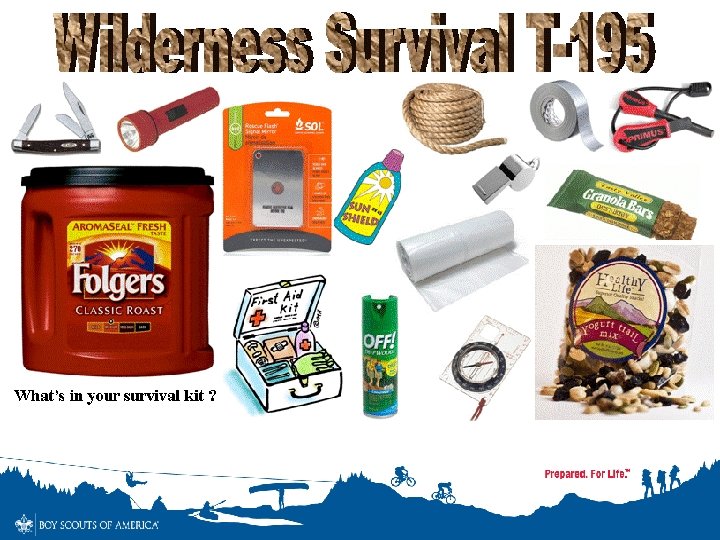
5. Put together a personal survival kit and be able to explain how each item in it could be useful.
Your survival kit need not be elaborate. You need only functional items that will meet your needs and a case to hold the items. For the case, you might want to use a Band-Aid box, a first aid case, an ammunition pouch, or another suitable case. This case should be-- Water repellent or waterproof. Easy to carry or attach to your body. Suitable to accept different sized components. Durable. In your survival kit, you should have– First aid items. Water purification tablets or drops. Fire starting equipment. Signaling items. Food procurement items. Shelter items. Some examples of these items are– Lighter, metal match, waterproof matches. - Snare wire. - Signaling mirror. - Wrist compass. - Fish and snare line. Fishhooks. - Candle. - Small hand lens. - Chap Stick. Oxy tetracycline tablets (diarrhea or infection). Water purification tablets. - Solar blanket. - Surgical blades. - Butterfly sutures. - Zip-lock bag’s for water storage. - Needle and thread. - Knife.
Every Survival Kit begins with the Outdoor Essentials. Get into the habit of having them with you on every trip into the backcountry.
Knife: Used for cutting food & rope for a shelter or even used for First Aide 1 of 10
First aid kit Prepare for the Worst A Boy Scout should always be ready for anything. Disasters, by their very nature, come unexpectedly. A good first aid kit should have more than necessary to treat anything that comes up. Splinting material, tourniquets, needle and thread and signaling devices should be included in a comprehensive first aid kit. Training on how to use these materials is also important. One of the requirements for the First Aid Merit Badge includes building a first aid kit. When hiking long distances, pack larger compression bandages to help manage penetrating wounds with profuse bleeding. Compression bandages provide bulk that is cinched down over a wound to apply continuous pressure to stop the bleeding. 2 of 10 The Boy Scout Motto is "Be Prepared; " for camping, hiking, boating and a host of other outdoor activities One of the best ways to prepare for any emergency is to pack a portable first aid kit
Extra clothing Inclement weather has a way of sneaking up on your when you are traveling in the backcountry. Carrying additional layers of clothing for protection from the elements if caught unexpectedly is a smart move and highly recommended. Consider the season and environment in which you are hiking to determine what type of extra clothing you should pack. Commonly carried items include an extra pair of socks, a synthetic jacket and insulating hat. 3 of 10
Rain gear Quality rain gear is essential for any backpacking trip. Hypothermia - the inability of the body to keep itself warm - is one of the most common causes of backcountry emergencies. Contrary to popular belief, hypothermia is not just a problem in winter. It is most likely to occur in wet, windy weather for hikers who are unprepared. The ability to stay dry is the key to avoiding hypothermia. Not only will rain gear help to keep you dry, it provides an additional layer for warmth and will also keep out the wind. Your rain jacket can double as your wind breaker. In wet and humid climates, or in multiple days of constant rain, it is impossible to stay completely dry. Moisture seeps into all of your gear and you can't help sweating when you hike. Here are some tips to help you make the best of the situation and stay as dry as possible: Keep a set of long underwear just for sleeping and camp. Don't wear them while hiking. Store them in a waterproof stuff sack in your pack to keep them dry. Keep your sleeping bag in a water proof stuff sack for extra protection. If your sleeping back is damp, make sure to dry it out if you have a break in the weather during the day. Monitor your body temperature while hiking to avoid excess perspiration. Use a trash compactor bag for a pack liner in addition to using a pack cover. 4 of 10
water bottle - 1 -liter plastic bottle made specifically for hiking water. The well-known Nalgene name is synonymous with water bottle. They are practically indestructible in the wild, making them very popular. Two bottles provide enough water for about 10 miles of hiking. Two bottles, one on each side of a pack, provide balance. They are easy to reach and easy to fill. Alternating which bottle you drink from keeps the load balanced. Just wash in a dishwasher or by hand. water bladder - Camelbak and Platypus are well-known but now there are dozens of brands making flexible hydration systems. They range in size, usually 1 -liter to 3 -liter. The bladders ride in the pack next to the hiker so are well balanced. A drink hose makes drinking while hiking extremely easy and may help hikers drink more, staying better hydrated. They are extremely stable, being completely packed in, and they tend to be light compared to the water they carry. 5 of 10
It is easy to stay beyond your expected time when traveling across panoramic ridgelines. If you ever find yourself trekking out of the backcountry at twilight or attempting to set up camp as the sun sets behind the horizon, a headlamp is an invaluable piece of equipment. Lightweight, compact and offering a hands-free light source, newer headlamps with LEDs feature a longer battery life than now-ancient incandescent bulbs. Many headlamp models also offer a strobe light mode, which is a great option to have during an emergency situation. Flashlight (with extra batteries and bulb) Headlamps (offers hands free) 6 of 10
Trail food These items will maintain energy levels in the case of an emergency and help maintain body temperature in cold weather. While you can survive three days without water and three weeks without food, your energy levels will be seriously depleted without these. 7 of 10
Matches and fire starter The ability to build a fire when lost is extremely helpful for reasons beyond the obvious warmth it provides. The light from the fire helps search teams at night when their task is much more difficult. During the day, a smoky fire will attract searchers as well. The key to fire-building is to assume that no matter how many matches you actually have, you will need some later to start another fire. With practice, you can learn the skill of building a roaring fire with ONE match, ONLY one and ALWAYS one. A candle burns much longer than does a match. This is helpful when trying to start a fire, especially if your firewood is wet. 8 of 10
Sun protection does not stop with sunscreen; it also includes sunglasses, lightweight skin shielding clothing and brimmed hats. Your activity level and the temperature are the factors that will determine if you choose to wear pants or shorts or longer or shorter sleeves while outdoors. 9 of 10
Map and Compass Even though we live in the age of GPS, also carry a compass and a map of the area. Back ups are always good to have. And it's always a good idea to orient as to your position and where you are going before you go into the woods. Have a reasonable knowledge of the terrain. And be able to take that information and relate it to an oriented map. Also keeping yourself aware of your surroundings, the time of day and the position of the sun are all good ways to ensure your safe return. 10 of 10
6. Using three different methods (other than matches), build and light three fires.
7. Do the following: a. Show five different ways to attract attention when lost. b. Demonstrate how to use a signal mirror. c. Describe from memory five ground-to- air signals and tell what they mean. 1 of 6
Mirrors On a sunny day, a mirror is the best signaling device. You can create a flash and can send signal a long way and effective, especially if you are surrounded by mountains. If you don’t have a mirror, you can use your belt buckle, stainless cup or any other object that reflects the sun’s rays. Hold the mirror at eye signal and point toward the sun to catch the rays. Flares are single-use devices so be sure to use it appropriately. The dark orange smoke is visible from a very long distance and is easily recognized as a distress signal at any time of the day. This is very useful when you are stranded at sea, lost in the mountains or in a desert. When lighting the flare, point it away from you or up into the sky. Do not point it anywhere near a person’s face or you and stretch out your arms while holding the flare. Fire is a very best signaling device especially in the cold, dark night. It does not only keep you comfortable and warm, but it can also attract rescuers or passersby. If possible, get to the widest open area. The international standard signal for help with fire is three fires in a triangular formation. But if you are alone, just try to build one big fire or set a lone standing tree on fire, but make sure that you don’t burn the whole forest down and endanger yourself. 2 of 6
Smoke In the daylight, your best option is smoke. The international distress signal is three columns of smoke. Once you have the fire going, throw in some wet moss on top of the fire. It creates a very massive thick white smoke that is visible even at hundreds of miles. To send off the three signals, wet a jacket, blanket or sleeping bag and cover the fire for about a second and pull it off three times in a row. It will send three distinct smoke puffs into the air, signaling that someone needs help. Do it until your rescuers come. Flashlight or Strobe Light When you go out for an adventure, a flashlight is probably one of the items in your essentials. You use it to light the trail or let you move around easily in the darkness. Especially at night, a flashlight can be used to send an SOS to an aircraft or rescuers. You can flash it several times to attract rescuers. A strobe light flashes 60 times in a minute. SOS Using the Morse code is the international way of sending signal that you are in distress. Three dots, three dashes, and three more dots, it is the clearest way to ask for help. If you have a twoway radio, you are lucky. But if you don’t have, find a large open space and spell out the code with branches and trees or simply write the S-O-S letters on the sand or soil where it is visible and readable. 3 of 6
Whistles are very useful when you go out into the mountains and you can even find it in life jackets. These are very effective audio signals which can even reach up to 1. 6 kilometers away and 120 decibels, depending on the type of whistle you have. The international distress signal is six blasts in a minute, and if rescuers are coming, they will answer you back in three blasts in a minute. Clothing Spread clothing on the ground or above a tree to send a signal that somebody is down below. Choose clothes, blanket or flags that are brightly colored or with colors that is in contrast to the natural surroundings. Make sure to arrange the clothes in a geometric pattern that will attract someone flying overhead, boating or skiing. Natural Material When you are in the least fortunate situation without any signal devices that can be used as listed above, bring out your creativity. There are many objects around that can be used to attract attention when you need rescuing. You can use foliage, rocks or snow blocks to build mounds that create shadows. If you are in a snow-covered area, use the snow to form letters or symbols and fill with twigs or branches. At the beach, you can use seaweeds or boulders to form a message. In any terrain, use contrasting materials that will send off visible and clear signals to the aircrews. No matter where you go, always bring with you a whistle, lighter and a flashlight. It is better to be prepared at all times and be able to also help someone else in need. Make sure to fully-charge your cellular phones before you step out of your house. 4 of 6
5 of 6
REQUIRE ASSISTANCE REQUIRE MEDICAL ASSISTANCE NO YES Ground-to-Air Visual Signal Code A simple set of ground-to-air signals will allow you to communicate with searchers flying overhead. Make your symbols as big as you can. Use whatever is on hand to construct symbols that can be seen easily from the air— rocks, overturned sod, piles of branches, and pieces of clothing and equipment. Where snow covers the ground, use your feet to stomp out the shapes of the symbols. Lining the shapes with branches, ashes, soil, or other dark material can make the symbols more visible. 6 of 6 PROCEEDING IN THIS DIRECTION
8. Improvise a natural shelter. For the purpose of this demonstration, use techniques that have little negative impact on the environment. Spend a night in your shelter. Building a survival shelter is an absolute priority, if you face a survival situation in harsh or unpredictable weather. A good shelter must protect you from the elements and be comfortable enough for resting and sleeping. Most people cannot survive unprotected from rough weather for more than a few hours. If possible choose ground: • that is dry, well drained and reasonably flat. • that is a comfortable distance to water and has a supply of firewood. • that has building materials for your shelter. • that provides protection against strong winds. If you are lost and people are looking for you, make sure your shelter site is easy to be seen and found by search and rescue teams. Unsuitable shelter sites: - A site too close to water may lead you to be troubled by insects. - Rivers presents a constant threat to safety. Heavy rainfall in nearby hills can easily create flash floods. Avoid dry riverbeds. - Avoid loose rocks, dead trees or other natural growth that could fall on your shelter. - Low ground, such as ravines and narrow valleys, couldbe damp and collect the heavy cold air at night and are therefore be colder than the surrounding high ground. On the other hand, the tops of mountains are exposed to higher winds. The best area to seek shelter is somewhere in between. 1 of 3
2 of 3
3 of 3
9. Explain how to protect yourself from insects, reptiles, and bears. Fire ants are known for their lively and aggressive behavior, swarming over anyone or anything that disturbs their nest, often attacking wild animals, baby animals, pets or people, in some instances, even killing them. Their painful stings affect about 40% of people in infested areas each year. Twenty million people a year are stung by fireants in the United States! An epinephrine autoinjector is a medical device used to deliver a measured dose of epinephrine (commonly known as adrenalin) using autoinjector technology, most frequently for the treatment of acute allergic reactions to avoid or treat the onset of anaphylactic shock. Trade names for this device include Epi. Pen, Anapen and Twinject. Bees and Wasps Black Widow Spider Scorpions Brown Recluse Spider 1 of 5
Insects Mosquitoes, chiggers, black flies, and other biting insects can make you miserable in the outdoors, and that can threaten morale. If you have it, use insect repellent. Wear a long-sleeved shirt, long pants, and a hat. Tie a bandanna around your face or use a spare T-shirt to protect your head. Guard your hands with gloves or pull a pair of socks over them. Try smoothing a layer of mud on exposed skin. Build a fire and stay close to the smoke. Consider moving to higher ground that might be breezier and less infested with bugs. Tick, Chigger, and Spider Bites and Stings The bites or stings of insects, ticks, chiggers, and spiders can be painful. Some may cause infection. Treating Stings. To treat bee stings, scrape away the stinger with the edge of a knife blade. Don’t squeeze the sac attached to the stinger—that might force more venom into the skin. Use an ice pack to reduce pain and swelling. Treating Tick Bites. Ticks are small, bloodsucking creatures that bury their heads in the skin. Protect yourself whenever you are in tick-infested woodlands and fields by wearing long pants and a long-sleeved shirt. Button your collar and tuck the cuffs of your pants into your boots or socks. Inspect yourself daily, especially the hairy parts of your body, and immediately remove any ticks you find. 2 of 5
Prevention is the key when dealing with snakes. Wear boots and heavy pants when hiking. Avoid walking in tall grass or underbrush and do not reach into rocky crevices, under logs or rocks. Do not try to kill a snake - ANY snake, and if you see what appears to be a dead snake, do not touch it. A snake can strike up to one hour after death. Copperhead Rattlesnake Cottonmouth (Water Moccasin) Mojave Rattlesnake 3 of 5 Coral Snake
Predatory Animals Be especially aware of the kinds of predatory animals you might meet during your adventures. Wolves, coyotes, and cougars (or panthers and pumas) are curious. So, if you happen upon such an animal, face the creature and slowly retreat from the area. Do not approach the animal, run, or play dead. Make yourself as “big” as possible by waving your arms and clothing above your head. Make a lot of noise. If you have no escape or become cornered, throw rocks and sticks. Remember, no matter what kind of wild animal, give all wildlife a wide berth—especially young animals and their mother. Bears are part of many backcountry ecosystems. The same guidelines Scouts follow to keep bears and themselves safe during outdoor adventures can be adapted during survival emergencies to allow people and bears to share the same wilderness areas without incident. You might need to adapt some of these guidelines to fit the circumstances of a survival situation. 4 of 5
Bear-Safety Checklist ! While hiking, alert bears to your approach by making noise. Never approach or provoke a bear. If you encounter a bear, do not run or shout. Stay calm, back away, and avoid eye contact with the bear. ! Set up your sleeping area at least 200 feet away from where you will cook and eat. ! Allow no smellables—food-soiled clothing, deodorant and antiperspirant, soap—in sleeping tents. ! Clean up and pack out any spilled food, food particles, and campsite trash. ! Use a bear bag, bear box, or bear canister to protect all unattended smellables. ! Dispose of dishwater at least 200 feet from your campsite and sleeping area. ! Wash early in the day. Avoid using scented lotions, soaps, deodorants, or shampoos. ! Change into clean sleeping clothes before going to bed. 5 of 5
10. Demonstrate three ways to treat water found in the outdoors to prepare it for drinking. Boiling Kills everything Pros Easy; cheap; requires no special equipment Cons Wastes fuel Chlorine dioxide Kills everything Pros Ultralight; cheap; easy Cons Takes 30 minutes to kill Giardia and four hours to neutralize cryptosporidium; affects taste Filter Kills bacteria and protozoa Pros Fast (1 to 3 liters per minute); no funny taste Cons Bulky; pricey; can require field maintenance 1 of 5
water is a host to many dangerous pathogens; bacteria and parasites found in unclean water can cause you serious illness or even death! Boiling your water is the best way to ensure it is suitable to drink, filtering devices and chemical purification products are not as effective. Boiling your water will kill all kinds of micro-organisms such as bacteria, parasites and viruses. The fact of the matter is by the time your water has reached boiling point (212°F / 100°C) all pathogens have already been killed! As a precautionary measure you may wish to boil for a full minute just to be safe. The time it takes for your water to reach a boil and then cool down is more than enough time to kill all harmful organisms that could make you sick. To be safe you may wish to follow the advice of the US Environmental Protection Agency which recommends boiling for 1 full minute, or 3 minutes if you are 2000 meters above ground level 2 of 5
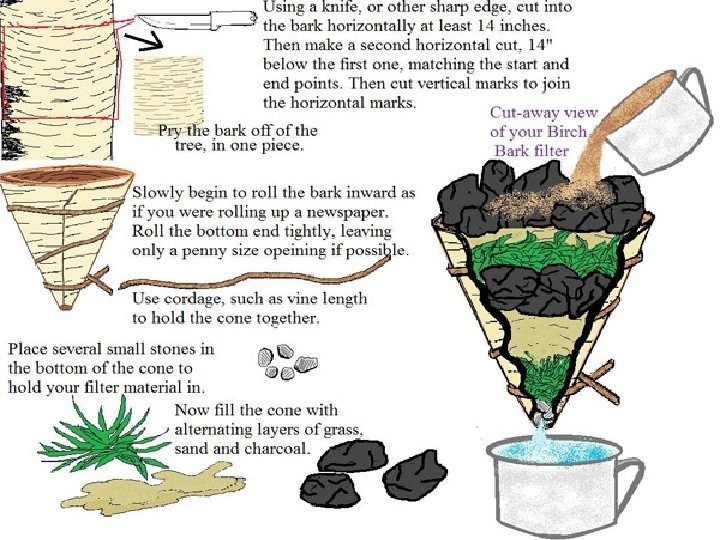
Another method of boiling water in wood or bark vessels is to heat rocks in the fire and using a pair of simple tongs, transfer them into the vessel of water and the heat released from the rocks will boil the water. 3 of 5
How long you need to wait before drinking the purified water depends on how cold or dirty (muddy) the water is. Clear water at summer temperatures (68 degrees F) will be purified in about 30 minutes. Water that's very cold (under 40 degrees F) and dirty or muddy requires you to wait four hours, which is what you'll probably see listed on the package, since the label requires the longest time to be listed. Chlorine dioxide will purify all water of bacteria and viruses in less than 30 minutes, but the longer time for cold, dirty water is required to purify it of crypto as well. Chlorine dioxide is used by many city water treatment plants, but easy-to-use versions of chlorine dioxide are available for backpackers and travelers to purify any water from bacteria, viruses, giardia and crypto. Despite the name, chlorine dioxide uses oxygen, not chlorine, to purify water. If you're backpacking or traveling in an area where you suspect the water needs purified from bacteria, viruses, giardia or crypto, be sure to bring chlorine dioxide tablets. 4 of 5
The Hyper. Flow microfilter utilizes the latest Hollow Fiber Technology and our most advanced engineering to make water treatment so small and so easy to use, it will change the way you travel in the backcountry. Its ergonomic design, diminutive size and tool-free maintainability make it just as appropriate on day trips as it is on multi-day excursions. Add a filtration rate of 3 -liters per minute and you’ve got the most efficient microfilter ever created. Also included is a Quick Connect bottle adaptor—allowing direct connection to all MSR® hydration products and a variety of other "wide mouth" containers—and an advanced prefilter to prolong the life of your filter. 5 of 5
11. Show that you know the proper clothing to wear in your area on an overnight in extremely hot weather and in extremely cold weather. Basic Warm-Weather Clothing Checklist ! T-shirt or lightweight short-sleeved shirt ! Hiking shorts ! Underwear ! Socks ! Long-sleeved shirt (lightweight) ! Long pants (lightweight) ! Sweater or warm jacket ! Brimmed hat ! Bandannas ! Rain gear ! Appropriate hiking footwear Basic Cold-Weather Clothing Checklist ! Long-sleeved shirt ! Long pants (fleece, wool, or synthetic blend) ! Sweater (fleece or wool) ! Long underwear (polypropylene) ! Socks (wool or synthetic blend) ! Warm hooded parka or jacket ! Stocking hat (fleece or wool) ! Mittens or gloves (fleece or wool) with water-resistant shells ! Wool scarf ! Rain gear ! Appropriate cold/wet weather footwear 1 of 2
Hiking Shirts Start out with a short sleeved hiking shirt made from breathable materials that also wicks moisture away from your skin. Depending on the length of your hike and the outdoor temperatures, you are bound to sweat and having this sweat remain on your skin for the duration of your hike may make for some painful and itchy red spots at the end of the day. Follow it up with a secondary, thin, long sleeved hiking shirt that you can take off if needed. Dressing in layers is crucial when hiking and having this secondary hiking shirt is a great alternative to wearing a jacket, if the weather is somewhat in between cool and cold. Hiking Shorts versus Pants Opt for hiking shorts versus pants if you are planning a day hike in warm weather. Allowing your skin to breathe provides you with the cooling off you need to stay comfortable and unless there are insect warnings in the area where you will hike, shorts suffice. Long pants are required hiking gear if you anticipate inclement weather or believe that you might end up in territory where you could encounter poison oak, ticks, or other flora and fauna that might be harmful. Hiking Jacket Purchase a jacket specifically for your hikes. It should have a waterproof exterior and a removable fleece interior. This makes it perfect for either summer or winter hikes, since you can adjust the jacket's warmth to the current weather conditions. A number of small pockets ensure that you can keep a utility knife, cell phone, water, snack, map and compass on your body; this minimizes the potential of losing these lifesaving items if the backpack gets lost. Hiking Hat and Gloves Do not leave home without a hat and gloves. Gloves come in handy even in warm weather, if you end up bouldering during a part of the hike. The hat protects your eyes from the sunlight and, during rainy weather, helps to keep your vision clear. It also serves to protect your head from overheating in the sun and can shield your neck and nose from the burning rays. 2 of 2
12. Explain why it usually is not wise to eat edible wild plants or wildlife in a wilderness survival situation. To avoid potentially poisonous plants, stay away from any wild or unknown plants that have— Milky or discolored sap. Beans, bulbs, or seeds inside pods. Bitter or soapy taste. Spines, fine hairs, or thorns. Dill, carrot, parsnip, or parsleylike foliage. "Almond" scent in woody parts and leaves. Grain heads with pink, purplish, or black spurs. Three-leaved growth pattern. Absolutely identify plants before using them as food. Poison hemlock has killed people who mistook it for its relatives, wild carrots and wild parsnips. Plants of the same species may differ in their toxic or subtoxic compounds content because of genetic or environmental factors. One example of this is the foliage of the common chokecherry. Some chokecherry plants have high concentrations of deadly cyanide compounds while others have low concentrations or none. Horses have died from eating wilted wild cherry leaves. Avoid any weed, leaves, or seeds with an almondlike scent, a characteristic of the cyanide compounds.