Weld Hydrogen Cracking Risk Management Guidance MAT1 1
- Slides: 18

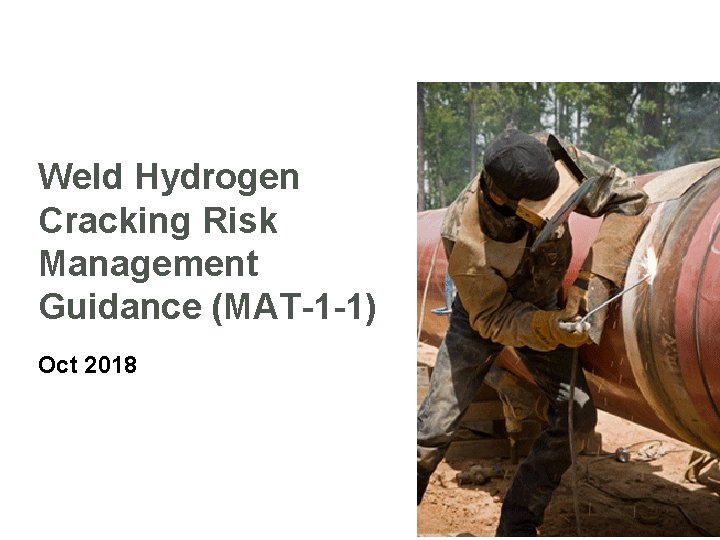
Weld Hydrogen Cracking Risk Management Guidance (MAT-1 -1) Oct 2018

Project Overview Background • PRCI and other organisations have funded research and development programs related to weld hydrogen cracking – – – Cracking test development Hardness limit definition Diffusible hydrogen delivery Evaluation of hydrogen cracking delay time Weldment hydrogen cracking susceptibility • Projects have produced results that can be used in developing or approving welding procedures, electrodes or consumables • Yet hydrogen cracking is still being observed in in-service welds and new construction

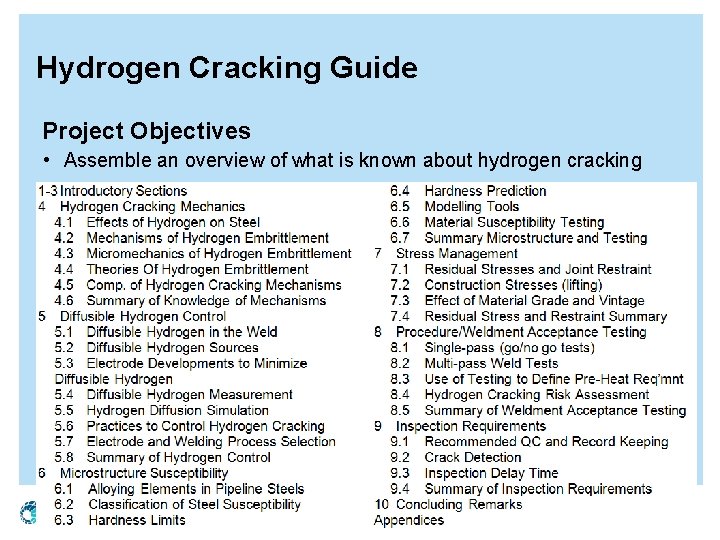
Hydrogen Cracking Guide Project Objectives • Assemble an overview of what is known about hydrogen cracking 3

Guide Observations Hydrogen cracking theories differ • Suggest different mechanisms for crack formation • Can explain different cracking behaviours observed for different materials and the factors controlling susceptibility The absorption and diffusion of hydrogen considered • The diffusion of hydrogen is describable to understand the time history of hydrogen concentration promoting cracking for electrode types • Susceptibility of each electrode type to hydrogen delivery was described along with hydrogen measurement techniques Weld microstructure and chemistry considered • Factors affecting susceptibility in terms of hardness / hardenability • Carbon and carbon equivalent used to control hardenability 4

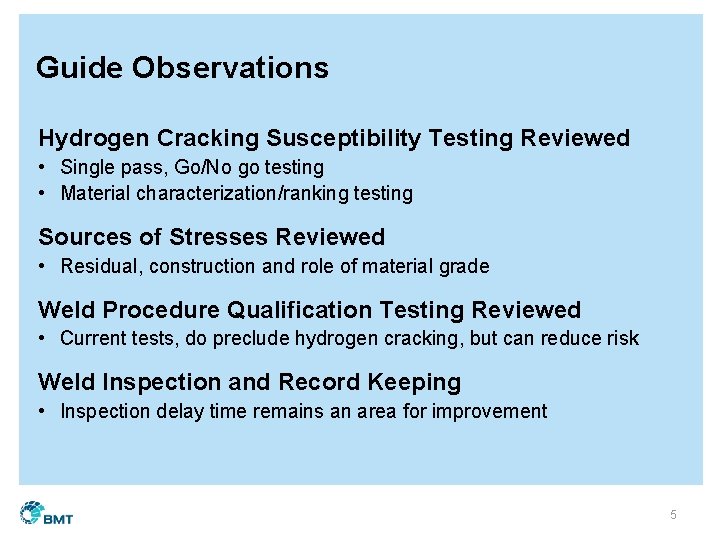
Guide Observations Hydrogen Cracking Susceptibility Testing Reviewed • Single pass, Go/No go testing • Material characterization/ranking testing Sources of Stresses Reviewed • Residual, construction and role of material grade Weld Procedure Qualification Testing Reviewed • Current tests, do preclude hydrogen cracking, but can reduce risk Weld Inspection and Record Keeping • Inspection delay time remains an area for improvement 5

Weld Inspection Delay Time Requested to add an appendix to the report to describe this work for fillet welds and girth welds 6

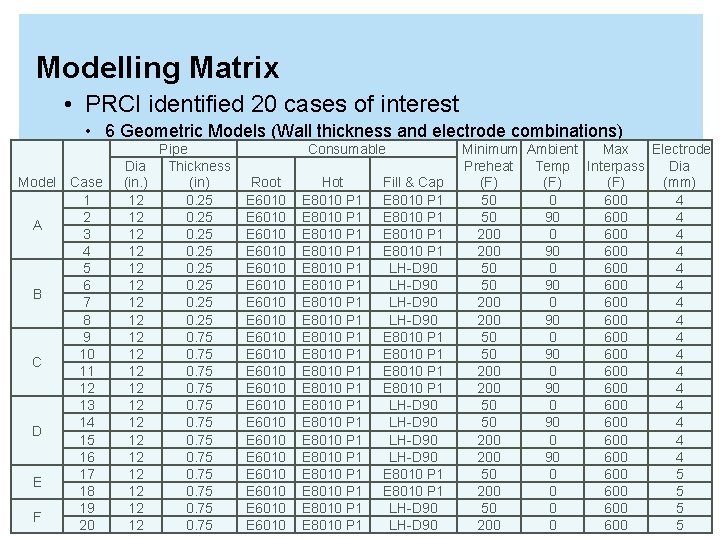
Modelling Matrix • PRCI identified 20 cases of interest • 6 Geometric Models (Wall thickness and electrode combinations) Model Case 1 2 A 3 4 5 6 B 7 8 9 10 C 11 12 13 14 D 15 16 17 E 18 19 F 20 Pipe Dia Thickness (in. ) (in) 12 0. 25 12 0. 75 12 0. 75 Consumable Root E 6010 E 6010 E 6010 E 6010 E 6010 Hot E 8010 P 1 E 8010 P 1 E 8010 P 1 E 8010 P 1 E 8010 P 1 Fill & Cap E 8010 P 1 E 8010 P 1 LH-D 90 LH-D 90 E 8010 P 1 LH-D 90 Minimum Ambient Max Electrode Preheat Temp Interpass Dia (F) (F) (mm) 50 0 600 4 50 90 600 4 200 0 600 4 200 90 600 4 50 0 600 5 200 0 600 5

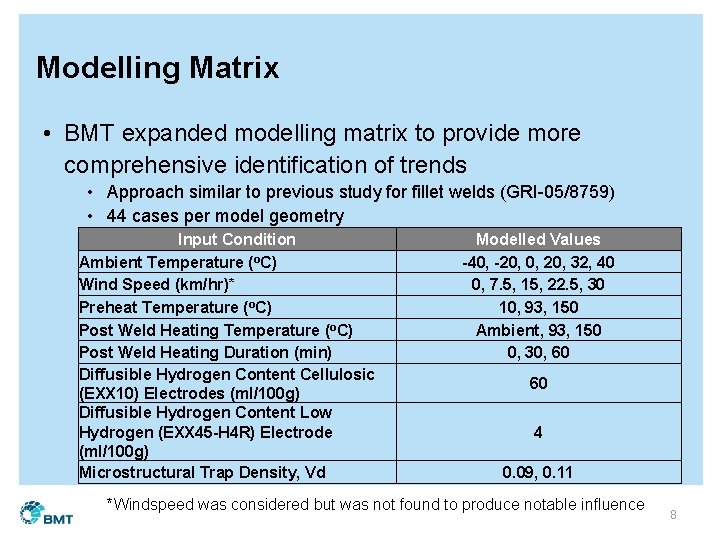
Modelling Matrix • BMT expanded modelling matrix to provide more comprehensive identification of trends • Approach similar to previous study for fillet welds (GRI-05/8759) • 44 cases per model geometry Input Condition Ambient Temperature (o. C) Wind Speed (km/hr)* Preheat Temperature (o. C) Post Weld Heating Duration (min) Diffusible Hydrogen Content Cellulosic (EXX 10) Electrodes (ml/100 g) Diffusible Hydrogen Content Low Hydrogen (EXX 45 -H 4 R) Electrode (ml/100 g) Microstructural Trap Density, Vd Modelled Values -40, -20, 0, 20, 32, 40 0, 7. 5, 15, 22. 5, 30 10, 93, 150 Ambient, 93, 150 0, 30, 60 60 4 0. 09, 0. 11 *Windspeed was considered but was not found to produce notable influence 8

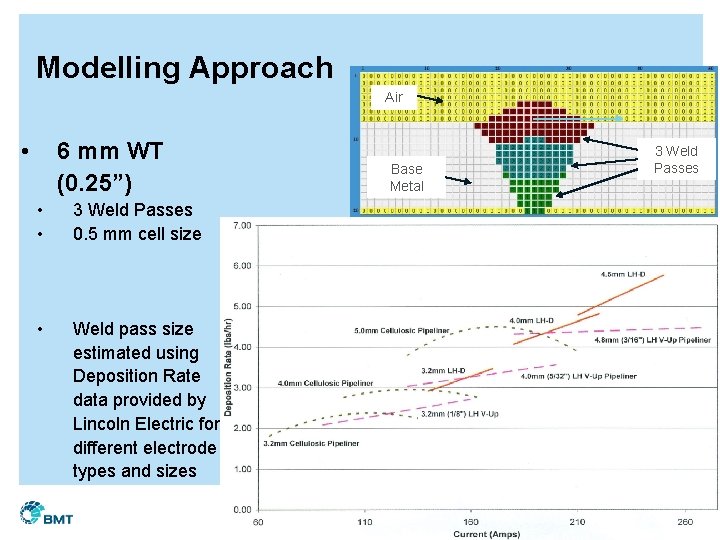
Modelling Approach Air • 6 mm WT (0. 25”) • • 3 Weld Passes 0. 5 mm cell size • Weld pass size estimated using Deposition Rate data provided by Lincoln Electric for different electrode types and sizes Base Metal 3 Weld Passes 9

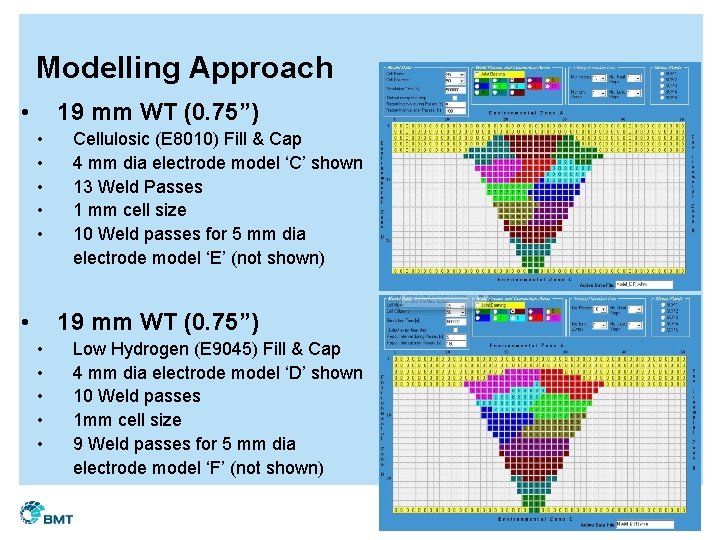
Modelling Approach • 19 mm WT (0. 75”) • • • Cellulosic (E 8010) Fill & Cap 4 mm dia electrode model ‘C’ shown 13 Weld Passes 1 mm cell size 10 Weld passes for 5 mm dia electrode model ‘E’ (not shown) 19 mm WT (0. 75”) • • • Low Hydrogen (E 9045) Fill & Cap 4 mm dia electrode model ‘D’ shown 10 Weld passes 1 mm cell size 9 Weld passes for 5 mm dia electrode model ‘F’ (not shown) 10

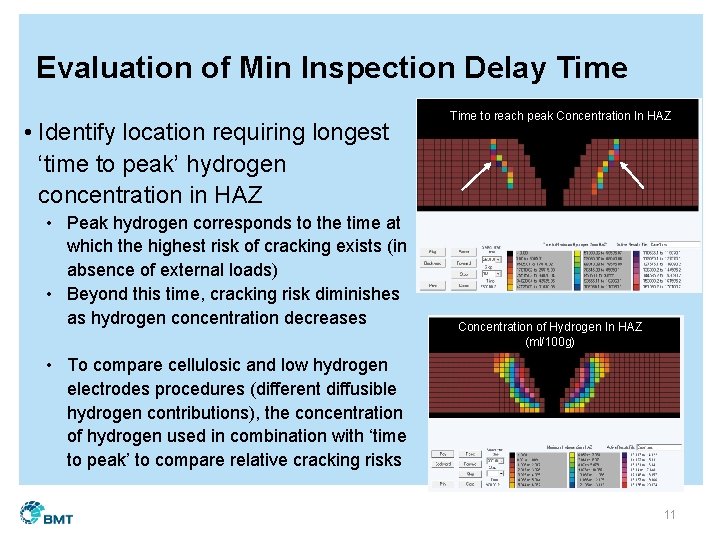
Evaluation of Min Inspection Delay Time • Identify location requiring longest ‘time to peak’ hydrogen concentration in HAZ • Peak hydrogen corresponds to the time at which the highest risk of cracking exists (in absence of external loads) • Beyond this time, cracking risk diminishes as hydrogen concentration decreases Time to reach peak Concentration In HAZ Concentration of Hydrogen In HAZ (ml/100 g) • To compare cellulosic and low hydrogen electrodes procedures (different diffusible hydrogen contributions), the concentration of hydrogen used in combination with ‘time to peak’ to compare relative cracking risks 11

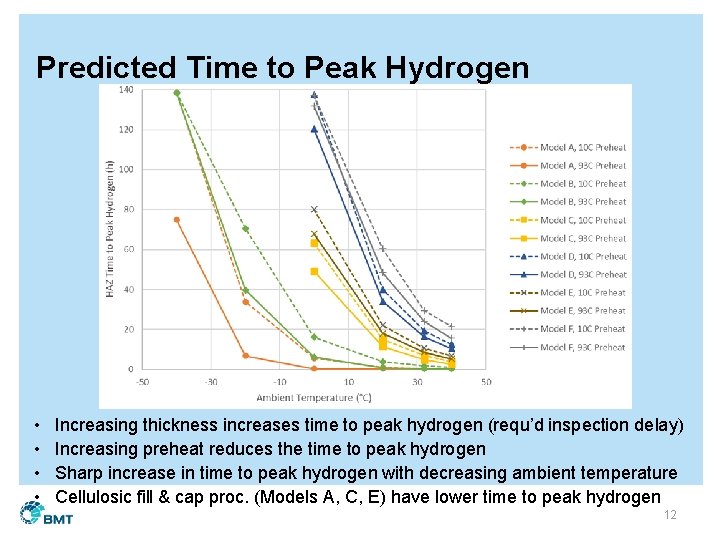
Predicted Time to Peak Hydrogen • • Increasing thickness increases time to peak hydrogen (requ’d inspection delay) Increasing preheat reduces the time to peak hydrogen Sharp increase in time to peak hydrogen with decreasing ambient temperature Cellulosic fill & cap proc. (Models A, C, E) have lower time to peak hydrogen 12

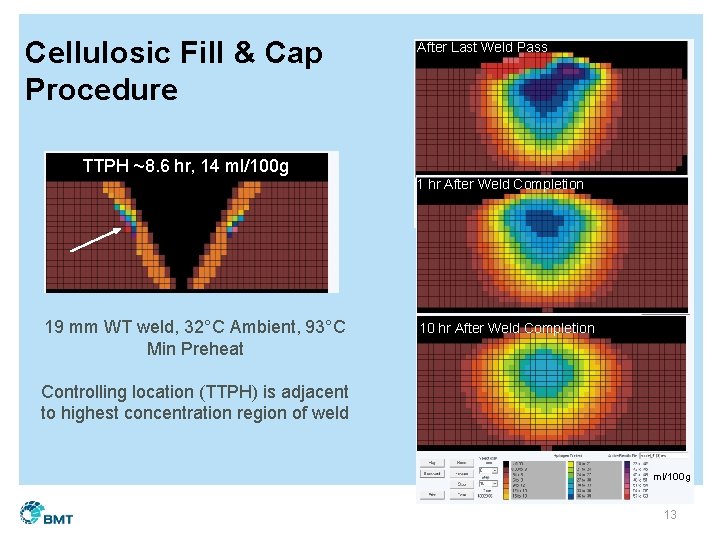
Cellulosic Fill & Cap Procedure After Last Weld Pass TTPH ~8. 6 hr, 14 ml/100 g 1 hr After Weld Completion 19 mm WT weld, 32°C Ambient, 93°C Min Preheat 10 hr After Weld Completion Controlling location (TTPH) is adjacent to highest concentration region of weld ml/100 g 13

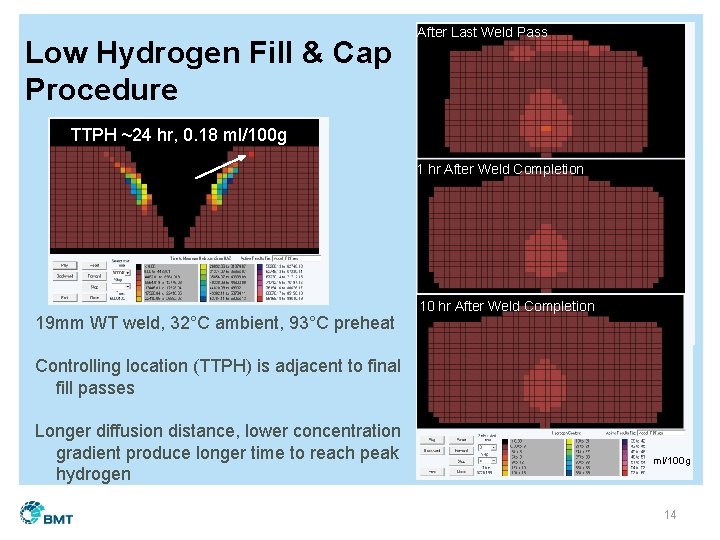
Low Hydrogen Fill & Cap Procedure After Last Weld Pass TTPH ~24 hr, 0. 18 ml/100 g 1 hr After Weld Completion 19 mm WT weld, 32°C ambient, 93°C preheat 10 hr After Weld Completion Controlling location (TTPH) is adjacent to final fill passes Longer diffusion distance, lower concentration gradient produce longer time to reach peak hydrogen ml/100 g 14

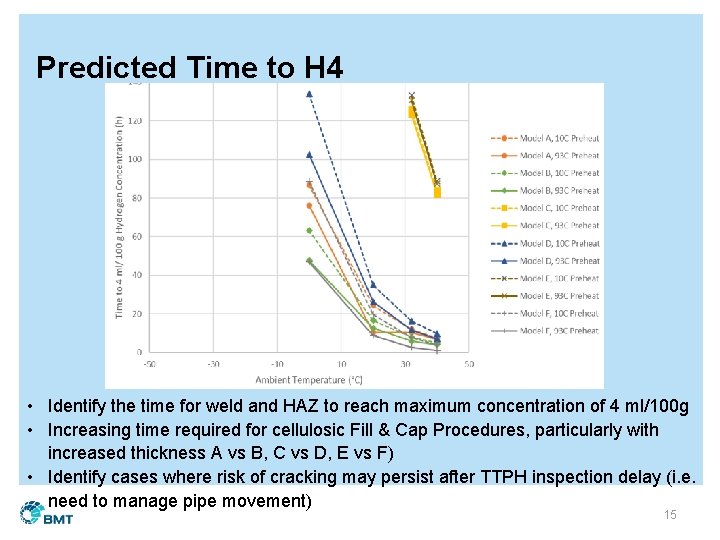
Predicted Time to H 4 • Identify the time for weld and HAZ to reach maximum concentration of 4 ml/100 g • Increasing time required for cellulosic Fill & Cap Procedures, particularly with increased thickness A vs B, C vs D, E vs F) • Identify cases where risk of cracking may persist after TTPH inspection delay (i. e. need to manage pipe movement) 15

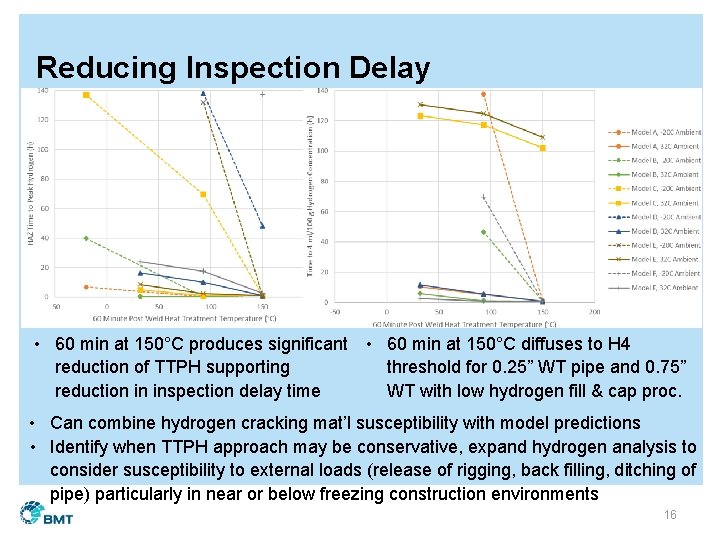
Reducing Inspection Delay • 60 min at 150°C produces significant • 60 min at 150°C diffuses to H 4 reduction of TTPH supporting threshold for 0. 25” WT pipe and 0. 75” reduction in inspection delay time WT with low hydrogen fill & cap proc. • Can combine hydrogen cracking mat’l susceptibility with model predictions • Identify when TTPH approach may be conservative, expand hydrogen analysis to consider susceptibility to external loads (release of rigging, back filling, ditching of pipe) particularly in near or below freezing construction environments 16

Model Summary • 6 Geometric Models Evaluated • Consider effect of wall thickness and different electrode combinations • Range of environmental temperatures, welding preheat, post heat, hydrogen diffusivity of completed weld • Strong temperature influence on required inspection delay time using TTPH approach and required time for hydrogen concentration to fall to maximum of H 4 across weld and HAZ • TTPH provides different inspection delay times for cellulosic fill & cap procedures vs low hydrogen fill & cap procedures • Inspection delays supported by TTPH assume constant microstructure and stress states • Additional consideration may be required for duration to external loading 17

Project Status • Draft Final Report Delivered • Comments Received • Significant comments • Desire to see more guidance on inspection delay time • Additional work accepted (no cost to PRCI) to perform hydrogen effusion (Inspection Delay Time Modelling) • Modelling of matrix weld procedures has been completed • Report has been updated to address comments • Not posted to PRIME. . Internal 2 nd Review in Progress, • Report Annex draft completed for internal review by Oct 25 • Final version of report to be posted to Prime Nov 9