Web Forms ASP NET Presentation 3 Using Web

Web. Forms – ASP. NET Presentation 3 Using Web Controls

Intrinsic Controls Used as an alternative to HTML controls – Use the prefix tag “asp: ” <asp: checkbox checked=“true” id=“chk 1” runat=server/> All intrinsic controls have common properties: – Text – Backcolor – Forecolor Some have control-specific properties – Checkboxes have the “checked” property – Listboxes have the “selecteditem” property (available only at runtime)

List of Some Intrinsic Controls <asp: textbox> <input type=text… <asp: button> <input type=button <asp: checkbox> <input type=checkbox <asp: linkbutton> <asp: imagebutton> <asp: hyperlink> <a href=“. . ”></a> <asp: image> <img src=“. . ” <asp: label> <span></span> <asp: radiobutton> <input type=radiobutton <asp: panel> <div></div> <asp: table> <table></table> Green is HTML equivalent… <asp: dropdownlist id=favcolor runat=server> <asp: listitem>blue</asp: listitem> <asp: listitem>red</asp: listitem> </asp: dropdownlinst>

Handling Intrinsic Control Events Web controls support server events only – Event is raised on the client and handled on the server – Have limited number of events as they require a round trip to the server Click type events are supported Some controls support “change” events Mouse and key type events are NOT supported – Buttons have an “onclick event” rather than an “onserverclick”event – Web controls do not support client-side coding HTML controls support both…

Using Auto. Post. Back Click events cause the form to be sent to the server – All change events that were raised before the click are processed first and then any coding for the click is processed – You can cause a form to post to the server immediately by setting the Auto. Post. Back property to True… To set up a change event for a listbox that would immediately cause a trip to the server (see next slide)

Auto. Post. Back property <asp: dropdownlist id=“kblist” runat=server autopostback = true on. Selected. Index. Changed=“lstchange”> </asp: dropdownlist> The event routine “lstchange” will be executed immediately and will not wait for a “click” event to happen…

Now you try Create a new web form with a dropdown listbox, button, textbox and a label. – Write an event procedure for the “onselected. Index. Changed” of the listbox Have the selected item in the listbox show in the label – In the “on. Click” event of the button, have the textbox show the selected item of the listbox. – Test this page. – Change the Auto. Post. Back property of the listbox to True and re-test the page….

Linking Two Controls Together Binding two controls together is useful for doing things like taking values from list boxes or drop-down lists… Must set the text property of the label or textbox control to the selected. Item of the listbox by using “binding tags” – <%# %> – Bind the label (texbox) using the “Data. Bind()” method at page_load
 %>\">")
Sample <asp: label ID="Label 1" runat="server" text="<%# Dropdownlist 1. Selected. Item. To. String() %>"> </asp: label> <asp: dropdownlist ID="Dropdownlist 1" runat="server" Width="180 px"> <asp: List. Item>apples</asp: List. Item> <asp: List. Item>oranges</asp: List. Item> <asp: List. Item>bananas</asp: List. Item> </asp: dropdownlist> ___________________________ protected void Page_Load(object sender, Event. Args e) { Label 1. Data. Bind(); }

Now you try Create a page with a listbox and a label or textbox – Bind the two controls together so that when the listbox is clicked, the text control shows the value selected….

Using Input Validation Controls In the past, validation code was written in Client-Side code (Java. Script) –. NET supports client-side scripting – You can now run validation code on the server If you wish to write your own code to check control values and send messages to the user . NET comes with pre-written controls that will write the validation code for you – For certain types of input

Types of Validation Controls Required Field Validator – Checks patterns such as email, phone ssn’s, etc. – Checks for value in field Compare Validator – Compares an input control to a fixed value or another input control Range Validator – Input is between two values Regular Expression Validator Custom Validator – Allows you to write your own code Validation Summary – Displays a summary of all the validation errors for all the validation controls on the page…

Adding Validation Controls Set properties – Control. To. Validate – Error. Message – Display (Static or Dynamic determines whether the control takes up space on the page or not… <asp: textbox id=“txtname” runat=server /> <asp: Required. Field. Validator id=“txtnamevalid” runat=server control. To. Validate=“txtname” errormessage=“Please enter name” Display=“dynamic”></ asp: Required. Field. Validator >

Validator Display None – specifies that you only want to display the error message in a Validation. Summary control. The error message will not display in the validation control. Static – specifies that you don't want the layout of the Web page to change when validator controls display error messages. Space on the page is allocated for the error messages when displaying the page. The validator contents are physically part of the page; therefore, multiple validators for the same input control must occupy different locations on the page. Dynamic – specifies that you want to dynamically place error messages on the Web page when validation fails. Space for the validation content is not allocated on the page; therefore, the page dynamically changes to display the error message. This allows multiple validators to share the same physical location on the page. In order to keep the page layout from changing when an error message is displayed, the HTML element containing the validator must be sized large enough to accommodate the maximum size of the validator.

Using Other Controls Range Validator Uses three additional properties: 1. Minimum. Value 2. Maximum. Value 3. Type (specifies data Compare Validator Use these additional properties: 1. Value. To. Compar e (or Control. To. Compare) 2. Type (datatype of two values compared) type of comparing values) 3. Operator (comparison operator – equal, notequal, greaterthan, etc. )

Regular Expression Validator Set the Validation Expression property to a regular expression. The following shows how to check for an SSN pattern: <asp: textbox id=“txtssn” runat=“server”/> <asp: regularexpressionvalidator id=“txtssnvalid” runat=“server” controltovalidate=“txtssn” errormessage=“Use the ssn format” validation. Expression=“[0 -9]{3}-[0 -9]{2}-[0 -9]{4}> </ asp: regularexpressionvalidator >

Use the Validation Expression Property

Regular. Expression Validator Control Character Meaning . + Any Character One or more occurances of the preceding char. Character “@” @ Character “. ” . An email address expression would look like this: “. +@. +. . +”

Validating the Entire Page. Is. Valid Property – Checks if all validation server controls are currently valid… if (Page. Is. Post. Back) { Page. Validate(); if (Page. Is. Valid) { spaninfo. innerhtml = “All is well!"; } }

Validation Summary Control Summarizes the messages of validation controls on the page Is displayed when page. Is. Valid property is false <asp: Validation. Summary id=“valsum” runat=“server” headertext=“These errors where found: ” showsummary=“true” displaymode=“list” />

Now you try Use ASP Web Controls - Create a page with: – Textbox for a name – Textbox for an age – <span> – Button Write code so that when the button is clicked the values of the name and age are displayed within the <span> Add validation controls to make sure the name field and age fields are filled in – Make sure the age field is between 18 and 50 Test by leaving the controls blank – Test by putting in an invalid age View the source in the browser

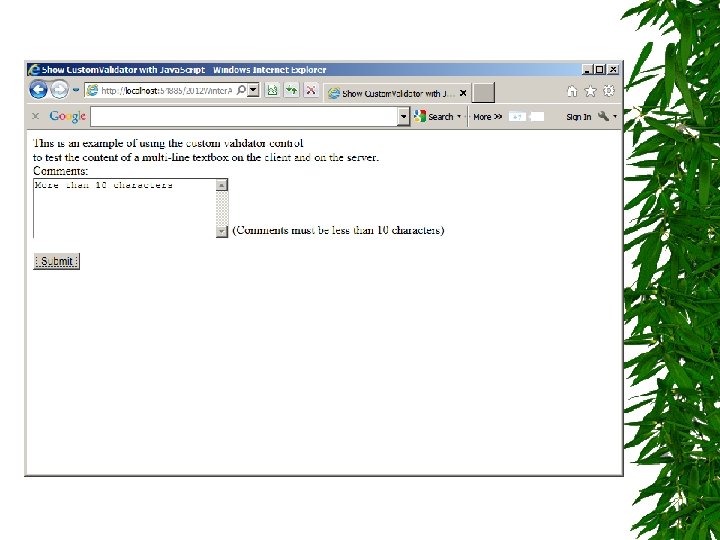
Using the Custom Validator Custom validator allows you to write your own logic to validate ASP controls Consider the following example of a multi-line textbox that needs to be restricted to a certain number of characters:

<asp: Label id="lbl. Comments" Text="Comments: " Associated. Control. ID="txt. Comments" Runat="server" /> <asp: Text. Box id="txt. Comments" Text. Mode="Multi. Line" Columns="30" Rows="5" Runat="server" /> <asp: Custom. Validator id="val. Comments" Control. To. Validate="txt. Comments" Text="(Comments must be less than 10 characters)" On. Server. Validate="val. Comments_Server. Validate" Client. Validation. Function="val. Comments_Client. Validat e" Runat="server" /> <asp: Button id="btn. Submit" Text="Submit" Runat="server" /> See next slide for client code… void val. Comments_Server. Validate(Object source, Server. Validate. Event. Args args) { if (args. Value. Length > 10) args. Is. Valid = false; else args. Is. Valid = true; }
 { if (args. Value. length > 10)")
<script type="text/javascript"> function val. Comments_Client. Validate(source, args) { if (args. Value. length > 10) args. Is. Valid = false; else args. Is. Valid = true; } </script>

Now you try: Create the Profile page in the Computer Science Classroom application to include the following: – – – User first name Student ID (for DB use) Email Address Password and confirmation textbox Button (see next slide)
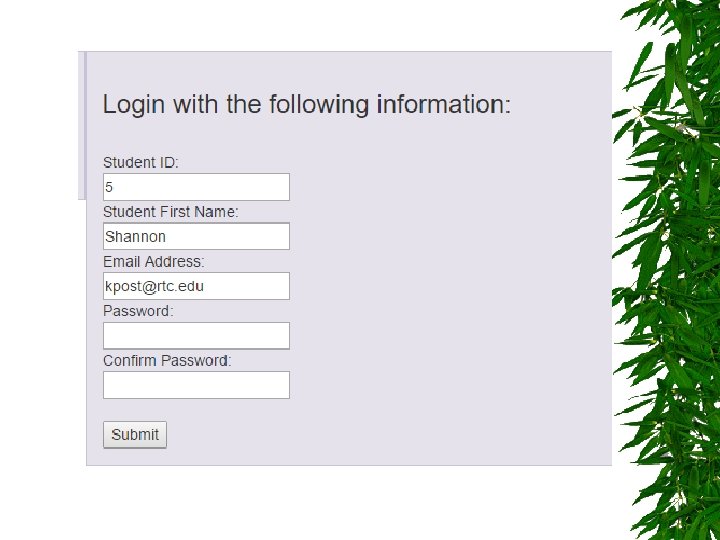

Now you try: Validate the Login Page Add validation controls for: – – Name – exists Id – exists and is between 1 and 100 Password – exists and matches confirmation Email – is valid – Test your work. If the controls are valid, redirect the user to the Default page. Response. Redirect(“Default. aspx");
- Slides: 28