WAX PATTERNS IN FPD Contents Introduction Waxes Wax


 withdraw the die so that a cusp tip")
")


- Slides: 48
WAX PATTERNS IN FPD
Contents Introduction Waxes Wax up techniques Wax pattern fabrication Ø Ø Ø Coping fabrication Wax pattern removal and evaluation Proximal surfaces Axial surfaces Occlusal morphology Margin finishing Conclusion References
q INTRODUCTION Most dental castings are made indirectly by lost wax technique
Lost wax casting of metals, practiced by ancient Greeks and Romans, involved coating of a wax model with plaster, melting the wax out of the resulting mould and filling the space with molten metal. The technique is used till today in dentistry and even in the industrial manufacture of complex components by investment casting of metals.
Waxes Wax - One of several esters of fatty acids with higher alcohols, usually monohydric alcohols. Dental waxes are combinations of various types of waxes compounded to provide desired physical properties- GPT-8
PATTERN WAX Waxes are used to form the general predetermined size and contour of an artificial dental restoration, which is to be constructed of a more durable material such as cast gold alloys, cobalt-chromium alloys, or acrylic resin.
The pattern for inlays, crowns and bridges is first made in Inlay wax and then replaced by metal during castings The American National Standards Institute/American Dental Association (ANSI/ADA) specification No. 4 for Dental Inlay Casting Wax covers two types of inlay wax:
Type I - Medium hardness wax Generally used in direct technique for making patterns in the oral cavity. Melts and flows when heated to a temperature of 450 C Good flow at this temperature ensures good reproduction of the inlay cavity The wax cools and hardens at 370 C, allowing for the operator to carve and shape it in the mouth.
Type II – Softer wax Generally used for indirect fabrication of wax pattern These waxes must resist the flow at room temperature to maintain the newly shaped form. Usually harden at 300 C
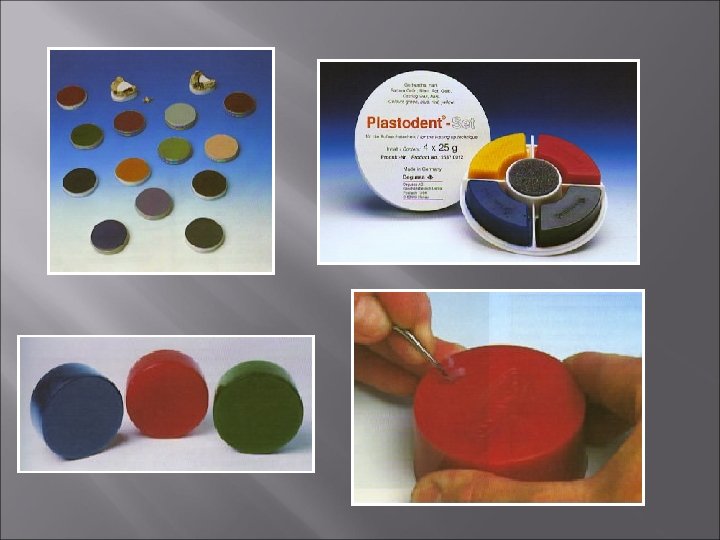
INLAY WAX Composition: it is a combination of animal and synthetic waxes 1. Paraffin-chief content 2. Gum dammar 3. Carnauba wax, Ceresin or Candelilla wax 4. Beeswax 5. Colouring agent
Supplied as: Sticks Cones Pellets Cakes Also in different colors, blue, green, purple etc
Wax – up Techniques • Wax up techniques • Wax coping fabrication • Dip method • Anatomic crown fabrication • Cut back method
Dip method Dipping wax: is a special wax has extremely low shrinkage and optimal viscosity. The aim here is to achieve reproducible results with uniform wall thicknesses and highprecision fit. This dipping wax has good scraping and cutting properties; high elasticity and stability.
Working temperature 7075° C. It is usually recommended by the manufactures to warm the die before dipping Dipping waxes are supplied in tablet form
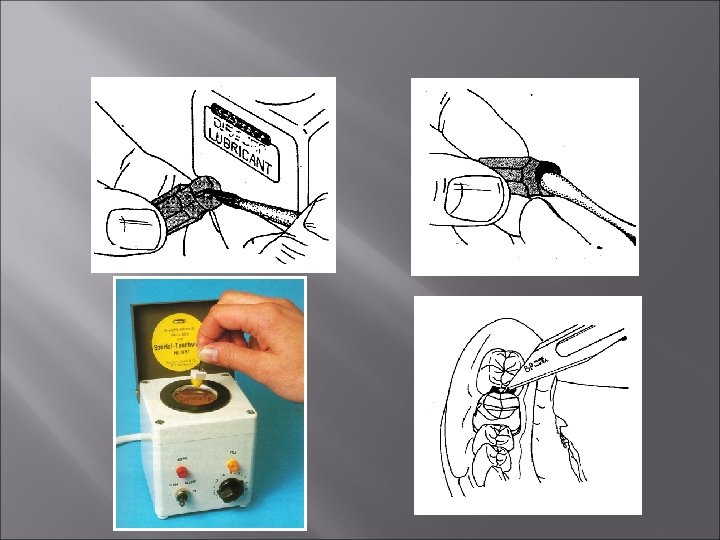
Hold die by dowel pin in an inverted position over dipping well. Rest your finger on unit to steady your hand. Dies with a deep central fossa, hold at 45° angle and roll die quickly into the wax. This will allow trapped air to escape.
Dip the die quickly into molten wax at least 2 mm past marginal finish line and hold for 1 second in the wax. Slowly withdraw die from wax. Pause 1 mm above wax level to allow excess wax of die to be drawn back into well
Posterior dies (bicuspids & molars) withdraw the die so that a cusp tip is the last point to leave the wax. Hold the die in a vertical position for a few seconds prior to uprighting for examination, preventing molten wax from running down side of die. If not satisfactory, remove the coping, let cool, and repeat process.
Full – crown wax up Armamentarium PKT waxing instruments (no 1 to no 5) No 7 wax spatula Laboratory knife with blade Sharp colored pencil (contrasting to wax) Sable brush Bunsen burner Inlay wax Occlusal indicator powder Die lubricant
PKT-3 PKT 1, 2 PKT 5 PKT 4
Waxing spatula Electric waxing instruments
WAX PATTERN FABRICATION The following sequence is recommended: 1. Internal surface 2. Wax pattern removal and evaluation. 3. Proximal surfaces. 4. Axial surfaces. 5. Occlusal surfaces. 6. Margin finishing.
INTERNAL SURFACE FABRICATION Apply die lubricant- To allow for clean separation of wax pattern from the die Flow wax onto the die with a well heated large heating instrument Dipping the lubricated die in a pot of molten wax can also be done Trim the wax back to the margins
WAX PATTERN REMOVAL & EVALUATION Coping is allowed to cool before coping is removed The examiner rotates the pattern under bright light and looks for any shaddows formed by folds or creases
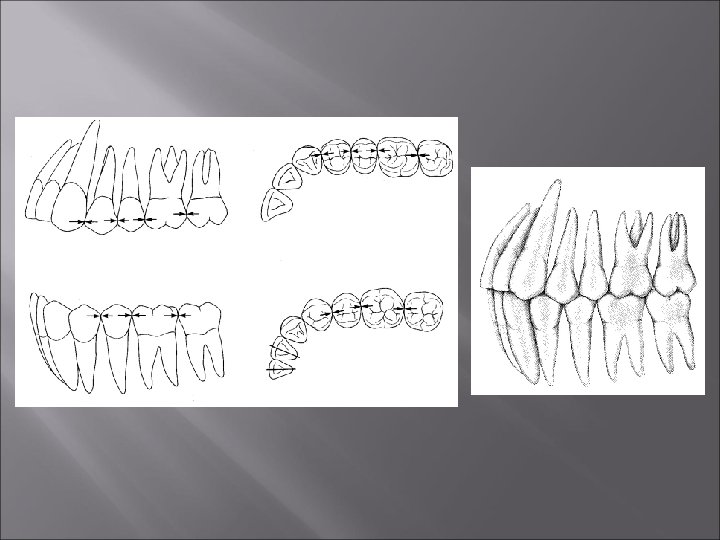
PROXIMAL SURFACES Contact areas: size and location of proximal areas should be established Abnormally large proximal contact areas make plaque control difficult and small contact areas may be unstable and cause drifting Most posterior contact areas are located in the occlusal third of the crown Contact between maxillary first molar and second molar occurs in middle third On occlusal view, Bw maxillary premolars and molars, contact areas are usually toward buccal Bw mandibular teeth contacts are central
Add wax to contact areas until they are correct size, properly located Shape proximal surface gingival to the contacts to the correct contour
AXIAL SURFACES Buccal and lingual surfaces are shaped following the contours of adjacent teeth The height of contour is located in the gingival third of most teeth, except mandibular molarsmiddle third on lingual surface Tooth surface gingival to its height of contour immediately adjacent to gingival soft tissues is called emergence profile It is usually flat or concave
Emergence Profile
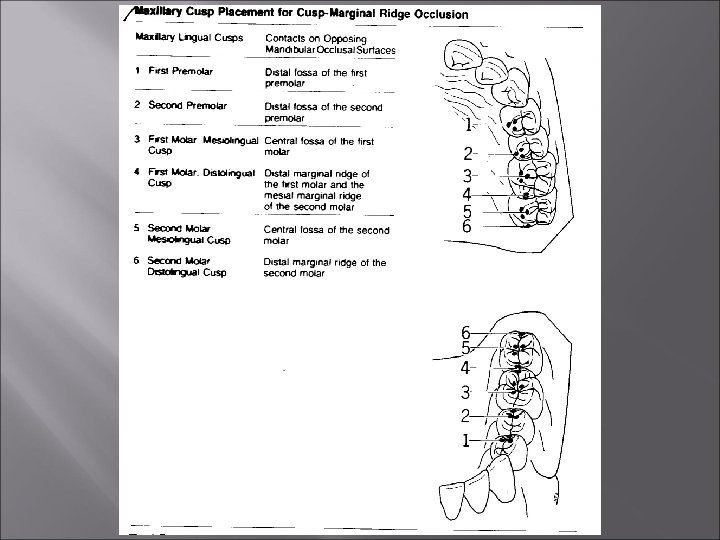
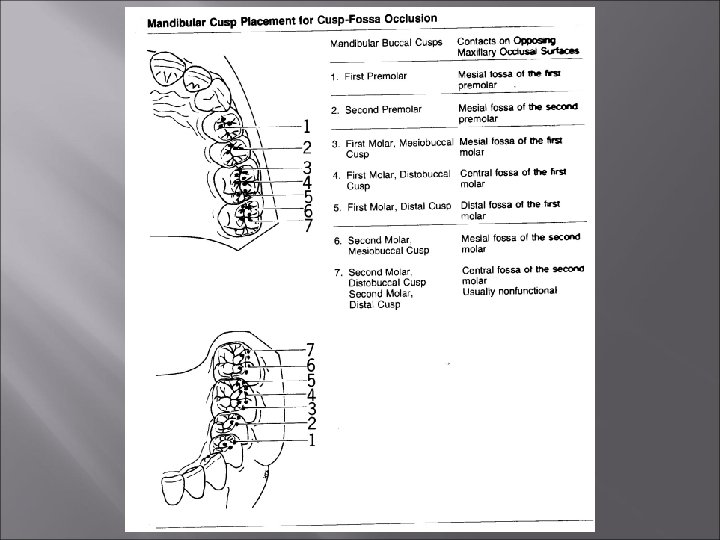
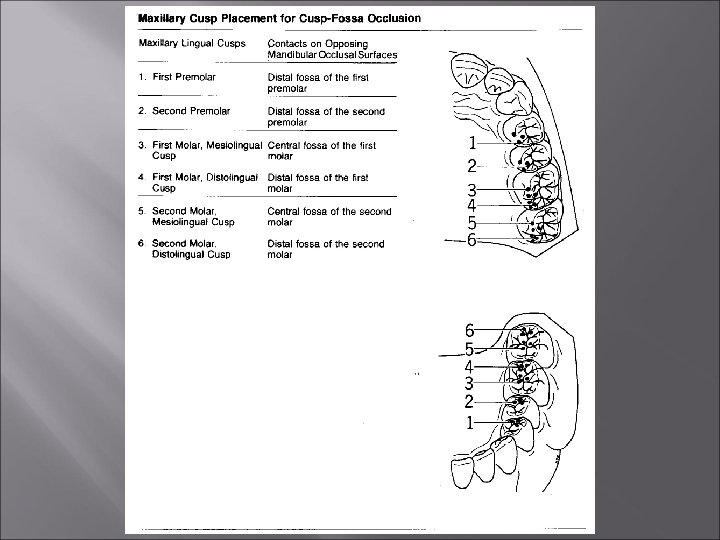
OCCLUSAL MORPHOLOGY Classification of occlusal arrangements Cusp fossa Cusp marginal ridge 1. Location of occlusal contact on opposing teeth. Occlusal fossae only. Marginal ridges and occlusal fossae. 2. Relation with opposing tooth. Tooth-to-tooth Tooth-to-two-teeth 3. Advantages. Occlusal forces are directed parallel with long axis of the tooth. These forces are near the center of the tooth, placing very little stress on the tooth. Found in 95% of all adults. Can be used for single tooth restorations. 4. Disadvantages. Rarely found in natural teeth. Used when restoring several contacting teeth and teeth opposing them. 5. Application. Full mouth reconstruction. Food impaction and displacement of teeth may arise if functional cusps wedge into a lingual embrassure. Most restorations in daily practice
WAXING TECHNIQUE There are two wax added techniques for waxing occlusal surface of restoration. 1 st technique given by E. V. Payne H. L. Lundeen promoted the same technique using wax of a different color for each of the features. Usually associated with cusp-marginal ridge occlusal scheme 2 nd technique given by P. K. Thomas Most often associated with cusp-fossae occlusal scheme
CUSP MARGINAL RIDGE FOR MAXILLARY TEETH • Place cones for buccal cusps • Form buccal ridges of buccal cusps by adding wax to the buccal aspects of buccal cones • Add triangular ridges from central groove to the cusp tip • Form mesial and distal cusp ridges • Position cones for lingual cusps- each mesiolingual cusp should be located so that it falls opposite buccolingual centre of the opposing tooth
• Add mesial and distal ridges to the lingual cusps • Add lingual ridges and triangular ridges to the cusps • Form marginal ridges by uniting mesial and distal ridges of buccal and lingual cusps • Supplemental anatomy is formed
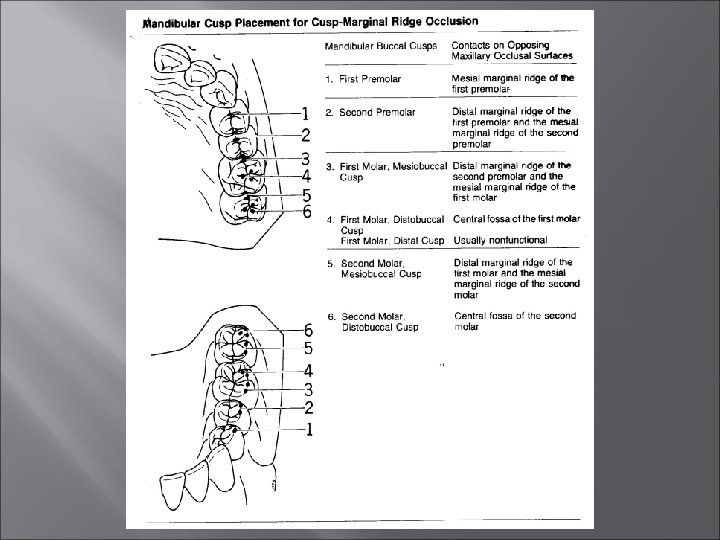
Cusp- marginal ridge for mandibualr teeth Place buccal cusps so that they are in line with the opposing fossae or marginal ridge with which they should occlude Place buccal ridges on buccal cusps and add mesial and distal ridges Add triangular ridges to the cusps – the base forming the central groove
Position cones for lingual cusps They should be placed as far mesiodistally as possible to prevent working-side interferences Add lingual ridges to the lingual cusps to form the outline of the lingual contour Form marginal ridges Smooth all grooves and fossae and round and finish the ridges
CUSP FOSSA ARRANGEMENT The development of cusp-fossa is best accomplished by waxing two opposing quadrants simultaneously First place the cones for mandibular buccal cusps with a PKT-1 They should be located at appx 1/3 rd the distance from buccal to the lingual surface Position them mesiodistally to fall in the appropriate fossae Place the cones for maxillary lingual cusps Position them buccolingually so they will be over the middle of the opposing mandibular tooth
Then place the cones for non functional cusps- maxillary buccal and mandibular lingual They should be shorter than functional cusps Add marginal ridges- should always be shorter than the cusps Marginal ridges of opposing arches should be in close contact in the intercuspal position
During the working movement, the buccal cusp of each maxillary premolar passes distal to the buccal cusp of its counterpart, so a small depression is given in the distal incline of mandibular premolar – Thomas notch the lingual cusps of mandibular molars must be short so that they will not collide with cusps of maxillar teeth during working movement Wax maxillary lingual cusp ridges and mandibualr buccal cusp ridges
Build up the triangular ridges for maxillary and mandibular teeth with PKT 1 The bases of the ridge forms the central groove Supplemental anatomy is formed Use PKT 5 to refine the ridges Smooth grooves with PKT 3 Check the occlusal contacts Tripod contacts should be formed about the cusp tips and fossae
Margin finishing Margin is a critically important area, it determines the success of the casting Remove the pattern from the working cast and place t back on the lubricated die Smooth any roughness on the axial surface with a warm instrument Remelt the entire margin Eliminate the depression formed by adding wax and then carve any excess
SUMMARY & CONCLUSION
REFERENCES Contemporary Fixed Prosthodontics. 3 rd edition, Rosensteil. Fundamentals of Fixed Prosthodontics. 3 rd edition, Herbert T. Shillenburg. Philips Science of Dental Materials. 10 th edition, Kenneth J. Anusavice. Restorative Dental Materials. 6 th edition, Robert J. Craig. Theory and Practice of Ceramo-metal restorations. Mashiro Kuwata.
Thank you