WARNING Read carefully these instructions before use and

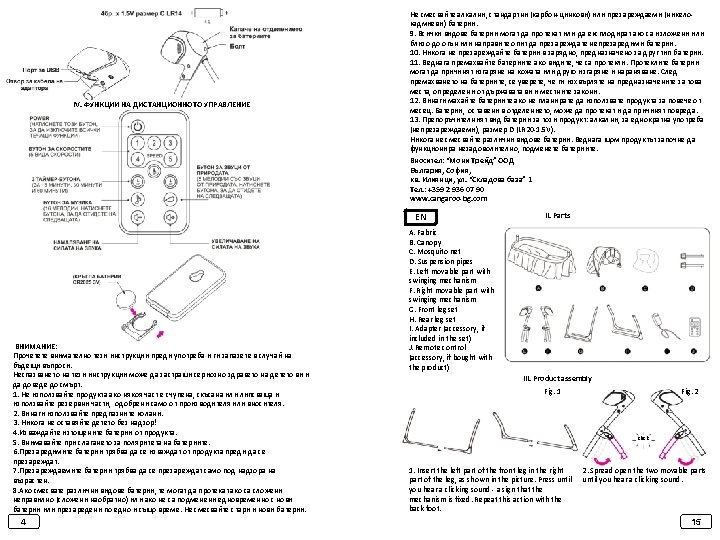
WARNING: Read carefully these instructions before use and save them for future reference. Failure to follow these instructions can seriously threaten the health of your child and lead to death. 1. Do not use the product if any part is broken, torn or missing and use spare parts that are approved by the manufacturer or importer only. 2. Always use the safety belts. 3. Never leave the child without adult supervision! 4. Remove the discharged batteries from the product. 5. Observe the polarity of the batteries when placing them. 6. The rechargeable batteries should be taken out of the product before being recharged. 7. The rechargeable batteries must be recharged under adult supervision only. 8. If you mix different types of batteries, they can leak if placed incorrectly (placed backwards) or if they are not replaced together with new batteries or recharged at the same time. Do not mix old and new batteries. Do not mix alkaline, standard (carbon-zinc) or rechargeable (nickel-cadmium) batteries. 9. All types of batteries can leak or explode if exposed or placed near a fire or you make an attempt to recharge non-rechargeable batteries. 10. Never recharge batteries with charger that is intended for other types of batteries. 11. Immediately remove the batteries if you see that they have leaked. The leaked batteries may cause burning of the skin or other burning and injury. After you remove the batteries, make sure that you are throwing them at the places intended for that purpose by the state and your local laws. 12. Always remove the batteries if you do not plan to use the product for more than a month. Batteries, left in the battery compartment, may leak and cause damage. 13. The recommended type of batteries for this product: alkaline, disposable (nonrechargeable), size D (LR 20 -1. 5 V). ИНСТРУКЦИИ ЗА СГЛОБЯВАНЕ И УПОТРЕБА НА ДЕТСКО КОШЧЕ ЛЮЛКА ACCENT Артикулен номер SW 137 INSTRUCTION MANUAL FOR ASSEMBLY AND USE OF SWING – CRIB ACCENT Item No. SW 137 Подходящо за деца от 0 до 6 месеца и с тегло до 12 кг. Suitable for children from 0 to 6 months and weighting up to 12 kg Never mix different types of batteries. Once the product starts to function unsatisfactorily, replace the batteries. Importer: “Moni Trade” Ltd. Bulgaria, Sofia, Iliyantsi square, 1 Skladova baza Str. Tel. : +359 2 936 07 90 www. cangaroo-bg. com Моля, прочетете внимателно тази инструкция преди употребата на продукта, за да осигурите правилното му използване и ги запазете в случай на бъдещи справки. Please, read this instruction carefully before initial usage of the product, to ensure its correct use. Keep this manual for future reference.
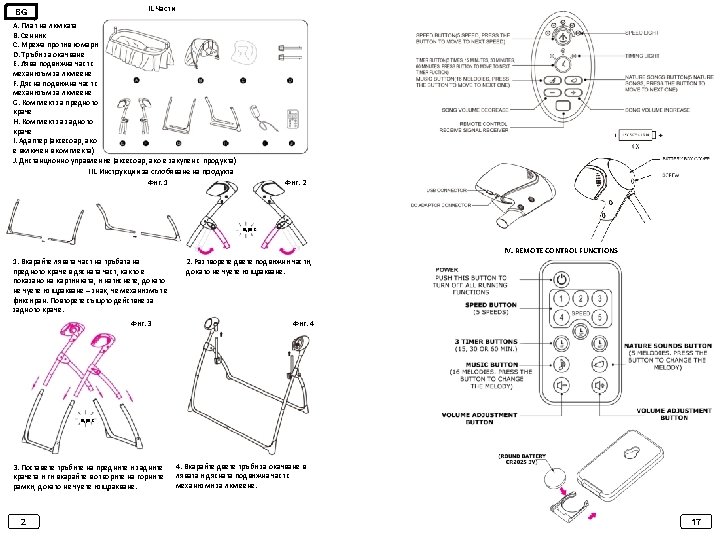

щрак Фиг. 5 Фиг. 6 Fig. 3 Fig. 4 click 5. Сглобяване на люлката: обърнете коша на люлката, както е показано на картинката, с дъното нагоре. Вкарайте пружините по посоката, показана на фигурата, докато чуете изщракване. 6. Закачете коша на люлката в пластмасовите части на тръбите за окачване, докато чуете изщракване – бутонът за окачване на коша трябва да се пада в предната част. За да освободите коша, натиснете бутона и го повдигнете нагоре. Фиг. 7 7. Монтирайте сенника като щракнете пластмасовите щипки от двете му страни върху люлката, след което залепете велкро лентите. Фиг. 8 8. Поставяне на комарника: Мрежата за комари се закрепя за сенника с цип, както е показано на картинката. 3. Insert the tubes of the front and rear legs into the upper openings of the frames; you should hear a clicking sound. Fig. 5 click 5. Assembly of the cradle: turn basket of the cradle upside down as shown in the picture. Insert the springs in plastic parts and press in the direction shown in the figure, until you hear a clicking sound. Fig. 7 7. Install the canopy by clicking the plastic clips on both sides of the cradle, afterwards fasten the velcro fasteners. 3 4. Insert the suspension pipes in the right and left movable parts with swinging mechanisms. Fig. 6 6. Hook the swing basket to the plastic parts of the suspension pipes, press until you hear a clicking sound –the button for unhooking the basket should be located in front. To release the basket, press the button and lift it up. Fig. 8 8. Placing the mosquito net: the mosquito net is to be attached to the canopy with a zipper, as shown in the picture. 16
- Slides: 4