Vital signs Outline Vital Signs Definition Temperature Pulse


 Positions assumed")


 Sphygmomanometer Preparation")


- Slides: 38
Vital signs
Outline Vital Signs Definition Temperature Pulse Rate Respiratory Rate Blood Pressure Pain
Vital sign physical signs that provide data to determine a person’s state of health indicate an individual is alive, such as temperature, pulse rate, respiratory rate (TPR), and blood pressure (BP).
Measuring Body Temperature Purposes 1 -To establish baseline data for subsequent evaluation. 2 -To identify whether the core body temperature is within normal range. 3 -To determine changes in the core body temperature in response to specific therapies ( antipyretic medication , immunosuppressive drugs, invasive procedure ) 4 -To monitor clients at risk for imbalanced body temperature ( clients at risk for infection , or diagnosis of infection , or those who have been exposed to temperature extreme)
Types of Thermometers Electronic thermometers Provide readings in less than 60 seconds most accurate if placed in sublingual pocket There is a sensor on the end of thermometer that touches the body part and reads the body’s temperature.
Types of Thermometers Tympanic membrane thermometer measures the temperature inside of the ear. It will read the infrared heat that comes from inside of the ear. Especially appropriate for infants and young children Readings are obtained in 2 seconds or less
Types of Thermometers Glass and mercury thermometers a glass tube with mercury inside of the tube. The tube goes underneath the tongue and the body temperature will cause the mercury to rise inside the tube. DO NOT just throw away a mercury thermometer.
Sites for taking the Temperature SITE ADVANTAGES ORAL DISADVANTAGES Thermometers can be broken Accessible and convenient Inaccurate if client has just ingested hot or cold fluid, or smoked RECTAL Reliable measurement Inconvenient and more unpleasant; difficult for client who cannot turn to side Could injure the rectum following surgery Presence of stool may interfere with thermometer placement AXILLARY Safe and noninvasive Thermometer must be left in place for a long time TYMPANIC MEMBRANES TEMPORAL ARTERY Readily accessible; reflects Can be uncomfortable and involves risk of injuring the core temperature, very membrane if inserted too far Presence of cerumen can affect the reading fast Safe and non invasive , very fast Requires electronic equipment (expensive / unavailable) ; Variation in technique if the client has perspiration on the forehead
Sites for taking the. Temperature
Assessment : v 1 -Clinical signs of fever. v 2 -Clinical signs of hypothermia v 3 -Site most appropriate for measurement. v 4 -Factors that may alter body temperature.
Planning Preparation of equipment : 1 -Thermometer 2 -Thermometer cover. 3 -Water- soluble lubricant for a rectal temperature. 4 -Disposable gloves. 5 - Towel for axillary temperature. 6 -Tissue /wipes
Implementation Preparation: Check that all equipments functioning well. Performance : 1 - Introduce self , verify the client’s identity , explain to the client what will you do, why and how ? 2 - Hand washing. 3 -Provide for client’s privacy. 4 -Position the patient according to the method will be practiced ( lateral or sim’s position for rectal temperature ) 5 -Place thermometer as the following :
Evaluation Compare the temperature measurement to baseline data , normal range of age of the client and the client’s previous temperature. Analyze considering time of day and any additional influence factors and other vital signs.
Assessment of peripheral Pulse Purpose : – To establish baseline data for subsequent evaluation. – To identify whether the pulse rate is within normal range. – To determine whether the pulse rhythm is regular and the pulse volume is appropriate. – To determine the equality of corresponding peripheral pulse on each side of the body. – To monitor and assess changes in the client’s health status. – To monitor client’s at risk for pulse alteration ( heart disease , cardiac arrhythmia. – To evaluate perfusion to the extremities
Assessment 1 -Clinical signs of cardiovascular alterations as: (dyspnea, cyanosis, palpitations , syncope , cool skin ) 2 - Factors that may alter pulse rate ( e. g. emotional status , physical activity ). 3 - Which site is most appropriate for assessment based on a purpose. `
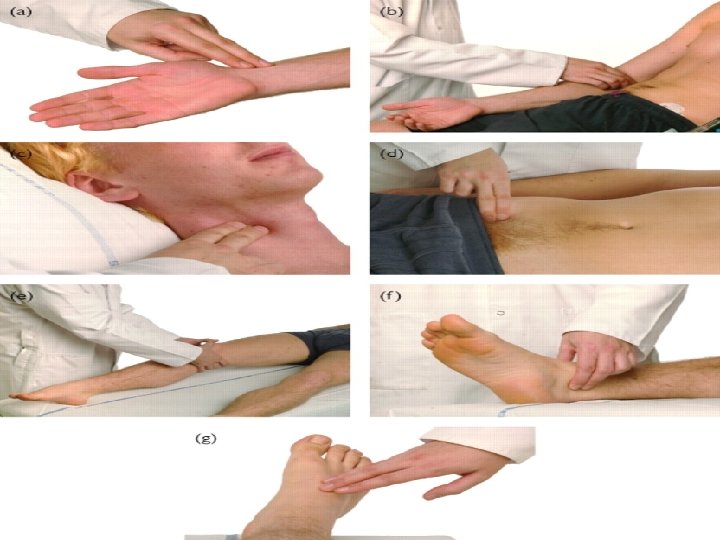
Pulse sites
Assessment of apical pulse : Position the patient in comfortable supine position or in a sitting position. Locate the apex of heart
q. Planning Equipment : q - Watch with a second hand or indicator. q Implementation Performance : 1 - Introduce self , verify the client’s identity , explain to the client what will you do, why and how ? 2 - Hand washing. 3 -Provide for client’s privacy. 4 - Select the pulse point. Normally , the radial pulse is taken unless it can’t be exposed. 5 - Position the patient in a rest position
Implementation : 6 - Palpate and count the pulse. Place 3 or 2 middle fingers lightly and squarely over the pulse point. 7 - Count for 15 seconds and multiply by 4. 8 - Record the pulse on the worksheet. 9 - Assess the pulse rhythm and strength. 10 - Document the pulse rate on the patient’s record. 11 - Hand wash
Evaluation 1 -Compare the pulse rate to baseline data or normal range for age of the client. 2 - Relate pulse volume , rate to other vital signs , pulse rhythm and volume to other baseline data and health status. 3 - Conduct appropriate follow up such as notifying the primary care giver or giving medication.
C-Assessment of Respiration : Purposes : To acquire baseline data against which future measurements can be compared. To monitor abnormal respiration and respiratory patterns and identify changes. To monitor respirations before or following the administration of general anesthetic or any medication that can influences respiration. To monitor clients at risk for respiratory alterations.
Assessment : Skin and mucous membrane color ( cyanosis or pallor ) Positions assumed for breathing ( using of orthopneic position). Signs of cerebral anoxia ( irritability , restlessness drowsiness or loss of consciousness ). Chest movement. Activity tolerance. Chest pain. Dyspnea Medication that affect respiration.
Planning Equipment: Watch with a second or indicator. Implementation : Preparation: For a routine assessment of respiration , determine the client’s activity schedule and choose a suitable time to monitor the respirations. A client who has been exercising will need to rest for a few minutes to permit the accelerated respiratory rate to return to normal.
Implementation : 1 - Introduce self , verify the client’s identity , never to notify the patient that you will assess respiration 2 - Hand washing. 3 -Provide for client’s privacy. 4 -Observe and count the respiratory rate. 5 - Observe the respiration for depth by watching the movement of the chest , observe for regularity. 6 - Document the respiratory rate , rhythm and depth in an appropriate record
Evaluation Relate respiratory rate to other vital signs , in particular pulse , relate respiratory rhythm , and depth to baseline data and health status. Report to the primary care provider a respiratory rate significantly above or below the normal range and any notable change in respiration from a previous assessment. Conduct appropriate follow up such as administering oxygen, or other medications
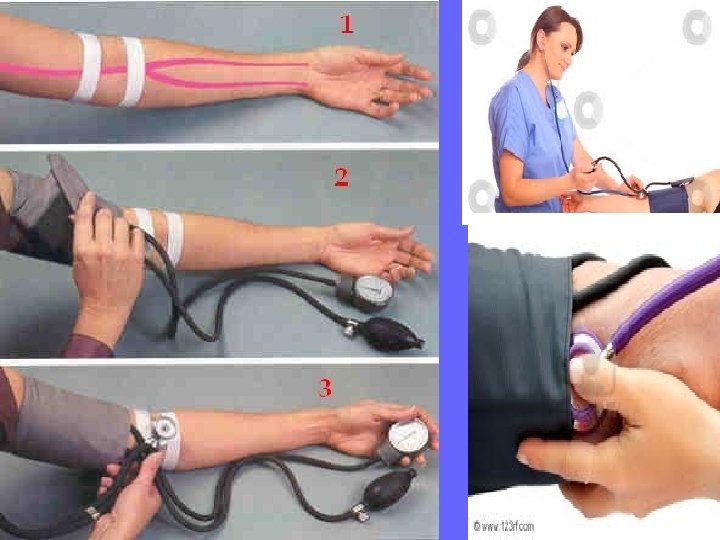
Assessment of Blood Pressure Purpose : 1 -To obtain a baseline measure of arterial blood pressure for subsequent evaluation. 2 - To determine the client’s hemodynamic status. 3 - To identify and monitor changes in blood pressure resulting from a disease processes.
Equipment Sphygmomanometer • Aneroid • Mercurial Stethoscope
Sphygmomanometer Pediatric Adult
Parts of stethoscope Earpieces- should fit snugly and follow the natural curve of the ear canal, point toward the face when it is in place Tubing- 12 -18 inches long, longer tubing decreases the transmission of sound waves
Parts of a stethoscope Diaphragm= circular, flat surfacetransmits high pitched sounds ( Bowel, lung, heart sounds Bell= bowl shaped- transmits low pitched sounds (heart and vascular sounds)
Assessment 1 - Signs & symptoms of hypertension ( headache , ringing in the ears , flushing of the face , nosebleeds, fatigue ). 2 - Signs & symptoms of hypotension ( tachycardia , dizziness, mental confusion , restlessness cool and clammy skin, pale or cyanosis ) 3 - Factors affecting blood pressure ( stress , activity , pain and time of last caffeine. ) 4 - Some blood pressure cuffs contains latex. Assess the client for latex allergy and obtain a latex –free cuff if indicated.
Planning Equipment : 1 - stethoscope 2 -Blood pressure cuff (appropriate size) Sphygmomanometer Preparation : 1 -Ensure that the equipment is intact and functioning well 2 - Make sure that the client has not smoked within 30 minutes
Implementation Preparation : 1 -Ensure that the equipment is intact and functioning well 2 - Make sure that the client has not smoked within 30 minutes Performance : 1 - Introduce self , verify the client’s identity , explain to the client what will you do, why and how 2 - Hand washing. 3 -Provide for client’s privacy.
4 -Take the accurate reading of blood pressure and Document the finding in the client’s record. 5 -Hand wash
Evaluation 1 - Relate blood pressure to other vital signs , to baseline data. 2 - Report any significant changes in client’s blood pressure. 3 - Conduct appropriate follow up , medication administration.
THANK TOU