Vision Sensor Use the Vision Sensor to detect


 CCSS. ELA-LITERACY. RST. 9 -10. 3 follow precisely a")


 education can expose")


- Slides: 99
Vision Sensor Use the Vision Sensor to detect objects!
The following documents are for teachers or instructors to facilitate learning with the provided resources.
Teacher Notes Guide What Are Teacher Notes? Each STEM Lab has resources only available to teachers. The goal of these resources are to help you prepare and guide students through each section of the lab. There are two types of teacher resources in each lab: the Teacher section of the lab and teacher notes on pages. The Teacher Section The Teacher section will provide an overview of the lab and resources to prepare for the lab. This section will be very useful to get a big picture overview of the lab and plan class time. The STEM Lab Guide provides an overview of what each section of the STEM Lab is for. The Preview page outlines key information such as materials needed, learning objectives, and standards. In addition, there is a description of each page in the lab. The Pacing guide provides a chart which covers the amount of time, concepts, delivery, materials needed, and resources. The Letter Home provides an introduction to this STEM Lab to let parents know what students will be doing. The Checklist allows you to keep track of how many pages of the STEM Lab have been completed. This could be a useful reference for students as well. The Answer Key provides the answers for the questions in the Know section. Note that the answers will also be provided in a teacher note on that page. The Finding Help page explains how to utilize the kb. vex. com website to answer questions, clear up uncertainties, and have students do their own troubleshooting while completing a STEM Lab. Teacher Notes Teacher notes are sections of teacher-only content which can be found on the pages of the STEM Lab itself. The goal for these teacher notes is to provide in-time tips and guidance for each stage of the lab to make every page easier for you to teach. There are several types of teacher notes which will provide overviews of the content, tips for helping students be successful, discussion questions, extension activities, and answer keys.
There are several main types of teacher notes on the STEM Lab pages: Teacher Toolbox—this type of teacher note will serve a number of purposes. Teacher Toolboxes will have answers to questions or descriptions of investigation results. They could provide additional options for teaching approaches or summaries of the content on the page. Teacher Tip—this teacher note will provide short, direct tips which typically provide justin-time help for making the STEM Lab run as smoothly as possible for students. Motivate Discussion—this type of note provides questions you can ask students to spark discussion and get students thinking about the topics in the lab. Answers, or possible answers, are also provided for guidance.
Extend Your Learning—this note will provide extension activities which can be assigned to students when there is additional time available. Extend Your Learning activities might also be assigned to students who complete their work faster than other students.
STEM Lab Guide STEM Labs follow a sequence of learning experiences. The learner is asked to do the following: Create a build or an artifact Explore the build or the artifact and speculate as to its possible application in the real world Learn by doing Make changes to a design or a build to improve and enhance it Assess knowledge 1. Seek Each engineering-focused STEM Lab begins with instructions for creating a working build or guidelines for an original design. If building from a set of given instructions, learners should be given ample time to follow the step-by-step instructions for creating the build whether individually or in small groups. After creating a design or build, learners are asked to test what it does. Learners are told to experiment with the build answer various questions, such as what it does, how it might be used, what if any mechanical advantage it affords, and how to explain the build using engineering terms. Learners are directed to answer these questions within their engineering notebooks because the intent is to have their answers be available for review and feedback. The amount of time allotted to this portion of the STEM Lab can vary depending on whether time permits and whether all groups of learners are proceeding at the same rate. 2. Play The play section within a STEM Lab begins with a brief reading that provides a context for the concepts or skills within the activity. A short procedure may follow to explore the new skill or concept introduced. Most often, learners will return to testing their builds to recognize some feature of its design but there are many different types of activities that they may complete. Some STEM Labs will focus on a single activity by having only one reading and one procedural activity, but most have more than one activity so that multiple concepts or skills can be introduced and more complicated concepts can be explored.
3. Apply This section is where learners are provided with examples of how the concepts they are being introduced to applies to their daily lives. They are also offered a look into the application of those skills in the competitive aspect of robotics and engineering. 4. Rethink After learning about the concepts within the build, learners are given the opportunity to explore further with their build through a challenge. After creating the environment for the build, students may need to modify their build for success. Most of the challenges are competitive in nature and foster hands-on learning. Learners are directed to record and justify the changes they make in their engineering notebooks. Questions are posed to ask about both the design and testing phase. The amount of time allotted to this portion of the STEM Lab can vary depending on the scope of the challenge. 5. Know At the end of the STEM Lab, learners are asked questions about the concepts taught throughout the lab. Questions can be printed if they are to be completed by hand turned in for a grade. Most questions are multiple-choice or truefalse. Whether working in teams, group, or classroom settings, the answers to the questions can be discussed to make sure that all learners recognize the correct answers and why they are correct. Answers are provided in the STEM Lab Preview page. Teacher Tips Organize small groups or teams to promote functional collaborations when a STEM Lab is being used in a classroom or any environment with many learners. Extend the Apply and Rethink sections for longer periods of time to allow learners who are not proceeding at the same pace to catch up. Use the pages in the Appendix section as supplements to guide learners' efforts if they are having difficulties completing a build or activity.
Vision Sensor Preview 8 - 15 years old 45 minutes - 3 hours, 10 minutes Beginner Description Students are asked to build and utilize a robot that will detect objects using color signatures. Key Concepts Using the Vision Utility Configuring the Vision Sensor Tuning the Vision Sensor Identifying Sensing Blocks Used to Program the Vision Sensor Objectives Follow building instructions to create a robot that will complete a specific task. Identify that a snapshot block will capture the current image from the Vision Sensor and that image will be processed analyzed for color signatures. Identify the steps needed to configure the Vision Sensor to detect an object. Construct and arrange ideas in an engineering notebook. Identify the criteria and constraints of the solution for their design problem by considering lighting constraints. Explain the advantages of using robots for transportation on highways and transit networks. Explain the use of an Object Exists block as a condition in an if/then/else block. Materials needed 1 or more VEX IQ Super Kits
Vision Sensor Green, blue and red solid objects VEXcode IQ Blocks Engineering notebook STEM Lab Format The following VEX STEM Lab supports students as they are introduced to completing a build of a robot, configuring a Vision Sensor, Tuning a Vision Sensor, and using the VEXcode IQ Blocks to analyze configured objects. Students will explore how Vision Sensors are used in various industries and will be introduced to the exciting world of VEX competitions. Seek: The goal of this section is for students to work collaboratively to build the Autopilot and answer exploration questions in their engineering notebook. The Completed Look of the Build o This page features a picture of a completely built the Autopilot robot that can be used to introduce the STEM Lab. It can be used as a student reference during the building process. Parts Needed o This page lists all the parts needed to build the Autopilot. It can be used as a student reference during the building process. Build Instructions o This section features detailed steps for students to follow to build the Autopilot. The Autopilot will be used for the duration of the STEM Lab. Suggested Time Allotment: 60 mins. Exploration Questions o This page features several discussion questions to pique interest in the Autopilot and its capabilities. Suggested Time Allotment: 5 mins. Play: The goal of this section is for students to demonstrate how the Autopilot operates and behaves when the Vision Sensor is used in a project. What is a Vision Sensor? o This page introduces what a Vision Sensor is and how it can be used with a project. Suggested Time Allotment: 5 mins. Using the Vision Sensor
o This page walks students though configuring and tuning a Vision Sensor using the Vision Utility and VEXcode IQ Blocks. Suggested Time Allotment: 40 mins. Apply: The goal of this section is to introduce students to some of the uses of Vision Sensors and to the VEX IQ Robotics competition. Perception with Self-Driving Vehicles o This page explores how vision sensors can be used in self-driving cars. Suggested Time Allotment: 5 mins. Competition Connection: Crossover o This page introduces the students to VEX competitions, which give students a chance to complete using their original robotic build to solve a gaming challenge. Suggested Time Allotment: 10 mins. This page is optional. Rethink: The goal of this section is for students to explore different sensing blocks used with the Vision Sensor in VEXcode IQ Blocks. Prepare for the Vision Data Challenge o This page displays an explanation of the different sensing blocks that can be used with the Vision Sensor. Suggested Time Allotment: 20 mins. This page is optional. Practice for the Vision Data Challenge o This page walks students through how the reporter sensing blocks are calculating the values that they are reporting. Suggested Time Allotment: 20 mins. This page is optional. The Vision Data Challenge o This page gives the students the opportunity to calculate their own values for the sensing blocks using a given image from the Vision Utility. Suggested Time Allotment: 20 mins. This page is optional. Know: The goal of this section is for students to complete a summative assessment on the content presented in the STEM lab. Know Questions o Students will answer several multiple-choice assessment questions. Students receive immediate feedback as their answer choices are submitted. Suggested Time Allotment: 5 mins. Facilitation Notes Ensure all required parts for the build are available prior to starting this STEM Lab. Students will need to download an example project from VEXcode IQ Blocks and configure color signatures in the lighting conditions for the classroom area. There are directions for both of these actions provided in the STEM Lab.
Due to varying lighting conditions, the Vision Sensor may need to be tuned after configuring the color signatures. An engineering notebook can be as simple as lined paper within a folder or binder. The notebook shown is a more sophisticated example that is available through VEX Robotics. The approximate pacing of each section of the Stem Lab is as follows: Seek- 65 minutes, Play- 45 minutes, Apply- 15 minutes, Rethink- 60 minutes, Know- 5 minutes. Further Your Learning Science Research and debate the pros vs. cons of self-driving cars. Discussion can be focused on safety, efficiency, and/or design. Investigate and write a paragraph about GPS (Global Positioning System) or LIDAR, the two systems that are necessary for self-driving cars. Social Studies Discuss and compare what types of landforms or communities that would be the easiest or hardest to implement a self-driving car and explain why. English Write a persuasive piece on the need for self-driving cars in the 21 st century. Create a brochure advertising a new self-driving car that has been designed by the student. Include a picture, sales information, price, and any other marketing information to promote the vehicle. Educational Standards Computer Science Teachers Association (CSTA) 3 B-AP-08: Describe how artificial intelligence drives many software and physical systems.
Common Core State Standards (CCSS) CCSS. ELA-LITERACY. RST. 9 -10. 3 follow precisely a complex multistep procedure when carrying out experiments, taking measurements, or performing technical tasks, attending to special cases or exceptions defined in the text. CCSS. ELA-LITERACY. RST. 11 -12. 3: follow precisely a complex multistep procedure when carrying out experiments, taking measurements, or performing technical tasks; analyze the specific results based on explanations in the text. CCSS. ELA-LITERACY. RST. 11 -12. 9: Synthesize information from a range of sources (e. g. , texts, experiments, simulations) into a coherent understanding of a process, phenomenon, or concept, resolving conflicting information when possible. MP. 5: Use appropriate tools strategically (Rethink) MP. 6: Attend to precision (Seek, Play, and Rethink)
Vision Sensor Pacing Guide STEM Labs are designed to be supplemental education experiences that are flexible and can be implemented in many different ways. Use the Pacing Guide to help make the Vision Sensor STEM Lab fit into your schedule. This STEM Lab can be adapted for a 45 -, 60 -, 105 -, and 110 -minute implementation instead of the full 190 minutes included in the materials. Options for implementing this STEM Lab include: If you have a limited amount of time, only complete the Seek and Play sections. The total time for both sections is 110 minutes. The students will finish with experiences in both building and using the Vision Sensor. An option for 105 minutes is to have an Autopilot robot (or two) ready before class and have your students complete the Play and Rethink sections. This option compromises building to maximize experience using the Vision Sensor. Students can then run and test their projects using the shared Autopilot robot(s). An option for 60 minutes is to have at least one Autopilot ready and have your students complete the Play and Apply sections. Students will gain experience in configuring and tuning the Vision Sensor as well as how Vision Sensors can be used in context in daily life and in VEX Robotics Competitions. If you have only 45 minutes and can have at least one Autopilot ready before class, have your students complete the Play section. Students will gain experience in configuring and tuning the Vision Sensor. The pacing guide for each STEM Lab (select any of the STEM Labs below to see its individual pacing guide) provides step-by-step instruction on What, How and When to teach. STEM Lab pacing guides preview the concepts that are taught in each section (Seek, Play, Apply, Rethink, Know) of the STEM Lab, relates the resources that teachers can use to teach those concepts and identifies all of the materials that are needed. The Individual STEM Lab pacing guide contains the valuable information below: Pacing- Provides the approximate time duration of each section of the STEM Lab. Concepts- Lists themes that surrounds the STEM. Delivery- Provides in-depth guidance on teaching strategies for each STEM Lab section to improve student mastery of the content. Materials Needed- Lists the materials that are essential to completing the STEM lab.
Resources- Provides the linked content and resources needed by the teacher to complete the lessons and activities. Section Pacing Concepts Delivery Materials needed Resources Seek Building and Exploring VEX Robots Student Centered 1 or more VEX IQ Super Kits Build Instructions* Vision Sensor Build Rubric Engineering Notebook Rubric (Individual Reflections) Building the Autopilot: 60 minutes Exploration: 5 minutes Cooperative Learning Collaboration Rubric Play What is a Vision Sensor? : 5 minutes Using the Vision Sensor: 40 minutes Apply Perception with Self. Driving Vehicles: 5 minutes Competition Connection: Crossover: 10 minutes Configuring the Vision Sensor Tuning the Vision Sensor Input and Output Teacher Direct Instruction Engineering Notebook Student Centered VEXcode IQ Blocks Student Centered Content Pages Vision Sensor “What is a Vision Sensor? "* "Using the Vision Sensor”* Sensor Data Sensors Self-driving Vehicles Cooperative Learning "Perception with Self. Driving Vehicles" "Competition Connection: Crossover"
Section Pacing Concepts Delivery Materials needed Resources Rethink Iterative Design Student Centered Vision Sensor "Prepare for the Vision Data Challenge”* Prepare for the Vision Data Challenge: 20 minutes Practice for the Vision Data Challenge: 20 minutes Creativity Sensing blocks Understanding Sensor Output Cooperative Learning 1 or more VEX IQ Super Kits VEXcode IQ Blocks “Practice for the Vision Data Challenge”* “The Vision Data Challenge"* The Vision Data Challenge: 20 minutes Engineering Notebook Rubric (Team Projects) Collaboration Rubric Know Review: 5 minutes Summative Assessment* Student Centered * Denotes an essential lesson to the STEM Lab. Multiple Choice Questions Know Questions* Answer Key
Vision Sensor Letter Home Introduction Science, Technology, Engineering and Mathematics (STEM) education can expose students to interesting hardware, software, and sensors that allow them to explore, interact, and receive data about their environment. Sensors can be programmed with software, as part of a robot's design, to control a robot's movement, make decisions, and analyze data through algorithms. Programming of sensors and using data, along with STEM concepts, will foster a student’s growth in the areas of computer science and computational thinking. The following VEX STEM Lab will introduce your child to data processing and how sensors serve as the input by collecting data from the robot's environment. The robot brain runs a program that processes how the sensor input data should affect the robot’s behavior. This information will later be analyzed in the “Vision Data Challenge, ” where students will gain a deeper understanding of how the sensing blocks in VEXcode IQ Blocks use the data received from the VEX Vision Sensor to report values. Please keep this letter for your reference as your student works through the “Vision Sensor” STEM Lab. It contains information that you can use to keep up to date on what your child is learning and spark discussions about STEM and Robotics. Look Inside the STEM Lab In this lab, students will build the Autopilot and will need to mount the VEX Vision Sensor onto the robot frame. The Vision Sensor will need to be mounted in a way to maximize the VEX Vision Sensor’s potential. They will then learn how to configure and tune the Vision Sensor and why these skills are useful for different environments. The students will then be exposed to how Vision Sensors are useful in daily-life and robotics competitions. In the Rethink section of the STEM Lab, the students will dive deeper into how the sensing blocks in VEXcode IQ Blocks calculate and analyze the data that is gained from the Vision Sensor's environment and processed into output. The students will analyze a snapshot taken from the Vision Sensor and calculate the appropriate values that the sensing blocks would report as output.
Vocabulary Engineering Notebook A type of journal that the students will use to record their designs, ideas, and reflections as they move through the STEM Lab. Sensors A devices that collect input from the environment and provide information that can be processed to make decisions. Autopilot The robot build that is used for the STEM Lab. This robot is the result of the first hands-on lesson the students will accomplish. It is used to complete the rest of the STEM Lab activities. Real World Connection Your child will also be presented with information pertaining to self-driving vehicles and how they use a wide array of sensors and on-board computers to safely move the vehicle along the road. Your child will also see an example of how the Vision Sensor could be used in a competition setting by analyzing the 2016 - 2017 VRC game: Crossover. They will reflect on these concepts and record thoughts and outcomes in their engineering notebooks. Guiding at Home Questions What other devices use the input, process, and output cycle? What are the advantages of using sensors on self-driving vehicles? What was the hardest part about tuning the Vision Sensor? What was your favorite part about using the VEX Vision Sensor? You can explore the STEM Lab at https: //education. vex. com/.
Vision Sensor Checklist Vision Sensor Seek o The Completed Look of the Build o Parts Needed o Build Instructions o Exploration Play o What is a Vision Sensor? o Using the Vision Sensor Apply o Perception with Self-Driving Vehicles o Competition Connection: Crossover Rethink o Prepare for the Vision Data Challenge o Practice for the Vision Data Challenge o The Vision Data Challenge Know o Review
Vision Sensor Answer Key What does the snapshot block do in this example? Takes a snapshot of the current image from the Vision Sensor so that it can be analyzed Which of the following should come first when configuring a signature for the Vision Sensor? Place the object in view of the Vision Sensor Which of the following is NOT an example of tuning the Vision Sensor? Calculating the center x Why is a forever block used in the Detecting Objects example project? The snapshot block only takes one current image of what the Vision Sensor sees. Using the forever block allows the Vision Sensor to take multiple snapshots so that it can continuously check for different objects. The leftmost X value of an object is 30 pixels and the width is 40 pixels in total. What is true about this object? Its center. X is 50 and it is to the left of the robot's center point.
Finding Help VEX Robotics offers support documentation mostly in the form of "How to" articles to help new users get quickly up and running and to help more experienced users find timely and targeted answers to their questions. The articles are particularly helpful when running STEM Labs. If you find yourself uncertain of how to do something, the VEX Robotics Knowledge Base likely has an article to help you with it. The link to the VEX IQ section of the VEX Robotics Knowledge Base is kb. vex. com. On the landing page, click on the large VEX IQ button to see only that portion of the knowledge base. The Search bar can be used to find specific articles from the entire database. For example, you or a student might have questions about charging, installing, and any other information related to batteries. To search for all articles related to VEX IQ batteries, use the search terms "IQ Battery -V 5. " This search returns any article related to the VEX IQ Robot or Controller Batteries and excludes any term related to V 5.
Articles are continuously added to the database. Topics range from installing hardware to installing programming software, and from navigating the VEX IQ Robot Brain to reading indicator lights. There also troubleshooting articles ranging from fixing displayed error messages to troubleshooting VEX IQ Smart Motors. Links to knowledge base articles are also provided within the text of this STEM Lab. For example, if the reader is asked to "Use the Autopilot program. . . , " the first time the word "use" is written it is likely linked to the knowledge base article "How to Use the Autopilot Program in the Demos Folder. " The best times to use the VEX Robotics Knowledge Base are when: You are planning a STEM Lab or preparing a learning environment. Students are independently investigating and solving their own problems related to hardware, software, or programming. You and your students are troubleshooting together.
Discover new hands-on builds and programming opportunities to further your understanding of a subject matter.
The Completed Look of the Build Teacher Toolbox - The Purpose of this Section The purpose of this STEM Lab Seek section is to give students experience building the Autopilot robot. Students will use step-by-step instructions to construct the robot, and finish by configuring the Smart Sensors. At the end of this section, students will be asked Exploration questions to think about the build and how they might use it. Before beginning this STEM Lab, be sure to have batteries charged and ready.
Teacher Tips Use this image as a point of reference to verify if students completed the build of the Autopilot correctly and to provide students with a preview of what they are about to build. The build takes approximately 60 minutes to complete. Allow students enough time at the end of the class period to note where they left off in their engineering notebooks and clean up their area. The completed Autopilot robot build. This robot is designed so that it can be built quickly and drive around either autonomously or with the Controller in a short amount of time.
Teacher Toolbox The Seek section of the STEM Lab guides students through building the robot needed for the rest of the lab. If you or your students have already built this robot and have gone through the questions on the Exploration page, you can skip down to the Play section of this STEM Lab and continue from there.
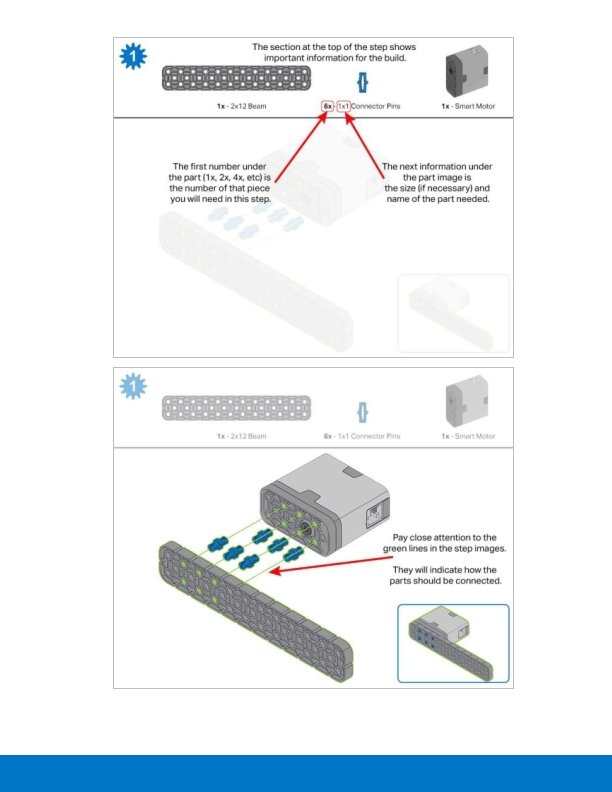
Build Instructions Teacher Toolbox - Students' Building Roles For suggestions on dividing the build components among the students on a team, click here.
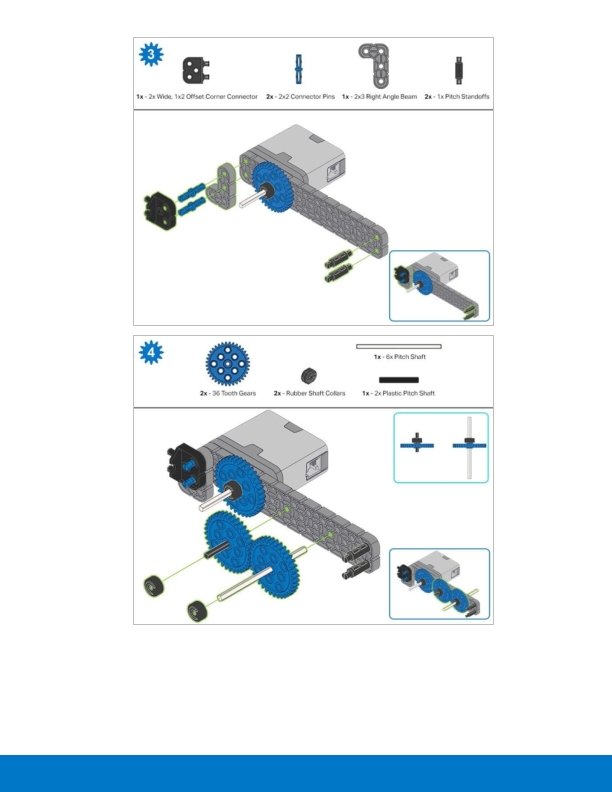
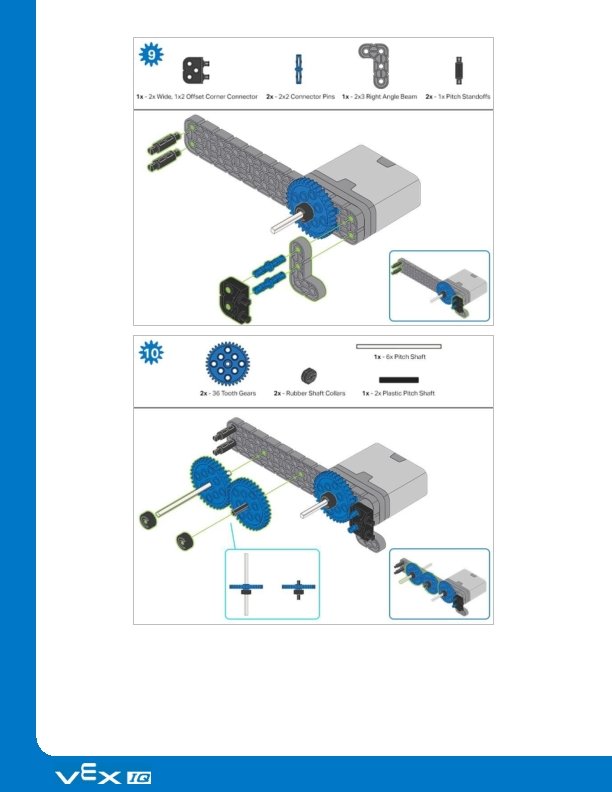
Steps 1 -6 will be repeated for steps 7– 12, so it’s possible to make both at once. Count all pieces before starting your build and have them readily available. When adding the 4 x Pitch Shaft, twist the pitch shaft to check for tension while turning. If it spins freely, it is not properly inserted into the motor.
Make sure the gears fit together properly before locking the Beam in place. After attaching the wheels, twist the wheel that has the shaft going into the motor. If the wheel spins freely and without tension, the 4 x Pitch Shaft has slipped out of place.
When adding the 4 x Pitch Shaft, twist the pitch shaft to check for tension while turning. If it spins freely, it is not properly inserted into the motor.
Make sure the gears fit together properly before locking the Beam in place. After attaching the wheels, twist the wheel that has the shaft going into the motor. If the wheel spins freely and without tension, the 4 x Pitch Shaft has slipped out of place.
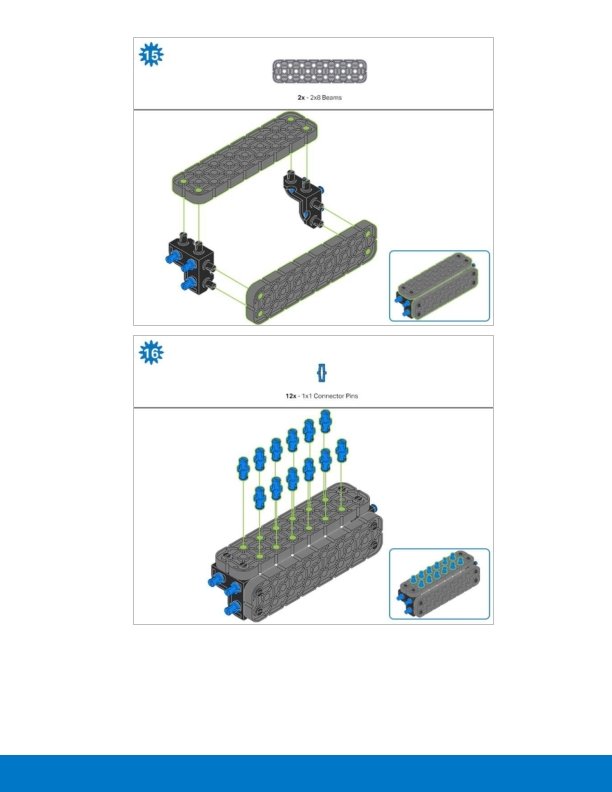
The orange arrows indicate to turn the assembly around.
The highlighted blue numbers placed in gear shapes represent the assemblies completed from those specific steps.
Ensure the Smart Radio and Robot Battery are inserted before attaching the Brain to the rest of the assembly. Steps 29 -30, when you attach the Smart Cables, make sure they are tucked away so as to not block the Smart Sensors. The orange arrows indicate to turn the robot around.
Teacher Toolbox - Time Estimates for the Build If the build instructions are followed, it should take approximately 60 minutes to build the Autopilot. An additional ten minutes was added to the total build time in order to account for students who may need extra time. Extend Your Learning - Gears How does the use of gears change how the robot moves? First, run the Driver Control project and then the Autopilot project with the 36 tooth gears still attached. Compare how the robot moves in these two projects using the gears. Then, re-build the robot without the 36 -tooth gears (step 7 and 12). Finally, run the Driver Control project and then the Autopilot project again with the 36 -tooth gears removed. Compare how the robot moves in these two projects without the use of the gears.
Teacher Toolbox - Checklist Once all students have completed the build, go through this checklist to make sure students are ready to move on. Check that the Autopilot is built correctly. Check that the battery is charged and connected to the VEX IQ Robot Brain. Check that all Smart Cables are plugged in firmly for a good connection. Check that students have put away any extra parts and have cleaned up their area.
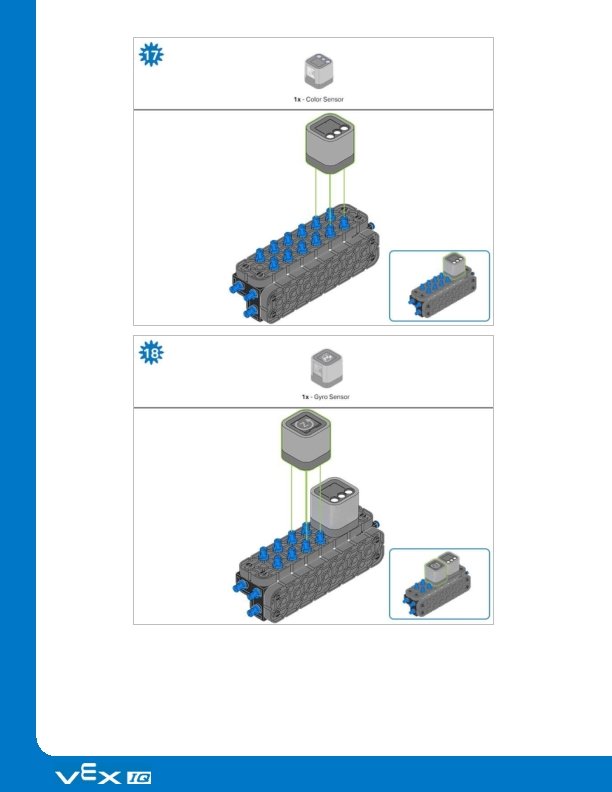
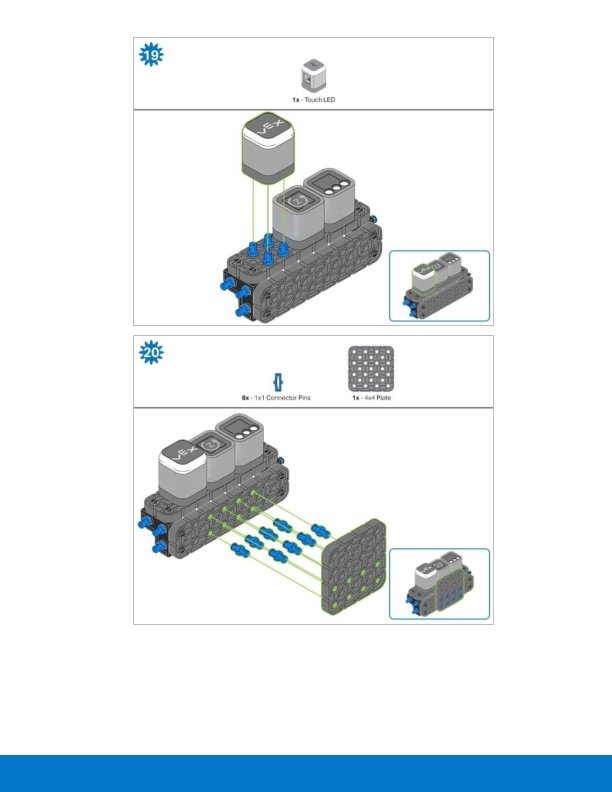
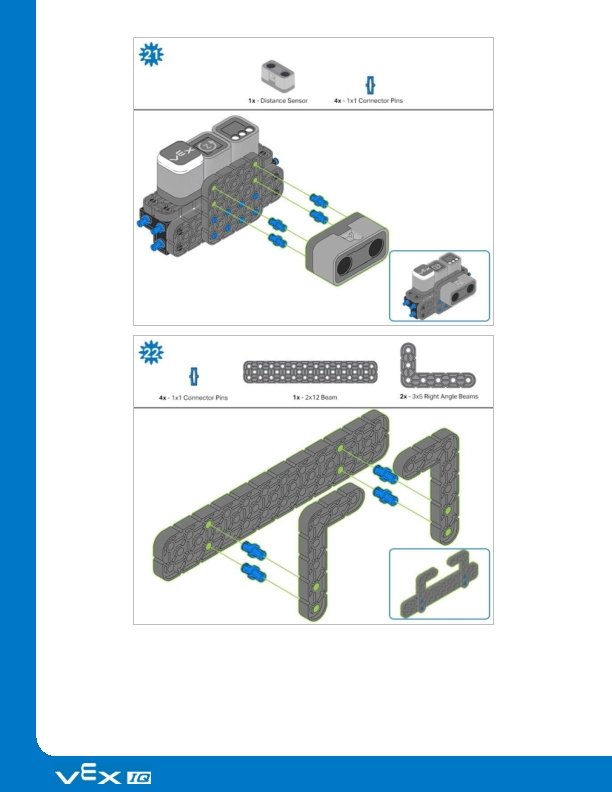
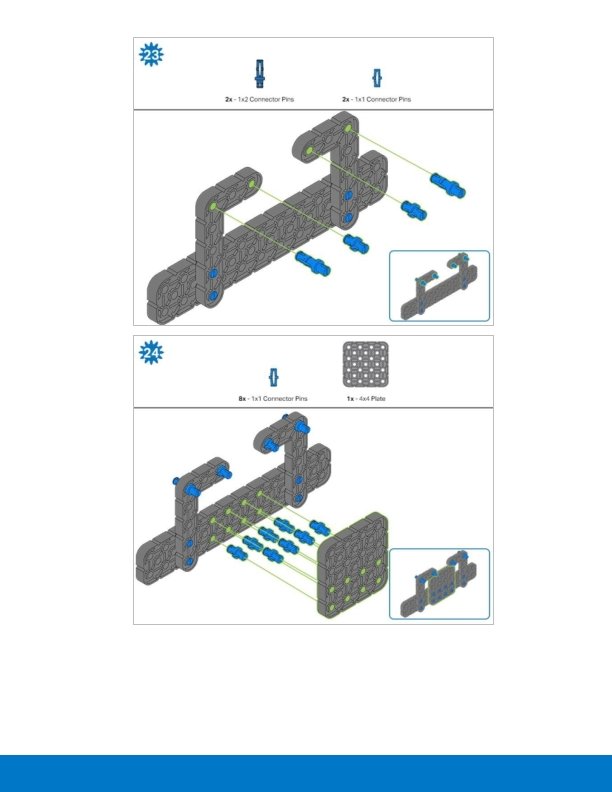
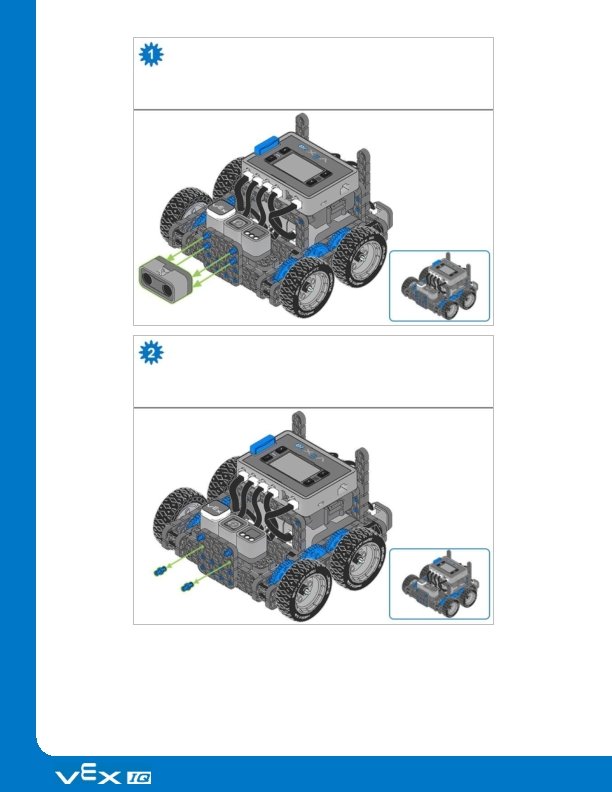
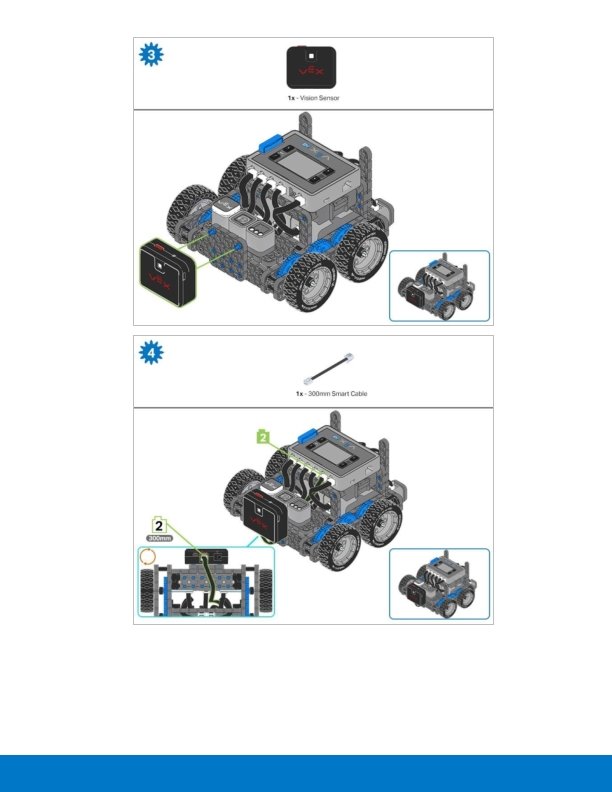
Adding the Vision Sensor After the Autopilot has been assembled, use the building instructions below to add the Vision Sensor.
Exploration Now that the build is finished, explore and see what it can do. Then answer this question in your engineering notebook. Predict and describe how the Autopilot robot’s behavior would change if the shaft in Step 2 of the robot Build Instructions was not inserted into the motor on one side of the robot, provide a diagram and a discussion of what purpose the rubber shaft collar on the motor shaft serves with your description. Teacher Toolbox - Answers could describe how the motor would not turn the shaft and the wheel would not turn. The discussion should tell how if the rubber collar was not on the shaft, there would be nothing to keep the shaft from sliding out of the motor. Higher order answers may include a description of things like, if the shaft is not in the motor, both of the wheels on that side will not move and when the robot tries to drive forward or backward it will only turn towards the side of the robot which the wheels are not turning.
Test your build, observe how it functions, and fuel your logic and reasoning skills through imaginative, creative play.
What is a Vision Sensor? Description Teacher Toolbox - The Purpose of this Page This page will introduce students to what a Vision Sensor is and some of its capabilities. The students will then analyze a partial image of an example project to view how the Vision Sensor can be used with VEXcode IQ Blocks. The Motivate Discussion questions at the bottom of the page can be completed as a class discussion or individually in the students' engineering notebooks. The Vision Sensor allows your robot to collect visual data from a live feed. A live feed is a streaming transmission of what a video camera is capturing. The Vision Sensor is like a smart camera that can observe, select, adjust, and store colors and objects that appear in its visual field. Vision Sensor 276 -4850
Capabilities: This sensor can be used for recognizing colors and color patterns. This sensor can be used to follow an object. This sensor can be used to collect information about the environment. The Vision Sensor allows the robot to use visual input data from its environment. The project can then determine how the visual input data should affect the robot's behavior. For example, the robot could perform actions (output) such as spinning motors or displaying results on the LCD screen. The Vision Sensor can also capture a snapshot of what is in front of it and analyze it according to what the user is asking. For example, a user can gather data from the snapshot such as, what color is the object? Is there an object detected at all? How large is the object (width and height)? The robot can then make decisions based off of this data. The partial example project below shows how this is done. In this first part of the example project, the robot will print "Blue Object Found" if a blue object is detected and "No Blue Object" otherwise. That is the first of three decisions within the example project but the second and third decisions are not shown here.
Motivate Discussion Q: What types of human jobs would benefit from having the help of a robot with a vision sensor? A: Listen for human jobs that would benefit from the ability to see into environments and/or manipulate surroundings from remote distances (e. g. , observing animals in the wild, disarming explosives, or performing robotassisted surgery). Q: Name a device and describe how it uses input, output, and process. A: A possible answer could be a calculator that takes the sequences of numbers and mathematical operators a person inputs, processes those numbers and operations to calculate a result, and then outputs that result on a screen for the person. Q: Why do you think a forever loop was used in the project shown above? A: A forever loop was used so that the Vision Sensor continuously checks the multiple snapshots taken to see if a red object comes into view of the sensor.
Using the Vision Sensor Teacher Toolbox - The Purpose of this Activity Using the Vision Sensor effectively requires the students to be able to configure it and tune it depending on the environment that it is in. In the following activity, the students will learn how to do both. For more information about programming the Vision Sensor with sensing blocks, visit the help information within VEXcode IQ Blocks. The following is an outline of what your students will do in this activity: Open the Detecting Objects example project. Watch the Configuring the Vision Sensor tutorial video. Configure the Vision Sensor. Run the Detecting Objects example project. Discuss and Reflect. Watch the Tuning the Vision Sensor tutorial video. Tune the Vision Sensor. For help organizing students for this activity click here. Teacher Tips If this is the student's first time using VEXcode IQ Blocks, they can also see the Tutorials in the toolbar to learn other basic skills. The Builder in each group should get the hardware required. The Recorder should get the group’s engineering notebook. The Programmer should open VEXcode IQ Blocks. Hardware/Software Required: Quantity Hardware/Other Items 1 VEX IQ Super Kit
Quantity Hardware/Other Items 1 VEXcode IQ Blocks (latest version, Windows, Mac. OS, Chromebook, i. Pad) 1 Engineering Notebook 1 Configuring the Vision Sensor (Tutorial) 1 Tuning the Vision Sensor (Tutorial) 1 Detecting Objects example project This activity will give you the tools to use the Vision Sensor. You can use the Help information inside of VEXcode IQ Blocks to learn about the blocks. For guidance in using the Help feature, see the Using Help tutorial. 1. Preparing for the activity Before you begin the activity, do you have each of these items ready? The Builder should check each of the following: Are all the motors and sensors plugged into the correct port? Are the smart cables fully inserted into all of the motors and sensors? Is the Brain turned on? Teacher Tips Model each of the troubleshooting steps for the students. Remind the students the each group has someone in the role of the builder. That person should be checking these items throughout the activity. Is the battery charged?
2. Open an Example Project. VEXcode IQ Blocks contains many different example projects. You’ll use one of them in this exploration. For help and tips on using example projects, check out the Using Examples and Templates tutorial. Then, open the Detecting Objects example project. The Programmer should complete the following steps: Open the File menu. Select Open Examples. Use the filter bar at the top of the application and select "Sensing. " Select and open the Detecting Objects example project. Save your project as Detecting Objects.
Check to make sure the project name Detecting Objects is now in the window in the center of the toolbar. For addition help, view the Use Example Projects and Templates tutorial video. Teacher Tips Make sure that the students have selected Open Examples from the File menu. Make sure that the students have selected the Detecting Objects Example project. You can point out to students that there are several selections to choose from on the Open Examples page. Remind students that they can refer to the Using Examples and Templates tutorial at any time. You can ask students to add their initials or the name of their group to the project name. This will help differentiate the programs if you ask the students to submit them. Since VEXcode IQ Blocks has autosave, there is no need to save the project again after it has been saved for the first time. If students need help saving, direct them to the Naming and Saving Your Project tutorial video. 3. Configuring and Using the Vision Sensor Begin by watching the Configuring the Vision Sensor tutorial video. Next, configure the Vision Sensor for three colored objects: red, green, and blue.
Have the Programmer open the previously saved Detecting Objects example project. What is this project actually doing? Predict what the Autopilot will do and have the Recorder write down the predictions in your engineering notebook.
Have the Driver Download and Run the project. Have the Builder place different colored objects in front of the Vision Sensor and observe the robot's behavior. Have the Recorder record in your engineering notebook how your prediction was different or correct compared to what you actually observed from the project. For additional help, view the Download and Run a Project tutorial video.
Teacher Toolbox - Answers Facilitate a classroom discussion to have the students share what they predicted this project will do in their engineering notebook and also reflect on how to configure the Vision Sensor. Facilitate the discussion by asking the following questions: What are the steps for configuring the Vision Sensor? What does the Object exists block do? What does the if/then/else block do? What would happen to how the Vision Sensor detects objects if we changed rooms? Answers will vary: The students should note that the object name will have to be decided. The object should be placed in the frame of the Vision Sensor and stilled using the "Freeze" button. The color will then be selected and configured using the "Set" button. The students should outline the steps listed in this article as well as the steps listed in the Configuring the Vision Sensor tutorial video. The Object exists block reports if the Vision Sensor detects a configured object. More information on how to use this block can be found in the Help information. The if-then-else block runs the blocks inside the first or second parts of the if then else based on the Boolean value reported. More information on how to use this block can be found in the Help information. If the Vision Sensor was asked to detect objects in a different environment, the lighting could change and the colors of the objects could look different. This may make it difficult for the Vision Sensor to detect objects.
Extend Your Learning - Configure more objects Choose two other colored objects to configure, possibly white, purple, yellow, etc. . . If the students need help with configuring, refer them to the Help information or tutorial. Teacher Tips The three colored objects do not have to be cubes, they can be any relatively small green, red, and blue object. 4. Tuning the Vision Sensor Often times an object is configured to be recognized by the Vision Sensor in one environment, for example, in a classroom. When the Vision Sensor is then taken into a different environment such as a competition setting, the object may not be recognized by the Vision Sensor. This is often due to a change in lighting after the Vision Sensor has already been configured. To solve this problem, you may have to tune your Vision Sensor. Begin by watching the Tuning the Vision Sensor tutorial video. Next, Tune the Vision Sensor for the three colored objects: red, green, and blue.
Have the Programmer open the previously saved Detecting Objects example project. How will tuning the Vision Sensor affect how well it can detect objects? Have the Builder take the Autopilot to a different part of the room with more or less light. Have the Driver Download and Run the project. Have the Builder place different colored objects in front of the Vision Sensor and observe the robot's behavior. Have the Recorder document in your engineering notebook how well the Vision Sensor detects objects. Does the Vision Sensor need tuned after it changed locations? For additional help, view the Download and Run a Project tutorial video.
Tune the Vision Sensor as necessary. Test the Vision Sensor after it has been tuned to determine if it can detect objects better and make adjustments as needed. Motivate Discussion - Reflecting on the Activity Q: Did the Vision Sensor detect objects as you expected it to? A: Answers will vary; however, the goal of this question is to promote cognitive thinking. Students should note that the Vision Sensor's ability to detect objects can change depending on the environment and light. Q: Why is it important to be able to tune the Vision Sensor as needed? A: While answers may vary, a common response should be that if a robot uses a Vision Sensor and is taken to a competition or even used in a game or challenge, how well the robot performs will depend on the accuracy of the Vision Sensor. Tuning it is important for accuracy.
Extend Your Learning - Multiple Objects Ask the students to run the Detecting Objects project and place more than one of the configured objects in front of the Vision Sensor. What happens? Ask them to document their findings in their engineering notebook. Now, ask the students to place one configured object and one unknown or not configured object in front of the Vision Sensor. What happens? Ask them to document their findings in their engineering notebook. Ask the students before testing it, what would happen if they placed three configured objects in front of the Vision Sensor? Ask the students to write down their predictions before testing it. Ask them to record their observations after testing it. Facilitate a discussion on what the students predicted and observed. Facilitate the discussion by asking: What were the differences between one, two, and three objects? Would you adjust the project in any way for recognizing multiple objects?
Become a 21 st century problem solver by applying the core skills and concepts you learned to other problems.
Perception with Self-Driving Vehicles A self-driving vehicle with an array of sensors Perception with Self-Driving Vehicles Self-driving vehicles use a wide array of sensors to perceive their surroundings, on-board computers to combine and process the data from all of those sensors, and one or more motors to safely move the vehicle along the road using AI (artificial intelligence). Self-driving vehicles often make use of high resolution cameras to be able to recognize things such as pedestrians, road signs, and other vehicles. Vision data from the cameras is often combined with sensors that use lasers to measure distance between the vehicle and other objects. This allows the on-board computers to make decisions based on what types of objects are in their environment, and how far away each object is.
Motivate Discussion Q: What do designers need to do to make sure that self-driving cars are safe? A: Possible replies will include making sure that the car sensors provide sufficient and precise information, practice driving on different types of roads, practice driving in different types of weather conditions. Q: Why is it important that the Vision Sensor used for the car will have to be able to practically tune itself? A: The Vision Sensor will have to be able to detect objects regardless of the environment. This includes being in a tunnel, snow, rain, at night, direct sunlight, etc. . . Q: How will using self-driving cars affect the environment? A: Students may think of several pros and cons to this question. An example of a pro would be that self-driving cars will be safer, which should lead to fewer accidents. This will reduce the need to replace vehicles. A con would be an increase in the usage of certain resources, such as gasoline and petroleum, due to an increase in driving.
Competition Connection: Crossover VRC 2016 -2017 Crossover Field Robot Capabilities The 2016 - 2017 VEX Robotics Competition game Crossover required players to place their colored Hexballs in their scoring zones. There were 28 Hexballs in total: 14 of each color (blue and orange) per team. Points were earned by placing the team's correctly colored Hexball in their goal zone. Although it was illegal to use a Vision Sensor in a VEX IQ Robotics Competition in 20162017, you can imagine that competition teams could have benefited from using the Vision Sensor to detect the team-specific colored Hexball. It would be easier for the robot to pick up the correctly colored Hexball during the autonomous period if the robot was programmed to move towards and grab a certain colored object. If the robot selects the incorrect colored Hexball during the autonomous period, there is a possibility that the robot would not score as many points. Similarly, for the Driving Skills Challenge, it may be hard for teams to manually line up the robot enough to place the Hexball in the goal. The Vision Sensor could be used to align the
robot more accurately. Overall, the Vision Sensor would have greatly helped skilled teams to program the robot to use the Vision Sensor to detect Hexballs and align the robot properly in order to place the Hexballs into the goals. Teacher Tips Advise students who are interested in competing in VEX IQ Robotics Competitions that it remains illegal to use Vision Sensors for VEX IQ Robotics Competitions. Eventually, the ban may be lifted. VEX EDR Robotics Competitions already allow them but the VEX IQ division does not yet. Check the VEX IQ Challenge's Game Manual at the start of each season to determine if the Vision Sensor is legal to use. If/when it becomes legal, teams can brainstorm ways the Vision Sensor may be able to assist with completing the challenge.
Extend Your Learning To expand this activity, ask your students to design and outline a project that they can detect blue and orange objects that they could potentially use for this competition game! Ask your students to do the following: Open the Detecting Objects example project. Configure the Vision Sensor to detect orange objects. For help configuring a new object, click here or view the Configuring the Vision Sensor tutorial video. Download and Run the project to observe if the robot can detect blue and orange objects. For help, view the Download and Run a Project tutorial video. If time allows, set-up a game field similar to the Crossover field. Practice using and altering the Detecting Objects project to score points!
Is there a more efficient way to come to the same conclusion? Take what you’ve learned and try to improve it.
Prepare for the Vision Data Challenge Teacher Toolbox - The Purpose of this Activity The Vision Sensor provides a variety of data that can then be used in projects. The Sensing blocks allow the user to have the project take snapshots, decide if the object exists, decide how many exist, determine the object's center X and Y coordinates within the Vision Sensor's snapshot, and determine the object's width and height in pixels within the snapshot. This activity will introduce all of the related blocks necessary for collecting that information in preparation for the Vision Data Challenge. The following is an outline of Rethink's Vision Data Challenge: Review a complete data set of information collected from the Vision Sensor's Sensing blocks. Complete a partial data set of information collected from the Vision Sensor about a different snapshot. Create a data set based on a snapshot and the Vision Sensor's Sensing blocks. The Vision Sensor's Sensing Blocks VEXcode IQ Blocks has Sensing blocks for the Vision Sensor. The first two you already used in the Play section to take a snapshot and to check if the object exists. In the figure below, you see that the snapshot block captured the GREENBOX snapshot. The object, GREENBOX, was identified in the snapshot and so the answer of whether it exists is TRUE. Let's look at these other Sensing blocks and what their values tell us.
The object count block tells us how many GREENBOX objects are in the snapshot. Here, there is only 1 detected. The center X value tells us whether the GREENBOX object is to the left or right of the robot's center point. Remember, the Vision Sensor is mounted in the middle of the front of the robot and so the snapshot's view is the robot's view. o If center X is greater than 157. 5, the object is to the right of the robot's center point. o If center X is less than 157. 5, the object is to the left of the robot's center point. The center Y value tells us whether the GREENBOX is higher or lower than the robot's center point. o If center Y is greater than 105. 5, the object is lower than the robot's center point. o If center Y is less than 105. 5, the object is higher than the robot's center point. The width and height values tell us how close the GREENBOX is to the robot.
o The same-sized object will be larger in width and height as it gets closer to the robot. Teacher Toolbox - Why this reading? The Help information within VEXcode IQ Blocks also provides information about the blocks but here, the data being collected are contextualized as to what they specifically tell the user about the object in the snapshot. Notes: The center. X and center. Y values of the entire snapshot are used for determining whether the object is to the left/right or above/below the robot's center point. They are calculated by dividing the total number of pixels on that axis by two (e. g. , center. X of snapshot = 315 / 2 = 157. 5). We can assume the center point of the robot is the same as the center point of the Vision Sensor's snapshot because the Vision Sensor should be mounted in the center of the robot's front side and facing forward. The position of the Vision Sensor on the robot's build and the degree to which the Vision Sensor might be angled downward need to be taken into account when judging the position of the object relative to the robot's (or Vision Sensor's) center point. The Y values increase downward within the snapshot. Make sure students recognize that before moving on to the next part. How are the center X and center Y values calculated? The values are calculated based on the coordinates within the snapshot. The width and height of the object are already calculated. The Vision Sensor tracks the X and Y values of the upper left corner of the object. Below, those coordinates are (84, 34).
The center X and center Y values can be calculated based off of the coordinates of the upper left corner (84, 34), and the width (W 140) and height (H 142) values provided. center. X = 140/2 + 84 = 154 o center. X = half the width of the object added to its leftmost X coordinate center. Y = 142/2 + 34 = 105
o center. Y = half the height of the object added to its topmost Y coordinate Teacher Toolbox - Concluding this page Make sure that students understand the math involved in finding the center X and center Y values. They will need it for the activity on the next page. Ask how the (84, 34) and (W 140, H 142) values relate to the coordinates provided in the corners of the snapshot. Students should recognize that the entire snapshot is mapped onto a coordinate plane based on the number of pixels. The X values range from 0 to 315 (316 pixels wide) and the Y values range from 0 to 211 (212 pixels tall). The object's coordinates and size are based on how many pixels the object takes up along those axes.
Practice for the Vision Data Challenge Teacher Toolbox - The Purpose of this Activity This activity has students apply what they learned on the previous page in order to complete a data set from an example snapshot. They will fill in missing values, calculate center X and Y values, and interpret what the data can tell us about the object's position relative to the robot's center point. This will prepare them for success on the Vision Data Challenge that follows.
Add the missing values below in your engineering notebook. Here are the provided data from the snapshot: X = 50 Y = 36 W = 152 H = 150
Is the REDBOX to the left or to the right of the robot's center point? Is the REDBOX higher or lower than the robot's center point? Teacher Tips Draw the students' attention to the fact that the detection frame does not fully cover the REDBOX. That is okay. It still recognizes the REDBOX. Tuning the Vision Sensor is unlikely to perfect the detection frame and that is okay. The Vision Sensor does recognize the majority of the REDBOX.
Teacher Toolbox - Answers Students' answers can be discussed as a class and/or you can review their engineering notebooks to ensure that they completed the activity. There is only one object (object count = 1) in the snapshot and width is provided by the program (object width = 152). The center X value is 152/2 + 50 = 126. The REDBOX is to the left of the robot's center point (a bit left of center). The REDBOX is 31. 5 pixels (center 157. 5 - 126) left of the robot's center point. The REDBOX is lower than the robot's center point (slightly lower than center). The REDBOX is 5. 5 pixels (111 - center 105. 5) below the robot's center point.
The Vision Data Challenge Teacher Toolbox - The Purpose of the Vision Data Challenge The purpose of the Vision Data Challenge is to ensure that students understand the data collected from the Vision Sensor's snapshot and how center X and Y values are calculated. Your students should also finish this lab with an understanding of how that data might be interpreted (e. g. , the center X value can be used to determine where the object is relative to the center point of the robot), and best practices for naming objects when configuring. Complete the Vision Data Challenge by answering the questions and filling in the missing data in your engineering notebook. Which of these blocks was used to take the snapshot above?
o o Fill in these values: Is YELLOWBOX to the left or to the right of the robot's center point? Is YELLOWBOX above or below the robot's center point? YELLOWBOX is NOT the best name to give this object if you want to easily recognize which color signature is which. Which of these is a better name? Why?
o YELLOWGEAR o YELLOWCUBE Teacher Toolbox - Answers Students' answers can be discussed as a class and/or you can review their engineering notebooks to ensure that they completed the activity successfully. B. YELLOWBOX is slightly to the left of the robot's center point but only by a difference of 16. 5 pixels (center 157. 5 - 141). YELLOWBOX is slightly lower than the robot's center point but only by a difference of 5. 5 pixels (111 - center 105. 5). A. YELLOWGEAR This is a better name because it describes not only the color of the object but also the type of the object. It is a gear, not a box or cube.
Extend Your Learning - Use the Sensing Blocks within a Project Now that some of the Vision Sensor's reported data is better understood, students might want to use these Sensing blocks within a project. Allow them to explore doing so. Some students might simply add print blocks to display the values on the screen. More advanced students might use these blocks within a project to make decisions. That will require adding a drivetrain to the robot's configuration.
Understand the core concepts and how to apply them to different situations. This review process will fuel motivation to learn.
Review Answer Key What does the snapshot block do in this example? Takes a snapshot of the current image from the Vision Sensor so that it can be analyzed Which of the following should come first when configuring a signature for the Vision Sensor? Place the object in view of the Vision Sensor Which of the following is NOT an example of tuning the Vision Sensor? Calculating the center x Why is a forever block used in the Detecting Objects example project? The snapshot block only takes one current image of what the Vision Sensor sees. Using the forever block allows the Vision Sensor to take multiple snapshots so that it can continuously check for different objects. The leftmost X value of an object is 30 pixels and the width is 40 pixels in total. What is true about this object? Its center. X is 50 and it is to the left of the robot's center point. 1. What does the snapshot block do in this example?
o Streams a continuous video of what the Vision Sensor sees o Prints the color of the object on the Brain's screen o Determines of an object exists or not o Takes a snapshot of the current image from the Vision Sensor so that it can be analyzed 2. Which of the following should come first when configuring a signature for the Vision Sensor? o Still the image so an area of color can be selected o Select the "Set" button o Clear the signature o Place the object in view of the Vision Sensor 3. Which of the following is NOT an example of tuning the Vision Sensor? o Adjusting the color signature slider o Adjusting the brightness o Resetting the color signature of adjusting the slider and brightness does not help
o Calculating the center x 4. Why is a forever block used in the Detecting Objects example project? o "Blue object found" should be printed forever o The snapshot block only takes one current image of what the Vision Sensor sees. Using the forever block allows the Vision Sensor to take multiple snapshots so that it can continuously check for different objects. o The blocks inside should only repeat a certain number of times o The if-then-else block needed to be contained inside another looping block 5. The leftmost X value of an object is 30 pixels and the width is 40 pixels in total. What is true about this object? o Its center. X is 50 and it is to the left of the robot's center point. o Its center. X is 70 and it is to the left of the robot's center point. o Its center. X is 50 and it is to the right of the robot's center point. o Its center. X is 70 and it is to the right of the robot's center point.
Additional information, resources, and materials.
Using the 1 Post Hex Nut Retainer w/ Bearing Flat The 1 Post Hex Nut Retainer w/ Bearing Flat allows shafts to spin smoothly through holes in structural components. When mounted, it provides two points of contact on structural components for stability. One end of the retainer contains a post sized to securely fit in the square hole of a structural component. The center hole of the retainer is sized and slotted to securely fit a hex nut, allowing a 8 -32 screw to easily be tightened without the need for a wrench or pliers. The hole on the end of the Retainer is intended for shafts or screws to pass through. To make use of the retainer:
Align it on a VEX structural component such that the end hole is in the desired location, and the center and end sections are also backed by the structural component. Insert the square post extruding from the retainer into the structural component to help keep it in place. Insert a hex nut into the center section of the retainer so that it is flush with the rest of the component. Align any additional structural components to the back of the main structural component, if applicable. Use an 8 -32 screw of appropriate length to secure the structural component(s) to the retainer through the center hole and hex nut.
Using the 4 Post Hex Nut Retainer The 4 Post Hex Nut Retainer provides five points of contact for creating a strong connection between two structural components using one screw and nut. Each corner of the retainer contains a post sized to securely fit in a square hole within a structural component. The center of the retainer is sized and slotted to securely fit a hex nut, allowing a 8 -32 screw to easily be tightened without the need for a wrench or pliers. To make use of the retainer: Align it on a VEX structural component such that the center hole is in the desired location, and each corner is also backed by the structural component.
Insert the square posts extruding from the retainer into the structural component to help keep it in place. Insert a hex nut into the center section of the retainer so that it is flush with the rest of the component. Align any additional structural components to the back of the main structural component, if applicable. Use an 8 -32 screw of appropriate length to secure the structural component(s) to the retainer through the center hole and hex nut.
Using the 1 Post Hex Nut Retainer The 1 Post Hex Nut Retainer provides two points of contact for connecting a structural component to another piece using one screw and nut. One end of the retainer contains a post sized to securely fit in the square hole of a structural component. The other end of the retainer is sized and slotted to securely fit a hex nut, allowing a 8 -32 screw to easily be tightened without the need for a wrench or pliers. To make use of the retainer: Align it on a VEX structural component such that both ends are backed by the structural component and positioned to secure the second piece.
Insert the square post extruding from the retainer into the structural component to help keep it in place. If the retainer is being used to secure two structural components, insert a hex nut into the other end of the retainer so that it is flush with the rest of the component. If used to secure a different type of component, such as a standoff, it may be appropriate to insert the screw through this side. Align any additional components to the back of the main structural component, if applicable. If the retainer is being used to connect two structural components, use an 8 -32 screw of appropriate length to secure the structural components through the hole and hex nut. If used to connect a different type of component, such as a standoff, secure it directly or with a hex nut.
Engineering Notebooks Alexander Graham Bell's notebook entry from a successful experiment with his first telephone An Engineering Notebook Documents your Work Not only do you use an engineering notebook to organize and document your work, it is also a place to reflect on activities and projects. When working in a team, each team member will maintain their own journal to help with collaboration. Your engineering notebook should have the following: An entry for each day or session that you worked on the solution Entries that are chronological, with each entry dated Clear, neat, and concise writing and organization Labels so that a reader understands all of your notes and how they fit into your iterative design process An entry might include: Brainstorming ideas
Sketches or pictures of prototypes Pseudocode and flowcharts for planning Any worked calculations or algorithms used Answers to guiding questions Notes about observations and/or conducted tests Notes about and reflections on your different iterations Extend Your Learning To connect this activity to a historical instance, ask your students to research Leonardo da Vinci. Known as a famous painter, da Vinci was also a selftaught engineer, creating approximately 30 engineering notebooks, including the renowned Codex Leicester. To relate this activity to inventions, ask students to research the process of obtaining a patent as well as the role of the engineering notebook in corroborating innovative work.
Building the Autopilot Robot with a Team Teacher Toolbox The build instructions will show students step-by-step instructions on how to build the Autopilot Robot. The Build Instruction Tips section will point out additional information for specific steps which will help students be successful with their build, so be sure to point out that section to students. There is an optional rubric to evaluate the robot build on this page. If any rubrics are used to evaluate students, review the rubric or pass out copies before students begin working so they are clear on how they will be assessed. Before starting the build, consider how your students will be organized. Will each student have their own robot, or will they work in pairs or teams? If working in teams, each student could build a portion of steps or each student could be given a role. The following roles can be utilized during the building of Autopilot: Right wheel — This person follows steps 1 -6 to build the right wheel of Autopilot. This person is also responsible for making sure that the motor gets plugged into the correct port (port 6). Left wheel — This person follows steps 7 -12 to build the left wheel of Autopilot. This person is also responsible for making sure that the motor gets plugged into the correct port (port 1). Sensors — This person follows steps 13 -26 to build the frame and attach the sensors. Robot Brain — This person follows steps 27 -30 to connect all of the components including the Robot Brain and making sure the sensors are attached to the correct ports. This person is also responsible for making sure that the battery is charged and ready. o Port 2: Distance Sensor o Port 3: Color Sensor o Port 4: Gyro Sensor o Port 5: Touch LED o Port 8: Bumper Switch o Port 9: Bumper Switch If there are two students in each group, the students can each choose two roles. If there are three students in a group, one of the students can choose to do two roles. If there are four
students in a group, each student can have one role. Provide the list of roles and their responsibilities to the students. Once students are in their groups, allow the members to choose their role. Circulate the classroom and make sure that every student has a role. There is an optional collaboration rubric on this page. Remind the students of roles throughout the exploration. For roles to work, students have to feel as though they will be held accountable for fulfilling those roles. Therefore, interject if you see a student taking over someone else’s role or not fulfilling their assigned role. Reminders about who is supposed to be doing what can be useful interventions. Glossary Autopilot The robot build that is used for the STEM Lab. This robot is the result of the first hands-on lesson the students will accomplish. It is used to complete the rest of the STEM Lab activities. Engineering Notebook A type of journal that the students will use to record their designs, ideas, and reflections as they move through the STEM Lab. Sensors A devices that collect input from the environment and provide information that can be processed to make decisions.