Using the Projectbased Learning Multimedia as a Teaching

Using the Project-based Learning Multimedia as a Teaching – Learning Strategy

Project – based learning enables classrooms to emphasize this undervalues part of the “invisible curriculum” – Daniel Goleman (emotional intelligence)

What is Project based Learning? is an old and respected educational method. The use of multimedia is a dynamic new form of communication. The merging of projectbased learning and multimedia represents a powerful teaching strategy that we call “project-based multimedia learning. ” Increasing Student Learning Through Multimedia Projects by Michael Simkins, Karen Cole, Fern Tavalin and Barbara Means

Project-based multimedia learning is a method of teaching in which students acquire new knowledge and skills in the course of designing, planning, and producing a multimedia product Increasing Student Learning Through Multimedia Projects by Michael Simkins, Karen Cole, Fern Tavalin and Barbara Means

multimedia products will be technologybased presentations, such as a computerized slide show, a Web site, or a video.

Analysis � Go over the k-12 content and performance standards and competencies to determine objective and content that the multimedia project will address effectively. � Estimate how much time you need to spend compared to how much time is available � Make clear and explicit parameters and procedures that must be observed in decision making.

� Set collaborative working arrangements to enable students to share their knowledge and skills and to build on one another’s strengths � Determine what resources you will need and what are available � Plan on how you will measure what students learn

Goals Objectives
")
To trim down time devoted to a multi media project, Simkins et al (2002) suggest the following: - Use technology students already know - Assign skills practice as homework - Let students compose text and select and prepare graphics and sounds as they plan

Objectives content with which to use the project based multimedia strategy resources What’s next?

Before the project starts 1. Create project description and milestones. Put in a nutshell what your project is all about. Include the project components students will be responsible for and their due date. Set deadlines.

A milestone may look like this: Stage 1 Estimated Time Before the project starts 2 weeks Introducing the project 1 -2 days Learning the technology 1 -3 days Preliminary research and planning 3 days – 3 weeks Concept design and storyboarding 3 -5 days First draft production 1 -3 weeks Assessing, testing , and finalizing presentations 1 -3 weeks Concluding activing 1 -3 day Total class time 5 -13 weeks

2. Work with real – world connections. If you have people outside the classroom involved as clients or assessors work with them to make an appropriate schedule and include their ideas for activities. 3. Prepare resources. Seek the assistance of your librarian or school media specialist. 4. Prepare software and peripherals such as microphones. Ask the help of technical people.

5. Organize computer files – finding files eats most of your time if you are not organized. Naming files and folders after file type and section title helps to keep things organized and makes it easier to merge elements later on. 6. Prepare the classroom. Organize books, printer, paper and any other resources so students can access them independently. Make room on the bulletin boards for hanging printouts of student work, schedules, and organizational charts.
 1. 2. 3. 4. 5. Make clear")
Producing the Project (One or two days) 1. 2. 3. 4. 5. Make clear what they will be making, who their audience will be and what you expect them to learn and demonstrate in terms of the k to 12 Standards and Competencies. Review project documents Perform pre assessments Perform relevant activities Group students Organize materials
 Give a chance for the students to work")
Learning the technology (1 -3 days) Give a chance for the students to work with whatever software and technology they will be using. If students are new to multimedia, then begin with lessons that involve using the different media types.
 -")
Preliminary Research and Planning (3 days – 3 weeks, depending on project size) - students should immerse themselves in the content or subject matter they need to understand - Students will engage in relevant experiences or conduct research to collect information and gather ideas. Field trips, teacher-guided lessons, student research, interviews, observation, and questioning are all activities that might occur during this stage
 A Storyboarding is a paper and pencil")
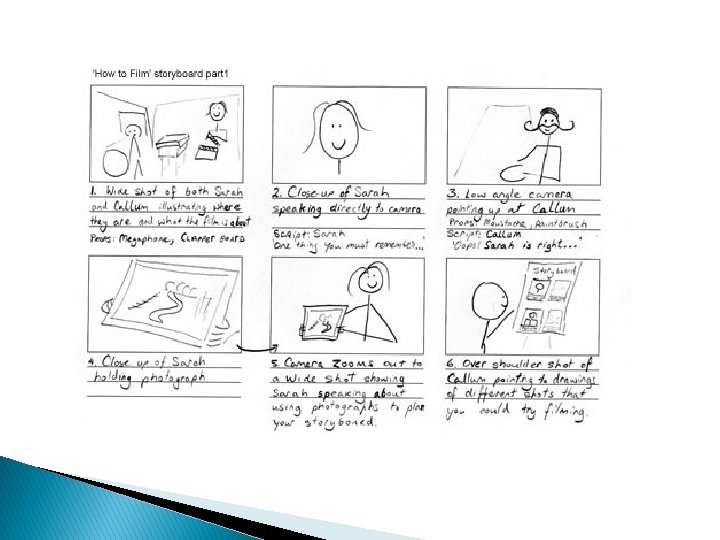
Concept Design and Storyboarding (3 -5 days) A Storyboarding is a paper and pencil sketch of the entire presentation, screen by screen or, in the case of video, shot by shot. Requiring a storyboard provides a natural check in point for you and gives your students an opportunity to plan ahead, the flow chart or storyboard becomes a concrete reference point for what to do next
 Functional testing User Testing")
Assessing, Testing, and Finalizing Presentations (1 -3 weeks) Functional testing User Testing

Functional Testing means trying all the buttons, taking all possible paths through the presentation, checking for errors, missing images, and the like User Testing means showing the presentation to members of the target audience and finding out if they can successfully navigate it and understand it.

Assessment means critical evaluation of your presentation. Possible evaluators include your students, you, members of your target audience, content experts, and design experts After assessment and testing, your studetns will be revising and making a “release candidate”, a version everyone thinks is just about perfect.
 - Allow time for students to present and show")
Concluding Activities (1 -3 days) - Allow time for students to present and show off their hard work. you will present to your target audience and celebrate your accomplishment. You can also think about scheduling your project so he end coincides with a school event, such as Parents’ Night or end of the quarter activity

The effective use of project based multimedia learning requires thorough planning. Initial planning involves: • Clarifying goals and objective • Determining how much time is needed and extent of students involvement in decision making • Setting up forms of collaboration • Identifying and determining what resources are needed • Deciding on the mode to measure what students learn

The various phases of the project include: 1. Before the project start 2. Introduction of the project 3. Learning the technology 4. Preliminary research and planning 5. Concept design and storyboarding 6. First draft production 7. Assessing, testing, and finalizing presentations, 8. Concluding activities.
- Slides: 25