UNITV Android User Interface Understanding the Components of


 event handler")


 within the Frame. Layout,")


 { Log. d(“State. Info”, “on. Resume”); super. on. Resume();")


 method, you can also use the android: screen.")
")


. show(); break; case Key. Event. KEYCODE_DPAD_RIGHT: Toast. make. Text(get. Base. Context(), “Right")


find.")


- Slides: 67
UNIT-V §Android User Interface: §Understanding the Components of a Screen, § Adapting to Display Orientation, §Managing Changes to Screen Orientation, § Utilizing the Action Bar, § Listening for UI Notifications.
Understanding the component. S o. F A Screen: An activity displays the user interface of your application, which may contain widgets like buttons, labels, text boxes, and so on. . Typically, you defi ne your UI using an XML fi le (e. g. , the main. xml fi le located in the res/layout folder), which may look like this: <? xml version=” 1. 0” encoding=”utf-8”? > <Linear. Layout xmlns: android=”http: //schemas. android. com/apk/res/android” android: orientation=”vertical” android: layout_width=”fill_parent” android: layout_height=”fill_parent”> <Text. View android: layout_width=”fill_parent” android: layout_height=”wrap_content” android: text=”@string/hello”/> </Linear. Layout>
During run time, you load the XML UI in the on. Create() event handler in your Activity class, using the set. Content. View() method of the Activity class: @Override public void on. Create(Bundle saved. Instance. State) { super. on. Create(saved. Instance. State); set. Content. View(R. layout. main); } During compilation, each element in the XML fi le is compiled into its equivalent Android GUI class, with attributes represented by methods. The Android system then creates the UI of the activity when it is loaded.
views and viewgroups An activity contains Views and View. Groups. A view is a widget that has an appearance on screen. Examples of views are buttons, labels, and text boxes. A view derives from the base class android . view. View. One or more views can be grouped together into a View. Group. A View. Group (which is itself a special type of view) provides the layout in which you can order the appearance and sequence of views. Examples of View. Groups include Linear. Layout and Frame. Layout. A View. Group derives from the base class android. view. View. Group. Android supports the following View. Groups: ➤➤ Linear. Layout ➤➤ Absolute. Layout ➤➤ Table. Layout ➤➤ Relative. Layout ➤➤ Frame. Layout ➤➤ Scroll. View
Linear. Layout The Linear. Layout arranges views in a single column or a single row. Child views can be arranged either vertically or horizontally. To see how Linear. Layout works, consider the following elements typically contained in the main. xml file: <? xml version=” 1. 0” encoding=”utf-8”? > <Linear. Layout xmlns: android=”http: //schemas. android. com/apk/res/android” android: orientation=”vertical” android: layout_width=”fill_parent” android: layout_height=”fill_parent”> <Text. View android: layout_width=”fill_parent” android: layout_height=”wrap_content” android: text=”@string/hello”/> </Linear. Layout> In the main. xml file, observe that the root element is <Linear. Layout> and it has a <Text. View> element contained within it. The <Linear. Layout> element controls the order in which the views contained within it appear.
Tab le 3 -1: Common Attributes Used in Views and View. Groups
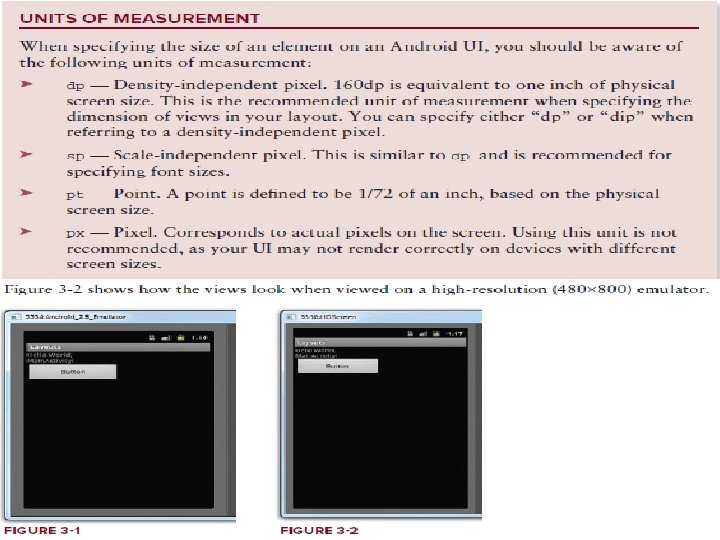
For example, the width of the <Text. View> element fi lls the entire width of its parent (which is the screen in this case) using the fill_parent constant. Its height is indicated by the wrap_content constant, which means that its height is the height of its content (in this case, the text contained within it). If you don’t want to have the <Text. View> view occupy the entire row, you can set its layout_width attribute to wrap_content, like this: < Text. View android: layout_width=”wrap_content android: layout_height=”wrap_content” android: text=”@string/hello”/> This will set the width of the view to be equal to the width of the text contained within it. Consider the following layout: <? xml version=” 1. 0” encoding=”utf-8”? > <Linear. Layout xmlns: android=”http: //schemas. android. com/apk/res/android” android: orientation=”vertical” android: layout_width=”fill_parent” android: layout_height=”fill_parent”> <Text. View android: layout_width=” 105 dp” android: layout_height=”wrap_content” android: text=”@string/hello”/> <Button android: layout_width=” 160 dp” android: layout_height=”wrap_content” android: text=”Button”/> </Linear. Layout>
The preceding example also specifies that the orientation of the layout is vertical: <Linear. Layout xmlns: android=”http: //schemas. android. com/apk/res/android” android: orientation=”vertical” android: layout_width=”fill_parent” android: layout_height=”fill_parent”> The default orientation layout is horizontal, so if you omit the android: orientation attribute, the views will appear as shown in Figure 3 -3.
In Linear. Layout, you can apply the layout_weight and layout_gravity attributes to views contained within it, as the following modifications to main. xml show: <? xml version=” 1. 0” encoding=”utf-8”? > <Linear. Layout xmlns: android=”http: //schemas. android. com/apk/res/android” android: orientation=”vertical” android: layout_width=”fill_parent” android: layout_height=”fill_parent”> <Text. View android: layout_width=” 105 dp” android: layout_height=”wrap_content” android: text=”@string/hello”/> <Button android: layout_width=” 160 dp” android: layout_height=”wrap_content” android: text=”Button” android: layout_gravity=”right” android: layout_weight=” 0. 2”/> <Edit. Text android: layout_width=”fill_parent” android: layout_height=”wrap_content” android: text. Size=” 18 sp” android: layout_weight=” 0. 8”/> </Linear. Layout>
Figure 3 -4 shows that the button is aligned to the right of its parent (which is the Linear. Layout) using the layout_gravity attribute. At the same time, you use the layout_weight attribute to specify the ratio in which the Button and Edit. Text views occupy the remaining space on the screen. The total value for the layout_weight attribute must be equal to 1.
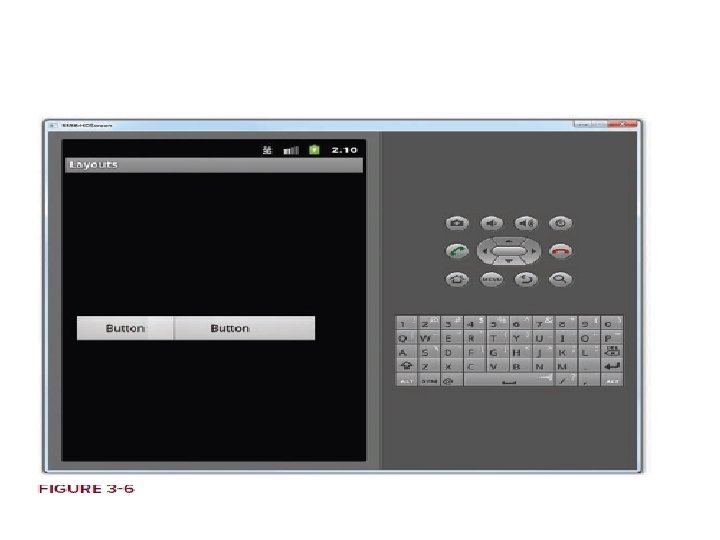
Absolute. Layout The Absolute. Layout enables you to specify the exact location of its children. Consider the following UI defined in main. xml: <? xml version=” 1. 0” encoding=”utf-8”? > <Absolute. Layout android: layout_width=”fill_parent” android: layout_height=”fill_parent” xmlns: android=http: //schemas. android. com/apk/res/android> <Button android: layout_width=” 188 dp” android: layout_height=”wrap_content” android: text=”Button” android: layout_x=” 126 px” android: layout_y=” 361 px”/> <Button android: layout_width=” 113 dp” android: layout_height=”wrap_content” android: text=”Button” android: layout_x=” 12 px” android: layout_y=” 361 px”/> </Absolute. Layout>
However, there is a problem with the Absolute. Layout when the activity is viewed on a highresolution screen (see Figure 3 -6). For this reason, the Absolute. Layout has been deprecated since Android 1. 5 (although it is still supported in the current version). You should avoid using the Absolute. Layout in your UI, as it is not guaranteed to be supported in future versions of Android.
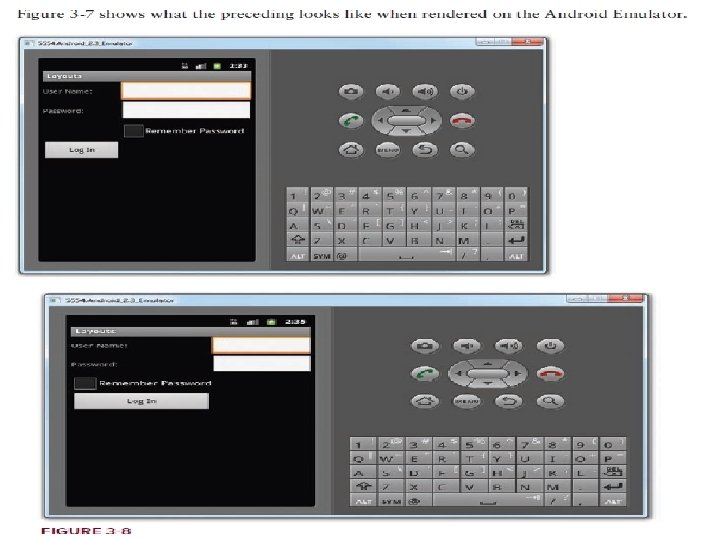
Table. Layout The Table. Layout groups views into rows and columns. You use the <Table. Row> element to designate a row in the table. Each row can contain one or more views. Each view you place within a row forms a cell. The width of each column is determined by the largest width of each cell in that column. Consider the content of main. xml shown here: <? xml version=” 1. 0” encoding=”utf-8”? > <Table. Layout xmlns: android=”http: //schemas. android. com/apk/res/android” android: layout_height=”fill_parent” android: layout_width=”fill_parent”> <Table. Row> <Text. View android: text=”User Name: ” android: width =” 120 px”/> <Edit. Text android: id=”@+id/txt. User. Name” android: width=” 200 px” /> </Table. Row>
<Table. Row> <Text. View android: text=”Password: ”/> <Edit. Text android: id=”@+id/txt. Password” android: password=”true”/> </Table. Row> <Text. View /> <Check. Box android: id=”@+id/chk. Remember. Password” android: layout_width=”fill_parent” android: layout_height=”wrap_content” android: text=”Remember Password”/> </Table. Row> <Button android: id=”@+id/button. Sign. In” android: text=”Log In” /> </Table. Row> </Table. Layout>
Relative. Layout The Relative. Layout enables you to specify how child views are positioned relative to each other. Consider the following main. xml file: <? xml version=” 1. 0” encoding=”utf-8”? > <Relative. Layout android: id=”@+id/RLayout” android: layout_width=”fill_parent” android: layout_height=”fill_parent” xmlns: android=”http: //schemas. android. com/apk/res/android”> <Text. View android: id=”@+id/lbl. Comments” android: layout_width=”wrap_content” android: layout_height=”wrap_content” android: text=”Comments” android: layout_align. Parent. Top=”true” android: layout_align. Parent. Left=”true” /> <Edit. Text android: id=”@+id/txt. Comments” android: layout_width=”fill_parent” android: layout_height=” 170 px” android: text. Size=” 18 sp” android: layout_align. Left=”@+id/lbl. Comments” android: layout_below=”@+id/lbl. Comments” android: layout_center. Horizontal=”true”/>
<Button android: id=”@+id/btn. Save” android: layout_width=” 125 px” android: layout_height=”wrap_content” android: text=”Save” android: layout_below=”@+id/txt. Comments” android: layout_align. Right=”@+id/txt. Comments”/> <Button android: id=”@+id/btn. Cancel” android: layout_width=” 124 px” android: layout_height=”wrap_content” android: text=”Cancel” android: layout_below=”@+id/txt. Comments” android: layout_align. Left=”@+id/txt. Comments”/> </Relative. Layout> Notice that each view embedded within the Relative. Layout has attributes that enable it to align with another view. These attributes are as follows: ➤➤ layout_align. Parent. Top ➤➤ layout_align. Parent. Left ➤➤ layout_align. Right ➤➤ layout_below ➤➤ layout_center. Horizontal
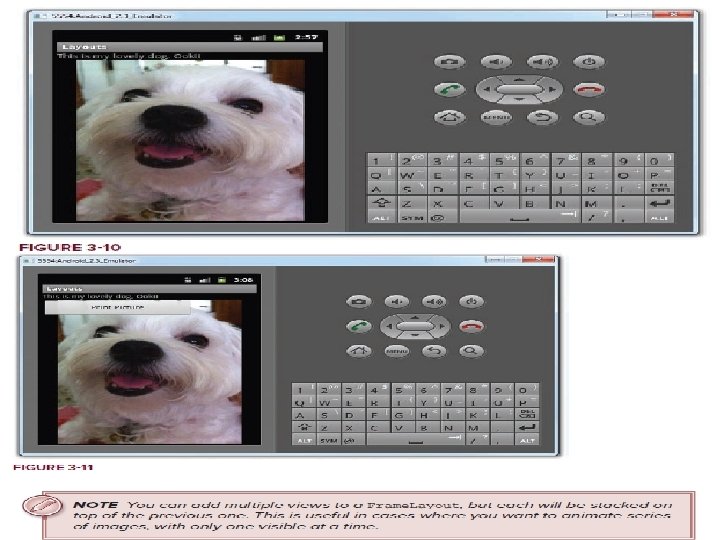
Framelayout The Frame. Layout is a placeholder on screen that you can use to display a single view. Views that you add to a Frame. Layout are always anchored to the top left of the layout. Consider the following content in main. xml: <? xml version=” 1. 0” encoding=”utf-8”? > <Relative. Layout android: id=”@+id/RLayout” android: layout_width=”fill_parent” android: layout_height=”fill_parent” xmlns: android=”http: //schemas. android. com/apk/res/android”> <Text. View android: id=”@+id/lbl. Comments” android: layout_width=”wrap_content” android: layout_height=”wrap_content” android: text=”This is my lovely dog, Ookii” android: layout_align. Parent. Top=”true” android: layout_align. Parent. Left=”true”/>
<Frame. Layout android: layout_width=”wrap_content” android: layout_height=”wrap_content” android: layout_align. Left=”@+id/lbl. Comments” android: layout_below=”@+id/lbl. Comments” android: layout_center. Horizontal=”true”> <Image. View android: src = “@drawable/ookii” android: layout_width=”wrap_content” android: layout_height=”wrap_content”/> </Frame. Layout> </Relative. Layout> Here, you have a Frame. Layout within a Relative. Layout. Within the Frame. Layout, you embed an Image. View. The UI is shown in Figure 3 -10.
If you add another view (such as a Button view) within the Frame. Layout, the view will overlap the previous view (see Figure 3 -11): <? xml version=” 1. 0” encoding=”utf-8”? > <Relative. Layout android: id=”@+id/RLayout” android: layout_width=”fill_parent” android: layout_height=”fill_parent” xmlns: android=”http: //schemas. android. com/apk/res/android”> <Text. View android: id=”@+id/lbl. Comments” android: layout_width=”wrap_content” android: layout_height=”wrap_content” android: text=”This is my lovely dog, Ookii” android: layout_align. Parent. Top=”true” android: layout_align. Parent. Left=”true”/> <Frame. Layout android: layout_width=”wrap_content” android: layout_height=”wrap_content” android: layout_align. Left=”@+id/lbl. Comments” android: layout_below=”@+id/lbl. Comments” android: layout_center. Horizontal=”true”>
<Image. View android: src = “@drawable/ookii” android: layout_width=”wrap_content” android: layout_height=”wrap_content”/> <Button android: layout_width=” 124 dp” android: layout_height=”wrap_content” android: text=”Print Picture”/> </Frame. Layout> </Relative. Layout>
Scrollview: A Scroll. View is a special type of Frame. Layout in that it enables users to scroll through a list of views that occupy more space than the physical display. The Scroll. View can contain only one child view or View. Group, which normally is a Linear. Layout. The following main. xml content shows a Scroll. View containing a Linear. Layout, which in turn contains some Button and Edit. Text views: <? xml version=” 1. 0” encoding=”utf-8”? > <Scroll. View android: layout_width=”fill_parent” android: layout_height=”fill_parent” xmlns: android=http: //schemas. android. com/apk/res/android > <Linear. Layout android: layout_width=”fill_parent” android: layout_height=”wrap_content” android: orientation=”vertical” > <Button android: id=”@+id/button 1” android: layout_width=”fill_parent” android: layout_height=”wrap_content” android: text=”Button 1” /> <Button android: id=”@+id/button 2” android: layout_width=”fill_parent” android: layout_height=”wrap_content” android: text=”Button 2”/> <Button
android: id=”@+id/button 3” android: layout_width=”fill_parent” android: layout_height=”wrap_content” android: text=”Button 3”/> <Edit. Text android: id=”@+id/txt” android: layout_width=”fill_parent” android: layout_height=” 300 px”/> <Button android: id=”@+id/button 4” android: layout_width=”fill_parent” android: layout_height=”wrap_content” android: text=”Button 4”/> <Button android: id=”@+id/button 5” android: layout_width=”fill_parent” android: layout_height=”wrap_content” android: text=”Button 5”/> </Linear. Layout> </Scroll. View>
Figure 3 -12 shows the Scroll. View enabling the users to drag the screen upward to reveal the views located at the bottom of the screen.
ADAPTING TO DISPLAY ORIENTATION One of the key features of modern smartphones is their ability to switch screen orientation, and Android is no exception. Android supports two screen orientations: portrait and landscape. By default, when you change the display orientation of your Android device, the current activity that is displayed will automatically redraw its content in the new orientation. This is because the on. Create() event of the activity is fi red whenever there is a change in display orientation. NOTE When you change the orientation of your Android device, your current activity is actually destroyed and then re-created. However, when the views are redrawn, they may be drawn in their original locations (depending on the layout selected). As you can observe in landscape mode, a lot of empty space on the right of the screen could be used. Furthermore, any additional views at the bottom of the screen would be hidden when the screen orientation is set to landscape.
In general, you can employ two techniques to handle changes in screen orientation: ➤➤ Anchoring — The easiest way is to “anchor” your views to the four edges of the screen. When the screen orientation changes, the views can anchor neatly to the edges. ➤➤ Resizing and repositioning — Whereas anchoring and centralizing are simple techniques to ensure that views can handle changes in screen orientation, the ultimate technique is resizing each and every view according to the current screen orientation.
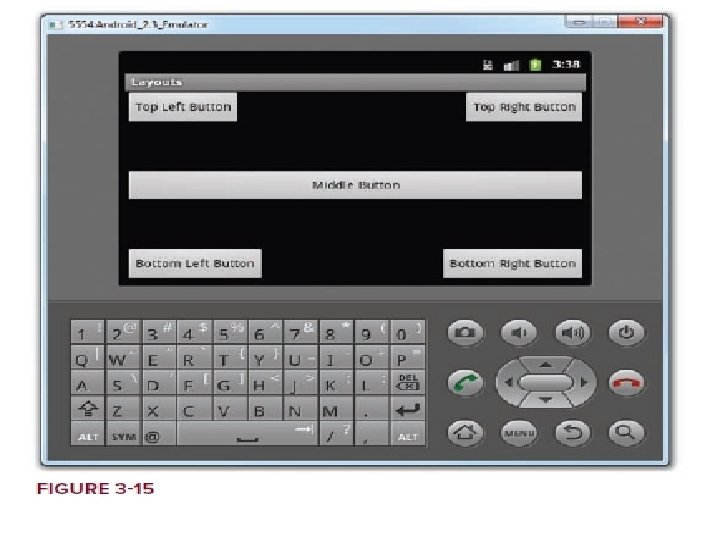
Anchoring Views Anchoring could be easily achieved by using Relative. Layout. Consider the following main. xml containing five Button views embedded within the <Relative. Layout> element: <? xml version=” 1. 0” encoding=”utf-8”? > <Relative. Layout android: layout_width=”fill_parent” android: layout_height=”fill_parent” xmlns: android=”http: //schemas. android. com/apk/res/android” > <Button android: id=”@+id/button 1” android: layout_width=”wrap_content” android: layout_height=”wrap_content” android: text=”Top Left Button” android: layout_align. Parent. Left=”true” android: layout_align. Parent. Top=”true” <Button android: id=”@+id/button 2” android: layout_width=”wrap_content” android: layout_height=”wrap_content” android: text=”Top Right Button” android: layout_align. Parent. Top=”true” android: layout_align. Parent. Right=”true” />
<Button android: id=”@+id/button 3” android: layout_width=”wrap_content” android: layout_height=”wrap_content” android: text=”Bottom Left Button” android: layout_align. Parent. Left=”true” android: layout_align. Parent. Bottom=”true”/> <Button android: id=”@+id/button 4” android: layout_width=”wrap_content” android: layout_height=”wrap_content” android: text=”Bottom Right Button” android: layout_align. Parent. Right=”true” android: layout_align. Parent. Bottom=”true”/> <Button android: id=”@+id/button 5” android: layout_width=”fill_parent” android: layout_height=”wrap_content” android: text=”Middle Button” android: layout_center. Vertical=”true” android: layout_center. Horizontal=”true”/> </Relative. Layout>
Observe the following attributes found in the various Button views: ➤➤ layout_align. Parent. Left — Aligns the view to the left of the parent view ➤➤ layout_align. Parent. Right — Aligns the view to the right of the parent view ➤➤ layout_align. Parent. Top — Aligns the view to the top of the parent view ➤➤ layout_align. Parent. Bottom — Aligns the view to the bottom of the parent view ➤➤ layout_center. Vertical — Centers the view vertically within its parent view ➤➤ layout_center. Horizontal — Centers the view horizontally within its parent view. When the screen orientation changes to landscape mode, the four buttons are aligned to the four edges of the screen, and the center button is centered in the middle of the screen with its width fully stretched.
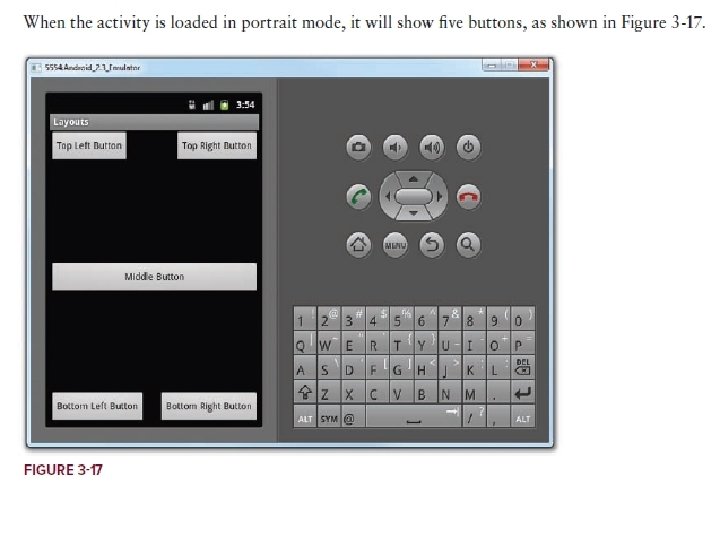
Resizing and Repositioning: Apart from anchoring your views to the four edges of the screen, an easier way to customize the UI based on screen orientation is to create a separate res/layout folder containing the XML files for the UI of each orientation. To support landscape mode, you can create a new folder in the res folder and name it as layout-land (representing landscape). Figure 3 -16 shows the new folder containing the file main. xml. Basically, the main. xml file contained within the layout folder defines the UI for the activity in portrait mode, whereas the main. xml file in the layout-land folder defines the UI in landscape mode. The following shows the content of main. xml under the layout folder: <? xml version=” 1. 0” encoding=”utf-8”? > <Relative. Layout android: layout_width=”fill_parent” android: layout_height=”fill_parent” xmlns: android=”http: //schemas. android. com/apk/res/android”> <Button android: id=”@+id/button 1” android: layout_width=”wrap_content” android: layout_height=”wrap_content” android: text=”Top Left Button” android: layout_align. Parent. Left=”true” android: layout_align. Parent. Top=”true”/> <Button android: id=”@+id/button 2” android: layout_width=”wrap_content” android: layout_height=”wrap_content” android: text=”Top Right Button” android: layout_align. Parent. Top=”true” android: layout_align. Parent. Right=”true”/>
<Button android: id=”@+id/button 3” android: layout_width=”wrap_content” android: layout_height=”wrap_content” android: text=”Bottom Left Button” android: layout_align. Parent. Left=”true” android: layout_align. Parent. Bottom=”true”/> <Button android: id=”@+id/button 4” android: layout_width=”wrap_content” android: layout_height=”wrap_content” android: text=”Bottom Right Button” android: layout_align. Parent. Right=”true” android: layout_align. Parent. Bottom=”true”/> <Button android: id=”@+id/button 5” android: layout_width=”fill_parent” android: layout_height=”wrap_content” android: text=”Middle Button” android: layout_center. Vertical=”true” android: layout_center. Horizontal=”true”/> </Relative. Layout>
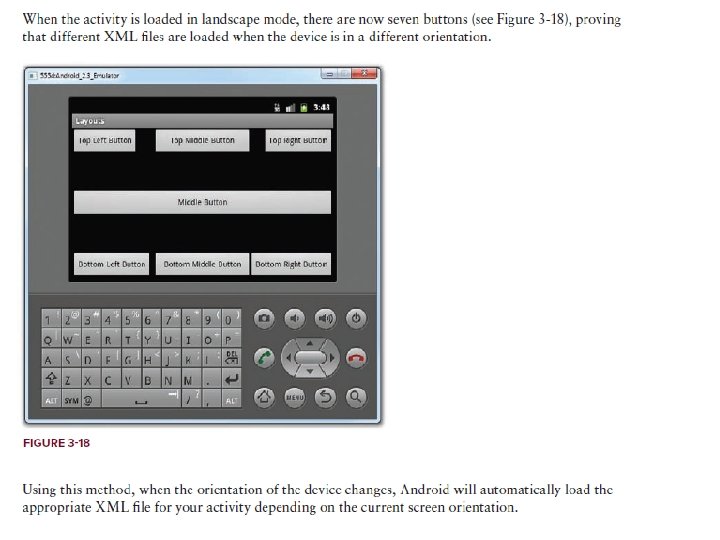
The following shows the content of main. xml under the layout-land folder (the statements in bold are the additional views to display in landscape mode): <? xml version=” 1. 0” encoding=”utf-8”? > <Relative. Layout android: layout_width=”fill_parent” android: layout_height=”fill_parent” xmlns: android=”http: //schemas. android. com/apk/res/android”> <Button android: id=”@+id/button 1” android: layout_width=”wrap_content” android: layout_height=”wrap_content” android: text=”Top Left Button” android: layout_align. Parent. Left=”true” android: layout_align. Parent. Top=”true”/> <Button android: id=”@+id/button 2” android: layout_width=”wrap_content” android: layout_height=”wrap_content” android: text=”Top Right Button” android: layout_align. Parent. Top=”true” android: layout_align. Parent. Right=”true”/>
<Button android: id=”@+id/button 3” android: layout_width=”wrap_content” android: layout_height=”wrap_content” android: text=”Bottom Left Button” android: layout_align. Parent. Left=”true” android: layout_align. Parent. Bottom=”true”/> <Button android: id=”@+id/button 4” android: layout_width=”wrap_content” android: layout_height=”wrap_content” android: text=”Bottom Right Button” android: layout_align. Parent. Right=”true” android: layout_align. Parent. Bottom=”true”/> <Button android: id=”@+id/button 5” android: layout_width=”fill_parent” android: layout_height=”wrap_content” android: text=”Middle Button” android: layout_center. Vertical=”true” android: layout_center. Horizontal=”true”/>
<Button android: id=”@+id/button 6” android: layout_width=” 180 px” android: layout_height=”wrap_content” android: text=”Top Middle Button” android: layout_center. Vertical=”true” android: layout_center. Horizontal=”true” android: layout_align. Parent. Top=”true”/> <Button android: id=”@+id/button 7” android: layout_width=” 180 px” android: layout_height=”wrap_content” android: text=”Bottom Middle Button” android: layout_center. Vertical=”true” android: layout_center. Horizontal=”true” android: layout_align. Parent. Bottom=”true”/> </Relative. Layout>
Managing Changes to Screen Orientation: Now that you have looked at how to implement the two techniques for adapting to screen orientation changes, let’s explore what happens to an activity’s state when the device changes orientation. Understanding Activity Behavior: 1. Using Eclipse, create a new Android project and name it Orientations. 2. Add the following statements in bold to the main. xml file: <? xml version=” 1. 0” encoding=”utf-8”? > <Linear. Layout xmlns: android=http: //schemas. android. com/apk/res/android: orientation=”vertical” android: layout_width=”fill_parent” android: layout_height=”fill_parent” > <Edit. Text android: id=”@+id/txt. Field 1” android: layout_width=”fill_parent” android: layout_height=”wrap_content” /> <Edit. Text android: layout_width=”fill_parent” android: layout_height=”wrap_content” /> </Linear. Layout>
3. Add the following statements in bold to the Main. Activity. java file: package net. learn 2 develop. Orientations; import android. app. Activity; import android. os. Bundle; import android. util. Log; public class Main. Activity extends Activity { /** Called when the activity is first created. */ @Override public void on. Create(Bundle saved. Instance. State) { super. on. Create(saved. Instance. State); set. Content. View(R. layout. main); Log. d(“State. Info”, “on. Create”); } @Override public void on. Start() { Log. d(“State. Info”, “on. Start”); super. on. Start(); }
@Override public void on. Resume() { Log. d(“State. Info”, “on. Resume”); super. on. Resume(); } @Override public void on. Pause() { Log. d(“State. Info”, “on. Pause”); super. on. Pause(); } @Override public void on. Stop() { Log. d(“State. Info”, “on. Stop”); super. on. Stop(); } @Override public void on. Destroy() { Log. d(“State. Info”, “on. Destroy”); super. on. Destroy(); } @Override public void on. Restart() { Log. d(“State. Info”, “on. Restart”); super. on. Restart(); }}
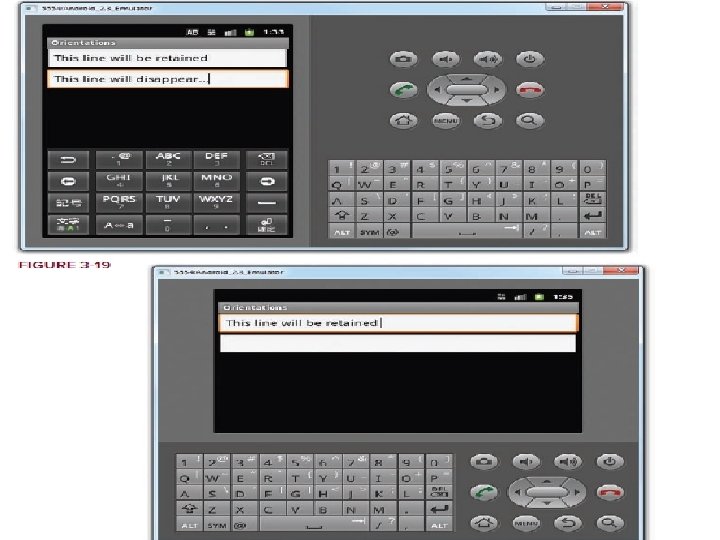
4. Press F 11 to debug the application on the Android Emulator. 5. Enter some text into the two Edit. Text views (see Figure 3 -19). 6. Change the orientation of the Android Emulator by pressing Ctrl+F 11. Figure 3 -20 shows the emulator in landscape mode. Note that the text in the first Edit. Text view is still visible, while the second Edit. Text view is now empty. 7. Observe the output in the Log. Cat window (you need to switch to the Debug perspective in Eclipse). You should see something like this: 01 -05 13: 32: 30. 266: DEBUG/State. Info(5477): on. Create 01 -05 13: 32: 30. 296: DEBUG/State. Info(5477): on. Start 01 -05 13: 32: 30. 296: DEBUG/State. Info(5477): on. Resume. . . 01 -05 13: 35: 20. 106: DEBUG/State. Info(5477): on. Pause 01 -05 13: 35: 20. 106: DEBUG/State. Info(5477): on. Stop 01 -05 13: 35: 20. 106: DEBUG/State. Info(5477): on. Destroy 01 -05 13: 35: 20. 246: DEBUG/State. Info(5477): on. Create 01 -05 13: 35: 20. 256: DEBUG/State. Info(5477): on. Start 01 -05 13: 35: 20. 256: DEBUG/State. Info(5477): on. Resume
How It Works: From the output shown in the Log. Cat window, it is apparent that when the device changes orientation, the activity is destroyed: 01 -05 13: 35: 20. 106: DEBUG/State. Info(5477): on. Pause 01 -05 13: 35: 20. 106: DEBUG/State. Info(5477): on. Stop 01 -05 13: 35: 20. 106: DEBUG/State. Info(5477): on. Destroy It is then re-created: 01 -05 13: 35: 20. 246: DEBUG/State. Info(5477): on. Create 01 -05 13: 35: 20. 256: DEBUG/State. Info(5477): on. Start 01 -05 13: 35: 20. 256: DEBUG/State. Info(5477): on. Resume 1. It is important that you understand this behavior because you need to ensure that you take the necessary steps to preserve the state of your activity before it changes orientation. 2. For example, you may have variables containing values needed for some calculations in the activity. 3. For any activity, you should save whatever state you need to save in the on. Pause() event, which is fired every time the activity changes orientation.
1. Another important behavior to understand is that only views that are named (via the android: id attribute) in an activity will have their state persisted when the activity they are contained in is destroyed. 2. For example, the user may change orientation while entering some text into an Edit. Text view. 3. When this happens, any text inside the Edit. Text view will be persisted and restored automatically when the activity is re-created. 4. In contrast, if you do not name the Edit. Text view using the android: id attribute, the activity will not be able to persist the text currently contained within it.
Persisting State Information during Changes in Configuration: So far, you have learned that changing screen orientation destroys an activity and re-creates it. Keep in mind that when an activity is re-created, the current state of the activity may be lost. When an activity is killed, it will fire one or more of the following two events: ➤➤ on. Pause() — This event is always fired whenever an activity is killed or pushed into the background. ➤➤ on. Save. Instance. State() — This event is also fired whenever an activity is about to be killed or put into the background (just like the on. Pause() event). However, unlike the on. Pause() event, the on. Save. Instance. State event is not fired when an activity is being unloaded from the stack (for example, when the user pressed the Back button), because there is no need to restore its state later. In short, to preserve the state of an activity, you could always implement the on. Pause() event, and then use your own ways to preserve the state of your activity, such as using a database, internal or external file storage, etc.
If you simply want to preserve the state of an activity so that it can be restored later when the activity is re-created (such as when the device changes orientation), a much simpler way would be to implement the on. Save. Instance. State() method, as it provides a Bundle object as an argument so that you can use it to save your activity’s state. The following code shows that you can save the string ID into the Bundle object during the on. Save. Instance. State event: @Override public void on. Save. Instance. State(Bundle out. State) { //---save whatever you need to persist--out. State. put. String(“ID”, “ 1234567890”); super. on. Save. Instance. State(out. State); } When an activity is re-created, the on. Create() event is first fired, followed by the on. Restore. Instance. State() event, which enables you to retrieve the state that you saved previously in the on. Save. Instance. State event through the Bundle object in its argument: @Override public void on. Restore. Instance. State(Bundle saved. Instance. State) { super. on. Restore. Instance. State(saved. Instance. State); //---retrieve the information persisted earlier--String ID = saved. Instance. State. get. String(“ID”); }
Note that this event returns an Object type, which pretty much allows you to return any data type. To extract the saved data, you can extract it in the on. Create() event, using the get. Last. Non. Configuration. Instance() method, like this: @Override public void on. Create(Bundle saved. Instance. State) { super. on. Create(saved. Instance. State); set. Content. View(R. layout. main); Log. d(“State. Info”, “on. Create”); String
DETECTING ORIENTATION CHANGES Sometimes you need to know the device’s current orientation during run time. To determine that, you can use the Window. Manager class. The following code snippet demonstrates how you can programmatically detect the current orientation of your activity: import android. util. Log; import android. view. Display; import android. view. Window. Manager; public void on. Create(Bundle saved. Instance. State) { super. on. Create(saved. Instance. State); set. Content. View(R. layout. main); //---get the current display info--Window. Manager wm = get. Window. Manager(); Display d = wm. get. Default. Display(); if (d. get. Width() > d. get. Height()) { //---landscape mode--Log. d(“Orientation”, “Landscape mode”); } else { //---portrait mode--Log. d(“Orientation”, “Portrait mode”); }} The get. Default. Display() method returns a Display object representing the screen of the device. You can then get its width and height and deduce the current orientation.
Controlling the Orientation of the Activity: Occasionally you might want to ensure that your application is only displayed in a certain orientation. For example, you may be writing a game that should only be viewed in landscape mode. In this case, you can programmatically force a change in orientation using the set. Request. Orientation() method of the Activity class: import android. content. pm. Activity. Info; public class Main. Activity extends Activity { /** Called when the activity is first created. */ @Override public void on. Create(Bundle saved. Instance. State) { super. on. Create(saved. Instance. State); set. Content. View(R. layout. main); //---change to landscape mode--set. Requested. Orientation(Activity. Info. SCREEN_ORIENTATION_LANDSCAPE); } To change to portrait mode, use the Activity. Info. SCREEN_ORIENTATION_PORTRAIT constant: set. Requested. Orientation(Activity. Info. SCREEN_ORIENTATION_PORTRAIT);
Besides using the set. Request. Orientation() method, you can also use the android: screen. Orientation attribute on the <activity> element in Android. Manifest. xml as follows to constrain the activity to a certain orientation: <? xml version=” 1. 0” encoding=”utf-8”? > <manifest xmlns: android=”http: //schemas. android. com/apk/res/android” package=”net. learn 2 develop. Orientations” android: version. Code=” 1” android: version. Name=” 1. 0”> <application android: icon=”@drawable/icon” android: label=”@string/app_name”> <activity android: name=”. Main. Activity” android: label=”@string/app_name” android: screen. Orientation=”landscape” > <intent-filter> <action android: name=”android. intent. action. MAIN” /> <category android: name=”android. intent. category. LAUNCHER” /> </intent-filter> </activity> </application> <uses-sdk android: min. Sdk. Version=” 9” /> </manifest>
The preceding example constrains the activity to a certain orientation (landscape in this case) and prevents the activity from being destroyed; that is, the activity will not be destroyed and the on. Create() event will not be fired again when the orientation of the device changes. Following are two other values that you can specify in the android: screen. Orientation attribute: ➤➤ portrait — Portrait mode ➤➤ sensor — Based on the accelerometer
Listening for UI Notifications Users interact with your UI at two levels: the activity level and the views level. At the activity level, the Activity class exposes methods that you can override. Some common methods that you can override in your activities include the following: ➤➤ on. Key. Down — Called when a key was pressed and not handled by any of the views contained within the activity. ➤➤ on. Key. Up — Called when a key was released and not handled by any of the views contained within the activity. ➤➤ on. Menu. Item. Selected — Called when a panel’s menu item has been selected by the user. ➤➤ on. Menu. Opened — Called when a panel’s menu is opened by the user.
Overriding Methods Defined in an Activity: To understand how activities interact with the user, let’s start off by overriding some of the methods defined in the activity’s base class and learn how they are handled when the user interacts with the activity. 1. Using Eclipse, create a new Android project and name it UIActivity. 2. Add the following statements in bold: <? xml version=” 1. 0” encoding=”utf-8”? > <Linear. Layout android: layout_width=”fill_parent” android: layout_height=”fill_parent” android: orientation=”vertical” xmlns: android=”http: //schemas. android. com/apk/res/android”> <Text. View android: layout_width=” 214 dp” android: layout_height=”wrap_content” android: text=”Your Name”/> <Edit. Text android: id=”@+id/txt 1” android: layout_width=” 214 dp” android: layout_height=”wrap_content” />
<Button android: id=”@+id/btn 1” android: layout_width=” 106 dp” android: layout_height=”wrap_content” android: text=”OK”/> <Button android: id=”@+id/btn 2” android: layout_width=” 106 dp” android: layout_height=”wrap_content” android: text=”Cancel”/> </Linear. Layout>
3. Add the following statements in bold to the Main. Activity. java file: package net. learn 2 develop. UIActivity; import android. app. Activity; import android. os. Bundle; import android. view. Key. Event; import android. widget. Toast; public class Main. Activity extends Activity { /** Called when the activity is first created. */ @Override public void on. Create(Bundle saved. Instance. State) { super. on. Create(saved. Instance. State); set. Content. View(R. layout. main); } @Override public boolean on. Key. Down(int key. Code, Key. Event event) { switch (key. Code) { case Key. Event. KEYCODE_DPAD_CENTER: Toast. make. Text(get. Base. Context(), “Center was clicked”, Toast. LENGTH_LONG). show(); break; case Key. Event. KEYCODE_DPAD_LEFT: Toast. make. Text(get. Base. Context(), “Left arrow was clicked”,
Toast. LENGTH_LONG). show(); break; case Key. Event. KEYCODE_DPAD_RIGHT: Toast. make. Text(get. Base. Context(), “Right arrow was clicked”, Toast. LENGTH_LONG). show(); break; case Key. Event. KEYCODE_DPAD_UP: Toast. make. Text(get. Base. Context(), “Up arrow was clicked”, Toast. LENGTH_LONG). show(); break; case Key. Event. KEYCODE_DPAD_DOWN: Toast. make. Text(get. Base. Context(), “Down arrow was clicked”, Toast. LENGTH_LONG). show(); break; } return false; } }
4. Press F 11 to debug the application on the Android Emulator. 5. When the activity is loaded, type some text into it, as shown on the left of Figure 3 -22. Next, click the down arrow key on the directional pad. Observe the message shown on the screen, as shown in the black area on the right of Figure 3 -22.
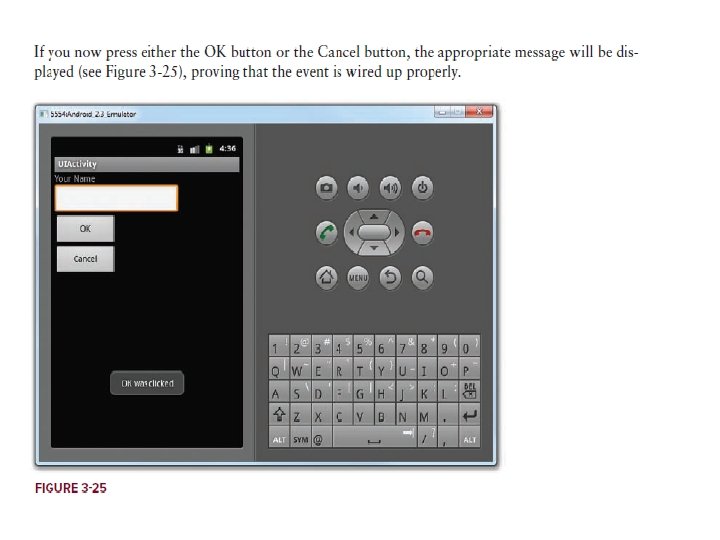
Registering Events for Views can fire events when users interact with them. For example, when a user touches a Button view, you need to service the event so that the appropriate action can be performed. To do so, you need to explicitly register events for views. Using the same example discussed in the previous section, recall that the activity has two Button views; therefore, you can register the button click events using an anonymous class as shown here: package net. learn 2 develop. UIActivity; import android. app. Activity; import android. os. Bundle; import android. view. Key. Event; import android. view. View; import android. widget. Toast; import android. view. View. On. Click. Listener; import android. widget. Button; public class Main. Activity extends Activity { /** Called when the activity is first created. */ @Override public void on. Create(Bundle saved. Instance. State) { super. on. Create(saved. Instance. State); set. Content. View(R. layout. main);
//---the two buttons are wired to the same event handler--Button btn 1 = (Button)find. View. By. Id(R. id. btn 1); btn 1. set. On. Click. Listener(btn. Listener); Button btn 2 = (Button)find. View. By. Id(R. id. btn 2); btn 2. set. On. Click. Listener(btn. Listener); } //---create an anonymous class to act as a button click listener--private On. Click. Listener btn. Listener = new On. Click. Listener() { public void on. Click(View v) { Toast. make. Text(get. Base. Context(), ((Button) v). get. Text() + “ was clicked”, Toast. LENGTH_LONG). show(); }}; @Override public boolean on. Key. Down(int key. Code, Key. Event event) { switch (key. Code) { //. . . } return false; } }
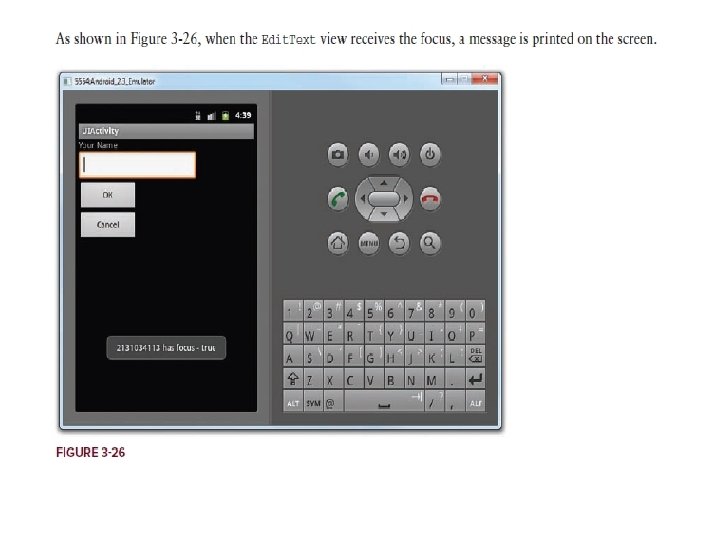
Besides defining an anonymous class for the event handler, you can also define an anonymous inner class to handle an event. The following example shows how you can handle the on. Focus. Change() event for the Edit. Text view: import android. widget. Edit. Text; public class Main. Activity extends Activity { /** Called when the activity is first created. */ @Override public void on. Create(Bundle saved. Instance. State) { super. on. Create(saved. Instance. State); set. Content. View(R. layout. main); //---the two buttons are wired to the same event handler--Button btn 1 = (Button)find. View. By. Id(R. id. btn 1); btn 1. set. On. Click. Listener(btn. Listener); Button btn 2 = (Button)find. View. By. Id(R. id. btn 2); btn 2. set. On. Click. Listener(btn. Listener); Edit. Text txt 1 = (Edit. Text)find. View. By. Id(R. id. txt 1); //---create an anonymous inner class to act as an onfocus listener--txt 1. set. On. Focus. Change. Listener(new View. On. Focus. Change. Listener() { @Override public void on. Focus. Change(View v, boolean has. Focus) { Toast. make. Text(get. Base. Context(), ((Edit. Text) v). get. Id() + “ has focus - “ + has. Focus, Toast. LENGTH_LONG). show(); } }); }
SUMMARY OF UNIT