Unit5 Io T Physical Devices and End Points


- Slides: 19
Unit-5 Io. T Physical Devices and End Points
What is an Io. T Device: • Io. T devices are connected to the Internet and send information about themselves or about their surrounding( eg: information sensed by the connected sensors) over a network( to other devices or servers/storage) or allow actuation upon the physical entities/environment around them remotely. Some examples of Io. T devices are • An home automation device that allows remotely monitoring the status of appliances and controlling the appliances • An industrial machine which sends information about its operation and health monitoring data to a server. • A car which sends information about its location to a cloud based service. • A wireless enabled wearable device that measures data about a person such as the number of steps walked and sends the data to a cloud based service.
Basic Building Blocks of an Io. T device: An Io. T device can consists of number of modules based on functional attributes, such as • Sensing: sensors can be either on-board the Io. T device or attached to the device. Io. T device can collect various types of information from the on-board or attached sensors such as temperature, humidity and light intensity etc. servers/storage. • Actuation: Io. T devices can have various types of actuators attached that allow taking actions upon the physical entities in the vicinity of the device. commands sent to the device. • Communication: Communication modules are responsible for sending collected data to other devices or cloud based servers/storage and receiving data from other devices and commands from remote applications. • Analysis and processing: Analysis and processing modules are responsible for making sense of the collected data.
Basic Building Blocks of an Io. T device: Fig shows a generic block diagram of a single board computer based Io. T device that includes CPU, GPU, RAM, storage and various types of interfaces and peripherals
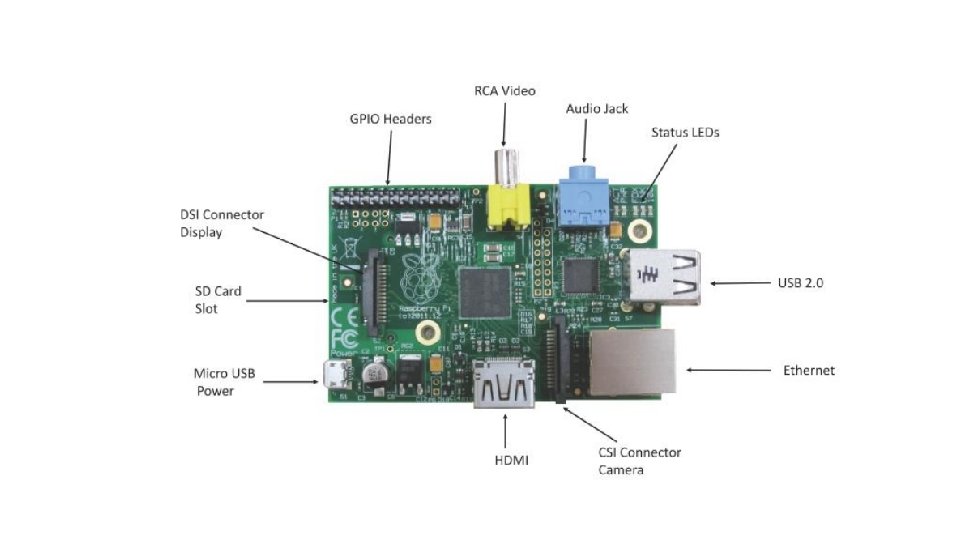
Exemplary Device: Raspberry Pi is a low cost mini computer with the physical size of a credit card. Raspberry Pi runs various flavors of Linux and can perform almost all tasks that a normal desktop computer can do. In addition to this Raspberry Pi also allows interfacing sensors and actuators through the general purpose I/O pins. Since Raspberry Pi runs Linux Operating System it supports PYTHON “out of the box”.
About the board: 1. Processor & RAM: Raspberry Pi is based on an ARM processor. Latest Raspberry Pi comes with 700 MHz Low Power ARM 1176 JZ-F processor and 512 MB SDRAM. 2. USB Ports: Raspberry Pi comes with Two USB 2. 0 ports. They provide a current upto 100 m. A. For connecting devices that draw current more than 100 m. A, an external USB powered hub is required. 3. Ethernet Ports: Raspberry Pi comes with a standard RJ 45 ethernet port. You can connect an ethernet cable or a USB Wifi adapter to provide Internet connectivity. 4. HDMI Output: the HDMI port on Rasbperry pi provides both video and audio output. You can connect the Raspberry Pi to a monitor using an HDMI cable. For monitors that have a DVI port but no HDMI port, you can use and HDMI to DVI adapater/cable. 5. Composite video output: Raspberry Pi comes with a composite video output with an RCA jack that supports both PAL and NTSC video output. The RCA jack can be used to connect old televisions that have an RCA input only. 6. Audio output: Raspberry Pi has a 3. 5 mm audio jack. This audio jack is used for providing audio output to old televisions along with the RCA jack for video. The audio quality from this jack is inferior to the HDMI output. 7. GPIO pins: Raspberry Pi comes with a number of general purpose input/output pins
About the board:
About the board: There are 4 types of pins on Rpi- true GPIO pins I 2 C interface pins, SPI interface pins And Serial Rx and Tx pins. 8. Display Serial Interface: used to connect an LCD panel to Rpi 9. Camera Serial Interface: used to connect a camera module to Rpi. 10. Status LEDs: Rpi has five status LEDs Status led Function ACT SD CARD ACCESS PWR 3. 3 V power is present FDX FULL DUPLEX LAN CONNECTED LNK LINK/NETWORK ACTIVITY 100 MB LAN CONNECTED
About the board: 11. SD Card Slot: Rpi doesnot have a built in operating system and storage you can plug in an SD card loaded with a linux image to the SD card slot. 12. Power input: Rpi has a micro usb connector for power input.
Linux on Raspberry Pi
Frequently used commands
Raspberry Pi Interfaces: Raspberry Pi has serial, SPI and I 2 C interfaces for data transfer
Raspberry Pi Interfaces: There are five pins on Rpi for SPI interfaces MISO master in slave out: master line for sending data to the peripherals MOSI master out slave in : slave line for sending data to the master SCK serial clock: clock generated by master to synchronize data transmission CE 0 CHIP ENABLE 0 to enable or disable devices CE 1 CHIP ENABLE 1 to enable or disable devices
Programming Raspberry Pi with Python Controlling LED with Raspberry Pi Let us start with a basic example of controlling an LED from Raspberry Pi.
Programming Raspberry Pi with Python Controlling LED with Raspberry Pi Python program for blinking LED Import Rpi. GPIO as GPIO Import time GPIO. setmode(GPIO. BCM) GPIO. setup(18, GPIO. OUT) While True: GPIO. output(18, True) time. sleep(1) GPIO. output(18, False) time. sleep(1) Program uses the Rpi. GPIO module to control the GPIO on Raspberry Pi. In this program we set pin 18 direction to output and then write True/False alternatively after a delay of one second.
Programming Raspberry Pi with Python Interfacing an LED and switch with Raspberry Pi: 3. 3 v GND
Programming Raspberry Pi with Python Fig shows the schematic diagram of connecting an LED and switch to Raspberry Pi. And a python program to controlling an LED with a switch. In this example the Led is connected to GPIO pin 18 and switch is connected to pin 25. in the infinite while loop the value of pin 25 is checked and the state of LED is toggled if the switch is pressed, This example shows how to get input from GPIO pins and process the input and take some action. The action in this example is toggling the state of an LED.
OTHER DEVICES